ignition Hyundai Elantra GT 2018 Manual PDF
[x] Cancel search | Manufacturer: HYUNDAI, Model Year: 2018, Model line: Elantra GT, Model: Hyundai Elantra GT 2018Pages: 478, PDF Size: 13.64 MB
Page 353 of 478
6-15
What to do in an emergency
6
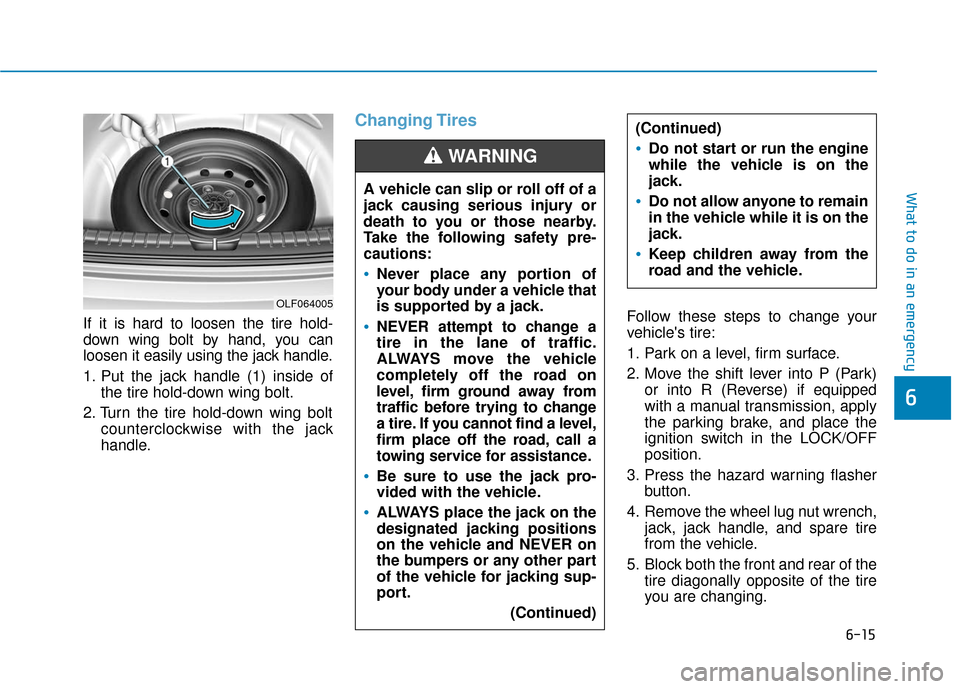
If it is hard to loosen the tire hold-
down wing bolt by hand, you can
loosen it easily using the jack handle.
1. Put the jack handle (1) inside ofthe tire hold-down wing bolt.
2. Turn the tire hold-down wing bolt counterclockwise with the jack
handle.
Changing Tires
Follow these steps to change your
vehicle's tire:
1. Park on a level, firm surface.
2. Move the shift lever into P (Park)or into R (Reverse) if equipped
with a manual transmission, apply
the parking brake, and place the
ignition switch in the LOCK/OFF
position.
3. Press the hazard warning flasher button.
4. Remove the wheel lug nut wrench, jack, jack handle, and spare tire
from the vehicle.
5. Block both the front and rear of the tire diagonally opposite of the tire
you are changing.
A vehicle can slip or roll off of a
jack causing serious injury or
death to you or those nearby.
Take the following safety pre-
cautions:
Never place any portion of
your body under a vehicle that
is supported by a jack.
NEVER attempt to change a
tire in the lane of traffic.
ALWAYS move the vehicle
completely off the road on
level, firm ground away from
traffic before trying to change
a tire. If you cannot find a level,
firm place off the road, call a
towing service for assistance.
Be sure to use the jack pro-
vided with the vehicle.
ALWAYS place the jack on the
designated jacking positions
on the vehicle and NEVER on
the bumpers or any other part
of the vehicle for jacking sup-
port.
(Continued)
(Continued)
Do not start or run the engine
while the vehicle is on the
jack.
Do not allow anyone to remain
in the vehicle while it is on the
jack.
Keep children away from the
road and the vehicle.
WARNING
OLF064005
Page 359 of 478
6-21
What to do in an emergency
6
When towing your vehicle in an
emergency without wheel dollies:
1.Place the ignition switch in theACC position.
2.Place the shift lever in N (Neutral).
3.Release the parking brake.
Removable Towing Hook
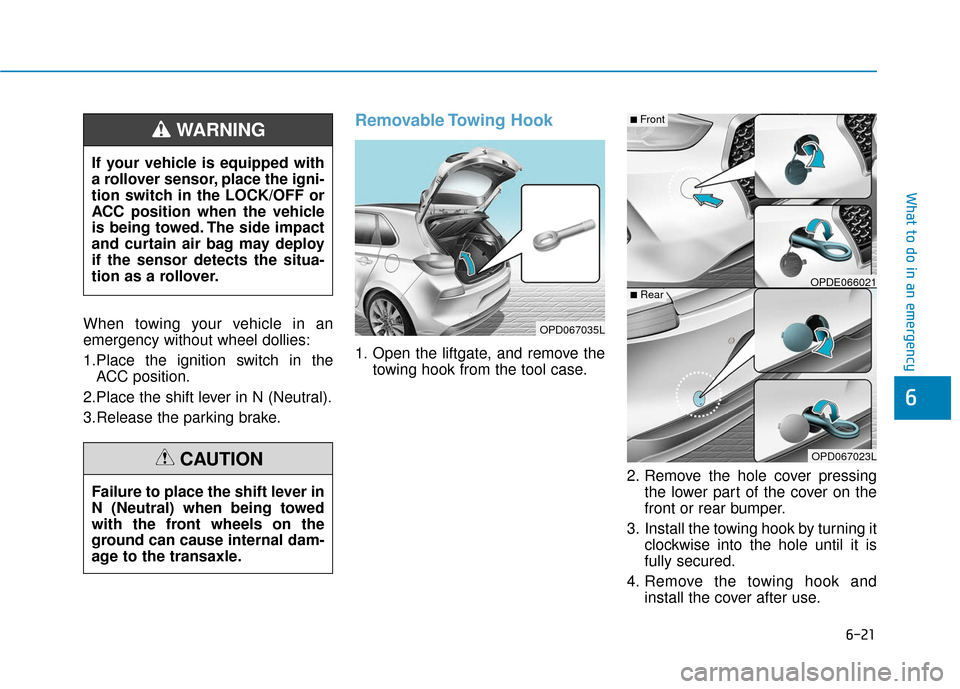
1. Open the liftgate, and remove the towing hook from the tool case.
2. Remove the hole cover pressingthe lower part of the cover on the
front or rear bumper.
3. Install the towing hook by turning it clockwise into the hole until it is
fully secured.
4. Remove the towing hook and install the cover after use.
If your vehicle is equipped with
a rollover sensor, place the igni-
tion switch in the LOCK/OFF or
ACC position when the vehicle
is being towed. The side impact
and curtain air bag may deploy
if the sensor detects the situa-
tion as a rollover.
WARNING
Failure to place the shift lever in
N (Neutral) when being towed
with the front wheels on the
ground can cause internal dam-
age to the transaxle.
CAUTION
OPD067035L
OPDE066021
OPD067023L
■Front
■Rear
Page 360 of 478
6-22
What to do in an emergency
Emergency Towing
If towing is necessary, we recom-
mend you have it done by an author-
ized HYUNDAI dealer or a commer-
cial tow truck service.If a towing service is not available in
an emergency, your vehicle may be
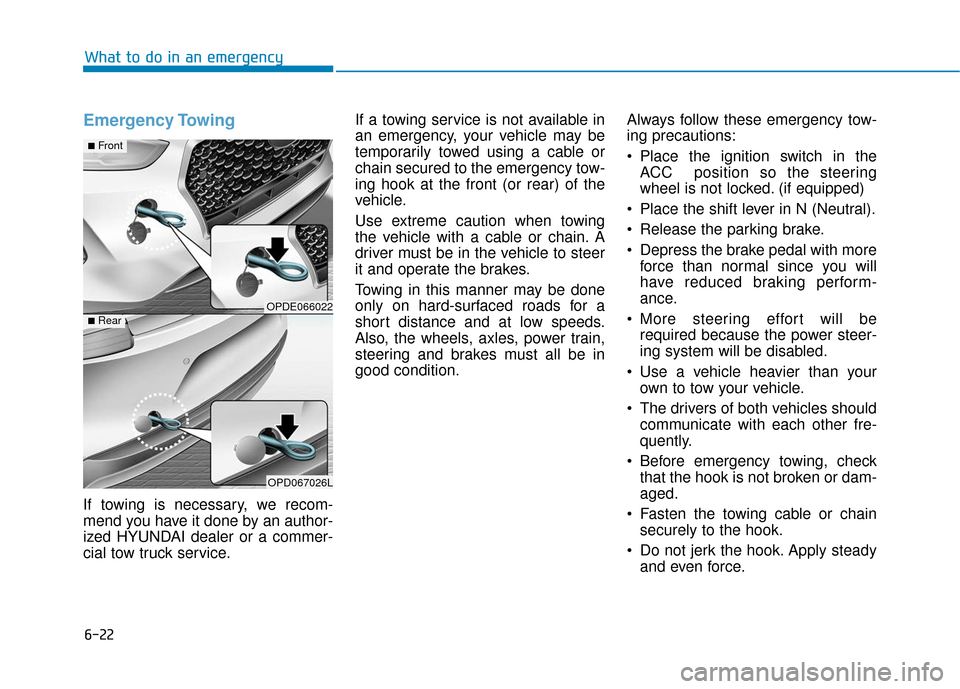
temporarily towed using a cable or
chain secured to the emergency tow-
ing hook at the front (or rear) of the
vehicle.
Use extreme caution when towing
the vehicle with a cable or chain. A
driver must be in the vehicle to steer
it and operate the brakes.
Towing in this manner may be done
only on hard-surfaced roads for a
short distance and at low speeds.
Also, the wheels, axles, power train,
steering and brakes must all be in
good condition.
Always follow these emergency tow-
ing precautions:
Place the ignition switch in the
ACC position so the steering
wheel is not locked. (if equipped)
Place the shift lever in N (Neutral).
Release the parking brake.
Depress the brake pedal with more force than normal since you will
have reduced braking perform-
ance.
More steering effort will be required because the power steer-
ing system will be disabled.
Use a vehicle heavier than your own to tow your vehicle.
The drivers of both vehicles should communicate with each other fre-
quently.
Before emergency towing, check that the hook is not broken or dam-
aged.
Fasten the towing cable or chain securely to the hook.
Do not jerk the hook. Apply steady and even force.
OPDE066022
OPD067026L
■Front
■Rear
Page 396 of 478
7-35
7
Maintenance
B
BA
A T
TT
TE
ER
R Y
Y
To prevent SERIOUS INJURY or
DEATH to you or bystanders,
always follow these precautions
when working near or handling
the battery:
Always read and follow
instructions carefully
when handling a battery.Wear eye protection
designed to protect the
eyes from acid splashes.
Keep all flames, sparks,
or smoking materials
away from the battery.
Hydrogen is always pres- ent in battery cells, is
highly combustible, and
may explode if ignited.
Keep batteries out of
reach of children.
(Continued)
WARNING (Continued)Batteries contain sulfu-
ric acid which is highly
corrosive. Do not allow
acid to contact your
eyes, skin or clothing.
If acid gets into your eyes, flush
your eyes with clean water for at
least 15 minutes and get imme-
diate medical attention. If acid
gets on your skin, thoroughly
wash the area. If you feel pain or
a burning sensation, get med-
ical attention immediately.
When lifting a plastic-cased
battery, excessive pressure
on the case may cause battery
acid to leak. Lift with a battery
carrier or with your hands on
opposite corners.
Do not attempt to jump start
your vehicle if your battery is
frozen. (Continued)
(Continued)
NEVER attempt to recharge
the battery when the vehicle’s
battery cables are connected
to the battery.
The electrical ignition system
works with high voltage.
NEVER touch these compo-
nents with the engine running
or when the Engine Start/Stop
button is in the ON position.
Page 397 of 478
7-36
Maintenance
When you do not use the vehicle for a long time in a low tempera-
ture area, disconnect the battery
and keep it indoors.
Always charge the battery fully to prevent battery case damage
in low temperature areas.
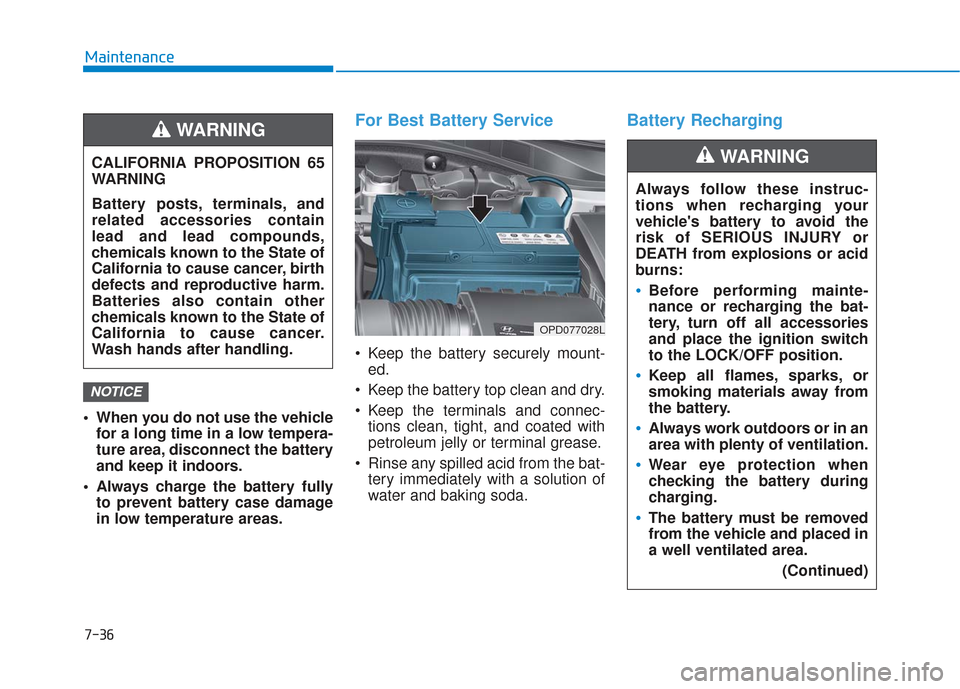
For Best Battery Service
Keep the battery securely mount-ed.
Keep the battery top clean and dry.
Keep the terminals and connec- tions clean, tight, and coated with
petroleum jelly or terminal grease.
Rinse any spilled acid from the bat- tery immediately with a solution of
water and baking soda.
Battery Recharging
NOTICE
CALIFORNIA PROPOSITION 65
WARNING
Battery posts, terminals, and
related accessories contain
lead and lead compounds,
chemicals known to the State of
California to cause cancer, birth
defects and reproductive harm.
Batteries also contain other
chemicals known to the State of
California to cause cancer.
Wash hands after handling.
WARNING
Always follow these instruc-
tions when recharging your
vehicle's battery to avoid the
risk of SERIOUS INJURY or
DEATH from explosions or acid
burns:
Before performing mainte-
nance or recharging the bat-
tery, turn off all accessories
and place the ignition switch
to the LOCK/OFF position.
Keep all flames, sparks, or
smoking materials away from
the battery.
Always work outdoors or in an
area with plenty of ventilation.
Wear eye protection when
checking the battery during
charging.
The battery must be removed
from the vehicle and placed in
a well ventilated area.
(Continued)
WARNING
OPD077028L
Page 420 of 478
7-59
7
Maintenance
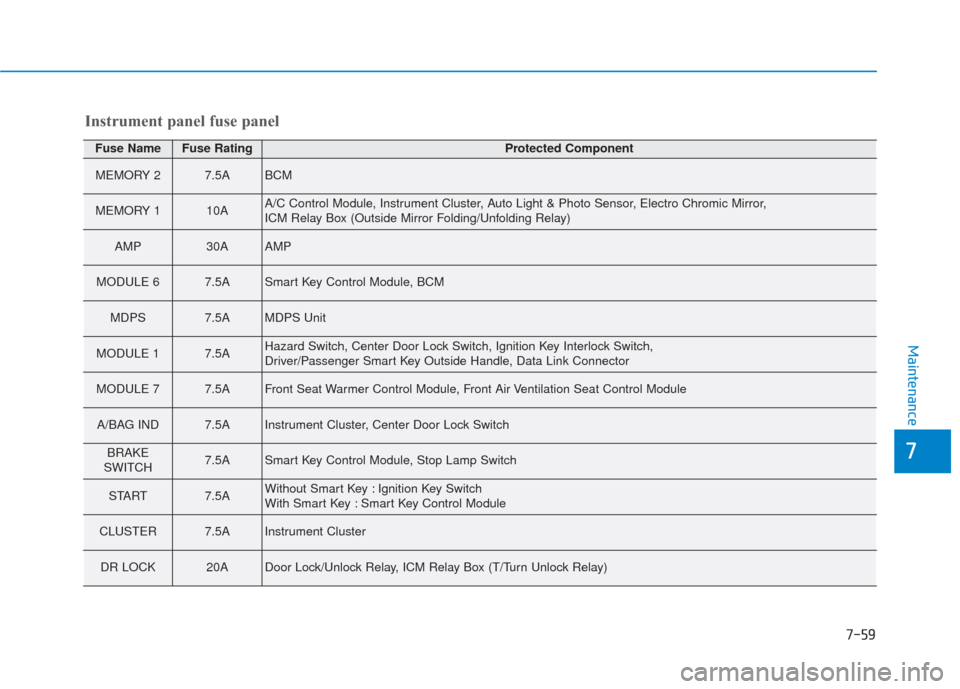
Fuse NameFuse RatingProtected Component
MEMORY 27.5ABCM
MEMORY 110AA/C Control Module, Instrument Cluster, Auto Light & Photo Sensor, Electro Chromic Mirror,
ICM Relay Box (Outside Mirror Folding/Unfolding Relay)
AMP30AAMP
MODULE 6 7.5ASmart Key Control Module, BCM
MDPS7.5AMDPS Unit
MODULE 17.5AHazard Switch, Center Door Lock Switch, Ignition Key Interlock Switch,
Driver/Passenger Smart Key Outside Handle, Data Link Connector
MODULE 77.5AFront Seat Warmer Control Module, Front Air Ventilation Seat Control Module
A/BAG IND7.5AInstrument Cluster, Center Door Lock Switch
BRAKE
SWITCH7.5ASmart Key Control Module, Stop Lamp Switch
START7.5AWithout Smart Key : Ignition Key Switch
With Smart Key : Smart Key Control Module
CLUSTER7.5AInstrument Cluster
DR LOCK20ADoor Lock/Unlock Relay, ICM Relay Box (T/Turn Unlock Relay)
Instrument panel fuse panel
Page 423 of 478
7-62
Maintenance
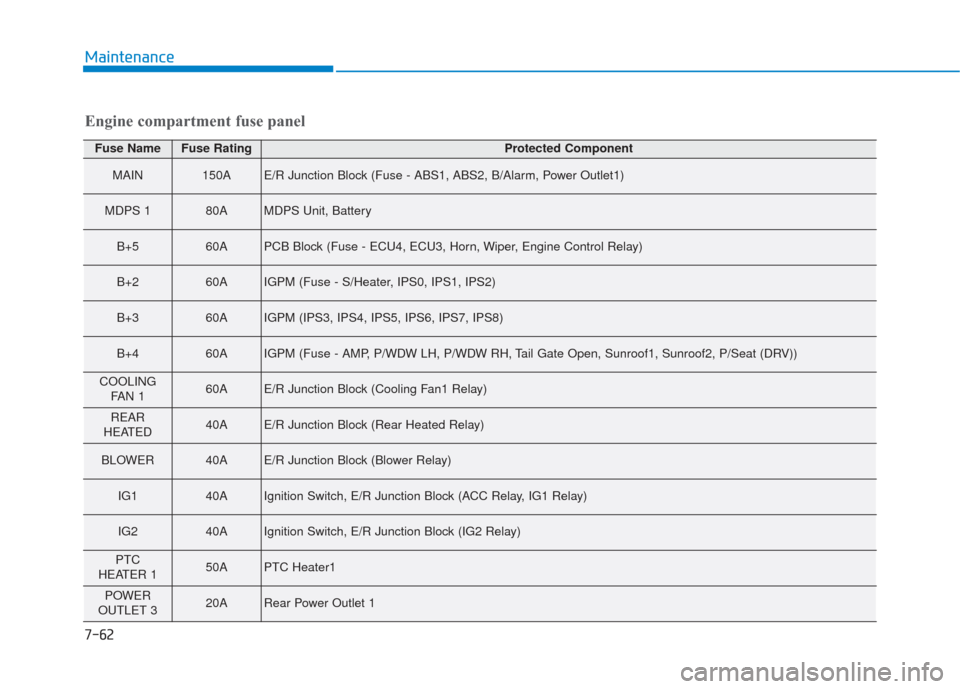
Engine compartment fuse panel
Fuse NameFuse RatingProtected Component
MAIN150AE/R Junction Block (Fuse - ABS1, ABS2, B/Alarm, Power Outlet1)
MDPS 180AMDPS Unit, Battery
B+560APCB Block (Fuse - ECU4, ECU3, Horn, Wiper, Engine Control Relay)
B+260AIGPM (Fuse - S/Heater, IPS0, IPS1, IPS2)
B+360AIGPM (IPS3, IPS4, IPS5, IPS6, IPS7, IPS8)
B+460AIGPM (Fuse - AMP, P/WDW LH, P/WDW RH, Tail Gate Open, Sunroof1, Sunroof2, P/Seat (DRV))
COOLINGFAN 160AE/R Junction Block (Cooling Fan1 Relay)
REAR
HEATED40AE/R Junction Block (Rear Heated Relay)
BLOWER40AE/R Junction Block (Blower Relay)
IG140AIgnition Switch, E/R Junction Block (ACC Relay, IG1 Relay)
IG240AIgnition Switch, E/R Junction Block (IG2 Relay)
PTC
HEATER 150APTC Heater1
POWER
OUTLET 320ARear Power Outlet 1
Page 425 of 478
7-64
Maintenance
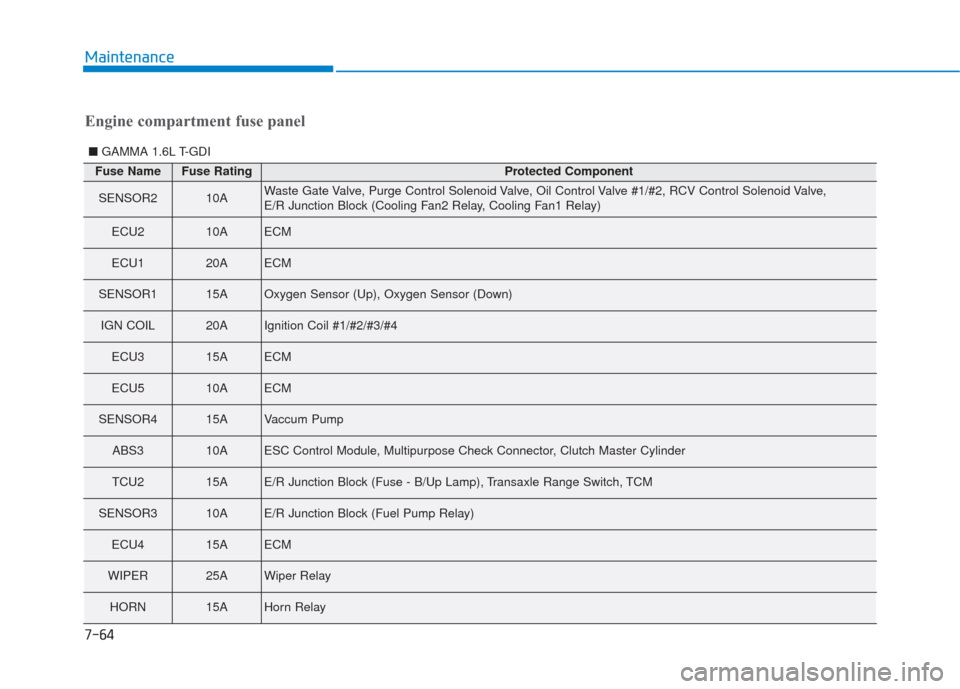
Fuse NameFuse RatingProtected Component
SENSOR210AWaste Gate Valve, Purge Control Solenoid Valve, Oil Control Valve #1/#2, RCV Control Solenoid Valve,
E/R Junction Block (Cooling Fan2 Relay, Cooling Fan1 Relay)
ECU210AECM
ECU120AECM
SENSOR115AOxygen Sensor (Up), Oxygen Sensor (Down)
IGN COIL20AIgnition Coil #1/#2/#3/#4
ECU315AECM
ECU510AECM
SENSOR415AVaccum Pump
ABS310AESC Control Module, Multipurpose Check Connector, Clutch Master Cylinder
TCU215AE/R Junction Block (Fuse - B/Up Lamp), Transaxle Range Switch, TCM
SENSOR310AE/R Junction Block (Fuel Pump Relay)
ECU415AECM
WIPER25AWiper Relay
HORN15AHorn Relay
■ GAMMA 1.6L T-GDI
Engine compartment fuse panel
Page 426 of 478
7-65
7
Maintenance
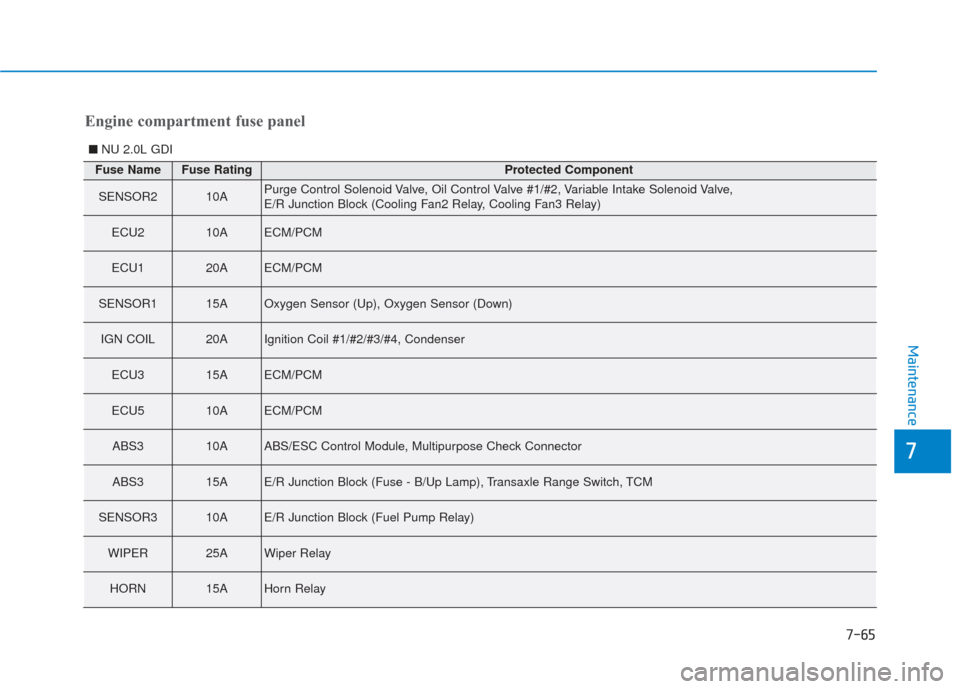
■NU 2.0L GDI
Fuse NameFuse RatingProtected Component
SENSOR210APurge Control Solenoid Valve, Oil Control Valve #1/#2, Variable Intake Solenoid Valve,
E/R Junction Block (Cooling Fan2 Relay, Cooling Fan3 Relay)
ECU210AECM/PCM
ECU120AECM/PCM
SENSOR115AOxygen Sensor (Up), Oxygen Sensor (Down)
IGN COIL20AIgnition Coil #1/#2/#3/#4, Condenser
ECU315AECM/PCM
ECU510AECM/PCM
ABS310AABS/ESC Control Module, Multipurpose Check Connector
ABS315AE/R Junction Block (Fuse - B/Up Lamp), Transaxle Range Switch, TCM
SENSOR310AE/R Junction Block (Fuel Pump Relay)
WIPER25AWiper Relay
HORN15AHorn Relay
Engine compartment fuse panel
Page 428 of 478
7-67
7
Maintenance
L
LI
IG
G H
H T
T
B
B U
U L
LB
B S
S
Consult an authorized HYUNDAI
dealer to replace most vehicle light
bulbs. It is difficult to replace vehicle
light bulbs because other parts of the
vehicle must be removed before you
can get to the bulb. This is especially
true for removing the headlamp
assembly to get to the bulb(s).
Removing/installing the headlamp
assembly can result in damage to
the vehicle.
Information
After heavy driving, rain or washing,
headlamp and trunk lenses could
appear frosty. This condition is caused
by the temperature difference
between the lamp inside and the out-
side temperature. This is similar to the
condensation on your windows inside
your vehicle during the rain and does-
n’t indicate a problem with your vehi-
cle. If the water leaks into the lamp
bulb circuitry, have your vehicle
checked by an authorized HYUNDAI
dealer.
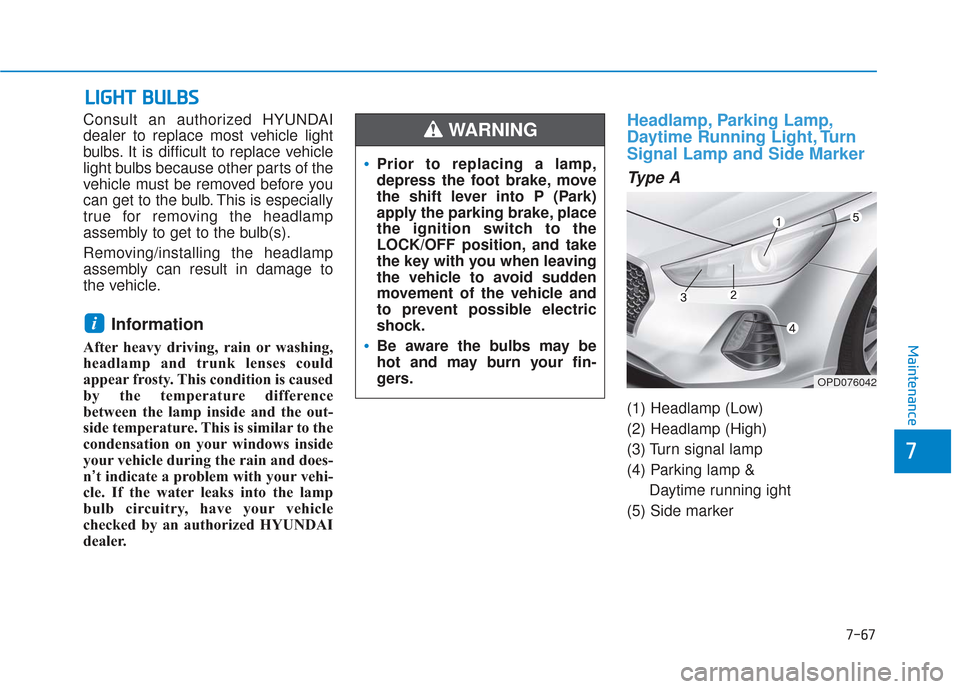
Headlamp, Parking Lamp,
Daytime Running Light, Turn
Signal Lamp and Side Marker
Type A
(1) Headlamp (Low)
(2) Headlamp (High)
(3) Turn signal lamp
(4) Parking lamp &
Daytime running ight
(5) Side marker
i
Prior to replacing a lamp,
depress the foot brake, move
the shift lever into P (Park)
apply the parking brake, place
the ignition switch to the
LOCK/OFF position, and take
the key with you when leaving
the vehicle to avoid sudden
movement of the vehicle and
to prevent possible electric
shock.
Be aware the bulbs may be
hot and may burn your fin-
gers.
WARNING
OPD076042