air conditioning HYUNDAI ELANTRA SEL 2021 Owner's Manual
[x] Cancel search | Manufacturer: HYUNDAI, Model Year: 2021, Model line: ELANTRA SEL, Model: HYUNDAI ELANTRA SEL 2021Pages: 570, PDF Size: 52.21 MB
Page 237 of 570
05
5-101
Air conditioning
HYUNDAI Air Conditioning Systems are
filled with R-1234yf refrigerant.
1.
Start the vehicle.
2.
Push the air conditioning button.
3.
Select the Face L
evel
mode.
4.
Set the air in
take control to
Recirculation mode temporarily to
allow the cabin to cool quickly. When
the desired temperature in the cabin
is reached, change the air intake
control back to Fresh mode.
5.
Adjus
t the fan speed control and
temperature control to maintain
maximum comfort.
Information
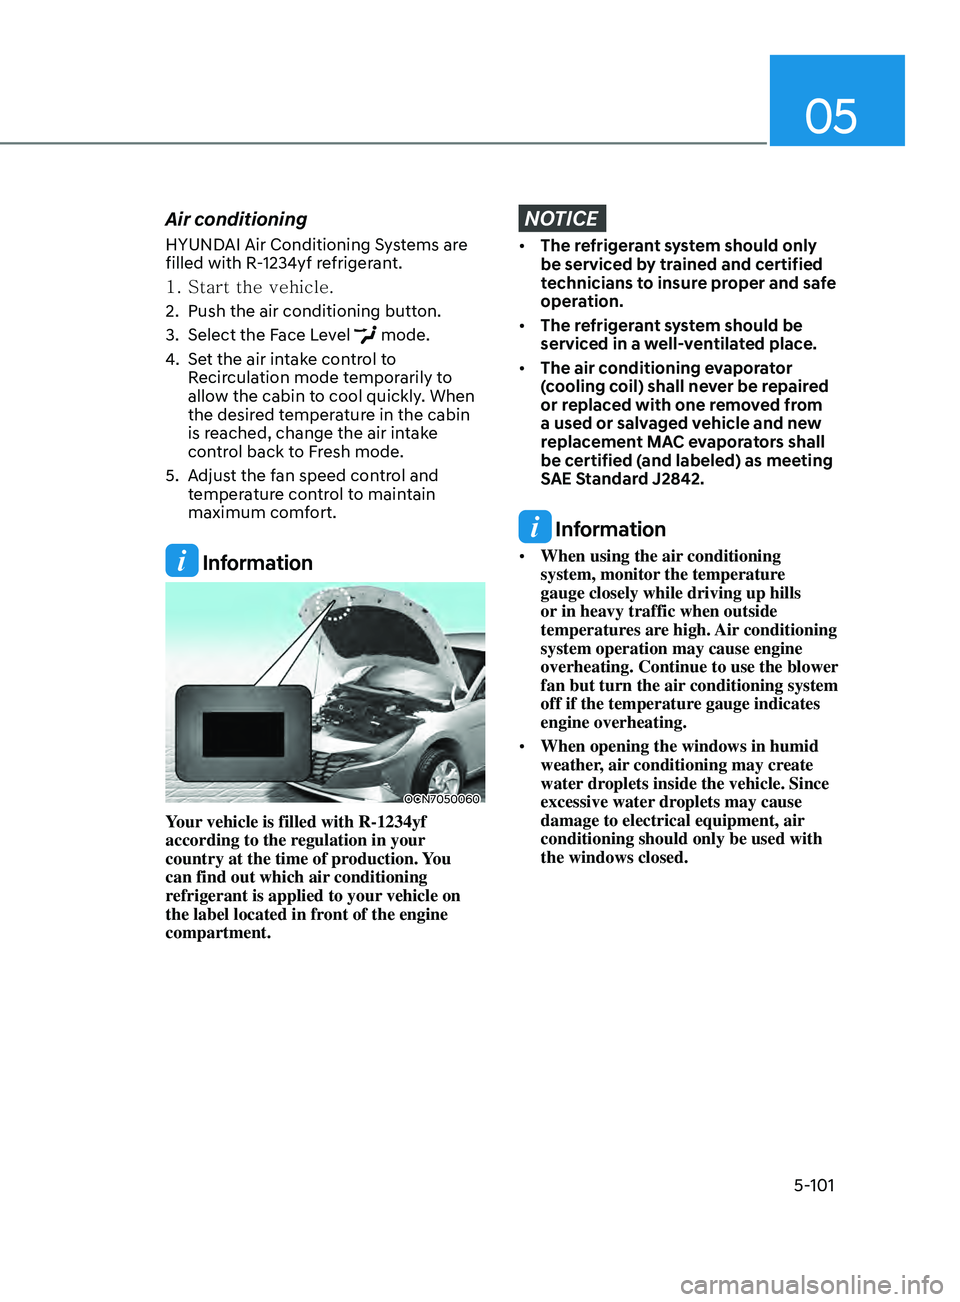
OCN7050060
Your vehicle is filled with R-1234yf
according to the regulation in your
country at the time of production. You
can find out which air conditioning
refrigerant is applied to your vehicle on
the label located in front of the engine
compartment.
NOTICE
• The refrigerant system should only
be serviced by trained and certified
technicians to insure proper and safe
operation.
• The refrigerant system should be
serviced in a well-ventilated place.
• The air conditioning evaporator
(cooling coil) shall never be repaired
or replaced with one removed from
a used or salvaged vehicle and new
replacement MAC evaporators shall
be certified (and labeled) as meeting
SAE Standard J2842.
Information
• When using the air conditioning
system, monitor the temperature
gauge closely while driving up hills
or in heavy traffic when outside
temperatures are high. Air conditioning
system operation may cause engine
overheating. Continue to use the blower
fan but turn the air conditioning system
off if the temperature gauge indicates
engine overheating.
• When opening the windows in humid
weather, air conditioning may create
water droplets inside the vehicle. Since
excessive water droplets may cause
damage to electrical equipment, air
conditioning should only be used with
the windows closed.
Page 238 of 570
Convenient Features
5-102
Air conditioning system operation tips
• If the vehicle has been parked in
direct sunlight during hot weather,
open the windows for a short time
to let the hot air inside the vehicle
escape.
• After sufficient cooling has been
achieved, switch back from
recirculation mode to fresh mode.
• To help reduce moisture inside of
the windows on rainy or humid
days, decrease the humidity inside
the vehicle by operating the air
conditioning system with the windows
and sunroof closed.
• During air conditioning system
operation, you may occasionally
notice a slight change in engine speed
as the air conditioning compressor
cycles. This is a normal system
operation characteristic.
• Use the air conditioning system
every month only for a few minutes
to ensure maximum system
performance.
• When using the air conditioning
system, you may notice clear water
dripping (or even puddling) on the
ground under the passenger side of
the vehicle. This is a normal system
operation characteristic.
• If you operate the air conditioner
excessively, the difference between
the temperature of the outside air and
that of the windshield could cause
the outer surface of the windshield to
fog up, causing loss of visibility. In this
case, set the mode selection button to
the
position and set the fan speed
control knob to the lowest speed
setting.
System Maintenance
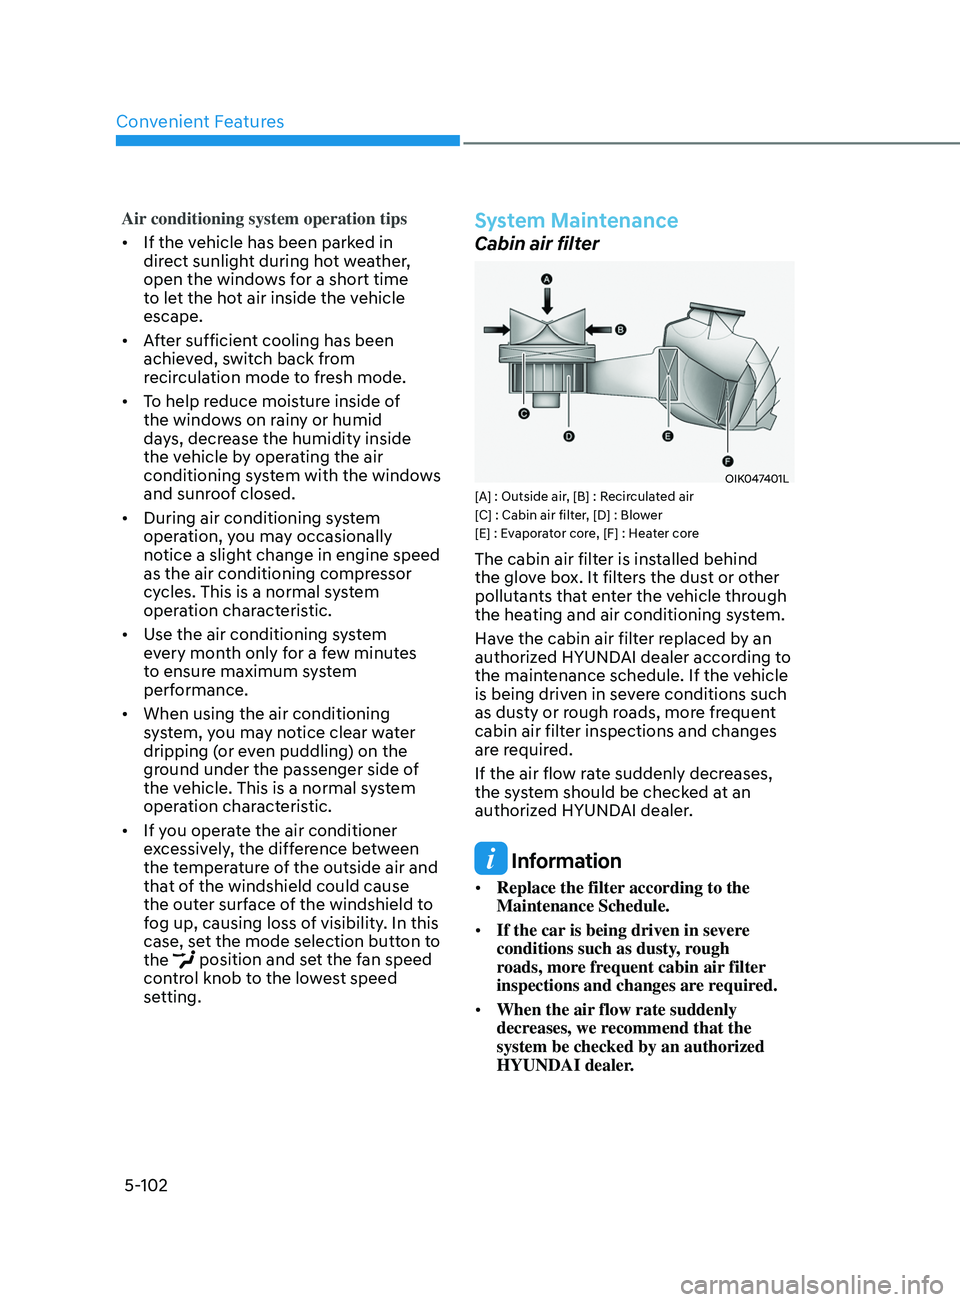
Cabin air filter
OIK047401L[A] : Outside air, [B] : Recirculated air
[C] : Cabin air filter, [D] : Blower
[E] : Evaporator core, [F] : Heater core
The cabin air filter is installed behind
the glove box. It filters the dust or other
pollutants that enter the vehicle through
the heating and air conditioning system.
Have the cabin air filter replaced by an
authorized HYUNDAI dealer according to
the maintenance schedule. If the vehicle
is being driven in severe conditions such
as dusty or rough roads, more frequent
cabin air filter inspections and changes
are required.
If the air flow rate suddenly decreases,
the system should be checked at an
authorized HYUNDAI dealer.
Information
• Replace the filter according to the
Maintenance Schedule.
• If the car is being driven in severe
conditions such as dusty, rough
roads, more frequent cabin air filter
inspections and changes are required.
• When the air flow rate suddenly
decreases, we recommend that the
system be checked by an authorized
HYUNDAI dealer.
Page 239 of 570
05
5-103
Checking the amount of air
conditioner refrigerant and
compressor lubricant
When the amount of refrigerant is low,
the performance of the air conditioning
is reduced. Overfilling also reduces the
performance of the air conditioning
system.
Therefore, if abnormal operation is
found, have the system inspected by an
authorized HYUNDAI dealer.
NOTICE
It is important that the correct type and
amount of oil and refrigerant are used.
Otherwise, damage to the compressor
and abnormal system operation may
occur. To prevent damage, the air
conditioning system in your vehicle
should only be serviced by trained and
certified technicians.
WARNING
Vehicles equipped with R-1234yf
Since the refrigerant is
mildly flammable and
operated at high pressure,
the air conditioning system
should only be serviced
by trained and certified
technicians. It is important
that the correct type
and amount of oil and
refrigerant are used.
All refrigerants should be reclaimed
with proper equipment.
Venting refrigerants directly to the
atmosphere is harmful to individuals
and environment. Failure to heed these
warnings can lead to serious injuries.
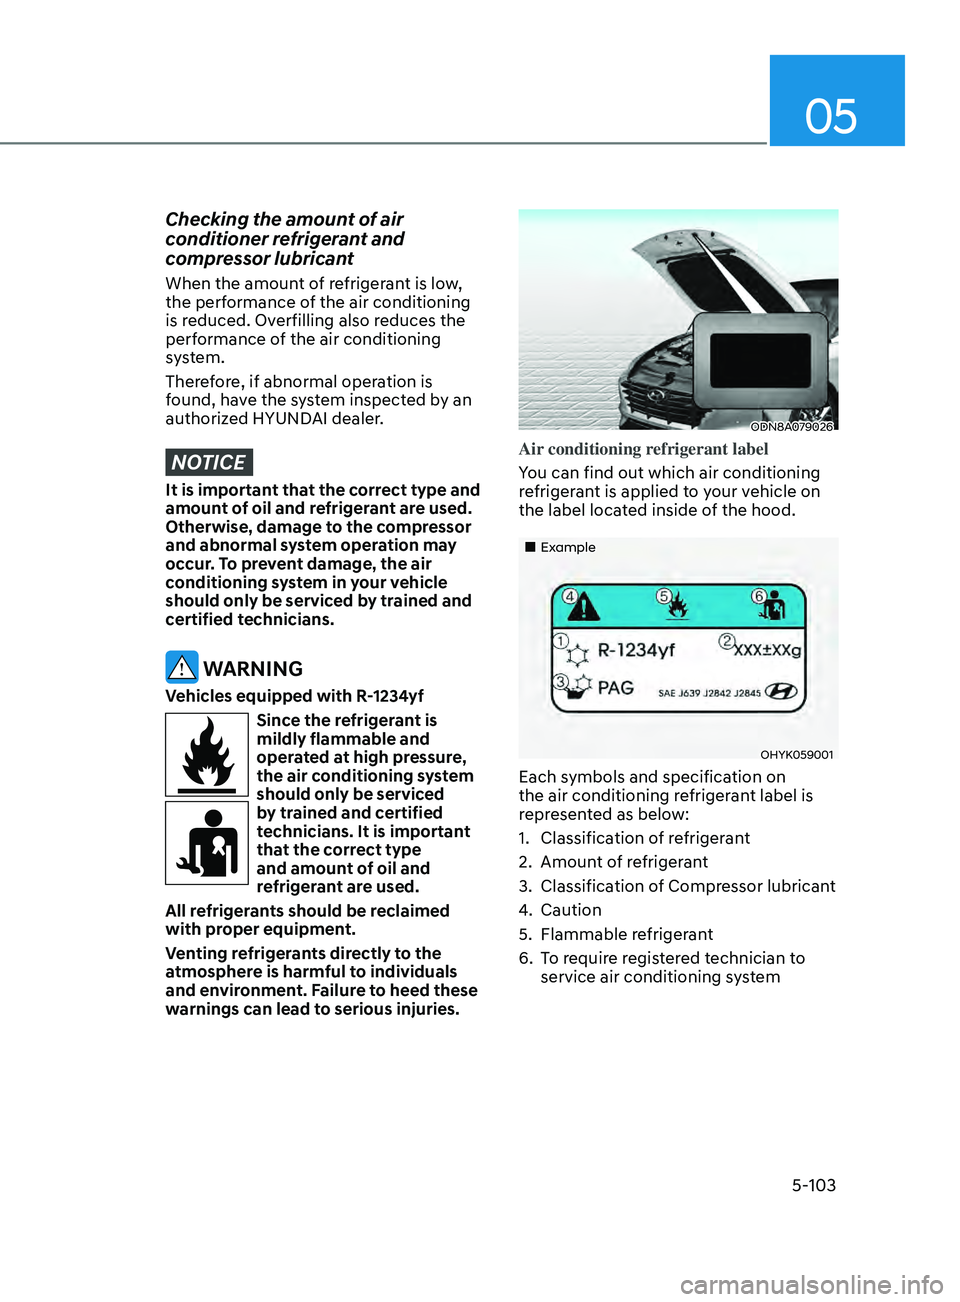
ODN8A079026
Air conditioning refrigerant label
You can find out which air conditioning
refrigerant is applied to your vehicle on
the label located inside of the hood.
„„Example
OHYK059001
Each symbols and specification on
the air conditioning refrigerant label is
represented as below:
1.
Classification o
f refrigerant
2.
Amount o
f refrigerant
3.
Classification o
f Compressor lubricant
4.
Caution
5.
Flammable re
frigerant
6.
To r
equire registered technician to
service air conditioning system
Page 240 of 570
Convenient Features
5-104
WARNING
Windshield heating
Do not use the
or position
during cooling operation in extremely
humid weather. The difference between
the temperature of the outside air and
that of the windshield could cause the
outer surface of the windshield to fog
up, causing loss of visibility. In this case,
set the mode selection knob or button
to the
position and fan speed control
knob or button to lower speed.
• For maximum defrost performance,
set the temperature control knob
to the highest temperature setting
(rotated all the way to the right) and
the fan speed control to the highest
setting.
• If warm air to the floor is desired while
defrosting or defogging, set the mode
to the floor-defrost position.
• Before driving, clear all snow and ice
from the windshield, rear window,
side view mirrors, and all side
windows.
• Clear all snow and ice from the
hood and air inlet in the cowl grill
to improve heater and defroster
efficiency and to reduce the
probability of fogging up inside of the
windshield.
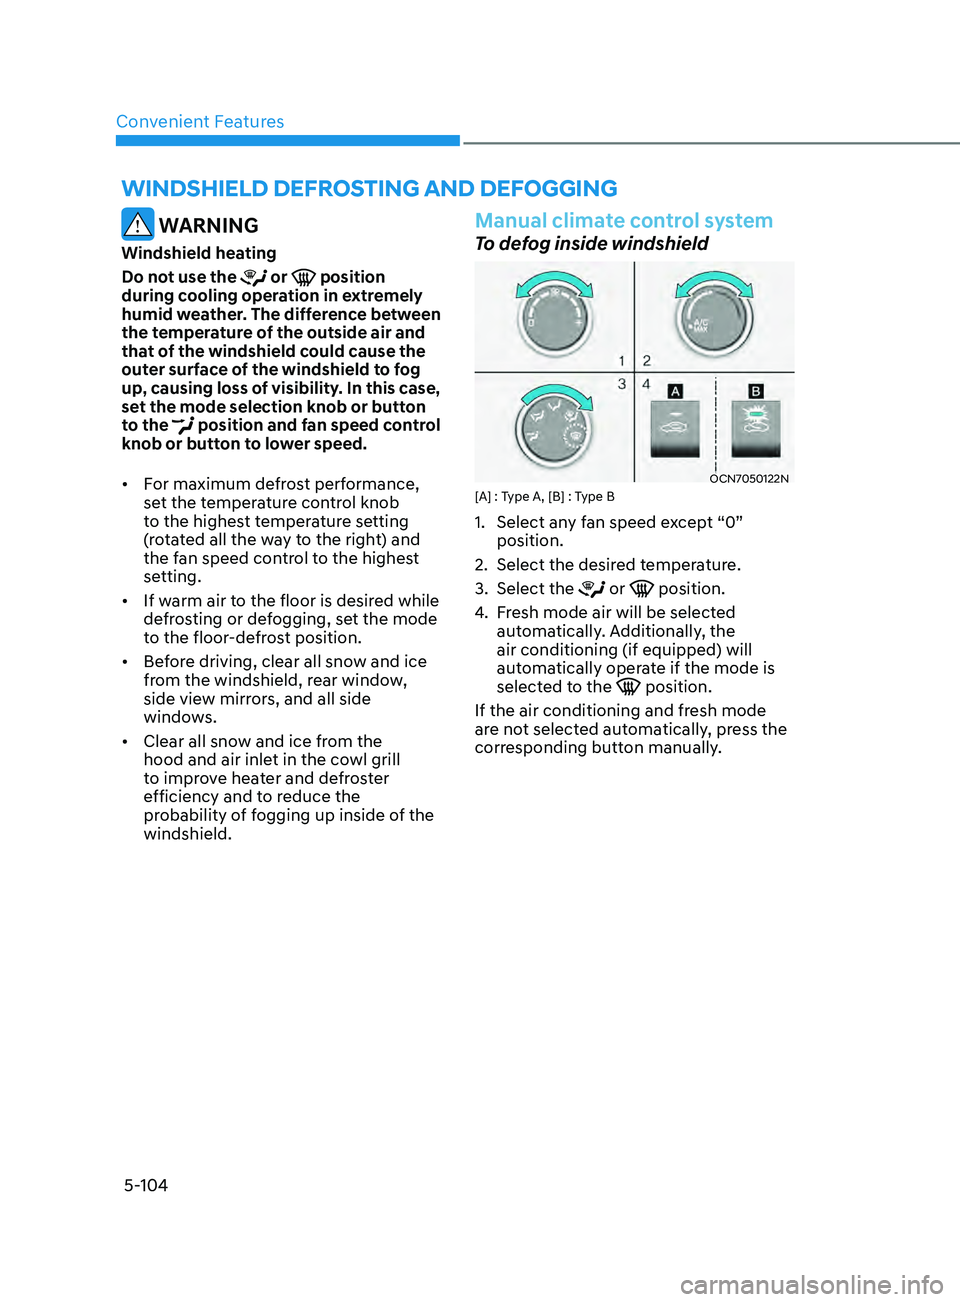
Manual climate control system
To defog inside windshield
OCN7050122N[A] : Type A, [B] : Type B
1. Select any f an speed except “0”
position.
2.
Select the desired t
emperature.
3.
Select the or position.
4.
Fr
esh mode air will be selected
automatically. Additionally, the
air conditioning (if equipped) will
automatically operate if the mode is
selected to the
position.
If the air conditioning and fresh mode
are not selected automatically, press the
corresponding button manually.
WinDshielD DeFr osting AnD DeFogging
Page 241 of 570

05
5-105
To defrost outside windshield
OCN7050123N[A] : Type A, [B] : Type B
1. Set the fan speed to the highest
setting (knob rotated all the way to
the right).
2.
Set the t
emperature control to the
highest temperature setting.
3.
Select the position.
4.
Fr
esh mode air and air conditioning
(if equipped) will be selected
automatically.
Automatic climate control
system
To defog inside windshield
OCN7050124L
1. Select desired f an speed.
2.
Select desired t
emperature.
3.
Press the de
froster button (
).
4.
The air-conditioning will turn on
accor
ding to the detected ambient
temperature, fresh mode and
higher fan speed will be selected
automatically.
If the air-conditioning, fresh mode
and higher fan speed are not selected
automatically, adjust the corresponding
button or knob manually.
If the
position is selected, lower fan
speed is controlled to higher fan speed.
Page 242 of 570
Convenient Features
5-106
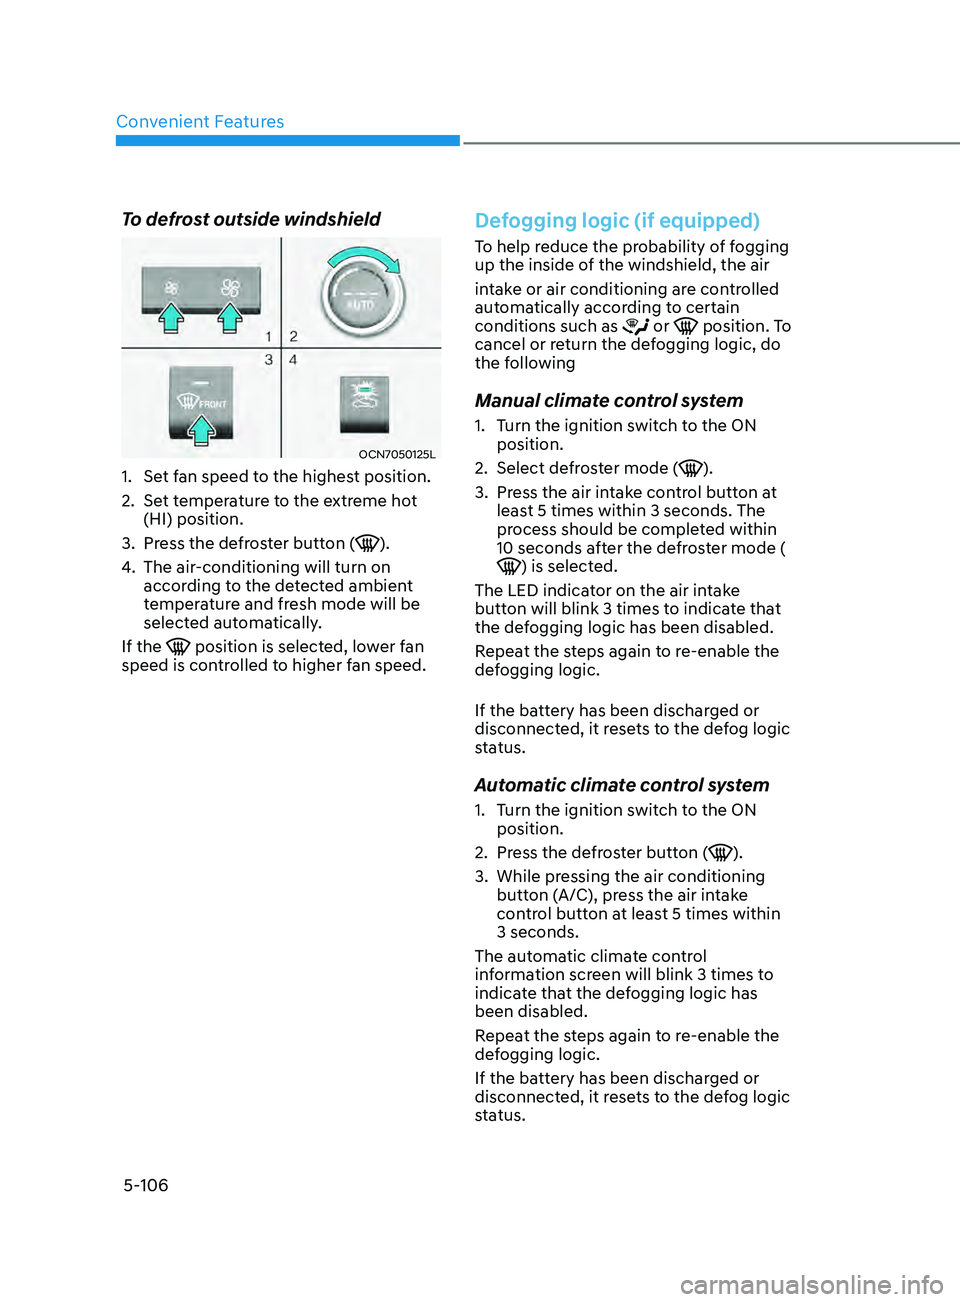
To defrost outside windshield
OCN7050125L
1. Set fan speed to the highest position.
2.
Set t
emperature to the extreme hot
(HI) position.
3.
Press the de
froster button (
).
4.
The air-conditioning will turn on
accor
ding to the detected ambient
temperature and fresh mode will be
selected automatically.
If the
position is selected, lower fan
speed is controlled to higher fan speed.
Defogging logic (if equipped)
To help reduce the probability of fogging
up the inside of the windshield, the air
intake or air conditioning are controlled
automatically according to certain
conditions such as
or position. To
cancel or return the defogging logic, do
the following
Manual climate control system
1. Turn the ignition switch to the ON
position.
2.
Select defr
oster mode (
).
3.
Press the air in
take control button at
least 5 times within 3 seconds. The
process should be completed within
10 seconds after the defroster mode (
) is selected.
The LED indicator on the air intake
button will blink 3 times to indicate that
the defogging logic has been disabled.
Repeat the steps again to re-enable the
defogging logic.
If the battery has been discharged or
disconnected, it resets to the defog logic
status.
Automatic climate control system
1. Turn the ignition switch to the ON
position.
2.
Press the de
froster button (
).
3.
While pressing the air conditioning
butt
on (A/C), press the air intake
control button at least 5 times within
3 seconds.
The automatic climate control
information screen will blink 3 times to
indicate that the defogging logic has
been disabled.
Repeat the steps again to re-enable the
defogging logic.
If the battery has been discharged or
disconnected, it resets to the defog logic
status.
Page 243 of 570
05
5-107
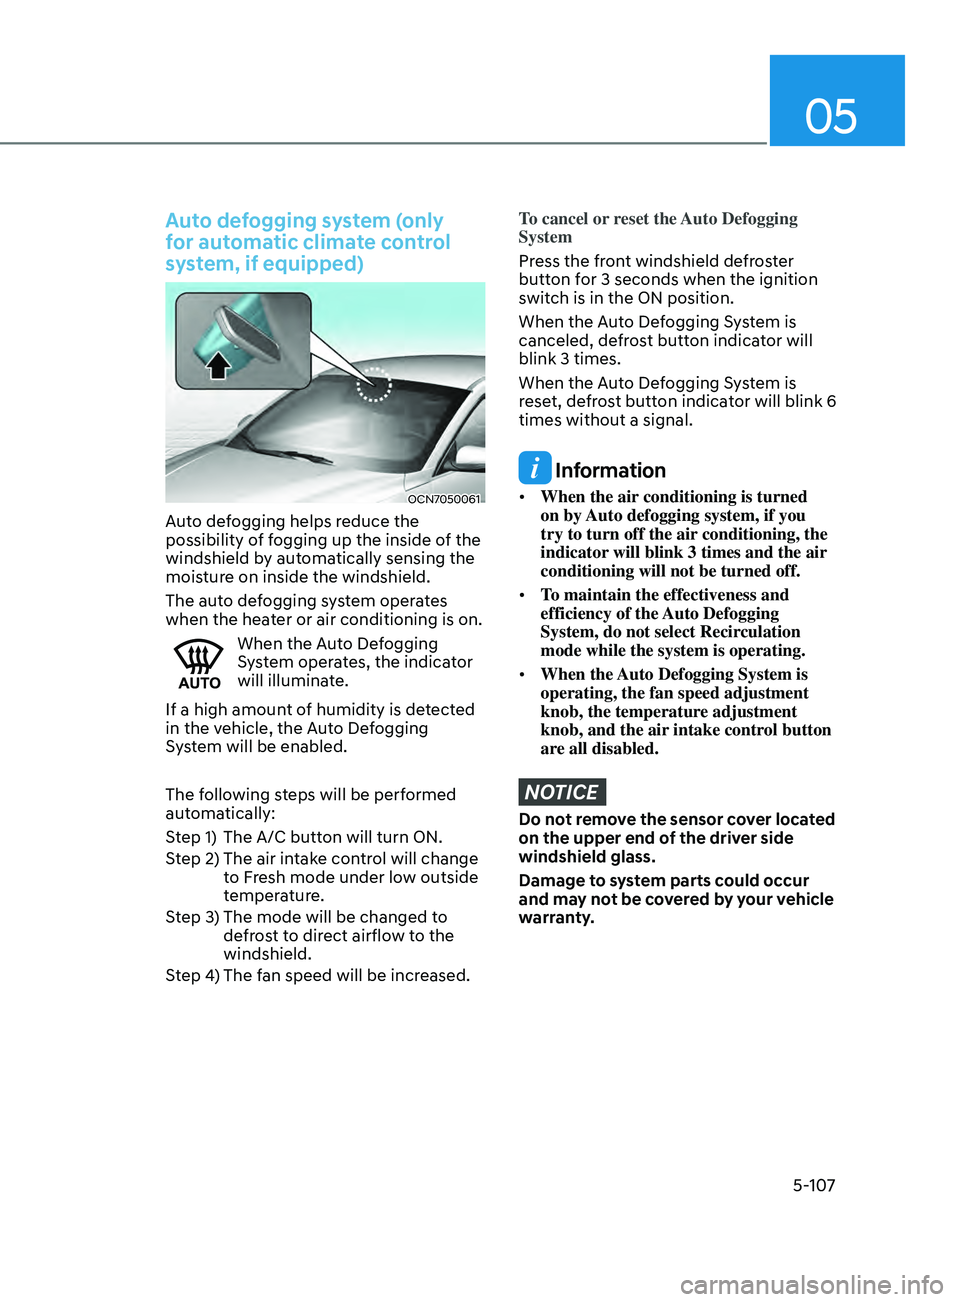
Auto defogging system (only
for automatic climate control
system, if equipped)
OCN7050061
Auto defogging helps reduce the
possibility of fogging up the inside of the
windshield by automatically sensing the
moisture on inside the windshield.
The auto defogging system operates
when the heater or air conditioning is on.
When the Auto Defogging
System operates, the indicator
will illuminate.
If a high amount of humidity is detected
in the vehicle, the Auto Defogging
System will be enabled.
The following steps will be performed
automatically:
Step 1) The A/C button will turn ON.
Step 2) The air intake control will change to Fresh mode under low outside
temperature.
Step 3) The mode will be changed to defrost to direct airflow to the
windshield.
Step 4) The fan speed will be increased.
To cancel or reset the Auto Defogging
System
Press the front windshield defroster
button for 3 seconds when the ignition
switch is in the ON position.
When the Auto Defogging System is
canceled, defrost button indicator will
blink 3 times.
When the Auto Defogging System is
reset, defrost button indicator will blink 6
times without a signal.
Information
• When the air conditioning is turned
on by Auto defogging system, if you
try to turn off the air conditioning, the
indicator will blink 3 times and the air
conditioning will not be turned off.
• To maintain the effectiveness and
efficiency of the Auto Defogging
System, do not select Recirculation
mode while the system is operating.
• When the Auto Defogging System is
operating, the fan speed adjustment
knob, the temperature adjustment
knob, and the air intake control button
are all disabled.
NOTICE
Do not remove the sensor cover located
on the upper end of the driver side
windshield glass.
Damage to system parts could occur
and may not be covered by your vehicle
warranty.
Page 245 of 570
05
5-109
Sunroof inside air recirculation
(if equipped)
When the sunroof is opened, outside
(fresh) air will be automatically selected.
At this time, if you press the air intake
control button, recirculated air position
will be selected but will change back
to outside (fresh) air after 3 minutes.
When the sunroof is closed, the air
intake position will return to the original
position that was selected.
Auto comfort control (for driver’s
seat) (if equipped)
The temperature of the driver’s seat
warmer, air ventilation seat and
heated steering wheel is automatically
controlled depending on the inside and
outside temperature of the vehicle when
the engine is running.
To use this function, it must be
activated from the Settings menu in the
Infotainment system screen. Select:
-All menus → Se
tup
→ V
ehicle
→ H
eated
/ Ven
tilated Features
For more details on Auto Comfort
Control, refer to “Seat warmers and
air ventilation seat” in chapter 3, and
“Heated steering wheel” in chapter 5
Automatic ventilation (if
equipped)
The system automatically selects the
fresh mode when the climate control
system operates over a certain period of
time (approximately 30 minutes) in low
temperature with the recirculation mode
selected.
To cancel or reactivate the
Automatic Ventilation
When the air conditioning system is on,
select Face Level mode and press the
air recirculation mode button at least 5
times within 3 seconds while pressing
the A/C button.
When the automatic ventilation is
canceled, the indicator blinks 3 times.
When the automatic ventilation is
activated, the indicator blinks 6 times.
ClimATe ConTr ol AddiTionAl feA TureS
Page 295 of 570
6-36
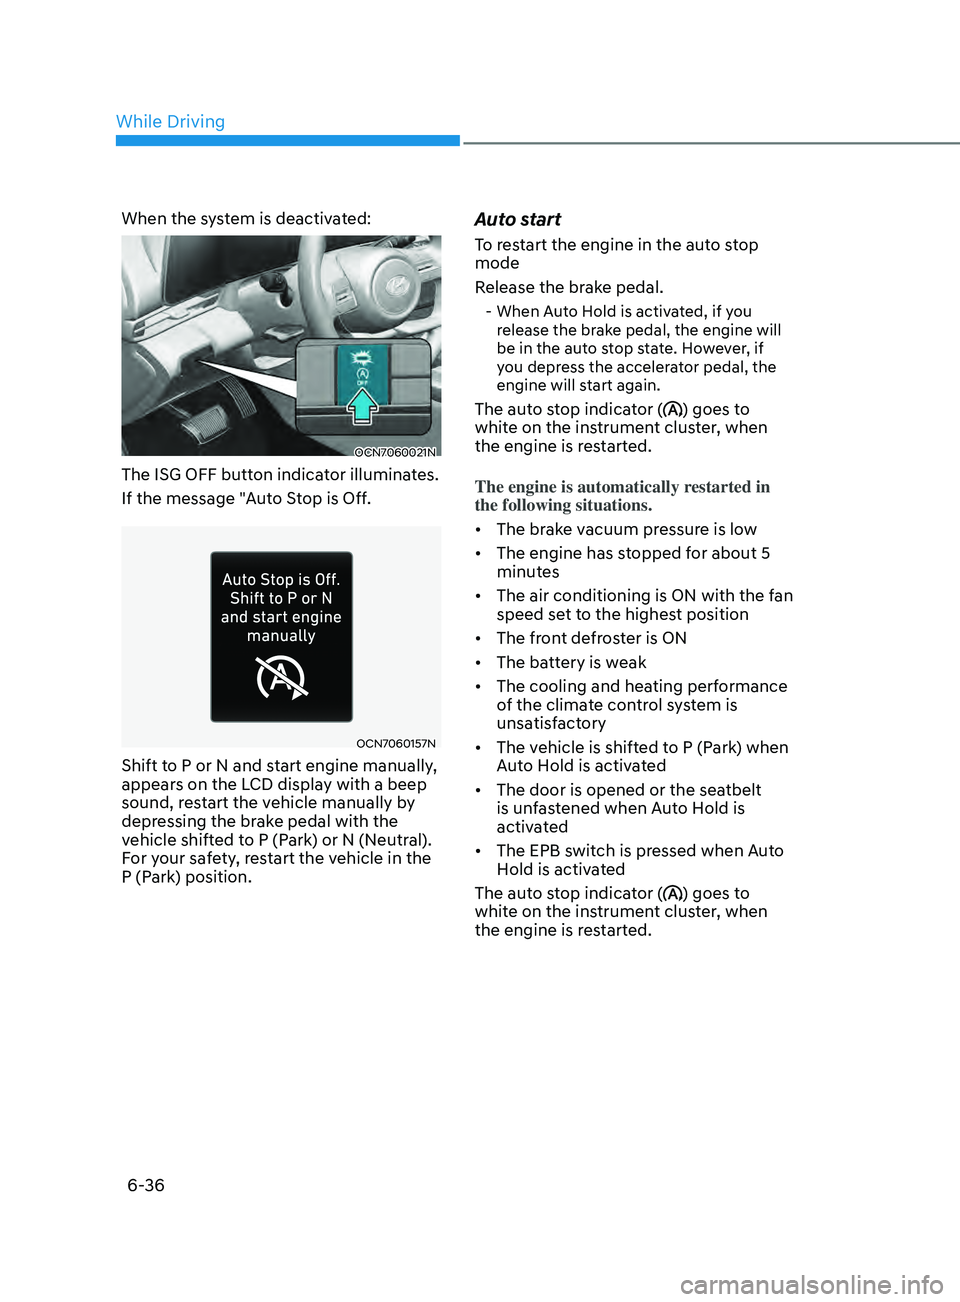
When the system is deactivated:
OCN7060021N
The ISG OFF button indicator illuminates.
If the message "Auto Stop is Off.
OCN7060157N
Shift to P or N and start engine manually,
appears on the LCD display with a beep
sound, restart the vehicle manually by
depressing the brake pedal with the
vehicle shifted to P (Park) or N (Neutral).
For your safety, restart the vehicle in the
P (Park) position.
Auto start
To restart the engine in the auto stop
mode
Release the brake pedal.
- When Auto Hold is activated, if you release the brake pedal, the engine will
be in the auto stop state. However, if
you depress the accelerator pedal, the
engine will start again.
The auto stop indicator () goes to
white on the instrument cluster, when
the engine is restarted.
The engine is automatically restarted in
the following situations.
• The brake vacuum pressure is low
• The engine has stopped for about 5
minutes
• The air conditioning is ON with the fan
speed set to the highest position
• The front defroster is ON
• The battery is weak
• The cooling and heating performance
of the climate control system is
unsatisfactory
• The vehicle is shifted to P (Park) when
Auto Hold is activated
• The door is opened or the seatbelt
is unfastened when Auto Hold is
activated
• The EPB switch is pressed when Auto
Hold is activated
The auto stop indicator (
) goes to
white on the instrument cluster, when
the engine is restarted.
While Driving
Page 468 of 570
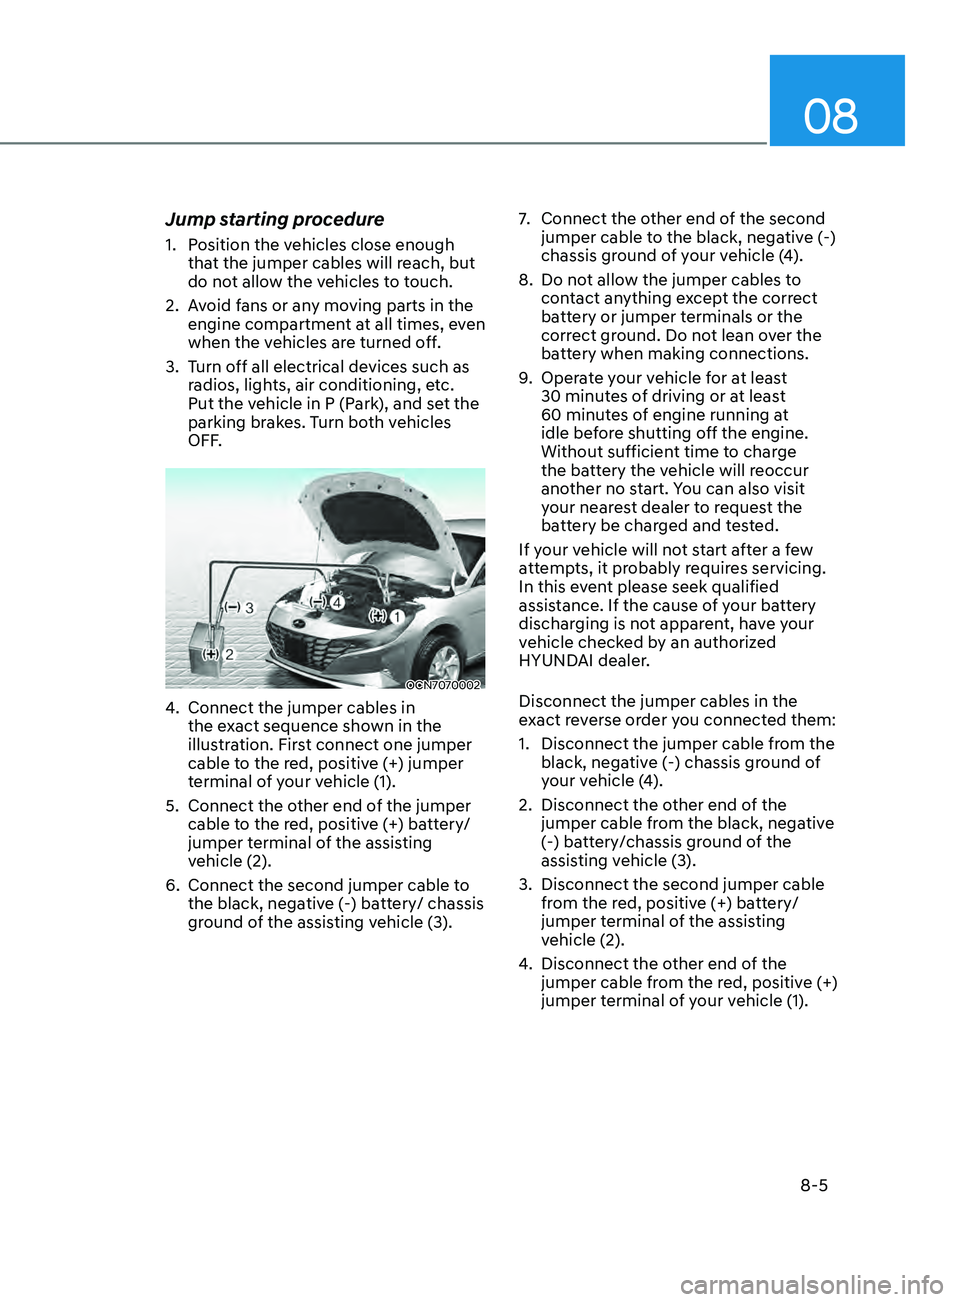
08
8-5
Jump starting procedure
1. Position the vehicles close enough
that the jumper cables will reach, but
do not allow the vehicles to touch.
2.
Av
oid fans or any moving parts in the
engine compartment at all times, even
when the vehicles are turned off.
3.
Turn o
ff all electrical devices such as
radios, lights, air conditioning, etc.
Put the vehicle in P (Park), and set the
parking brakes. Turn both vehicles
OFF.
OCN7070002
4. Connect the jumper cables in
the ex act sequence shown in the
illustration. First connect one jumper
cable to the red, positive (+) jumper
terminal of your vehicle (1).
5.
Connect the other end o
f the jumper
cable to the red, positive (+) battery/
jumper terminal of the assisting
vehicle (2).
6.
Connect the second jumper cable to
the black, nega
tive (-) battery/ chassis
ground of the assisting vehicle (3). 7.
Connect the other end o
f the second
jumper cable to the black, negative (-)
chassis ground of your vehicle (4).
8.
Do not allo
w the jumper cables to
contact anything except the correct
battery or jumper terminals or the
correct ground. Do not lean over the
battery when making connections.
9.
Opera
te your vehicle for at least
30 minutes of driving or at least
60 minutes of engine running at
idle before shutting off the engine.
Without sufficient time to charge
the battery the vehicle will reoccur
another no start. You can also visit
your nearest dealer to request the
battery be charged and tested.
If your vehicle will not start after a few
attempts, it probably requires servicing.
In this event please seek qualified
assistance. If the cause of your battery
discharging is not apparent, have your
vehicle checked by an authorized
HYUNDAI dealer.
Disconnect the jumper cables in the
exact reverse order you connected them:
1.
Disconnect the jumper cable from the
black, nega
tive (-) chassis ground of
your vehicle (4).
2.
Disconnect the other end o
f the
jumper cable from the black, negative
(-) battery/chassis ground of the
assisting vehicle (3).
3.
Disconnect the second jumper cable
from the r
ed, positive (+) battery/
jumper terminal of the assisting
vehicle (2).
4.
Disconnect the other end o
f the
jumper cable from the red, positive (+)
jumper terminal of your vehicle (1).