ECO mode HYUNDAI ENTOURAGE 2009 Owner's Guide
[x] Cancel search | Manufacturer: HYUNDAI, Model Year: 2009, Model line: ENTOURAGE, Model: HYUNDAI ENTOURAGE 2009Pages: 402, PDF Size: 9.08 MB
Page 241 of 402
3225
Features of your vehicle
5. ForwardThere are two CD fast forward speeds.
Press and hold the FWD button for up to
2 seconds and the player will fast forward
at 3 times the normal speed. Hold the
button for more than 2 seconds and the
player will fast forward at about 10 times
the normal speed. When the holding but-
ton is released, the RSE unit will auto-
matically return to a play mode.6. ReverseThere are two fast reverse speeds. The
RSE unit will fast reverse at 3 times the
normal speed, if the REV button is
pressed. Hold the button for more than 2
seconds and the RSE unit will fast
reverse at about 10 times the normal
speed. When the button is released, the
RSE unit will automatically return to a
play mode.
7. Next TrackPress the NEXT button to skip to the
beginning of the next track. The next
track number is displayed on the screen.
Press and hold the NEXT button for 2
seconds or more to move quickly through
the tracks.8. Previous TrackPress the PREV button to skip to the
beginning of the current track.
Press the PREV button during the first 8
seconds of the current track to skip to the
beginning of the previous track.
Press the PREV button during the first 8
seconds of the first track to skip to the
beginning of the last track on the CD.
Press and hold the PREV button for 2
seconds or more to move quickly through
the tracks.
Page 243 of 402
3227
Features of your vehicle
Using the Remote ControlIn addition to having all the buttons and
functionality listed in the DVD and CD
Controls section, the remote control has
several other buttons that offer additional
functions. It is an infrared remote control,
and must be pointed at the face of the
RSE at a 45° angle for best results. It
requires a CR2025 battery (included).
The remote control has the following
additional buttons:✽ ✽
NOTICEThe RSE system is always “awake”
when the vehicle's ignition is turned on
or when the vehicle is in “accessory”
power mode.1. StopPressing this button once will stop DVD
or CD play. To eject a disc, you must use
the eject button on the control panel.2. Speaker Volume “+” and “-”These buttons control the volume of the
audio of a DVD or CD through the vehicle
speakers, not the volume from head-
phones. Press “+” to turn the volume up
and “-” to turn the volume down.
3. Play/PauseWhen an audio CD(VCD/DVD) is insert-
ed, the RSE will display the HYUNDAI
logo, then automatically begin playing
the first track. The track number and time
elapsed for the current track is displayed.
If a CD(VCD/DVD) is loaded and playing,
press the PLAY/PAUSE( ) button to
pause the CD(VCD/DVD). Press the but-
ton again to resume play.
If a CD(VCD/DVD) is already loaded,
stopping and playing the CD(VCD/ DVD)
by pressing PLAY/PAUSE( ) button
on the remote control; cycling the ignition
and pressing play; or changing the
source will cause the CD(VCD/DVD) to
begin playing at the point where it was
stopped during the previous play. The
player will automatically play this previ-
ous play position unless the
STOP/EJECT( ) button is pressed.
At the end of the CD(VCD/DVD), the
player will automatically return to the first
track and continue playing.4. DisplayWhen the player is in DVD mode, press
the DISP button to view the DVD title,
chapter number and elapsed time and
other information about the DVD current-
ly playing.It will also display brightness. There are
“Day Time” brightness with brightest level
and “Night Time” brightness which has
70% level of “Day Time” brightness. Adjust
the level of brightness by pressing the
REV(dimmer) or FWD(brighter) buttons.
The next time the player is turned on, it
will return to the brightness level it was
adjusted to when last used.
The RSE unit has two presets of display
brightness. When the headlamp is turned
on, the display brightness level will be
dimmed as the preset. However, when
the headlamp is turned off, the display
brightness will return to the daytime
brightness.
Press DISP to adjust the image format.
The image format, also known as the
aspect ratio, is a ratio of the height to
width of the image on the screen. For
example, a 4:3 ratio would mean an
image that is 4 units by 3 units. You have
two options: 4:3 (normal) and 16:9
(widescreen). Press the display button to
select the preferred aspect ratio.
When the RSE unit receives video sig-
nals from the AUX, the aspect ratio can
be changed to 16:9 or 4:3 by the DISP
button.
The aspect ratio information will auto-
matically disappear if no button is
pressed for three seconds.
Page 246 of 402
Features of your vehicle230 315. Slow PlayThere are 3 slow forward and 3 slow
reverse speeds available when viewing
DVDs. To review a DVD in slow motion,
first press the PLAY/PAUSE ( ) button
to pause the DVD, then press either REV
or FWD ((�W) or (�X) on the remote con-
trol) to select slow playback in either
reverse or forward.
Pressing either the REV or FWD ((�W) or
(�X) on the remote control) button once
changes the player to 1/8 of normal
speed. Press the button again to return to
pause mode.
Press and hold either button for more
than 2 seconds but less than 4 seconds
and the player will switch to 1/4 of the
normal speed. Hold either button for
more than 4 seconds and the player will
switch to 1/2 of the normal speed.From the remote control for DVD, you can
immediately switch to 1/8 forward or
backward speed with the (,) but-
tons. Press either button again to return
to normal play.
While using the Slow Play feature, the
current play speed is displayed on the
screen.
Press PLAY again to resume normal
play.
16. On/OffThis button will only turn off the DVD or
CD and display, not the system itself. The
system will remain on standby.
Page 258 of 402
Driving your vehicle10 4N (neutral)The wheels and transaxle are not locked.
The vehicle will roll freely even on the
slightest incline unless the parking brake
or service brakes are applied.D (drive)This is the normal forward driving posi-
tion. The transaxle will automatically shift
through a 5-gear sequence, providing the
best fuel economy and power.
For extra power when passing another
vehicle or climbing grades, depress the
accelerator fully, at which time the
transaxle will automatically downshift to
the next lower gear.✽ ✽
NOTICEAlways come to a complete stop
before shifting into D (Drive).
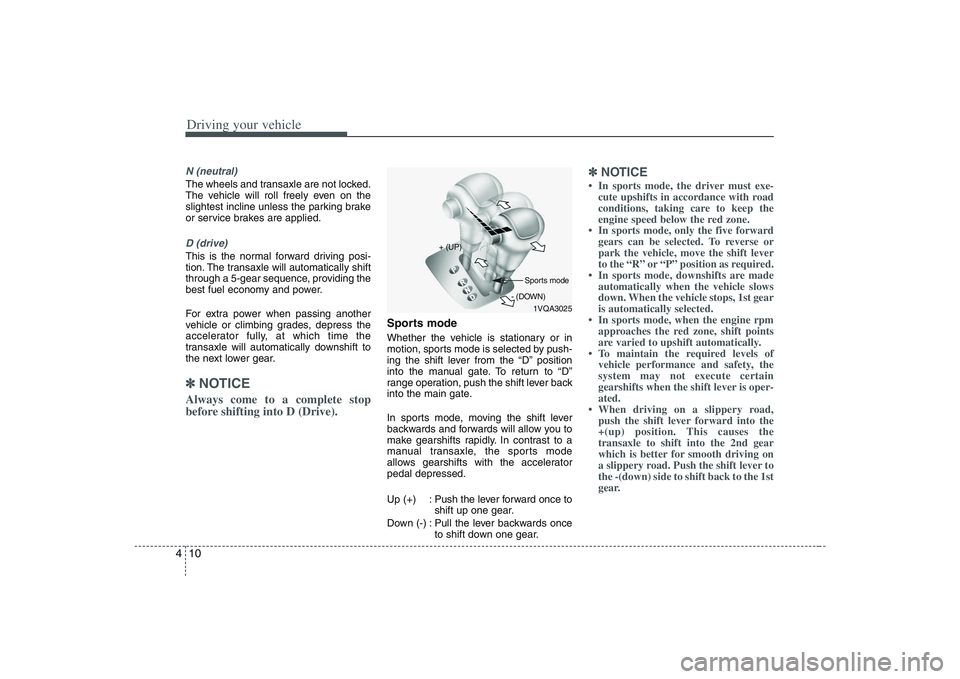
Sports modeWhether the vehicle is stationary or in
motion, sports mode is selected by push-
ing the shift lever from the “D” position
into the manual gate. To return to “D”
range operation, push the shift lever back
into the main gate.
In sports mode, moving the shift lever
backwards and forwards will allow you to
make gearshifts rapidly. In contrast to a
manual transaxle, the sports mode
allows gearshifts with the accelerator
pedal depressed.
Up (+) : Push the lever forward once to
shift up one gear.
Down (-) : Pull the lever backwards once
to shift down one gear.
✽ ✽
NOTICE• In sports mode, the driver must exe-
cute upshifts in accordance with road
conditions, taking care to keep the
engine speed below the red zone.
• In sports mode, only the five forward
gears can be selected. To reverse or
park the vehicle, move the shift lever
to the “R” or “P” position as required.
• In sports mode, downshifts are made
automatically when the vehicle slows
down. When the vehicle stops, 1st gear
is automatically selected.
• In sports mode, when the engine rpm
approaches the red zone, shift points
are varied to upshift automatically.
• To maintain the required levels of
vehicle performance and safety, the
system may not execute certain
gearshifts when the shift lever is oper-
ated.
• When driving on a slippery road,
push the shift lever forward into the
+(up) position. This causes the
transaxle to shift into the 2nd gear
which is better for smooth driving on
a slippery road. Push the shift lever to
the -(down) side to shift back to the 1st
gear.
1VQA3025 + (UP)
- (DOWN)Sports mode
Page 259 of 402
411
Driving your vehicle
Moving up a steep grade from a
standing startTo move up a steep grade from a stand-
ing start, depress the brake pedal, shift
the shift lever to D (Drive). Select the
appropriate gear depending on load
weight and steepness of the grade, and
release the parking brake. Depress the
accelerator gradually while releasing the
service brakes.
When accelerating from a stop on a
steep hill, the vehicle may have a ten-
dency to roll backwards. Shifting the
shift lever into 2 (Second Gear) while
in Sports mode will help prevent the
vehicle from rolling backwards.
Good driving practices Never move the gear selector lever
from "P" or "N" to any other position
with the accelerator pedal depressed.
Never move the gear selector lever into
"P" when the vehicle is in motion.
Be sure the car is completely stopped
before you attempt to shift into "R".
Never take the car out of gear and
coast down a hill. This may be
extremely hazardous. Always leave the
car in gear when moving.
Do not "ride" the brakes. This can
cause them to overheat and malfunc-
tion. Instead, when you are driving
down a long hill, slow down and shift to
a lower gear. When you do this, engine
braking will help slow the car.
Slow down before shifting to a lower
gear. Otherwise, the lower gear may
not be engaged.
Always use the parking brake. Do not
depend on placing the transaxle in "P"
to keep the car from moving.
Exercise extreme caution when driving
on a slippery surface. Be especially
careful when braking, accelerating or
shifting gears. On a slippery surface,
an abrupt change in vehicle speed can
cause the drive wheels to lose traction
and the vehicle to go out of control. Optimum vehicle performance and
economy is obtained by smoothly
depressing and releasing the accelera-
tor pedal.
WARNING
Always buckle-up! In a collision,
an unbelted occupant is signifi-
cantly more likely to be seriously
injured or killed than a properly
belted occupant.
Avoid high speeds when corner-
ing or turning.
Do not make quick steering wheel
movements, such as sharp lane
changes or fast, sharp turns.
The risk of rollover is greatly
increased if you lose control of
your vehicle at highway speeds.
Loss of control often occurs if
two or more wheels drop off the
roadway and the driver over-
steers to reenter the roadway.
In the event your vehicle leaves
the roadway, do not steer sharply.
Instead, slow down before pulling
back into the travel lanes.
Never exceed posted speed lim-
its.
Page 270 of 402
Driving your vehicle22 4
The Electronic Stability Control (ESC)
system is designed to stabilize the vehicle
during cornering manuevers. ESC checks
where you are steering and where the
vehicle is actually going. ESC applies the
brakes at individual wheels and
intervenes in the engine management
system to stabilize the vehicle.
The Electronic Stability Control (ESC)
system is an electronic system designed
to help the driver maintain vehicle control
under adverse conditions. It is not a
substitute for safe driving practices.
Factors including speed, road conditions
and driver steering input can all affect
whether ESC will be effective in
preventing a loss of control. It is still your
responsibility to drive and corner at
reasonable speeds and to leave a
sufficient margin of safety.
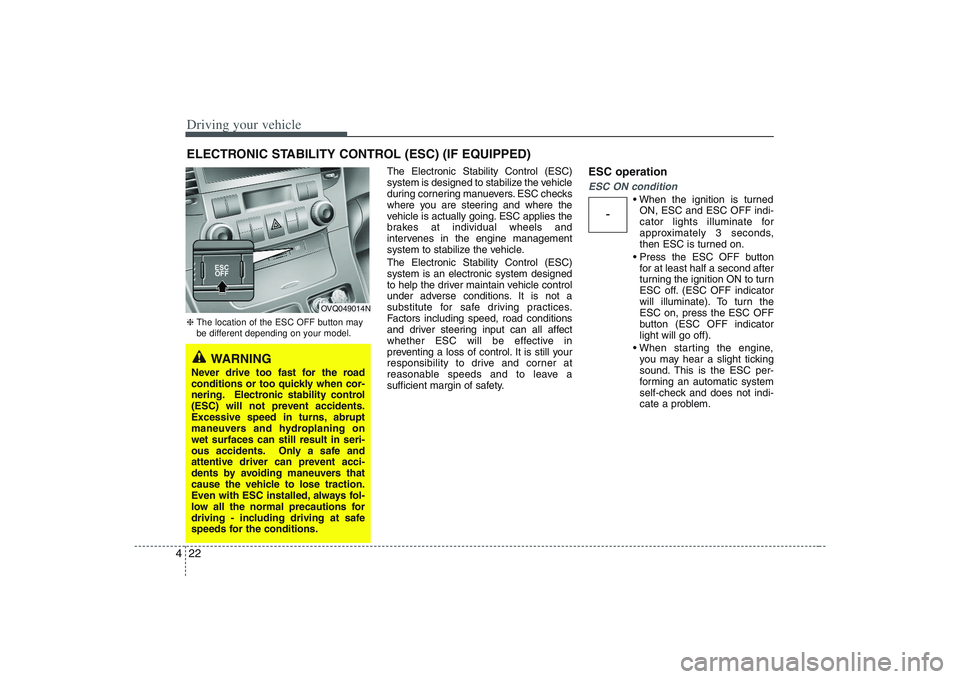
ESC operationESC ON condition
ON, ESC and ESC OFF indi-
cator lights illuminate for
approximately 3 seconds,
then ESC is turned on.
for at least half a second after
turning the ignition ON to turn
ESC off. (ESC OFF indicator
will illuminate). To turn the
ESC on, press the ESC OFF
button (ESC OFF indicator
light will go off).
you may hear a slight ticking
sound. This is the ESC per-
forming an automatic system
self-check and does not indi-
cate a problem.
ELECTRONIC STABILITY CONTROL (ESC) (IF EQUIPPED)
-
WARNING
Never drive too fast for the road
conditions or too quickly when cor-
nering. Electronic stability control
(ESC) will not prevent accidents.
Excessive speed in turns, abrupt
maneuvers and hydroplaning on
wet surfaces can still result in seri-
ous accidents. Only a safe and
attentive driver can prevent acci-
dents by avoiding maneuvers that
cause the vehicle to lose traction.
Even with ESC installed, always fol-
low all the normal precautions for
driving - including driving at safe
speeds for the conditions.❈The location of the ESC OFF button may
be different depending on your model.
OVQ049014N
Page 366 of 402
Maintenance48 6Cold Tire Pressure: The amount of
air pressure in a tire, measured in
pounds per square inch (psi) or kilo-
pascals (kPa) before a tire has built
up heat from driving.
Curb Weight: This means the weight
of a motor vehicle with standard and
optional equipment including the
maximum capacity of fuel, oil and
coolant, but without passengers and
cargo.
DOT Markings: A code molded into
the sidewall of a tire signifying that
the tire is in compliance with the U.S.
Department of Transportation motor
vehicle safety standards. The DOT
code includes the Tire Identification
Number (TIN), an alphanumeric des-
ignator which can also identify the
tire manufacturer, production plant,
brand and date of production.
GVWR: Gross Vehicle Weight Rating
GAWR FRT: Gross Axle Weight
Rating for the front Axle.
GAWR RR: Gross Axle Weight
Rating for the rear axle.Intended Outboard Sidewall: The
side of an asymmetrical tire, that
must always face outward when
mounted on a vehicle.
Kilopascal (kPa): The metric unit for
air pressure.
Load Index: An assigned number
ranging from 1 to 279 that corre-
sponds to the load carrying capacity
of a tire.
Maximum Inflation Pressure: The
maximum air pressure to which a
cold tire may be inflated. The maxi-
mum air pressure is molded onto the
sidewall.
Maximum Load Rating: The load
rating for a tire at the maximum per-
missible inflation pressure for that
tire.
Maximum Loaded Vehicle Weight:
The sum of curb weight; accessory
weight; vehicle capacity weight; and
production options weight.
Normal Occupant Weight:The
number of occupants a vehicle is
designed to seat multiplied by 150
pounds (68 kg).Occupant Distribution: Designated
seating positions.
Outward Facing Sidewall:The side
of a asymmetrical tire that has a par-
ticular side that faces outward when
mounted on a vehicle. The outward
facing sidewall bears white lettering
or bears manufacturer, brand, and/or
model name molding that is higher or
deeper than the same moldings on
the inner facing sidewall.
Passenger (P-Metric) Tire: A tire
used on passenger cars and some
light duty trucks and multipurpose
vehicles.
Recommended Inflation Pressure:
Vehicle manufacturer's recommend-
ed tire inflation pressure and shown
on the tire placard.
Radial Ply Tire: A pneumatic tire in
which the ply cords that extend to the
beads are laid at 90 degrees to the
centerline of the tread.
Rim: A metal support for a tire and
upon which the tire beads are seat-
ed.
Sidewall: The portion of a tire
between the tread and the bead.
Page 367 of 402
649
Maintenance
Speed Rating: An alphanumeric
code assigned to a tire indicating the
maximum speed at which a tire can
operate.
Traction: The friction between the
tire and the road surface. The
amount of grip provided.
Tr e a d: The portion of a tire that
comes into contact with the road.
Treadwear Indicators: Narrow
bands, sometimes called "wear
bars," that show across the tread of a
tire when only 2/32 inch of tread
remains.
UTQGS: Uniform Tire Quality
Grading Standards, a tire information
system that provides consumers with
ratings for a tire's traction, tempera-
ture and treadwear. Ratings are
determined by tire manufacturers
using government testing proce-
dures. The ratings are molded into
the sidewall of the tire.
Vehicle Capacity Weight: The num-
ber of designated seating positions
multiplied by 150 lbs. (68 kg) plus the
rated cargo and luggage load.Vehicle Maximum Load on the
Tire: Load on an individual tire due to
curb and accessory weight plus
maximum occupant and cargo
weight.
Vehicle Normal Load on the Tire:
Load on an individual tire that is
determined by distributing to each
axle its share of the curb weight,
accessory weight, and normal occu-
pant weight and driving by 2.
Vehicle Placard: A label permanent-
ly attached to a vehicle showing the
original equipment tire size and rec-
ommended inflation pressure.
All season tires Hyundai specifies all season tires on
some models to provide good per-
formance for use all year round,
including snowy and icy road condi-
tions. All season tires are identified
by ALL SEASON and/or M+S (Mud
and Snow) on the tire sidewall. Snow
tires have better snow traction than
all season tires and may be more
appropriate in some areas.Summer tires Hyundai specifies summer tires on
some models to provide superior
performance on dry roads. Summer
tire performance is substantially
reduced in snow and ice. Summer
tires do not have the tire traction rat-
ing M+S (Mud and Snow) on the tire
side wall. if you plan to operate your
vehicle in snowy or icy conditions.
Hyundai recommends the use of
snow tires or all season tires on all
four wheels.