lock Hyundai Equus 2016 Workshop Manual
[x] Cancel search | Manufacturer: HYUNDAI, Model Year: 2016, Model line: Equus, Model: Hyundai Equus 2016Pages: 477, PDF Size: 16.25 MB
Page 152 of 477
Operating HomeLink®
To operate, simply press and release
the programmed HomeLink®button.
Activation will occur for the trained
device (i.e. garage door opener, gate
operator, security system, entry door
lock, home/office lighting, etc.). For
convenience, the hand-held transmit-
ter of the device may also be used at
any time.
Reprogramming a single
HomeLink
®button
To program a new device to a previ-
ously trained HomeLink
®button, fol-
low these steps:
1. Press and hold the desired HomeLink
®button. Do NOT release
until the step 4 is completed.
2. When the indicator light begins to flash slowly (after 20 seconds),
point the handheld transmitter 1 to
3 inches away from the
HomeLink
®surface.
3. Press and hold the handheld transmitter button. The HomeLink
®
indicator light will flash, first slowly
and then rapidly.
4. When the indicator light begins to flash rapidly, release both buttons.
5. Press and hold the just-trained HomeLink
®button and observe
the red Status Indicator LED. If the
indicator light stays on constantly,
programming is complete and
your new device should activate. Erasing HomeLink
®buttons
An individual programming cannot
be erased. However, to erase all
three programmings;
1. Press and hold the two outer HomeLink
®buttons until the indi-
cator light begins to flash after 20
seconds; and
2. Release both buttons. Do not hold for longer than 30 seconds.
The Integrated HomeLink
®Wireless
Control System is now in the training
(learning) mode and can be pro-
grammed at any time by following the
appropriate steps as in the
"Programming".
FCC ID: NZLZTVHL3
IC: 4112A-ZTVHL3
3-57
Convenient features of your vehicle03
Page 155 of 477
Folding the Outside RearviewMirrors
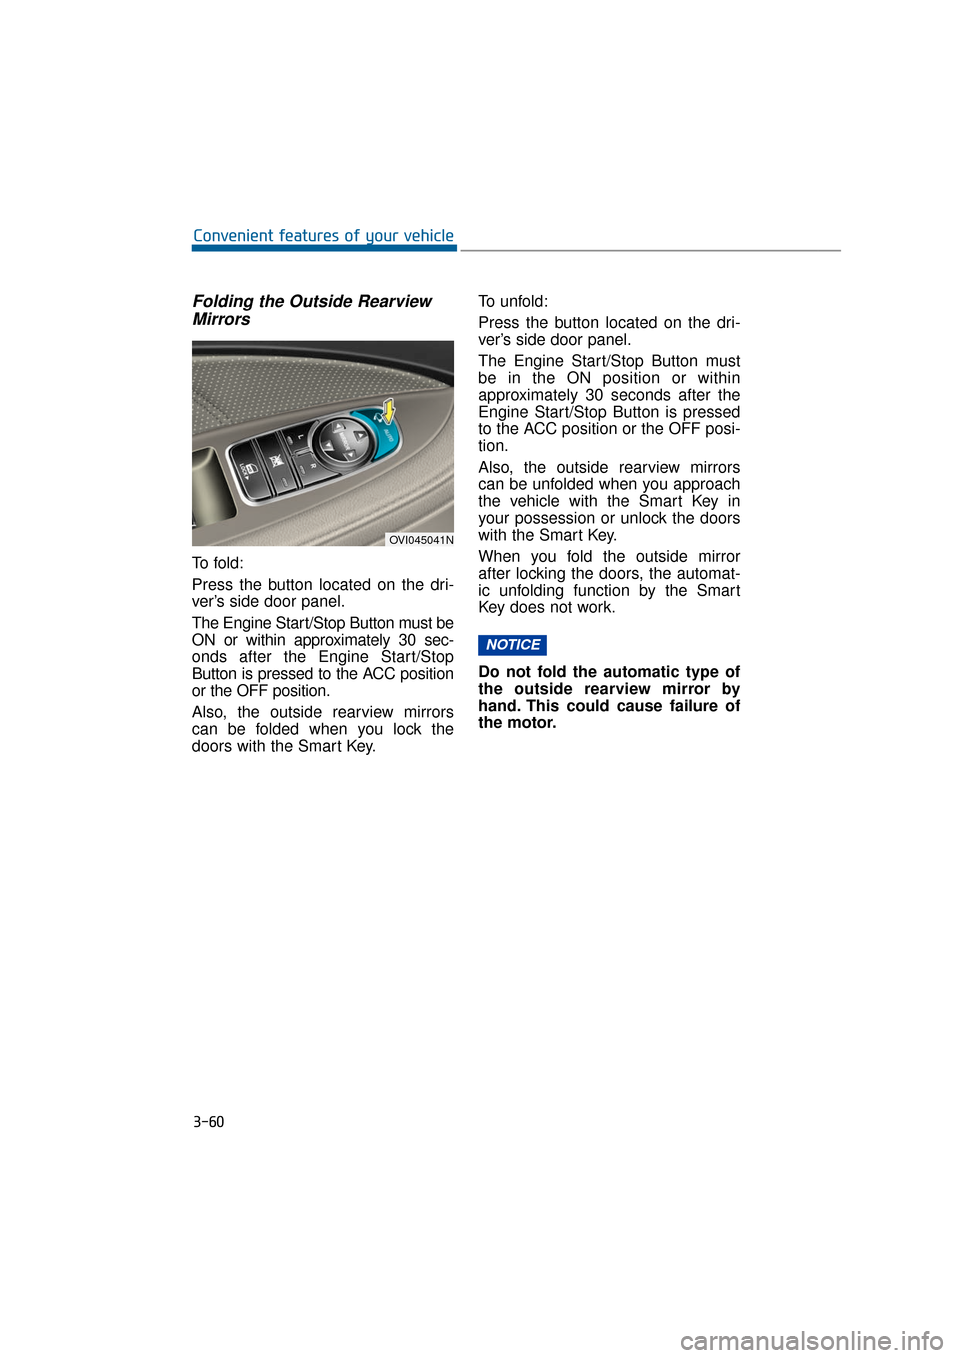
To f o l d :
Press the button located on the dri-
ver’s side door panel.
The Engine Start/Stop Button must be
ON or within approximately 30 sec-
onds after the Engine Start/Stop
Button is pressed to the ACC position
or the OFF position.
Also, the outside rearview mirrors
can be folded when you lock the
doors with the Smart Key. To unfold:
Press the button located on the dri-
ver’s side door panel.
The Engine Start/Stop Button must
be in the ON position or within
approximately 30 seconds after the
Engine Start/Stop Button is pressed
to the ACC position or the OFF posi-
tion.
Also, the outside rearview mirrors
can be unfolded when you approach
the vehicle with the Smart Key in
your possession or unlock the doors
with the Smart Key.
When you fold the outside mirror
after locking the doors, the automat-
ic unfolding function by the Smart
Key does not work.
Do not fold the automatic type of
the outside rearview mirror by
hand. This could cause failure of
the motor.
NOTICE
3-60
Convenient features of your vehicle
OVI045041N
Page 170 of 477
3-75
Convenient features of your vehicle03
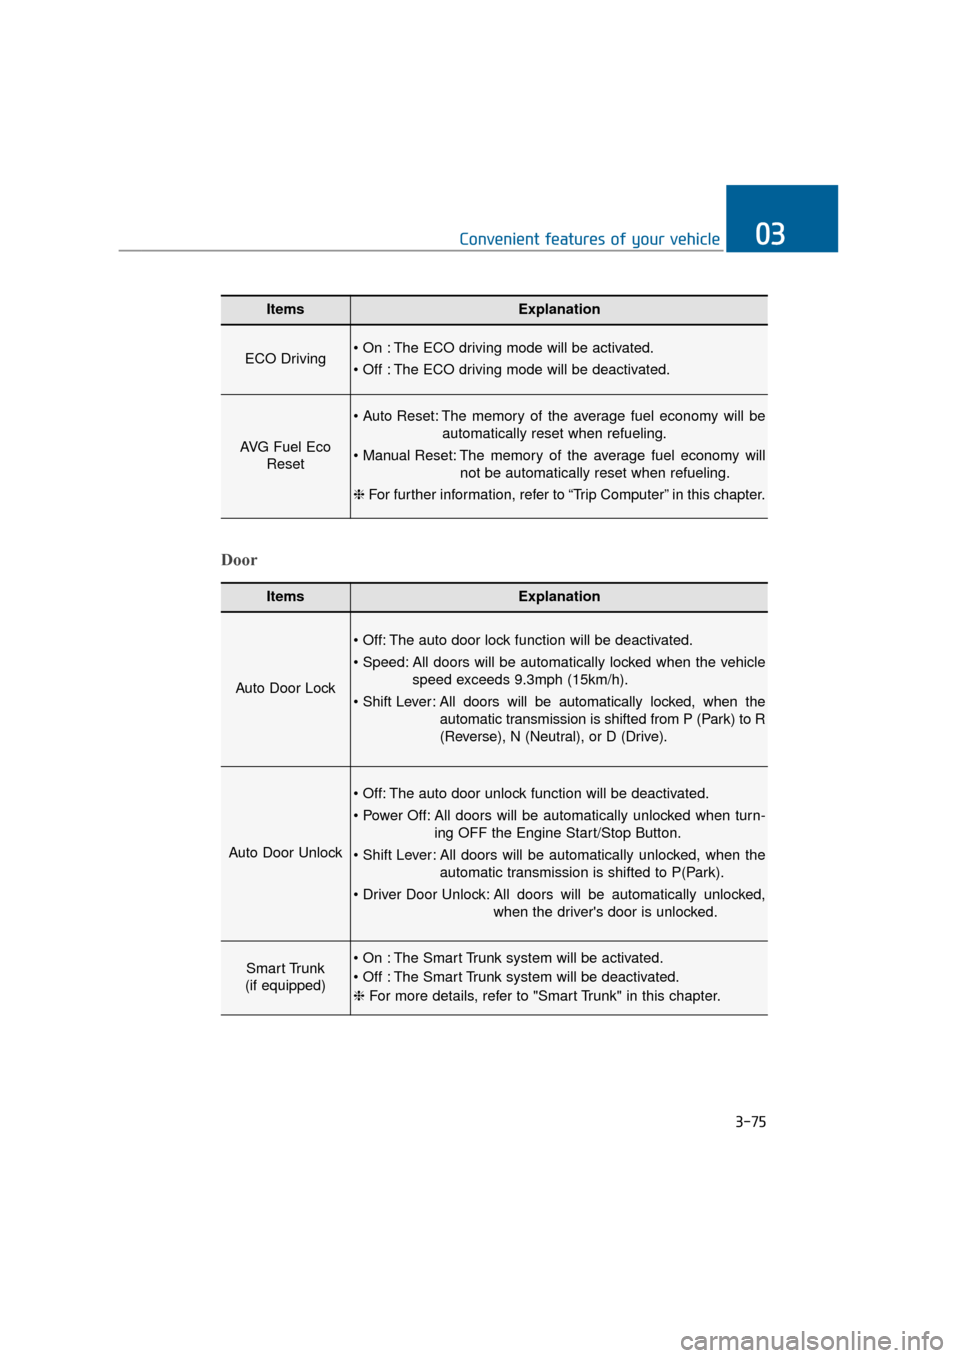
ItemsExplanation
ECO Driving The ECO driving mode will be activated.
The ECO driving mode will be deactivated.
AVG Fuel EcoReset
The memory of the average fuel economy will be
automatically reset when refueling.
The memory of the average fuel economy will not be automatically reset when refueling.
❈ For further information, refer to “Trip Computer” in this chapter.
ItemsExplanation
Auto Door Lock
The auto door lock function will be deactivated.
All doors will be automatically locked when the vehicle
speed exceeds 9.3mph (15km/h).
All doors will be automatically locked, when the
automatic transmission is shifted from P (Park) to R
(Reverse), N (Neutral), or D (Drive).
Auto Door Unlock
The auto door unlock function will be deactivated.
All doors will be automatically unlocked when turn- ing OFF the Engine Start/Stop Button.
All doors will be automatically unlocked, when the automatic transmission is shifted to P(Park).
All doors will be automatically unlocked, when the driver's door is unlocked.
Smart Trunk
(if equipped) The Smart Trunk system will be activated.
The Smart Trunk system will be deactivated.
❈ For more details, refer to "Smart Trunk" in this chapter.
Door
Page 175 of 477
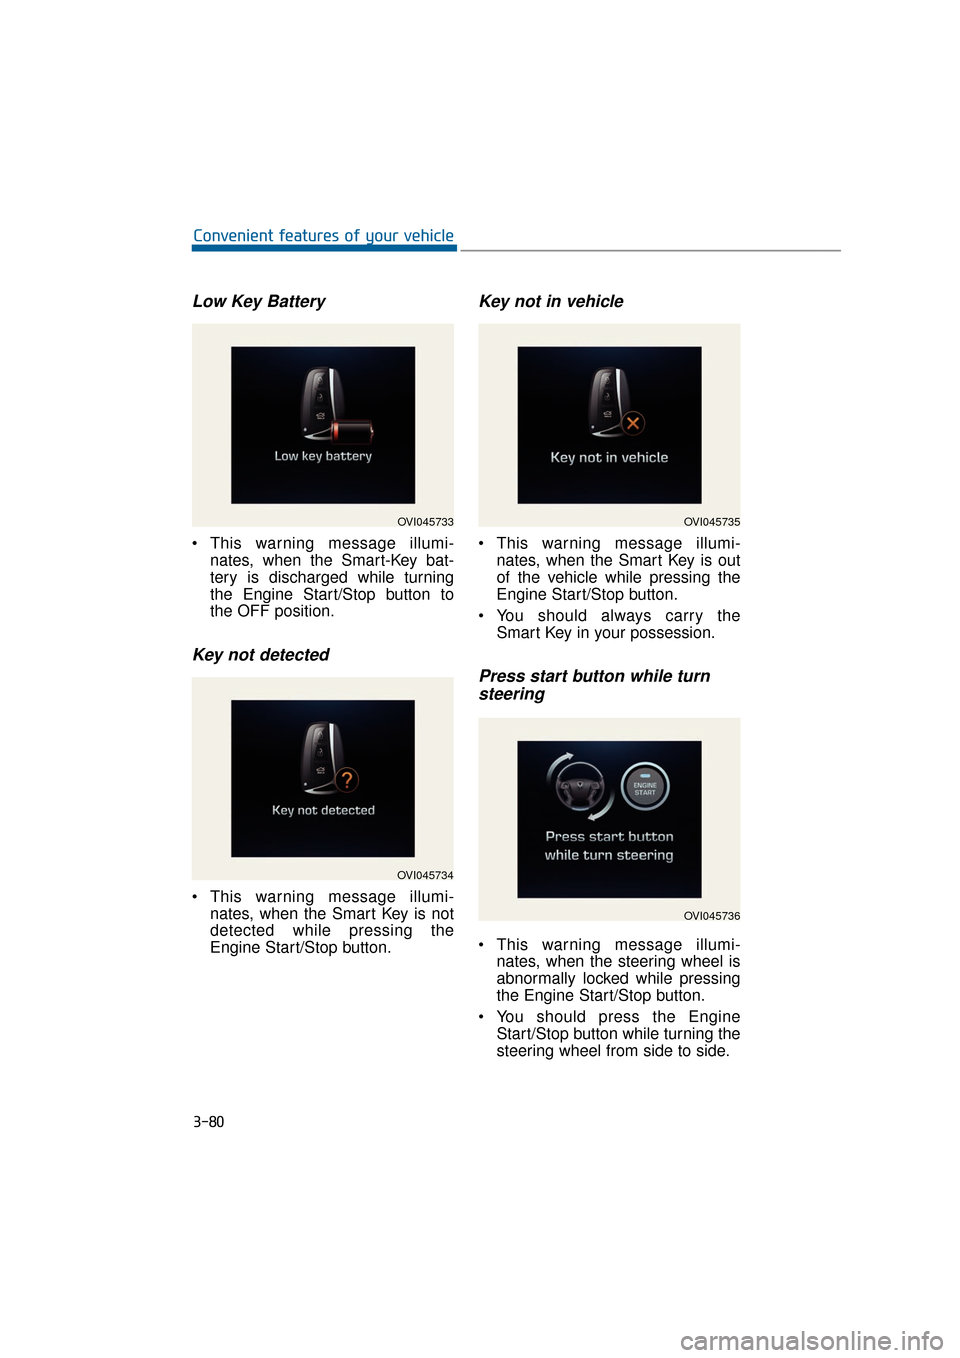
Low Key Battery
This warning message illumi-nates, when the Smart-Key bat-
tery is discharged while turning
the Engine Start/Stop button to
the OFF position.
Key not detected
This warning message illumi-nates, when the Smart Key is not
detected while pressing the
Engine Start/Stop button.
Key not in vehicle
This warning message illumi-nates, when the Smart Key is out
of the vehicle while pressing the
Engine Start/Stop button.
You should always carry the Smart Key in your possession.
Press start button while turnsteering
This warning message illumi-
nates, when the steering wheel is
abnormally locked while pressing
the Engine Start/Stop button.
You should press the Engine Start/Stop button while turning the
steering wheel from side to side.
3-80
Convenient features of your vehicle
OVI045733
OVI045734
OVI045735
OVI045736
Page 185 of 477
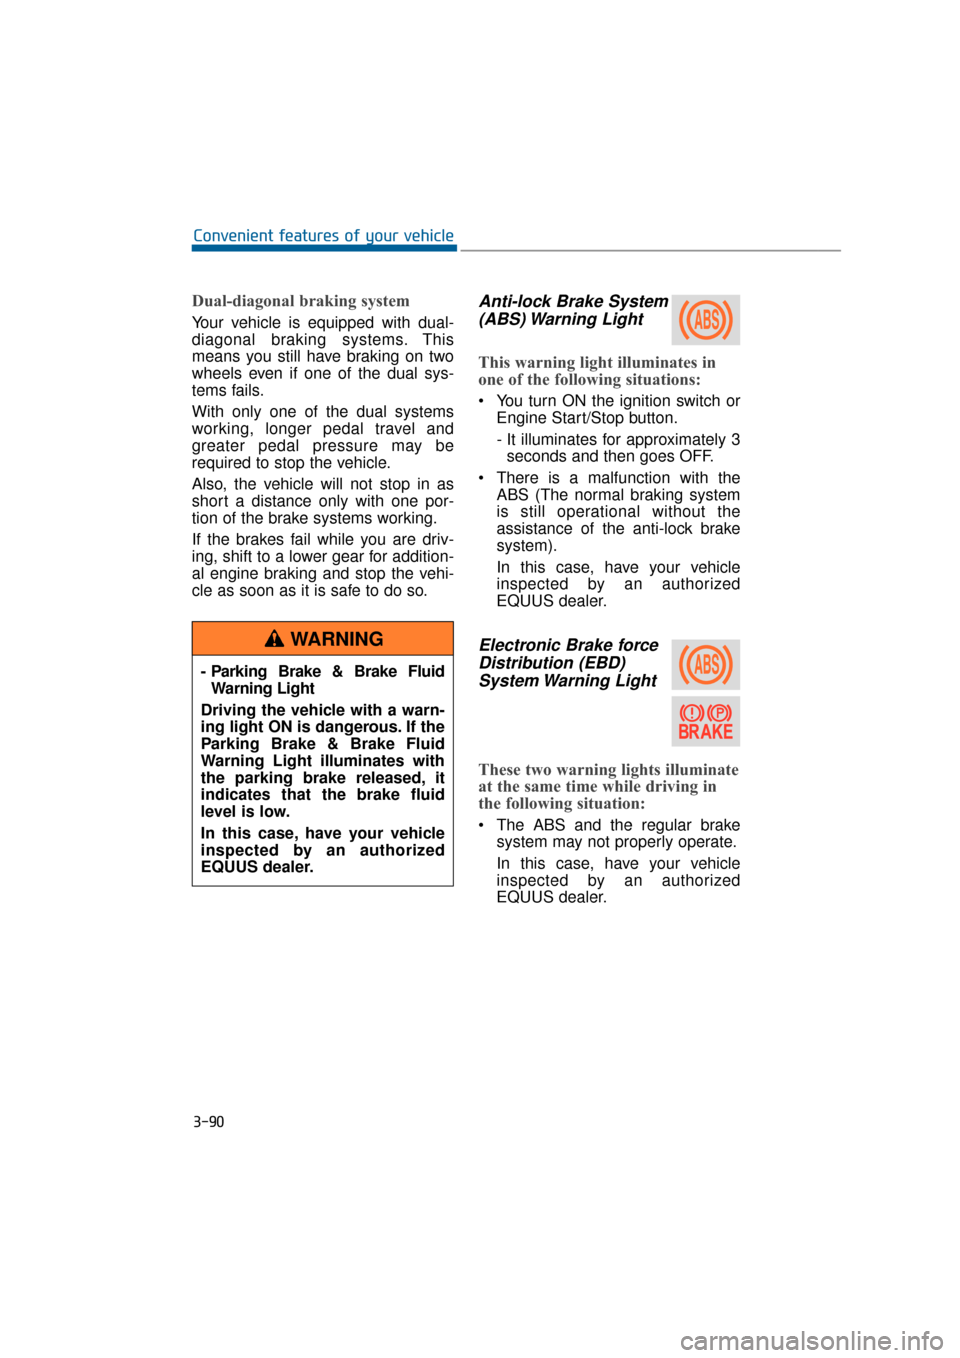
Dual-diagonal braking system
Your vehicle is equipped with dual-
diagonal braking systems. This
means you still have braking on two
wheels even if one of the dual sys-
tems fails.
With only one of the dual systems
working, longer pedal travel and
greater pedal pressure may be
required to stop the vehicle.
Also, the vehicle will not stop in as
short a distance only with one por-
tion of the brake systems working.
If the brakes fail while you are driv-
ing, shift to a lower gear for addition-
al engine braking and stop the vehi-
cle as soon as it is safe to do so.
Anti-lock Brake System(ABS) Warning Light
This warning light illuminates in
one of the following situations:
You turn ON the ignition switch or
Engine Start/Stop button.
- It illuminates for approximately 3seconds and then goes OFF.
There is a malfunction with the ABS (The normal braking system
is still operational without the
assistance of the anti-lock brake
system).
In this case, have your vehicle
inspected by an authorized
EQUUS dealer.
Electronic Brake forceDistribution (EBD)System Warning Light
These two warning lights illuminate
at the same time while driving in
the following situation:
The ABS and the regular brake
system may not properly operate.
In this case, have your vehicle
inspected by an authorized
EQUUS dealer.
3-90
Convenient features of your vehicle
- Parking Brake & Brake Fluid Warning Light
Driving the vehicle with a warn-
ing light ON is dangerous. If the
Parking Brake & Brake Fluid
Warning Light illuminates with
the parking brake released, it
indicates that the brake fluid
level is low.
In this case, have your vehicle
inspected by an authorized
EQUUS dealer.
WARNING
Page 200 of 477
Inoperable conditions of the
Parking Assist System
The Parking Assist System maynot properly operate, when:
1. Moisture is frozen over the sensor.
(It will operate normally again
when the frozen ice melts.)
2. The sensor is covered or blocked with foreign substances, such as
snow or water. (It will normally
operate again when the substance
is removed, and the sensor is no
longer blocked.)
3. The sensor is stained with foreign substances such as snow or
water. (The sensing range will
return to normal when foreign sub-
stances are removed.)
There is a possible malfunctionwith the Parking Assist Systemwhen:
1. The vehicle drives on uneven road
surfaces such as unpaved roads,
gravels, bumps, or slopes.
2. The sensor is interfered with objects, which generate excessive
noise, such as horns, motorcycle
engines, or truck air brakes.
3. Heavy rain or water is sprayed.
4. Wireless transmitters or mobile phones are near the sensor.
5. The sensor is covered with snow.
Detecting range may decrease when:
1. Outside air temperature is
extremely hot or cold.
2. The sensor cannot detect an object, as it is smaller than 39 in (1
m) or narrower than 5.5 in (14 cm)
in diameter.
The following objects may notbe recognized by the sensor:
1. A sharp or slim object, such as
ropes, chains or small poles.
2. An object, such as clothes, spongy material or snow, absorbs the sen-
sor frequency.
Information
1. The warning may not soundsequentially depending on the speed
and shapes of the objects detected.
2. The Parking Assist System may malfunction if the vehicle bumper
height or sensor installation is mod-
ified. Any unauthorized installment
of equipment or accessories may
also limit the sensor performance.
3. Sensor may not recognize objects within 12 in (30 cm), or it may mis-
calculate the distance.
4. When the sensor is frozen or stained with snow or water, the sensor may
be inoperative until the stains are
removed using a soft cloth.
5. Do not push, scratch or strike the sensor with any hard objects that
could damage the sensor surface.
This may damage the sensor.
i
3-105
Convenient features of your vehicle03
Page 204 of 477
Battery saver function
The purpose of this function is toprevent the battery from being dis-
charged. The system automatical-
ly turns OFF the parking lights
when the driver turns OFF the
engine and opens the driver's
door.
With this function, the parking lights are turned OFF automatical-
ly if the driver parks the vehicle on
the side of the road at night.
If necessary, in order to keep the
lights ON when the engine is
turned OFF, perform the follow-
ings:
1) Open the driver-side door.
2) Turn the parking lights ON and OFF again using the light
switch on the steering column.
Headlamp escort function
When you press the Engine
Start/Stop button to the ACC or OFF
position with the headlamps ON, the
headlamps (and/or tail lights) remain
ON for approximately 5 minutes.
However, when the driver’s door is
open and then closed, the head-
lamps are turned OFF after 15 sec-
onds.
The headlamps can be turned OFF
by pressing the lock button on the
Smart Key twice or turning the light
switch to the OFF or Auto position.
However, when you turn the light
switch to the Auto position, and when
it is dark outside, the headlamps will
not be turned OFF.
If the driver exit the vehicle
through other doors (except dri-
ver’s door), the battery saver func-
tion does not operate and the
headlamp escort function does
not turn OFF automatically.
Therefore, it discharges the bat-
tery. In this case, make sure to
turn OFF the lamp before exiting
the vehicle.
NOTICE
L LI
IG
G H
H T
TI
IN
N G
G
3-109
Convenient features of your vehicle03
Page 213 of 477
Do not use the interior lights for
an extended period of time when
the engine is OFF.
It may discharge the battery.
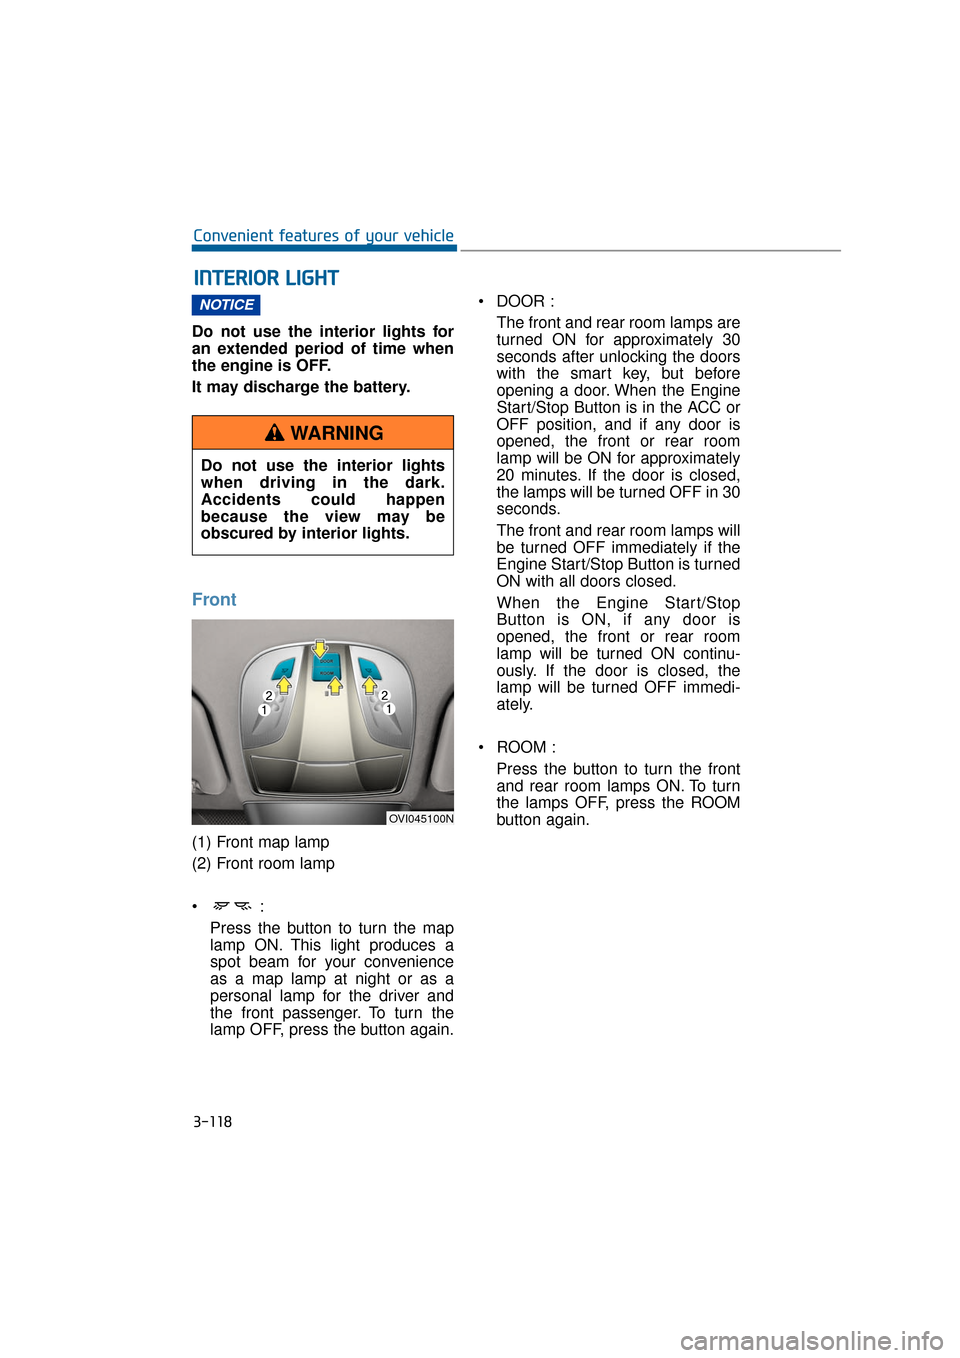
Front
(1) Front map lamp
(2) Front room lamp
Press the button to turn the map
lamp ON. This light produces a
spot beam for your convenience
as a map lamp at night or as a
personal lamp for the driver and
the front passenger. To turn the
lamp OFF, press the button again. DOOR :
The front and rear room lamps are
turned ON for approximately 30
seconds after unlocking the doors
with the smart key, but before
opening a door. When the Engine
Start/Stop Button is in the ACC or
OFF position, and if any door is
opened, the front or rear room
lamp will be ON for approximately
20 minutes. If the door is closed,
the lamps will be turned OFF in 30
seconds.
The front and rear room lamps will
be turned OFF immediately if the
Engine Start/Stop Button is turned
ON with all doors closed.
When the Engine Start/Stop
Button is ON, if any door is
opened, the front or rear room
lamp will be turned ON continu-
ously. If the door is closed, the
lamp will be turned OFF immedi-
ately.
ROOM : Press the button to turn the frontand rear room lamps ON. To turn
the lamps OFF, press the ROOM
button again.
NOTICE
I
I N
N T
TE
ER
R I
IO
O R
R
L
L I
IG
G H
H T
T
3-118
Convenient features of your vehicle
Do not use the interior lights
when driving in the dark.
Accidents could happen
because the view may be
obscured by interior lights.
WARNING
OVI045100N
Page 216 of 477
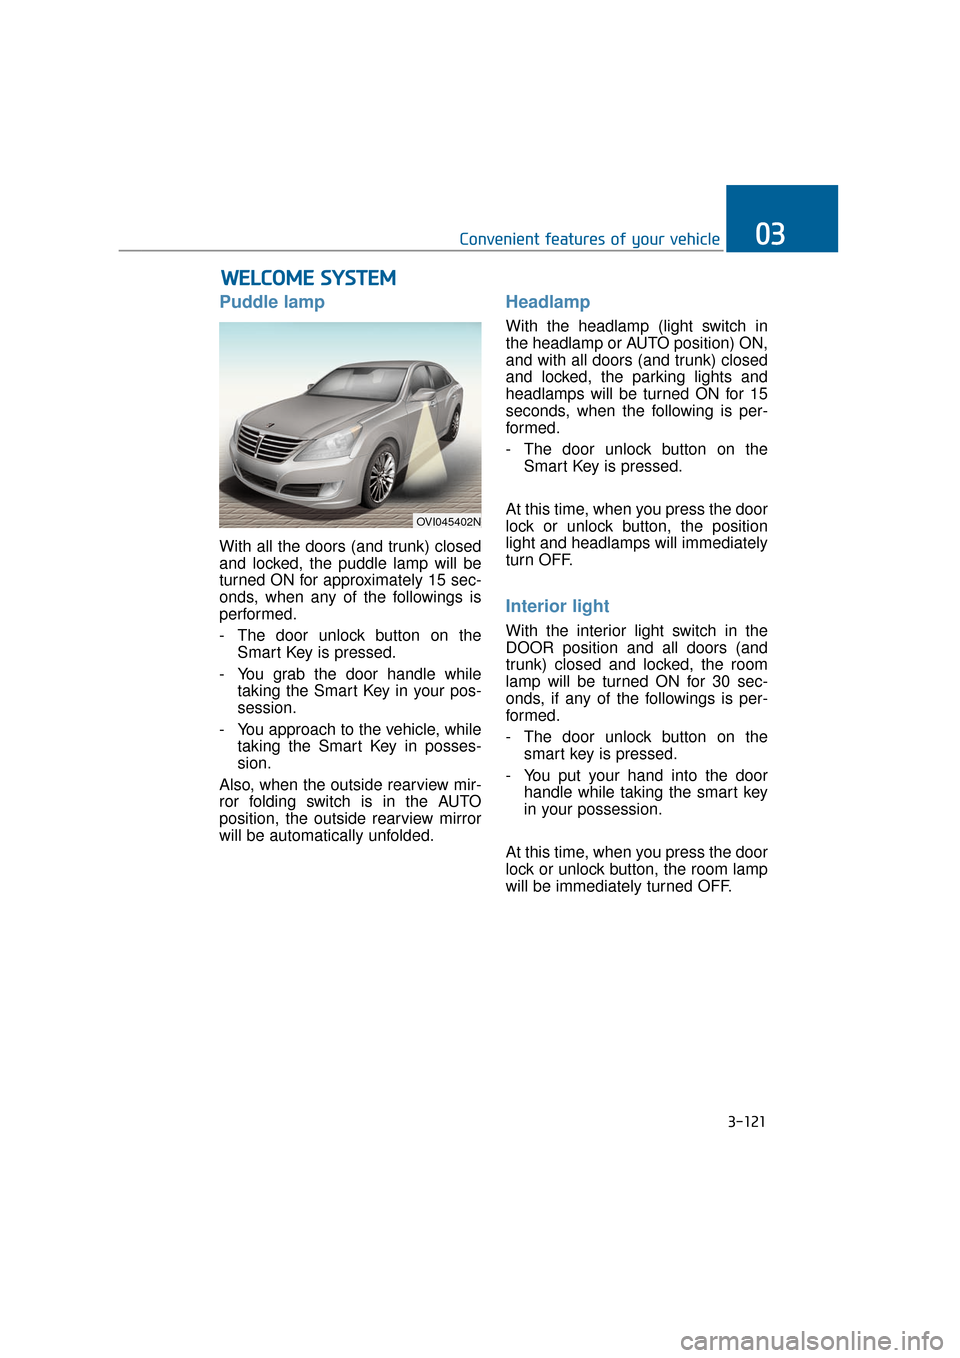
Puddle lamp
With all the doors (and trunk) closed
and locked, the puddle lamp will be
turned ON for approximately 15 sec-
onds, when any of the followings is
performed.
- The door unlock button on theSmart Key is pressed.
- You grab the door handle while taking the Smart Key in your pos-
session.
- You approach to the vehicle, while taking the Smart Key in posses-
sion.
Also, when the outside rearview mir-
ror folding switch is in the AUTO
position, the outside rearview mirror
will be automatically unfolded.
Headlamp
With the headlamp (light switch in
the headlamp or AUTO position) ON,
and with all doors (and trunk) closed
and locked, the parking lights and
headlamps will be turned ON for 15
seconds, when the following is per-
formed.
- The door unlock button on the Smart Key is pressed.
At this time, when you press the door
lock or unlock button, the position
light and headlamps will immediately
turn OFF.
Interior light
With the interior light switch in the
DOOR position and all doors (and
trunk) closed and locked, the room
lamp will be turned ON for 30 sec-
onds, if any of the followings is per-
formed.
- The door unlock button on the smart key is pressed.
- You put your hand into the door handle while taking the smart key
in your possession.
At this time, when you press the door
lock or unlock button, the room lamp
will be immediately turned OFF.
W W E
EL
LC
C O
O M
M E
E
S
S Y
Y S
ST
T E
EM
M
3-121
Convenient features of your vehicle03
OVI045402N
Page 221 of 477
3-126
Convenient features of your vehicle
Manual air heating and cooling
The heating and cooling system can
be controlled manually by pushing
buttons except the AUTO button. In
this case, the system works sequen-
tially according to the order of button
selection. When pressing any button
except the AUTO button in automatic
mode, the selected function will
changed not to be controlled auto-
matically.
1. Start the engine.
2. Set the mode, as desired.For improved heating and cooling
effects:- Heating:
- Cooling:
3. Set the temperature control, as desired.
4. Set the air intake control to the outside (fresh) air position.
5. Set the fan speed control, as desired.
6. If air conditioning operation is needed, turn the air conditioning
system ON.
Press the AUTO button in order to
convert to the full automatic mode of
the climate control system.
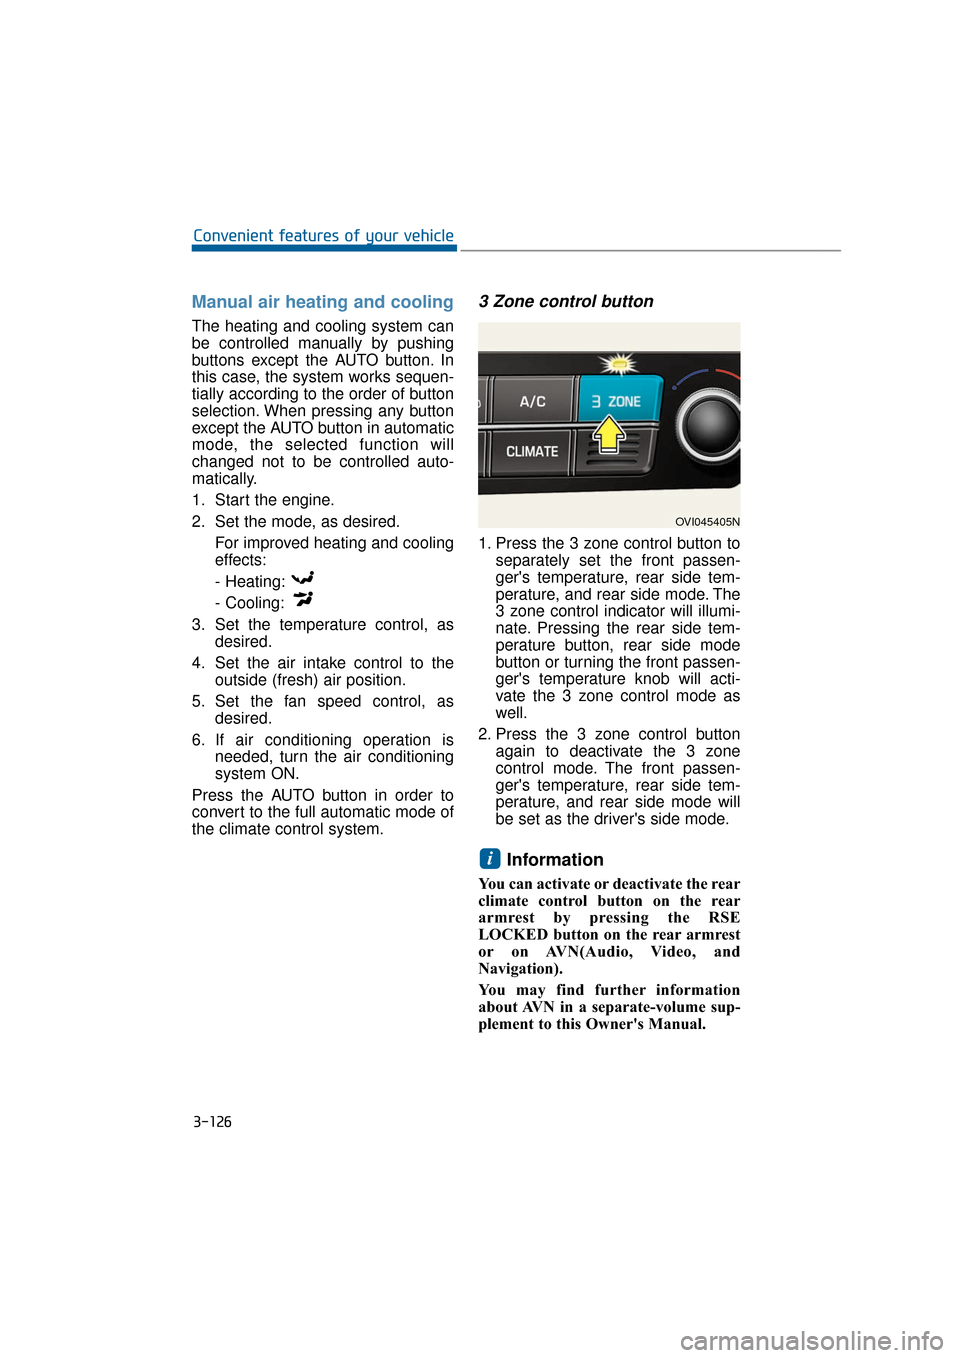
3 Zone control button
1. Press the 3 zone control button to separately set the front passen-
ger's temperature, rear side tem-
perature, and rear side mode. The
3 zone control indicator will illumi-
nate. Pressing the rear side tem-
perature button, rear side mode
button or turning the front passen-
ger's temperature knob will acti-
vate the 3 zone control mode as
well.
2. Press the 3 zone control button again to deactivate the 3 zone
control mode. The front passen-
ger's temperature, rear side tem-
perature, and rear side mode will
be set as the driver's side mode.
Information
You can activate or deactivate the rear
climate control button on the rear
armrest by pressing the RSE
LOCKED button on the rear armrest
or on AVN(Audio, Video, and
Navigation).
You may find further information
about AVN in a separate-volume sup-
plement to this Owner's Manual.
i
OVI045405N