buttons Hyundai Equus 2016 Owner's Manual
[x] Cancel search | Manufacturer: HYUNDAI, Model Year: 2016, Model line: Equus, Model: Hyundai Equus 2016Pages: 477, PDF Size: 16.25 MB
Page 32 of 477
2-5
Safety system of your vehicle02
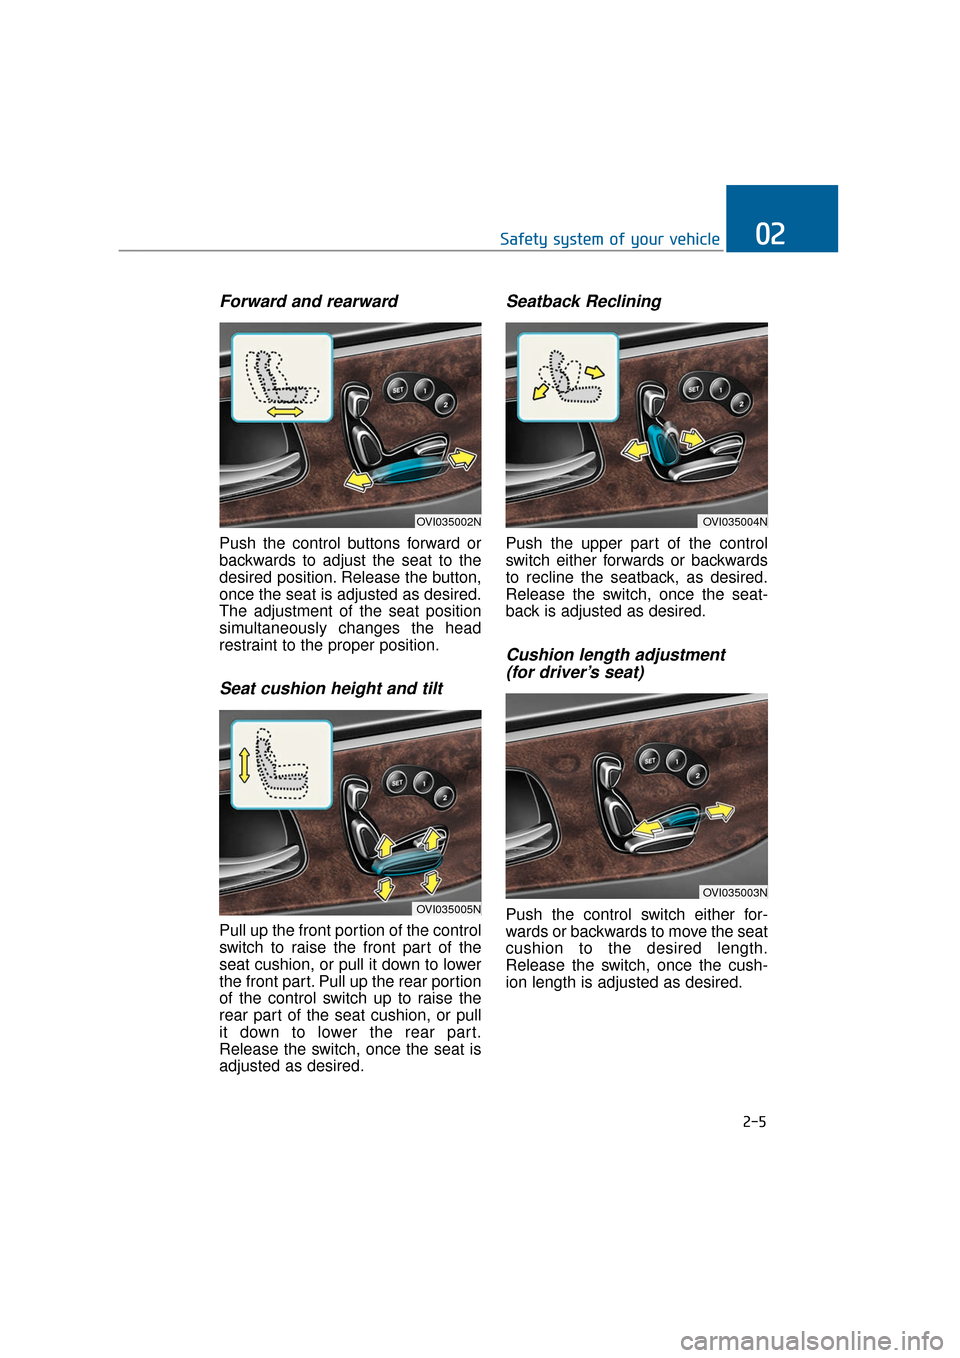
Forward and rearward
Push the control buttons forward or
backwards to adjust the seat to the
desired position. Release the button,
once the seat is adjusted as desired.
The adjustment of the seat position
simultaneously changes the head
restraint to the proper position.
Seat cushion height and tilt
Pull up the front portion of the control
switch to raise the front part of the
seat cushion, or pull it down to lower
the front part. Pull up the rear portion
of the control switch up to raise the
rear part of the seat cushion, or pull
it down to lower the rear part.
Release the switch, once the seat is
adjusted as desired.
Seatback Reclining
Push the upper part of the control
switch either forwards or backwards
to recline the seatback, as desired.
Release the switch, once the seat-
back is adjusted as desired.
Cushion length adjustment (for driver’s seat)
Push the control switch either for-
wards or backwards to move the seat
cushion to the desired length.
Release the switch, once the cush-
ion length is adjusted as desired.
OVI035002N
OVI035005N
OVI035004N
OVI035003N
Page 117 of 477
To Reset the Power Trunk
When the battery is discharged or
disconnected, or when the related
fuse is replaced or disconnected,
reset the Power Trunk as follows:
1. Set the shift lever in P(Park).
2. Manually close the trunk.
When the Power Trunk does not
properly operate after following the
above procedures, have the system
checked by an authorized EQUUS
dealer.
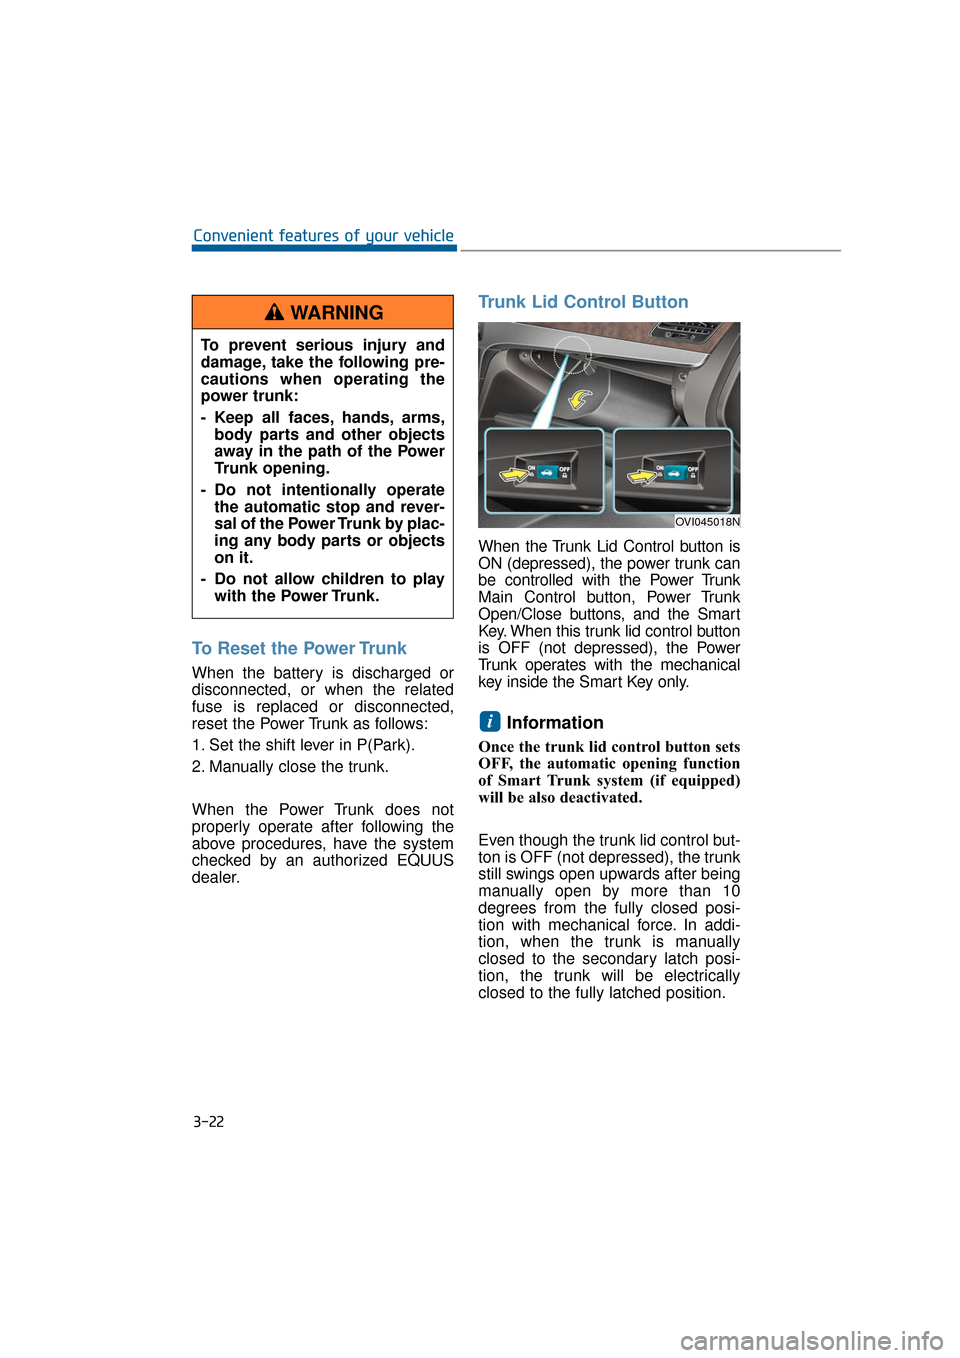
Trunk Lid Control Button
When the Trunk Lid Control button is
ON (depressed), the power trunk can
be controlled with the Power Trunk
Main Control button, Power Trunk
Open/Close buttons, and the Smart
Key. When this trunk lid control button
is OFF (not depressed), the Power
Trunk operates with the mechanical
key inside the Smart Key only.
Information
Once the trunk lid control button sets
OFF, the automatic opening function
of Smart Trunk system (if equipped)
will be also deactivated.
Even though the trunk lid control but-
ton is OFF (not depressed), the trunk
still swings open upwards after being
manually open by more than 10
degrees from the fully closed posi-
tion with mechanical force. In addi-
tion, when the trunk is manually
closed to the secondary latch posi-
tion, the trunk will be electrically
closed to the fully latched position.
i
3-22
Convenient features of your vehicleTo prevent serious injury and
damage, take the following pre-
cautions when operating the
power trunk:
- Keep all faces, hands, arms, body parts and other objects
away in the path of the Power
Trunk opening.
- Do not intentionally operate the automatic stop and rever-
sal of the Power Trunk by plac-
ing any body parts or objects
on it.
- Do not allow children to play with the Power Trunk.
WARNING
OVI045018N
Page 135 of 477
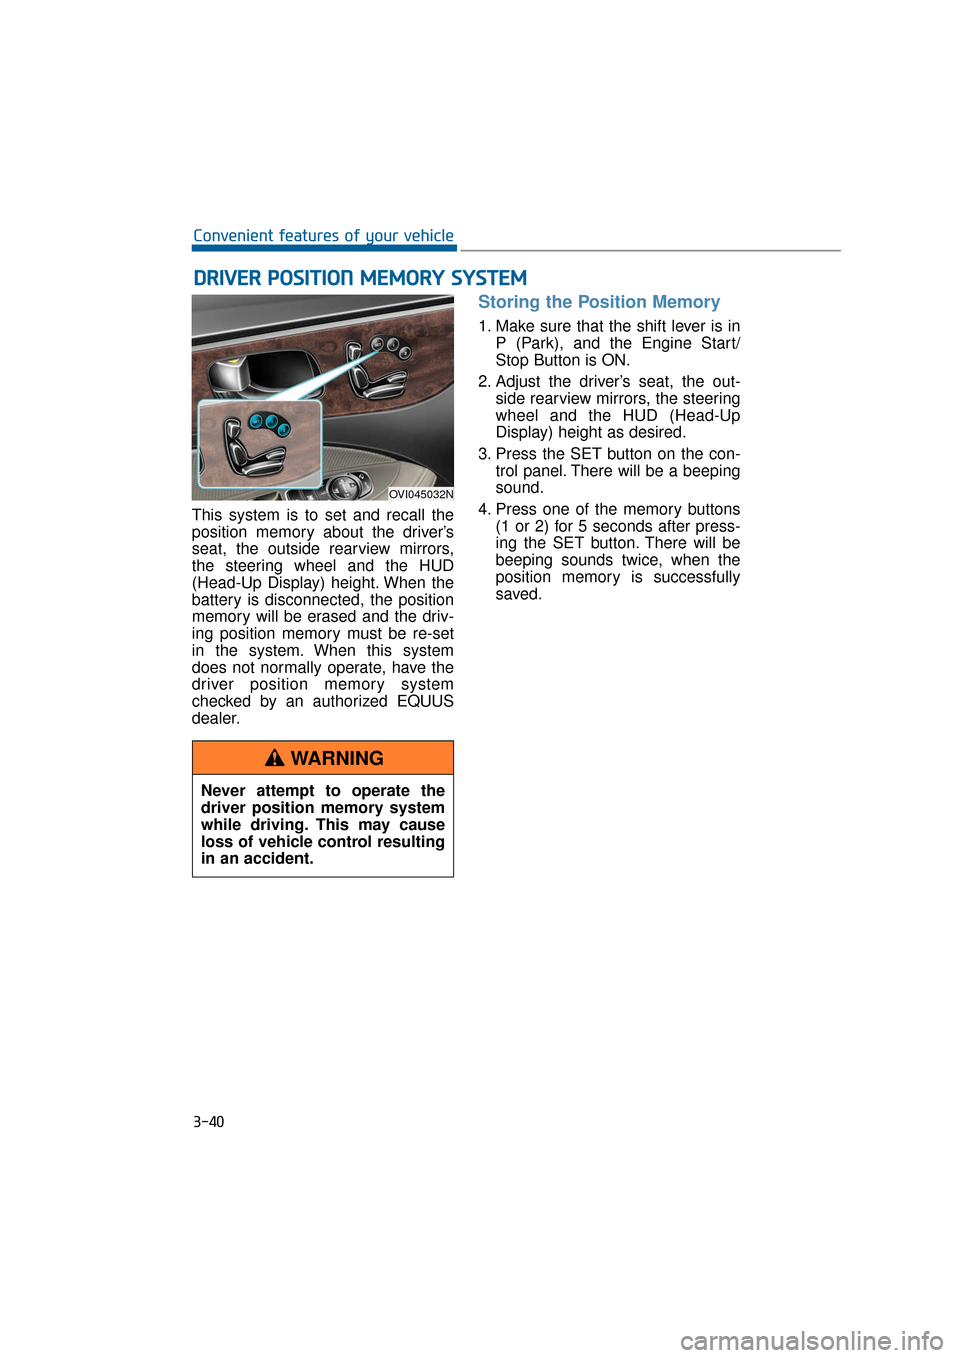
This system is to set and recall the
position memory about the driver’s
seat, the outside rearview mirrors,
the steering wheel and the HUD
(Head-Up Display) height. When the
battery is disconnected, the position
memory will be erased and the driv-
ing position memory must be re-set
in the system. When this system
does not normally operate, have the
driver position memory system
checked by an authorized EQUUS
dealer.
Storing the Position Memory
1. Make sure that the shift lever is inP (Park), and the Engine Start/
Stop Button is ON.
2. Adjust the driver’s seat, the out- side rearview mirrors, the steering
wheel and the HUD (Head-Up
Display) height as desired.
3. Press the SET button on the con- trol panel. There will be a beeping
sound.
4. Press one of the memory buttons (1 or 2) for 5 seconds after press-
ing the SET button. There will be
beeping sounds twice, when the
position memory is successfully
saved.
D DR
RI
IV
V E
ER
R
P
P O
O S
SI
IT
T I
IO
O N
N
M
M E
EM
M O
OR
RY
Y
S
S Y
Y S
ST
T E
EM
M
3-40
Convenient features of your vehicle
OVI045032N
Never attempt to operate the
driver position memory system
while driving. This may cause
loss of vehicle control resulting
in an accident.
WARNING
Page 136 of 477
Recalling the Position Memory
1. Check that the shift lever is in P(Park) and the Engine Start/Stop
button is ON.
2. Press the memory button (1 or 2) to recall the desired position.
There will be a beeping sound.
Then, the driver’s seat, outside
rearview mirrors, steering wheel
and HUD (Head-Up Display)
height will be automatically adjust-
ed, as set in the memory.
While the pre-set position is being
recalled, pressing one of the control
buttons for the driver’s seat, the out-
side rearview mirror, or the steering
wheel will stop the movement of that
component in that position. Other
components will be continuously
adjusted, as set in the memory.
Easy Access Function
When the engine is turned OFF, and
when the driver exits from the vehi-
cle, the steering wheel moves away
from the driver, and the seat moves
backwards. After entering the vehi-
cle, the steering wheel will move
toward the driver. After turning the
Engine Start/Stop button to the ACC
position, the seat will move forwards.
You can activate or deactivate the
Easy Access Function in the User
Setting Mode. Refer to "User Setting
Mode" in this chapter.
3-41
Convenient features of your vehicle03
Use caution when recalling the
position memory while sitting in
the vehicle. Immediately push
the seat position control knob,
when the seat moves too far in
any direction.
WARNING
Page 140 of 477
Automatic-Dimming Night Vision
Safety™ (NVS®) Mirror
The NVS®Mirror in your vehicle is
the most advanced mirror to reduce
annoying glare in the rearview mirror
in any driving situation. For more
information regarding NVS
®mirrors
and other applications, please visit
the Gentex website:
www.gentex.com
Information
The NVS®Mirror automatically
reduces glare while driving based
upon light levels detected in front of
the vehicle and from the rear of the
vehicle. These light sensors are visible
through openings in the front and rear
of the mirror case. Any object that
obstructs either light sensor will
degrade the automatic dimming con-
trol function.
Automatic-dimming function
Your mirror automatically dims the
glare upon detecting it from the vehi-
cles traveling behind you. The auto-
matic-dimming function can be con-
trolled by the Dimming ON/OFF
Button:
1. Pressing and holding the button for 3 seconds turns OFF the
automatic-dimming function,
which is indicated by the turned-
OFF green light of the Status
Indicator LED.
2. Re-pressing and holding the button for 3 seconds turns ON the
automatic-dimming function which
is indicated by the turned-ON
green light of the Status Indicator
LED.
The mirror defaults to the ON posi-
tion whenever the vehicle is started.
Z-Nav™ Compass Display
The NVS™ Mirror in your vehicle is
also equipped with a Z-Nav™
Compass that shows the vehicle
Compass heading on the Display
Window in the 8 cardinals headings
(N, NE, E, SE, etc.).
Compass function
The Compass can be turned
ON/OFF and remember the last
heading information when the igni-
tion is cycled. To turn ON/OFF the
display function:
1. Press and release the button within 1 second to turn OFF the
display function.
2. Press and release the button again within 1 second to turn ON
the display back.
Additional options can be set by
pressing and holding buttons in
sequences.
There is a difference between the
magnetic north and the actual north.
The compass in the mirror can offset
this difference by knowing the
Magnetic Zone in which it is operat-
ing. This is set either by the dealer or
by the user. The operating Zone
Numbers for North America are
shown in the figure on the next page.
i
3-45
Convenient features of your vehicle03
Page 142 of 477
There are some conditions that can
cause changes to the vehicle mag-
nets, such as installing a ski rack or
a CB antenna. Body repair work on
the vehicle can also cause changes
to the vehicle's magnetic field. In
these situations, the compass will
need to be re-calibrated to quickly
correct these changes. To re-cali-
brate the compass:
1. Press and hold the button formore than 9 seconds. When the
compass memory is deleted, a let-
ter "C" will appear on the display.
2. To calibrate the compass, drive the vehicle in a circle twice at less
than 5 mph (8 km/h).
Integrated HomeLink®Wireless
Control System
The HomeLink®Wireless Control
System provides a convenient way to
replace up to three hand-held
radiofrequency (RF) transmitters
with a single built-in device. This
innovative feature will learn the radio
frequency codes of most current
transmitters to operate devices such
as gate operators, garage door
openers, entry door locks, security
systems, and even home lighting.
Both standard and rolling code-
equipped transmitters can be pro-
grammed by following the outlined
procedures. Additional HomeLink
®
information can be found at:
www.homelink.com or by calling 1-
800-355-3515. Retain the original transmitter of the
RF device you programmed for use
in other vehicles as well as for future
HomeLink
®programming. It is also
suggested that upon the sale of the
vehicle, the programmed HomeLink
®
buttons be erased for security pur-
poses.
3-47
Convenient features of your vehicle03
Before programming
HomeLink®to a garage door
opener or gate operator, make
sure that people and objects are
out of the way from the device
to prevent potential harm or
damage. Do not use HomeLink
®
with any garage door opener
that lacks the safety stop and
reverse features required by
U.S. federal safety standards
(this includes any garage door
opener model manufactured
before April 1, 1982). A garage
door that cannot detect an
object - signaling the door to
stop and reverse - does not
meet current U.S. federal safety
standards. Using a garage door
opener without these features
increases the risk of serious
injury or death.
WARNING
Page 143 of 477
Programming HomeLink®
Information
• When programming a garage dooropener, it is advised to park the
vehicle outside of the garage.
• It is recommended to replace the hand-held transmitter battery of the
device being programmed to
HomeLink
®for quicker training
and accurate transmission of the
radio-frequency signal.
• Some vehicles may require the igni- tion switch to be turned to the sec-
ond (or "accessories") position for
programming and/or operation of
HomeLink.
• In the event that there are still pro- gramming difficulties or questions
after following the programming
steps listed below, contact
HomeLink
®at: www.homelink.com
or 1-800-355-3515. Programming
To train most devices, follow these
instructions:
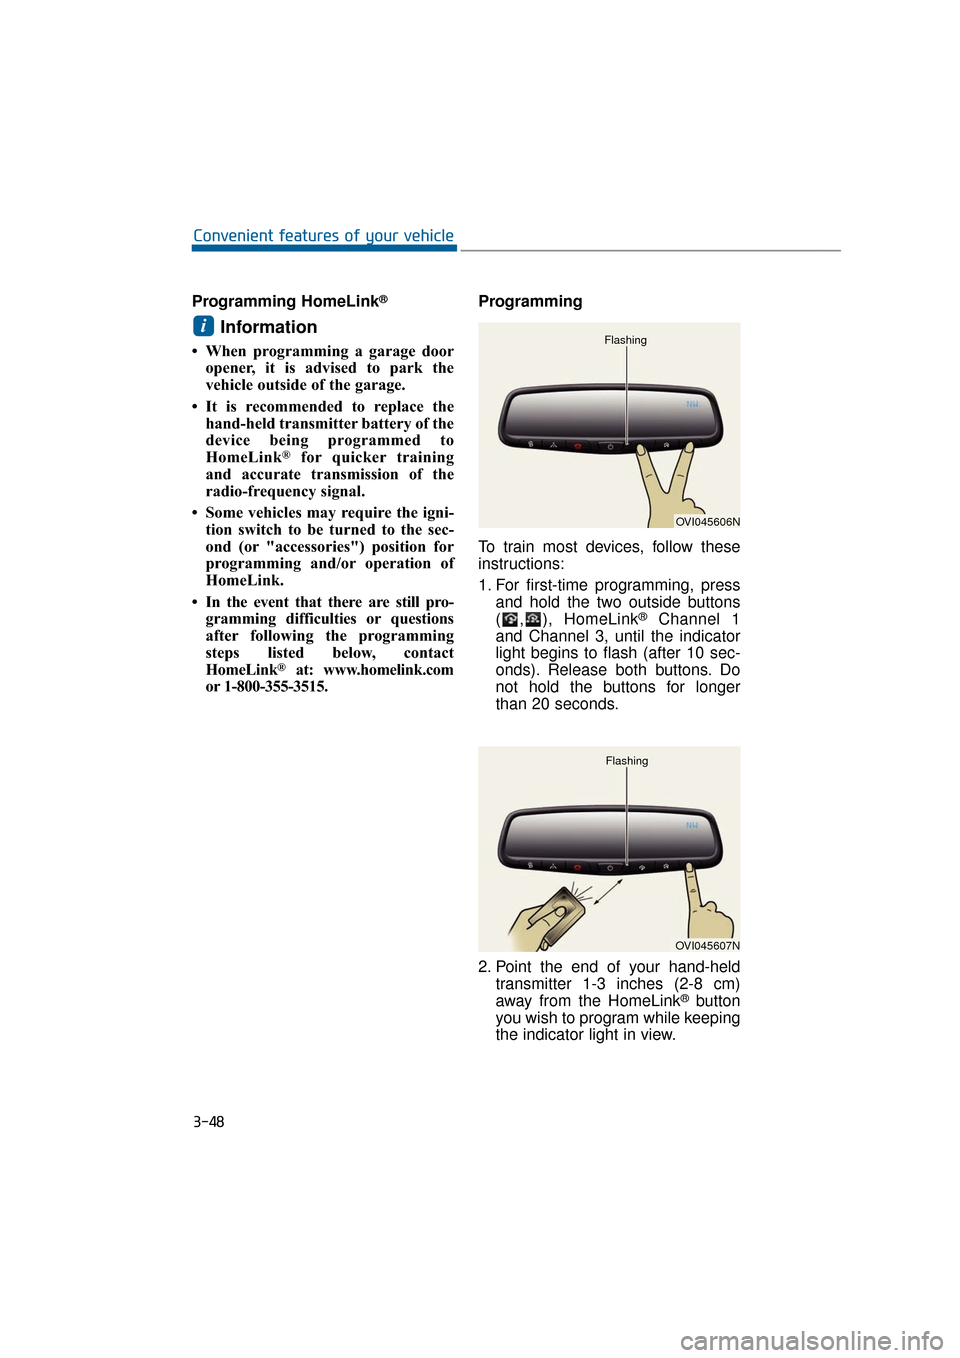
1. For first-time programming, press
and hold the two outside buttons
( , ), HomeLink
®Channel 1
and Channel 3, until the indicator
light begins to flash (after 10 sec-
onds). Release both buttons. Do
not hold the buttons for longer
than 20 seconds.
2. Point the end of your hand-held transmitter 1-3 inches (2-8 cm)
away from the HomeLink
®button
you wish to program while keeping
the indicator light in view.
i
3-48
Convenient features of your vehicle
OVI045606N
Flashing
OVI045607N
Flashing
Page 144 of 477
3. Simultaneously press and holdboth the HomeLink®and handheld
transmitter buttons until the
HomeLink
®indicator changes
from slow flashing to rapid flash-
ing. Now you may release both the
HomeLink
®and hand-held trans-
mitter buttons.
Information
Some devices may require you to
replace this Programming step 3 with
procedures noted in the "Gate
Operator/Canadian Programming"
chapter. When the HomeLink
®indica-
tor does not change to rapid flashing
after performing these steps, contact
HomeLink
®at www.homelink.com.
4. Firmly press, hold for 5 seconds and release the programmed
HomeLink
®button up to two sep-
arate times to activate the door.
When the door does not activate,
press and hold the just-pro-
grammed HomeLink
®button and
observe the indicator.
minated, programming is com-
plete. Your device will activate by
pressing and releasing the
HomeLink
®button.
ly for 2 seconds and then turns to
a constant light, continue with
"Programming" steps 5-7 to com-
plete the programming of a rolling
code-equipped device (most
commonly a garage door open-
er). 5. At the garage door opener receiv-
er (motor-head unit) in the
garage, find the "learn" or "smart"
button. This can usually be found
where the hanging antenna wire
is attached to the motor-head
unit.
6. Firmly press and release the "learn" or "smart" button. (The
name and color of the button vary
by manufacturer). Wait for 30 sec-
onds before starting the step 7.
7. Return to the vehicle. Firmly press and hold the programmed
HomeLink
®button for 2 seconds.
Then release it. Repeat this
"press/hold/release" sequence
for the second time. Depending
on the brand of the garage door
opener (or other rolling code
equipped device), repeat this
sequence for the third time to
complete the programming
process.
HomeLink
®should now activate your
rolling code equipped device.
i
3-49
Convenient features of your vehicle03
Page 145 of 477
Gate operator & Canadian
programming
During programming, your handheld
transmitter may automatically stop
transmitting. Continue to press the
Integrated HomeLink
®Wireless
Control System button (refer to the
steps 2 to 3 in the Programming part)
while you press and re-press
("cycle") your handheld transmitter
every two seconds until the frequen-
cy signal is learned. The indicator
light will flash slowly and then rapidly
after a few seconds when success-
fully trained.
Operating HomeLink
®
To operate, simply press and release
the programmed HomeLink®button.
Activation will now occur for the
trained devices (i.e. garage door
opener, gate operator, security sys-
tem entry door lock, home/office
lighting, etc.). For convenience, the
hand-held transmitter of the device
may also be used at any time. Reprogramming a single
HomeLink
®button
To program a device to HomeLink
®
using a HomeLink®button previous-
ly trained, follow these steps:
1. Press and hold the desired HomeLink
®button. DO NOT
release the button.
2. The indicator light will begin to flash after 20 seconds. Without
releasing the HomeLink
®button,
proceed to the "Programming"
step 2.
For more questions or comments,
contact HomeLink
®at www.home-
link.comor 1-800-355-3515.
Erasing HomeLink
®buttons
An individual programming cannot
be erased respectively. However, all
three programming can be erased at
the same time by following below
steps;
1. Press and hold the two outer HomeLink
®buttons until the indi-
cator light begins to flash after 10
seconds.
2. Release both buttons. Do not hold for longer than 20 seconds.
The Integrated HomeLink
®Wireless
Control System is now in the training
(learning) mode and can be pro-
grammed at any time by following the
appropriate steps as in the
"Programming".
FCC ID: NZLTLMHL4
IC: 4112A-TLMHL4
3-50
Convenient features of your vehicle
Page 147 of 477
Automatic-Dimming Night Vision
Safety™ (NVS®) Mirror
The NVS®Mirror in your vehicle is
the most advanced mirror to reduce
annoying glare in the rearview mirror
in any driving situation. For more
information regarding NVS
®mirrors
and other applications, please visit
the Gentex website:
www.gentex.com
The NVS
®Mirror automatically
dims glare in driving conditions
based upon light levels detected
in front of the vehicle and from the
rear of the vehicle. These light
sensors are visible through open-
ings in the front and rear of the
mirror case. Any object that
obstructs either light sensor will
degrade the automatic dimming
control function.
Automatic-dimming function
Your mirror automatically dims the
glare upon detecting it from the vehi-
cles traveling behind you. The auto-
matic-dimming function can be con-
trolled by the Dimming ON/OFF
Button:
1. Pressing and hold the button for 3 seconds turns OFF the automat-
ic-dimming function, which is indi-
cated by the turned-OFF green
light of the Status Indicator LED.
2. Pressing and hold the button for 3 seconds again turns ON the
automatic-dimming function which
is indicated by the turned-ON
green light of the Status Indicator
LED.
Information
The mirror resets to be ON whenever
the vehicle is started.
Z-Nav™ Compass Display
The NVS™ Mirror in your vehicle is
also equipped with a Z-Nav™
Compass that shows the vehicle
Compass heading on the Display
Window in the 8 cardinals headings
(N, NE, E, SE, etc.).
Compass function
The Compass can be turned
ON/OFF and remember the last
heading information when the igni-
tion is cycled. To turn ON/OFF the
display function:
1. Press and release the buttonwithin 1 second to turn OFF the
display function.
2. Press and release the button again within 1 second to turn ON
the display back.
Additional options can be set by
pressing and holding buttons in
sequences, as detailed below.
There is a difference between the
magnetic north and the actual north.
The compass in the mirror can offset
this difference by knowing the
Magnetic Zone in which it is operat-
ing. This is set either by the dealer or
by the user. The operating Zone
Numbers for North America are
shown in the figure on the next page.
i
NOTICE
3-52
Convenient features of your vehicle