turn signal HYUNDAI GENESIS G80 2013 User Guide
[x] Cancel search | Manufacturer: HYUNDAI, Model Year: 2013, Model line: GENESIS G80, Model: HYUNDAI GENESIS G80 2013Pages: 432, PDF Size: 29.24 MB
Page 194 of 432
4115
Features of your vehicle
✽
✽NOTICE
• If you install an aftermarket HID
headlamp, your vehicle's audio and
electronic device may malfunction.
• Prevent chemicals such as perfume, cosmetic oil, sun cream, hand cleaner,
and air freshener from contacting the
interior parts because they may cause
damage or discoloration.
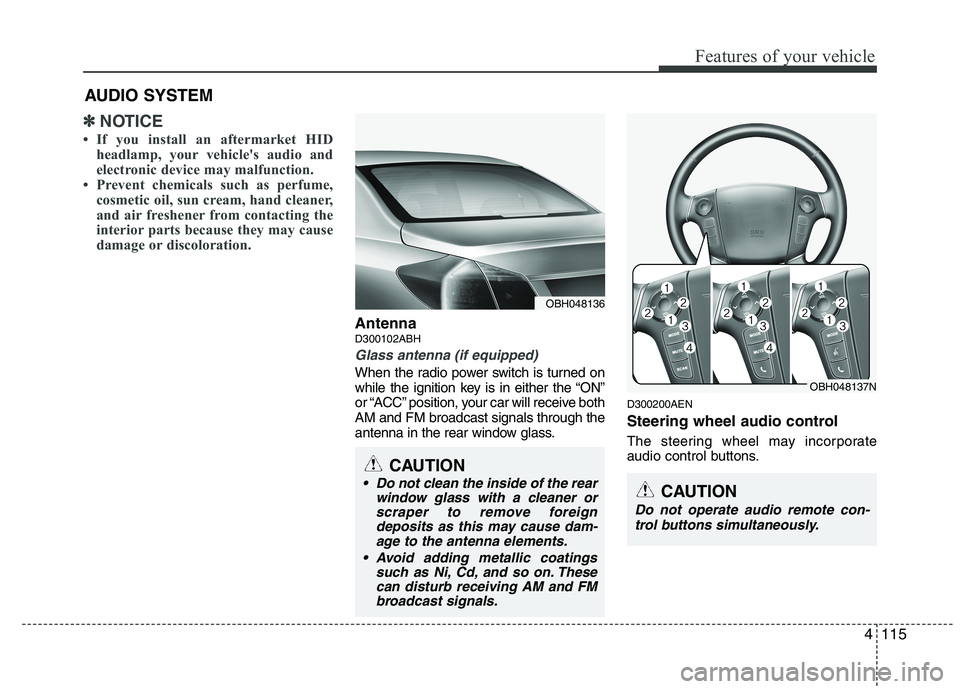
AntennaD300102ABH
Glass antenna (if equipped)
When the radio power switch is turned on
while the ignition key is in either the “ON”
or “ACC” position, your car will receive both
AM and FM broadcast signals through the
antenna in the rear window glass.
D300200AEN
Steering wheel audio control
The steering wheel may incorporate
audio control buttons.
AUDIO SYSTEM
OBH048136
CAUTION
• Do not clean the inside of the rear
window glass with a cleaner orscraper to remove foreigndeposits as this may cause dam-age to the antenna elements.
Avoid adding metallic coatings such as Ni, Cd, and so on. Thesecan disturb receiving AM and FMbroadcast signals.
OBH048137N
CAUTION
Do not operate audio remote con-
trol buttons simultaneously.
Page 227 of 432
Features of your vehicle
148 4
HD RADIOTMINFORMATION
Licensing information
HD RadioTMTechnology is Manufactured
Under License From iBiquity Digital
Corporation. U.S. and Foreign Patents.
HD Radio
TMand the HD and HD Radio
logos are proprietary trademarks of
iBiquity Digital Corporation.
Availability information
HD RadioTM reception is available in the
United States, including Alaska and
Hawaii.
What is HD RadioTMtechnology?
The vehicle audio system (if equipped) is
able to receive standard analog FM/AM
radio broadcasting as well as digital HD
Radio
TMFM/AM broadcasting.
HD RadioTMtechnology provides digital
and analog reception using existing FM
and AM broadcasting frequencies.
Currently, radio stations broadcasting an
HD Radio
TMsignal are operating in a
hybrid mode of both, analog and digital, in
order to reach both receivers. In both
modes, analog and digital, the broadcast-
ed program contents are the same(except
during multicasting, see below).
Eventually, as analog receivers are
replaced by digital ones, radio stations
may be able to turn off their analog
broadcasting and use only the digital
broadcasting.
Multicasting
HD RadioTMFM stations are able to broad-
cast multiple digital program
streams(channels) over a single FM fre-
quency. For example, a HD Radio
TMFM
station can run a main channel of music
and a sub channel of news(or even two dif-
ferent music channels) at one frequency.
Only the program content of the main
channel is in broadcasted analog.
Page 292 of 432
553
Driving your vehicle
The LDWS does not operate
when:
The driver turns on the turn signal to
change lane.
However, when the hazard warning
flasher is operating, the LDWS oper-
ates normally.
Operating the wiper switch with HI
mode due to heavy rain.
Driving on the lane line.
✽ ✽
NOTICE
To change lane, operate the turn signal
switch then change the lane.
The LDWS may not warn you even
if the vehicle leaves the lane, or
may warn you even if the vehicle
does not leave the lane when:
The lane can't be visible due to snow,
rain, stain, a puddle or many other
things.
The brightness outside changes sud-
denly.
Not turning on the headlights at night
or in a tunnel.
Difficult to distinguish the color of the
lane marking from the road.
Driving on a steep grade or a curve.
Light reflects from the water on the
road.
The lens or windshield is stained with
foreign matter.
The sensor cannot detect the lane
because of fog, heavy rain or heavy
snow.
The surrounding of the inside rear view
mirror temperature is high due to a
direct sun light.
The lane is very wide or narrow.
The lane line is damaged or indistinct.
A shadow is on the lane line by a medi-
an strip.
There is a mark that looks like lane line.
There is a boundary structure. The distance from vehicle ahead is
very short or the vehicle ahead drives
hiding the lane line.
The vehicle shakes heavily.
The lane number increases or
decreases or the lane lines are cross-
ing.
Putting something on the dashboard.
Driving with the sun in front of you.
Driving in areas under construction.
The lane line is more than two.
Page 311 of 432
What to do in an emergency
2 6
ROAD WARNING
F010100AUN
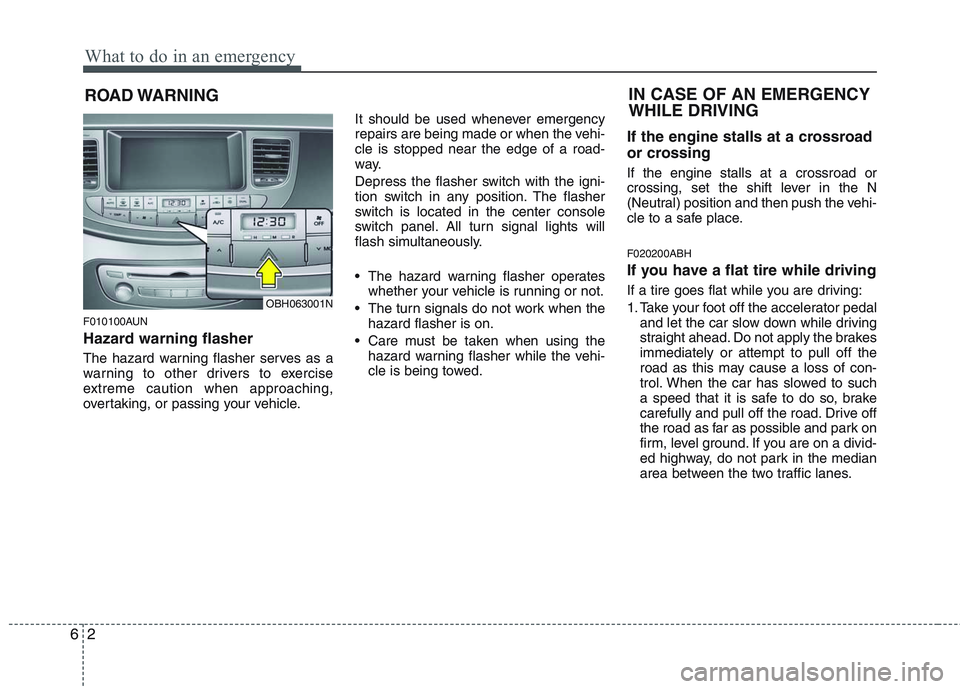
Hazard warning flasher
The hazard warning flasher serves as a
warning to other drivers to exercise
extreme caution when approaching,
overtaking, or passing your vehicle.It should be used whenever emergency
repairs are being made or when the vehi-
cle is stopped near the edge of a road-
way.
Depress the flasher switch with the igni-
tion switch in any position. The flasher
switch is located in the center console
switch panel. All turn signal lights will
flash simultaneously.
• The hazard warning flasher operates
whether your vehicle is running or not.
The turn signals do not work when the
hazard flasher is on.
Care must be taken when using the
hazard warning flasher while the vehi-
cle is being towed.
If the engine stalls at a crossroad
or crossing
If the engine stalls at a crossroad or
crossing, set the shift lever in the N
(Neutral) position and then push the vehi-
cle to a safe place.
F020200ABH
If you have a flat tire while driving
If a tire goes flat while you are driving:
1. Take your foot off the accelerator pedal
and let the car slow down while driving
straight ahead. Do not apply the brakes
immediately or attempt to pull off the
road as this may cause a loss of con-
trol. When the car has slowed to such
a speed that it is safe to do so, brake
carefully and pull off the road. Drive off
the road as far as possible and park on
firm, level ground. If you are on a divid-
ed highway, do not park in the median
area between the two traffic lanes.
IN CASE OF AN EMERGENCY
WHILE DRIVING
OBH063001N
Page 317 of 432
What to do in an emergency
8 6
Please note that the TPMS is not a
substitute for proper tire maintenance,
and it is the driver’s responsibility to
maintain correct tire pressure, even if
under-inflation has not reached the
level to trigger illumination of the
TPMS low tire pressure telltale.
Your vehicle has also been equipped
with a TPMS malfunction indicator to
indicate when the system is not oper-
ating properly. The TPMS malfunction
indicator is provided by a separate tell-
tale, which displays the symbol
"TPMS" when illuminated. When the
malfunction indicator is illuminated,
the system may not be able to detect
or signal low tire pressure as intended.
TPMS malfunctions may occur for a
variety of reasons, including the instal-
lation of replacement or alternate tires
or wheels on the vehicle that prevent
the TPMS from functioning properly.
Always check the TPMS malfunction
telltale after replacing one or more
tires or wheels on your vehicle to
ensure that the replacement or alter-
nate tires and wheels allow the TPMS
to continue to function properly.✽ ✽
NOTICE
If the TPMS, Low Tire Pressure tell-
tale does not illuminate for 3 sec-
onds when the ignition switch is
turned to the ON position or engine
is running, or if it remains illuminat-
ed after coming on for approximate-
ly 3 seconds, take your car to your
nearest authorized HYUNDAI deal-
er and have the system checked.
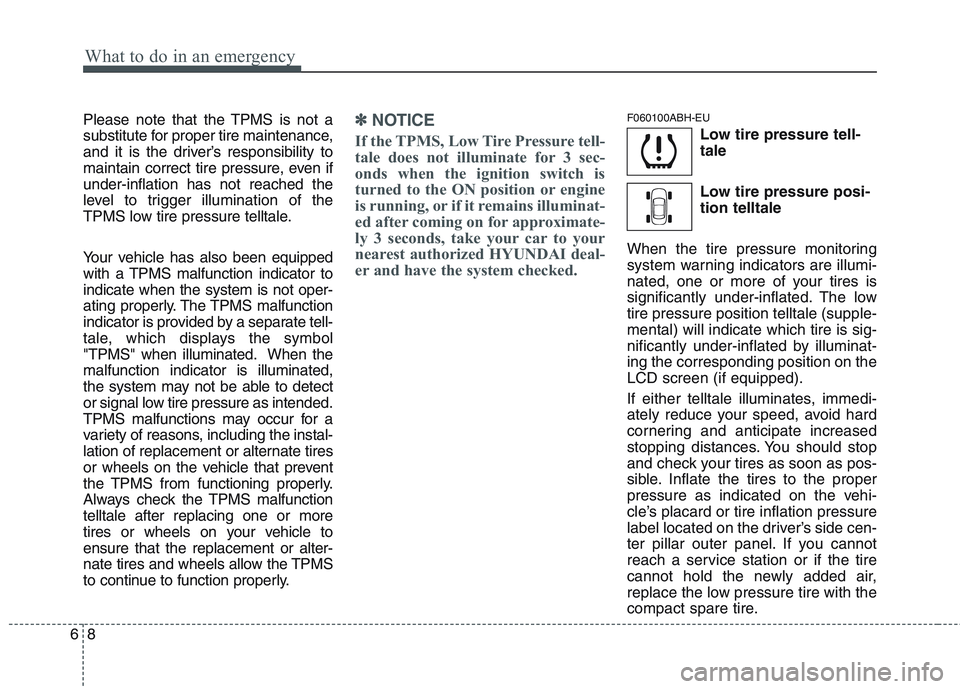
F060100ABH-EU
Low tire pressure tell-
tale
Low tire pressure posi-
tion telltale
When the tire pressure monitoring
system warning indicators are illumi-
nated, one or more of your tires is
significantly under-inflated. The low
tire pressure position telltale (supple-
mental) will indicate which tire is sig-
nificantly under-inflated by illuminat-
ing the corresponding position on the
LCD screen (if equipped).
If either telltale illuminates, immedi-
ately reduce your speed, avoid hard
cornering and anticipate increased
stopping distances. You should stop
and check your tires as soon as pos-
sible. Inflate the tires to the proper
pressure as indicated on the vehi-
cle’s placard or tire inflation pressure
label located on the driver’s side cen-
ter pillar outer panel. If you cannot
reach a service station or if the tire
cannot hold the newly added air,
replace the low pressure tire with the
compact spare tire.
Page 396 of 432
Maintenance
62 7
LIGHT BULBS
G220000AEN
Use only the bulbs of the specified
wattage.
✽ ✽
NOTICE
After driving in rain or washing, the
headlight and taillight lenses could
appear frosty. This condition is caused by
the temperature difference between the
lamp inside and outside. This is similar
to the condensation on your windows
inside your vehicle during the rain and
doesn’t indicate a problem with your
vehicle. If the water leaks into the lamp
bulb circuitry, have the vehicle checked
by an authorized HYUNDAI dealer.
G220100BBH
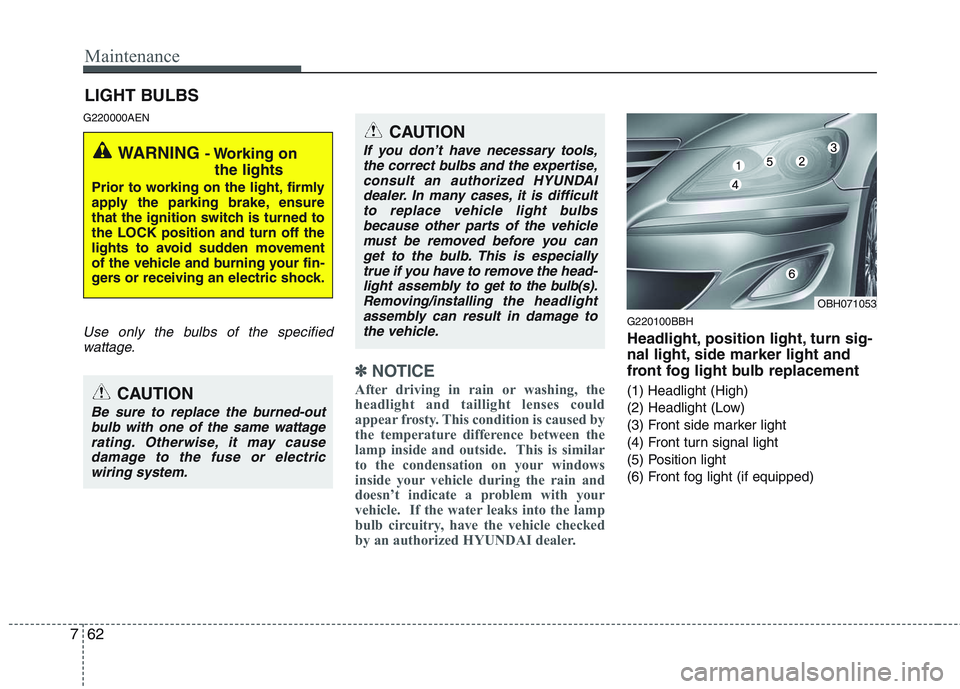
Headlight, position light, turn sig-
nal light, side marker light and
front fog light bulb replacement
(1) Headlight (High)
(2) Headlight (Low)
(3) Front side marker light
(4) Front turn signal light
(5) Position light
(6) Front fog light (if equipped)
WARNING - Working on
the lights
Prior to working on the light, firmly
apply the parking brake, ensure
that the ignition switch is turned to
the LOCK position and turn off the
lights to avoid sudden movement
of the vehicle and burning your fin-
gers or receiving an electric shock.
CAUTION
Be sure to replace the burned-out
bulb with one of the same wattage
rating. Otherwise, it may cause
damage to the fuse or electric
wiring system.
CAUTION
If you don’t have necessary tools,
the correct bulbs and the expertise,
consult an authorized HYUNDAI
dealer. In many cases, it is difficult
to replace vehicle light bulbs
because other parts of the vehicle
must be removed before you can
get to the bulb. This is especially
true if you have to remove the head-
light assembly to
get to the bulb(s).
Removing/installingthe headlight
assembly can result in damage to
the vehicle.OBH071053
Page 398 of 432
Maintenance
64 7
G220102ABH-EU
Headlight (bulb type), front turn sig-
nal, position, side marker and fog
light bulbs (if equipped)
If the light bulb is not operating, have the
vehicle checked by an authorized
HYUNDAI dealer.
✽ ✽
NOTICE
Always have the headlight aiming adjust-
ed after an accident or the headlight
assembly is reinstalled at an authorized
HYUNDAI dealer.
G220200AEN
Side repeater light bulb replace-
ment (if equipped)
If the light bulb is not operating, have the
vehicle checked by an authorized
HYUNDAI dealer.
G220300ABH
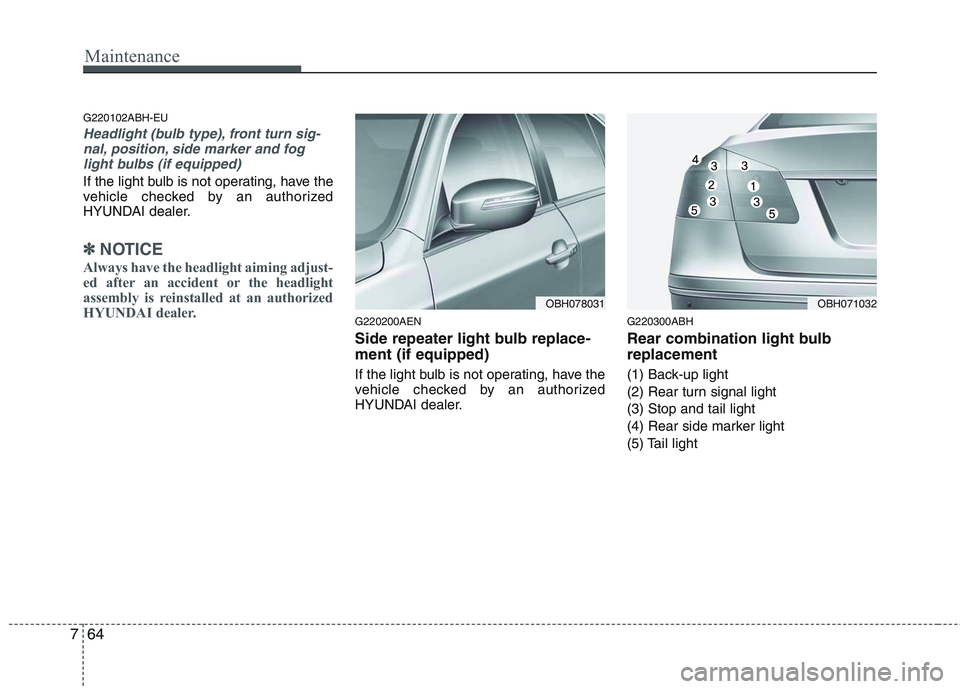
Rear combination light bulb
replacement
(1) Back-up light
(2) Rear turn signal light
(3) Stop and tail light
(4) Rear side marker light
(5) Tail light
OBH078031OBH071032
Page 399 of 432
765
Maintenance
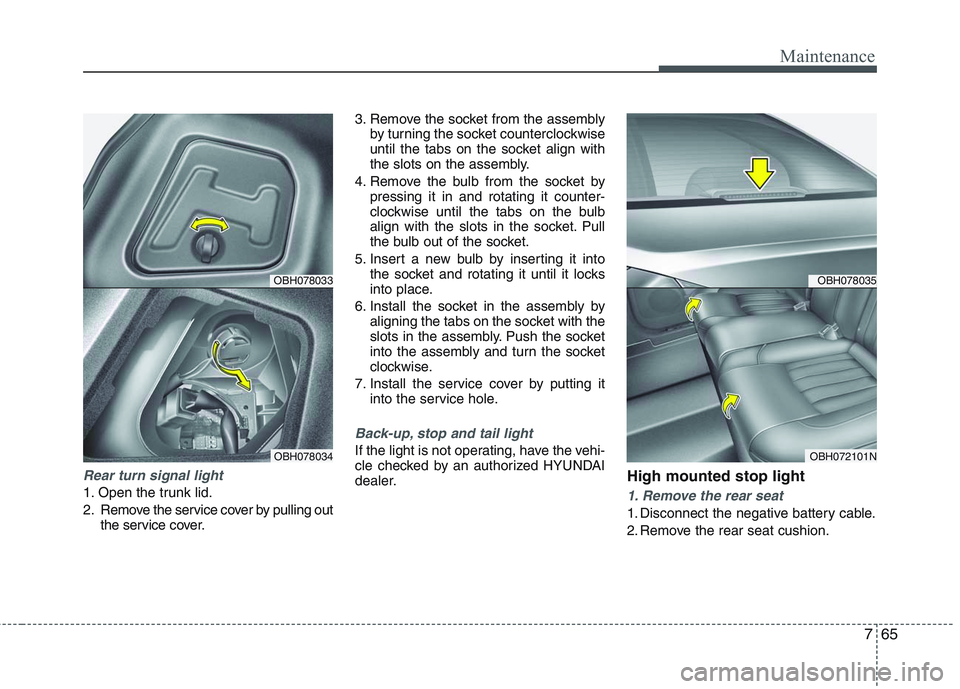
Rear turn signal light
1. Open the trunk lid.
2. Remove the service cover by pulling out
the service cover.3. Remove the socket from the assembly
by turning the socket counterclockwise
until the tabs on the socket align with
the slots on the assembly.
4. Remove the bulb from the socket by
pressing it in and rotating it counter-
clockwise until the tabs on the bulb
align with the slots in the socket. Pull
the bulb out of the socket.
5. Insert a new bulb by inserting it into
the socket and rotating it until it locks
into place.
6. Install the socket in the assembly by
aligning the tabs on the socket with the
slots in the assembly. Push the socket
into the assembly and turn the socket
clockwise.
7. Install the service cover by putting it
into the service hole.
Back-up, stop and tail light
If the light is not operating, have the vehi-
cle checked by an authorized HYUNDAI
dealer.
High mounted stop light
1. Remove the rear seat
1. Disconnect the negative battery cable.
2. Remove the rear seat cushion.
OBH078033
OBH078034
OBH078035
OBH072101N
Page 417 of 432
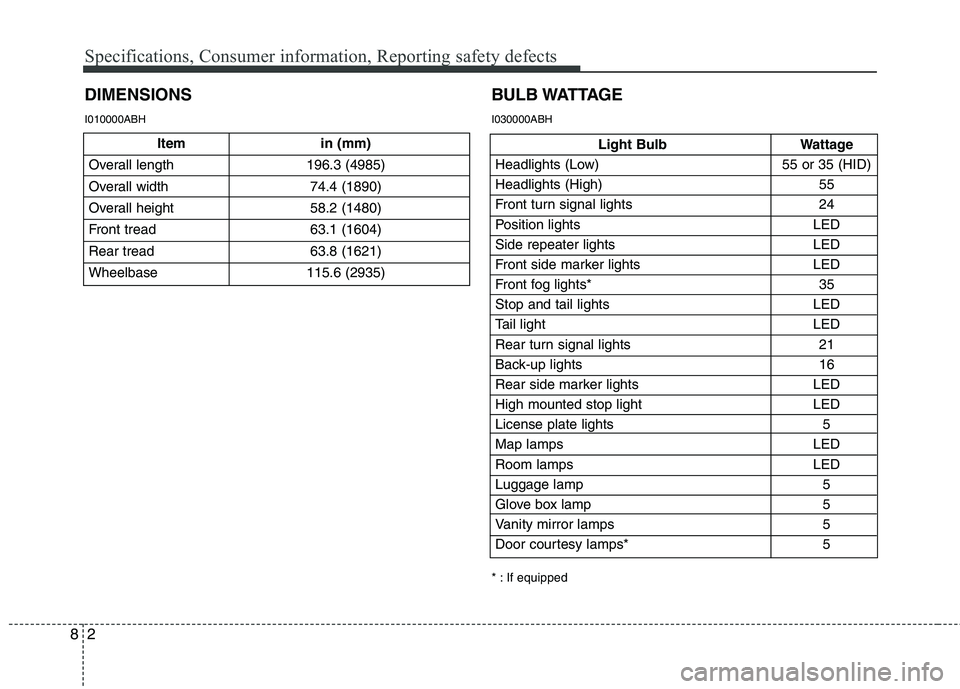
Specifications, Consumer information, Reporting safety defects
2 8
DIMENSIONS
Light Bulb Wattage
Headlights (Low) 55 or 35 (HID)
Headlights (High) 55
Front turn signal lights 24
Position lights LED
Side repeater lights LED
Front side marker lights LED
Front fog lights* 35
Stop and tail lights LED
Tail light LED
Rear turn signal lights 21
Back-up lights 16
Rear side marker lights LED
High mounted stop light LED
License plate lights 5
Map lamps LED
Room lamps LED
Luggage lamp 5
Glove box lamp 5
Vanity mirror lamps 5
Door courtesy lamps* 5
BULB WATTAGE
* : If equipped
I010000ABHI030000ABH
Item in (mm)
Overall length 196.3 (4985)
Overall width 74.4 (1890)
Overall height 58.2 (1480)
Front tread 63.1 (1604)
Rear tread 63.8 (1621)
Wheelbase 115.6 (2935)
Page 429 of 432
Index
4I
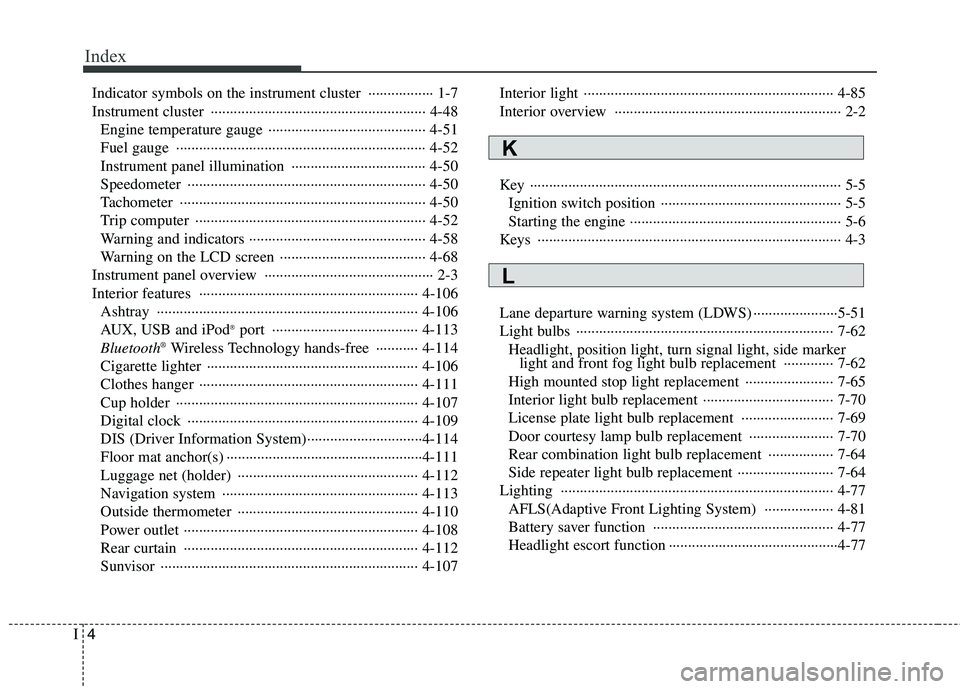
Indicator symbols on the instrument cluster ················· 1-7
Instrument cluster ························································ 4-48
Engine temperature gauge ········································· 4-51
Fuel gauge ································································· 4-52
Instrument panel illumination ··································· 4-50
Speedometer ······························································ 4-50
Tachometer ································································ 4-50
Trip computer ···························································· 4-52
Warning and indicators ·············································· 4-58
Warning on the LCD screen ······································ 4-68
Instrument panel overview ············································ 2-3
Interior features ························································· 4-106
Ashtray ···································································· 4-106
AUX, USB and iPod
®port ······································ 4-113
Bluetooth®Wireless Technology hands-free ··········· 4-114
Cigarette lighter ······················································· 4-106
Clothes hanger ························································· 4-111
Cup holder ······························································· 4-107
Digital clock ···························································· 4-109
DIS (Driver Information System)······························4-114
Floor mat anchor(s) ···················································4-111
Luggage net (holder) ··············································· 4-112
Navigation system ··················································· 4-113
Outside thermometer ··············································· 4-110
Power outlet ····························································· 4-108
Rear curtain ····························································· 4-112
Sunvisor ··································································· 4-107Interior light ································································· 4-85
Interior overview ··························································· 2-2
Key ················································································· 5-5
Ignition switch position ··············································· 5-5
Starting the engine ······················································· 5-6
Keys ··············································································· 4-3
Lane departure warning system (LDWS) ······················5-51
Light bulbs ··································································· 7-62
Headlight, position light, turn signal light, side marker
light and front fog light bulb replacement ············· 7-62
High mounted stop light replacement ······················· 7-65
Interior light bulb replacement ·································· 7-70
License plate light bulb replacement ························ 7-69
Door courtesy lamp bulb replacement ······················ 7-70
Rear combination light bulb replacement ················· 7-64
Side repeater light bulb replacement ························· 7-64
Lighting ······································································· 4-77
AFLS(Adaptive Front Lighting System) ·················· 4-81
Battery saver function ··············································· 4-77
Headlight escort function ············································4-77
L
K