tire pressure Hyundai Grand i10 2015 Owner's Manual
[x] Cancel search | Manufacturer: HYUNDAI, Model Year: 2015, Model line: Grand i10, Model: Hyundai Grand i10 2015Pages: 343, PDF Size: 29.47 MB
Page 212 of 343
Driving your vehicle
24
5
Anti-lock Brake System (ABS) (if equipped)
ABS is an electronic braking system that
helps prevent a braking skid. ABS allows
the driver to steer and brake at the same
time.Using ABS
To obtain the maximum benefit from your ABS in an emergency situation, do not
attempt to modulate your brake pressure
and do not try to pump your brakes.
Depress your brake pedal as hard as
possible.
When you apply your brakes under con-
ditions which may lock the wheels, you
may hear sounds from the brakes, or feel
a corresponding sensation in the brake
pedal. This is normal and it means your
ABS is active. ABS does not reduce the time or dis-
tance it takes to stop the vehicle.
Always maintain a safe distance from the
vehicle in front of you.
ABS will not prevent a skid that results from sudden changes in direction, such
as trying to take a corner too fast or mak-
ing a sudden lane change. Always drive
at a safe speed for the road and weather
conditions.
ABS cannot prevent a loss of stability.
Always steer moderately when braking
hard. Severe or sharp steering wheel
movement can still cause your vehicle to
veer into oncoming traffic or off the road.(Continued)
The safety features of an ABS or
ESC equipped vehicle should not
be tested by high speed driving or
cornering. This could endanger the
safety of yourself or others.
WARNING
An Anti-Lock Braking System
(ABS) or an Electronic Stability
Control (ESC) system will not pre-
vent accidents due to improper or
dangerous driving maneuvers.
Even though vehicle control is
improved during emergency brak-
ing, always maintain a safe dis-
tance between you and objects
ahead of you. Vehicle speeds
should always be reduced during
extreme road conditions. The brak-
ing distance for cars equipped with
ABS or ESC may be longer than forthose without these systems in the
following road conditions.
Drive your vehicle at reduced
speeds during the following condi-tions:
Rough, gravel or snow-covered roads.
On roads where the road surface is pitted or has different surface height.
Tire chains are installed on your vehicle.
(Continued)
Page 219 of 343
531
Driving your vehicle
Emergency Stop Signal (ESS) (if equipped) The Emergency Stop Signal system
alerts the driver behind by blinking the
stop light when the vehicle brakes rapid-
ly and severely.
The system is activated when:
The vehicle suddenly stops (vehiclespeed is over 55km/h (34mph) and the
vehicle deceleration is greater than7m/s2).
The ABS is activating. When vehicle speed is under 40 km/h
(25mph) and the ABS deactivates or
the sudden stop situation is over, the
stop light will stop blinking. Instead, the
hazard warning flasher will turn on
automatically. The hazard warning
flasher will turn off when vehicle speed
is over 10km/h (6mph) after the vehicle
has stopped. Also, it will turn off when
the vehicle is driven at low speed for
some time. You can turn it off manually
by pressing the hazard warning flasher
switch. Good braking practices
Wet brakes can be dangerous! The
brakes may get wet if the vehicle is driv-
en through standing water or if it is
washed. Your vehicle will not stop as
quickly if the brakes are wet. Wet brakes
may cause the vehicle to pull to one side.
To dry the brakes, apply the brakes light-
ly until the braking action returns to nor-
mal, taking care to keep the vehicle
under control at all times. If the braking
action does not return to normal, stop as
soon as it is safe to do so and we rec-
ommend that you call an authorized
HYUNDAI dealer for assistance.
DO NOT drive with your foot resting on
the brake pedal. Even light, but constant
pedal pressure can result in the brakes
overheating, brake wear, and possibly
even brake failure.
If a tire goes flat while you are driving,
apply the brakes gently and keep the
vehicle pointed straight ahead while you
slow down. When you are moving slowly
enough for it to be safe to do so, pull off
the road and stop in a safe location.
Keep your foot firmly on the brake pedal
when the vehicle is stopped to prevent
the vehicle from rolling forward.
WARNING
Whenever leaving the vehicle or
parking, always come to a complete
stop and continue to depress the
brake pedal. Move the shift lever
into the 1st gear (for manual
transaxle vehicle) or P (Park, for
automatic transaxle vehicle) posi-
tion, then apply the parking brake,
and place the ignition switch in theLOCK/OFF position.
Vehicles with the parking brake not
fully engaged are at risk for moving
inadvertently and causing injury to
yourself or others.
Page 241 of 343
613
What to do in an emergency
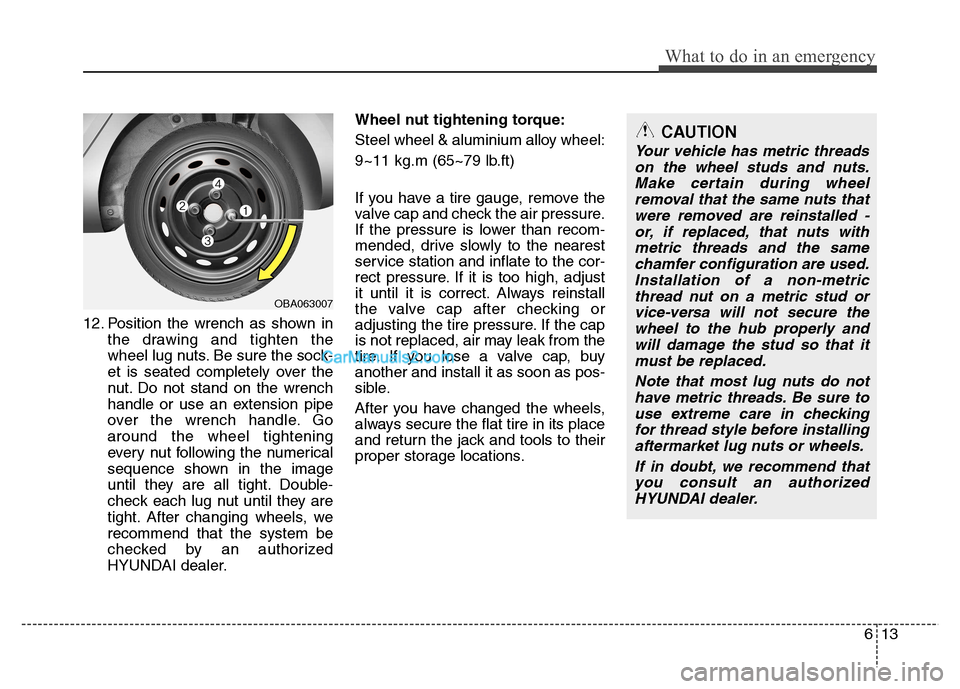
12. Position the wrench as shown inthe drawing and tighten the
wheel lug nuts. Be sure the sock-
et is seated completely over the
nut. Do not stand on the wrench
handle or use an extension pipe
over the wrench handle. Goaround the wheel tightening
every nut following the numerical
sequence shown in the image
until they are all tight. Double-
check each lug nut until they are
tight. After changing wheels, werecommend that the system be
checked by an authorized
HYUNDAI dealer. Wheel nut tightening torque:
Steel wheel & aluminium alloy wheel:
9~11 kg.m (65~79 lb.ft)
If you have a tire gauge, remove the
valve cap and check the air pressure.
If the pressure is lower than recom-
mended, drive slowly to the nearest
service station and inflate to the cor-
rect pressure. If it is too high, adjust
it until it is correct. Always reinstall
the valve cap after checking or
adjusting the tire pressure. If the cap
is not replaced, air may leak from the
tire. If you lose a valve cap, buyanother and install it as soon as pos-
sible.
After you have changed the wheels,
always secure the flat tire in its place
and return the jack and tools to their
proper storage locations.
CAUTION
Your vehicle has metric threads
on the wheel studs and nuts.Make certain during wheel removal that the same nuts thatwere removed are reinstalled -or, if replaced, that nuts withmetric threads and the same chamfer configuration are used.Installation of a non-metricthread nut on a metric stud or vice-versa will not secure thewheel to the hub properly andwill damage the stud so that it must be replaced.
Note that most lug nuts do nothave metric threads. Be sure touse extreme care in checkingfor thread style before installing aftermarket lug nuts or wheels.
If in doubt, we recommend thatyou consult an authorizedHYUNDAI dealer.
OBA063007
Page 242 of 343
What to do in an emergency
14
6
WARNING - Wheel studs
If the studs are damaged, they
may lose their ability to retain
the wheel. This could lead to theloss of the wheel and a collisionresulting in serious injuries.
WARNING - Inadequate
spare tire pressure
Check the inflation pressures as
soon as possible after installing
the spare tire. Adjust it to the
specified pressure, if necessary.
Refer to “Tires and wheels” in
chapter 8.
Page 253 of 343
Maintenance
6
7
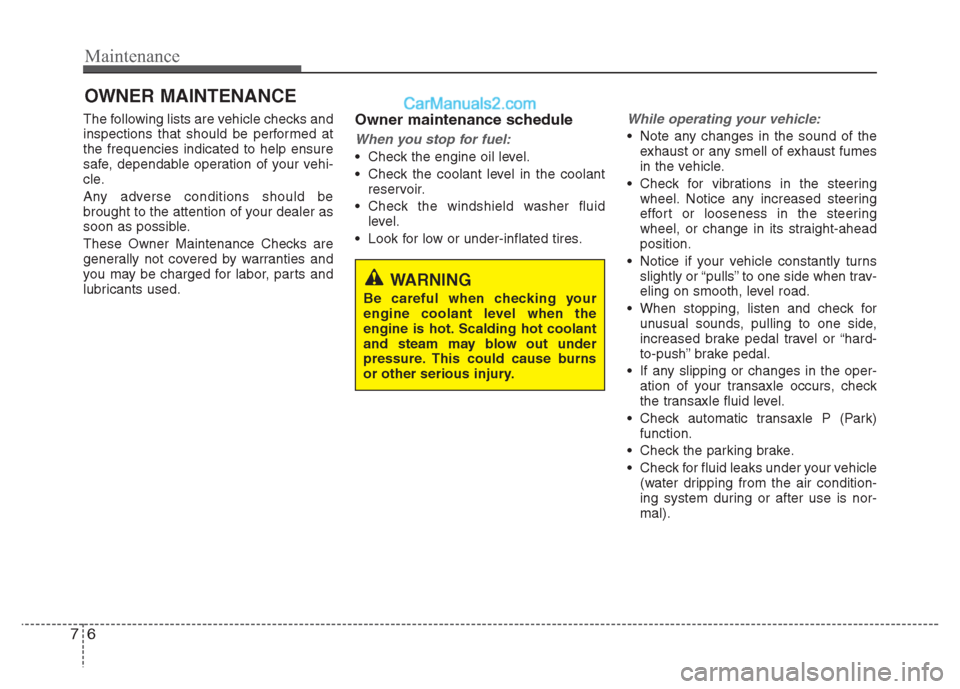
OWNER MAINTENANCE
The following lists are vehicle checks and
inspections that should be performed atthe frequencies indicated to help ensure
safe, dependable operation of your vehi-
cle.
Any adverse conditions should be
brought to the attention of your dealer as
soon as possible.
These Owner Maintenance Checks are
generally not covered by warranties and
you may be charged for labor, parts and
lubricants used. Owner maintenance schedule
When you stop for fuel:
• Check the engine oil level.
Check the coolant level in the coolant
reservoir.
Check the windshield washer fluid level.
Look for low or under-inflated tires.
While operating your vehicle:
Note any changes in the sound of the exhaust or any smell of exhaust fumes
in the vehicle.
Check for vibrations in the steering wheel. Notice any increased steering
effort or looseness in the steering
wheel, or change in its straight-aheadposition.
Notice if your vehicle constantly turns slightly or “pulls” to one side when trav-
eling on smooth, level road.
When stopping, listen and check for unusual sounds, pulling to one side,
increased brake pedal travel or “hard-
to-push” brake pedal.
If any slipping or changes in the oper- ation of your transaxle occurs, check
the transaxle fluid level.
Check automatic transaxle P (Park) function.
Check the parking brake.
Check for fluid leaks under your vehicle (water dripping from the air condition-
ing system during or after use is nor-mal).
WARNING
Be careful when checking your
engine coolant level when the
engine is hot. Scalding hot coolant
and steam may blow out under
pressure. This could cause burns
or other serious injury.
Page 254 of 343
77
Maintenance
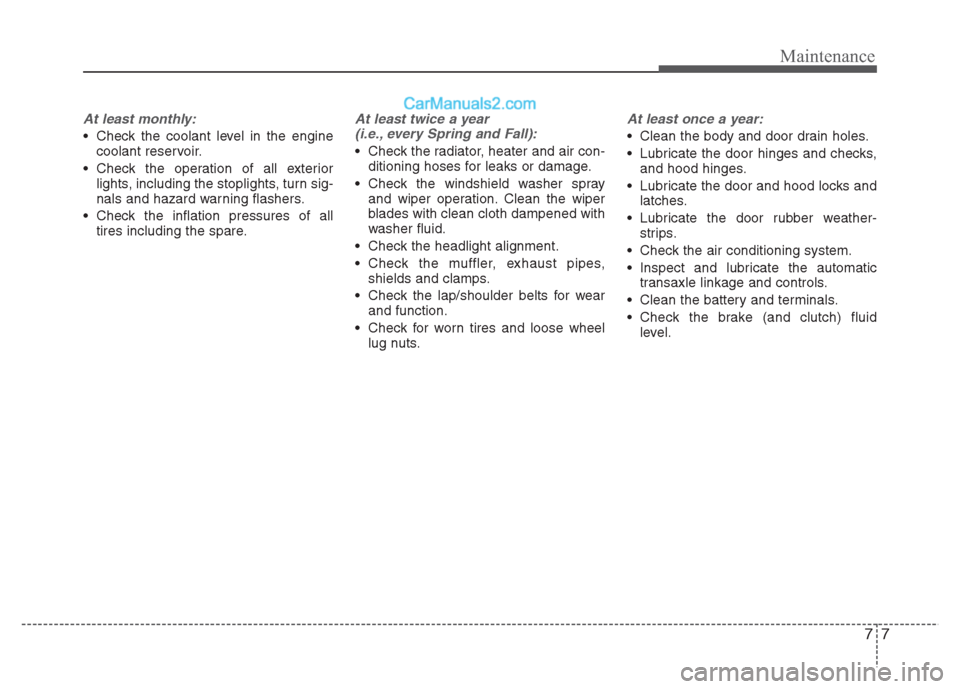
At least monthly:
Check the coolant level in the enginecoolant reservoir.
Check the operation of all exterior lights, including the stoplights, turn sig-
nals and hazard warning flashers.
Check the inflation pressures of all tires including the spare.
At least twice a year
(i.e., every Spring and Fall):
Check the radiator, heater and air con- ditioning hoses for leaks or damage.
Check the windshield washer spray and wiper operation. Clean the wiper
blades with clean cloth dampened with
washer fluid.
Check the headlight alignment.
Check the muffler, exhaust pipes, shields and clamps.
Check the lap/shoulder belts for wear and function.
Check for worn tires and loose wheel lug nuts.
At least once a year:
Clean the body and door drain holes.
Lubricate the door hinges and checks,and hood hinges.
Lubricate the door and hood locks and latches.
Lubricate the door rubber weather- strips.
Check the air conditioning system.
Inspect and lubricate the automatic transaxle linkage and controls.
Clean the battery and terminals.
Check the brake (and clutch) fluid level.
Page 259 of 343
Maintenance
12
7
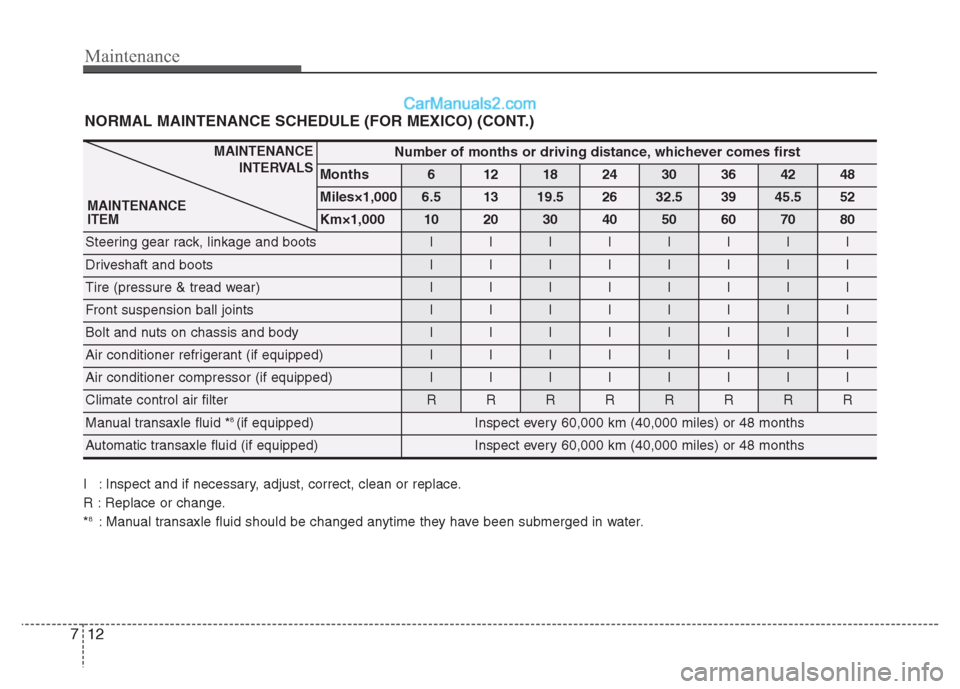
NORMAL MAINTENANCE SCHEDULE (FOR MEXICO) (CONT.)
Number of months or driving distance, whichever comes first
Months612182430364248
Miles×1,0006.51319.52632.53945.552
Km×1,0001020304050607080
Steering gear rack, linkage and bootsIIIIIIII
Driveshaft and bootsIIIIIIII
Tire (pressure & tread wear) IIIIIIII
Front suspension ball jointsIIIIIIII
Bolt and nuts on chassis and bodyIIIIIIII
Air conditioner refrigerant (if equipped)IIIIIIII
Air conditioner compressor (if equipped)IIIIIIII
Climate control air filter RRRRRRRR
Manual transaxle fluid * 8
(if equipped)Inspect every 60,000 km (40,000 miles) or 48 months
Automatic transaxle fluid (if equipped) Inspect every 60,000 km (40,000 miles) or 48 months
I : Inspect and if necessary, adjust, correct, clean or replace.
R : Replace or change.*8
: Manual transaxle fluid should be changed anytime they have been submerged in water.
MAINTENANCE
INTERVALS
MAINTENANCE ITEM
Page 263 of 343
Maintenance
16
7
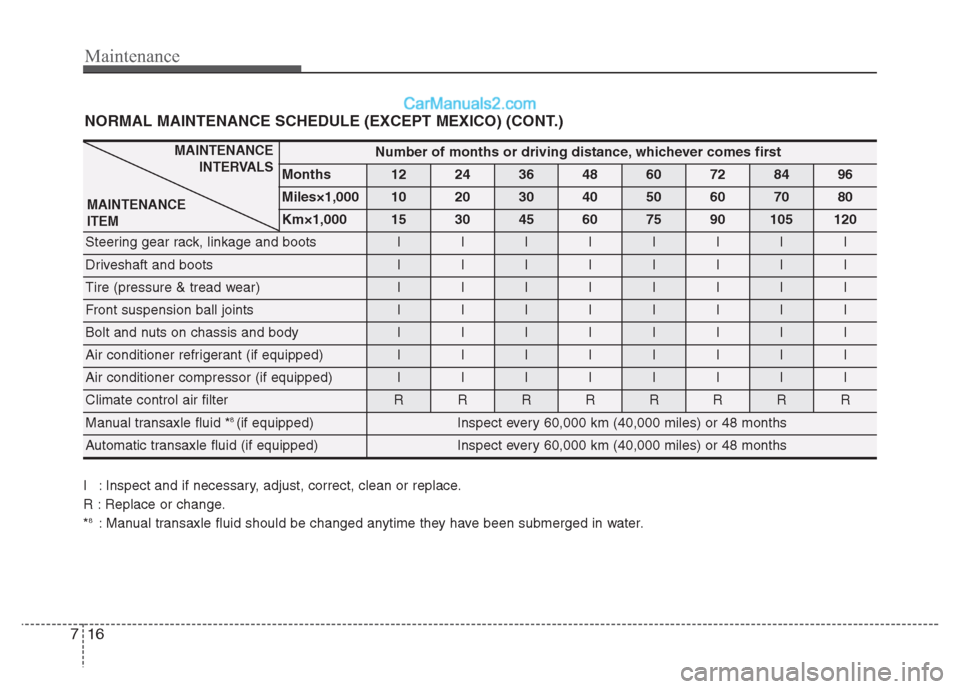
NORMAL MAINTENANCE SCHEDULE (EXCEPT MEXICO) (CONT.)
Number of months or driving distance, whichever comes first
Months1224364860728496
Miles×1,0001020304050607080
Km×1,000153045607590105120
Steering gear rack, linkage and bootsIIIIIIII
Driveshaft and bootsIIIIIIII
Tire (pressure & tread wear) IIIIIIII
Front suspension ball jointsIIIIIIII
Bolt and nuts on chassis and bodyIIIIIIII
Air conditioner refrigerant (if equipped)IIIIIIII
Air conditioner compressor (if equipped)IIIIIIII
Climate control air filter RRRRRRRR
Manual transaxle fluid * 8
(if equipped)Inspect every 60,000 km (40,000 miles) or 48 months
Automatic transaxle fluid (if equipped) Inspect every 60,000 km (40,000 miles) or 48 months
MAINTENANCE
INTERVALS
MAINTENANCE ITEM
I : Inspect and if necessary, adjust, correct, clean or replace.
R : Replace or change.* 8
: Manual transaxle fluid should be changed anytime they have been submerged in water.
Page 288 of 343
741
Maintenance
TIRES AND WHEELS
Tire care
For proper maintenance, safety, and
maximum fuel economy, you must
always maintain recommended tire
inflation pressures and stay within
the load limits and weight distribution
recommended for your vehicle. Recommended cold tire inflation pressures All tire pressures (including the
spare) should be checked when the
tires are cold. “Cold Tires” means the
vehicle has not been driven for at
least three hours or driven less than1.6 km (one mile).
Recommended pressures must be
maintained for the best ride, top vehi-
cle handling, and minimum tire wear.
For recommended inflation pressure
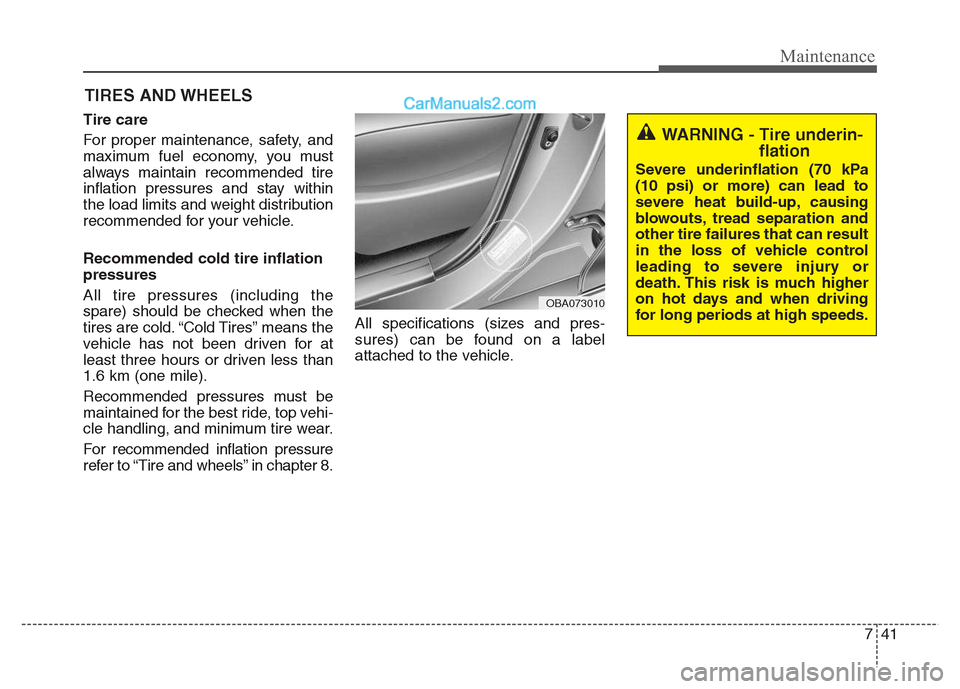
refer to “Tire and wheels” in chapter 8. All specifications (sizes and pres-
sures) can be found on a label
attached to the vehicle.
WARNING - Tire underin-
flation
Severe underinflation (70 kPa (10 psi) or more) can lead to
severe heat build-up, causing
blowouts, tread separation andother tire failures that can result
in the loss of vehicle control
leading to severe injury or
death. This risk is much higher
on hot days and when driving
for long periods at high speeds.
OBA073010
Page 289 of 343
Maintenance
42
7
WARNING - Tire inflation
Overinflation or underinflation
can reduce tire life, adversely
affect vehicle handling, and
lead to sudden tire failure. This
could result in loss of vehicle
control and potential injury.
CAUTION - Tire pressure
Always observe the following:
Check tire pressure when the tires are cold. (After vehiclehas been parked for at leastthree hours or hasn't been driven more than 1.6 km (onemile) since startup.)
Check the pressure of your spare tire each time you checkthe pressure of other tires.
Never overload your vehicle. Be careful not to overload avehicle luggage rack if yourvehicle is equipped with one.
Worn, old tires can cause acci- dents. If your tread is badlyworn, or if your tires have been damaged, replace them.
CAUTION
Underinflation also results in excessive wear, poor handlingand reduced fuel economy.Wheel deformation also ispossible. Keep your tire pres-sures at the proper levels. If a tire frequently needs refilling,we recommend that the sys-tem be checked by an author- ized HYUNDAI dealer.
Overinflation produces a harsh ride, excessive wear atthe center of the tire tread, anda greater possibility of dam- age from road hazards.
CAUTION
Warm tires normally exceed recommended cold tire pres-sures by 28 to 41 kPa (4 to 6 psi). Do not release air fromwarm tires to adjust the pres-sure or the tires will be under- inflated.
Be sure to reinstall the tire inflation valve caps. Withoutthe valve cap, dirt or moisturecould get into the valve core and cause air leakage. If avalve cap is missing, install anew one as soon as possible.