headlight bulb Hyundai Grandeur 2002 Owner's Manual
[x] Cancel search | Manufacturer: HYUNDAI, Model Year: 2002, Model line: Grandeur, Model: Hyundai Grandeur 2002Pages: 230, PDF Size: 3.82 MB
Page 61 of 230
1- 48 FEATURES OF YOUR HYUNDAI
To turn on the rear fog lights, push the switch. They will come on when theheadlight switch is in the second posi-tion and the key is in the "ON" position.
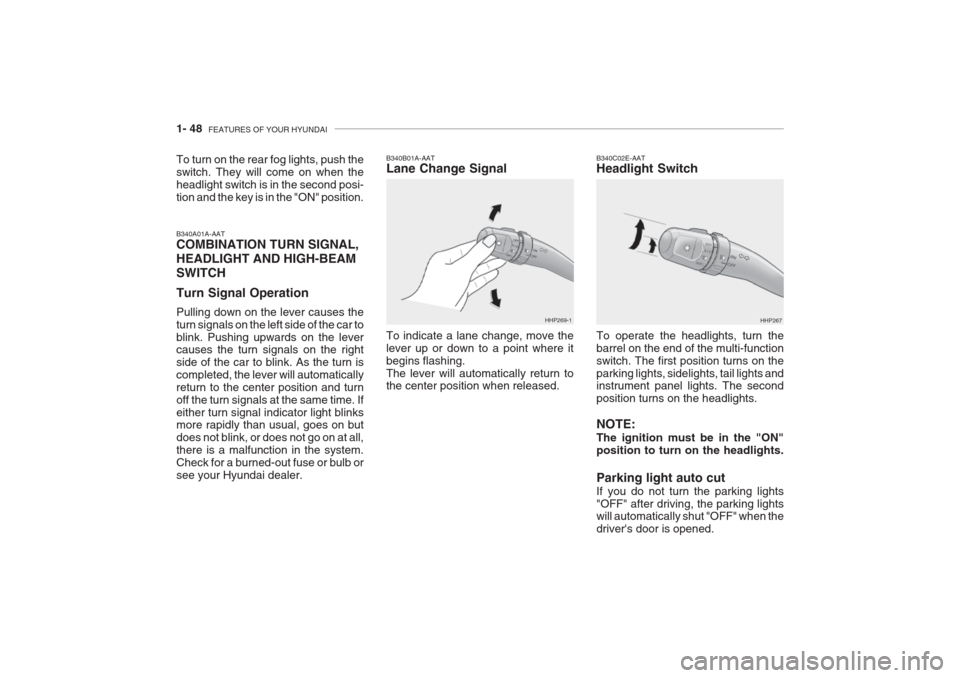
B340A01A-AAT COMBINATION TURN SIGNAL, HEADLIGHT AND HIGH-BEAMSWITCH Turn Signal Operation Pulling down on the lever causes the turn signals on the left side of the car toblink. Pushing upwards on the lever causes the turn signals on the right side of the car to blink. As the turn iscompleted, the lever will automaticallyreturn to the center position and turnoff the turn signals at the same time. Ifeither turn signal indicator light blinks more rapidly than usual, goes on but does not blink, or does not go on at all,there is a malfunction in the system.Check for a burned-out fuse or bulb orsee your Hyundai dealer. B340B01A-AAT Lane Change Signal To indicate a lane change, move the lever up or down to a point where itbegins flashing.The lever will automatically return to the center position when released.
HHP269-1
B340C02E-AAT Headlight Switch To operate the headlights, turn the barrel on the end of the multi-functionswitch. The first position turns on the
parking lights, sidelights, tail lights and instrument panel lights. The second position turns on the headlights. NOTE: The ignition must be in the "ON" position to turn on the headlights. Parking light auto cut If you do not turn the parking lights "OFF" after driving, the parking lights will automatically shut "OFF" when the driver's door is opened. HHP267
Page 178 of 230

6. Do-It-Yourself Maintenance
Engine Compartment ..................................................................... 6-2
General Checks .............................................................................. 6-5
Checking the Engine Oil ................................................................ 6-6
Changing the Oil and Filter ........................................................... 6-7
Checking and Changing the Engine Coolant ............................... 6-8
Spark Plugs ..................................................................................6-10
Changing the Air Cleaner Filter ................................................... 6-11
Checking the Transaxle Oil (Manual) .......................................... 6-13
Checking the Transaxle Fluid (Automatic) .................................. 6-14
Checking the Brakes .................................................................... 6-15
Checking the Clutch Fluid ............................................................ 6-16
Air Conditioning Care ................................................................... 6-17
Changing the Air Filter (For Evaporator and Blower Unit) ......... 6-18
Checking Drive Belts .................................................................... 6-21
Checking and Replacing Fuses ................................................... 6-21
Power Steering Fluid Level .......................................................... 6-24
Headlight Aiming Adjustment ....................................................... 6-25
Replacement of Light Bulbs ......................................................... 6-26
Bulb Wattage ................................................................................ 6-33
Junction Box Description ............................................................. 6-34
6
Page 202 of 230
DO-IT-YOURSELF MAINTENANCE 6- 25
G290A02L-GAT
HEADLIGHT AIMING ADJUST- MENT
HID Type (If installed)
WARNING:
If you need headlight aiming ad- justment, have your vehicle in- spected by your Hyundai Dealer. Don't attempt to replace or inspect the HID headlight bulb to prevent danger of an electric shock.
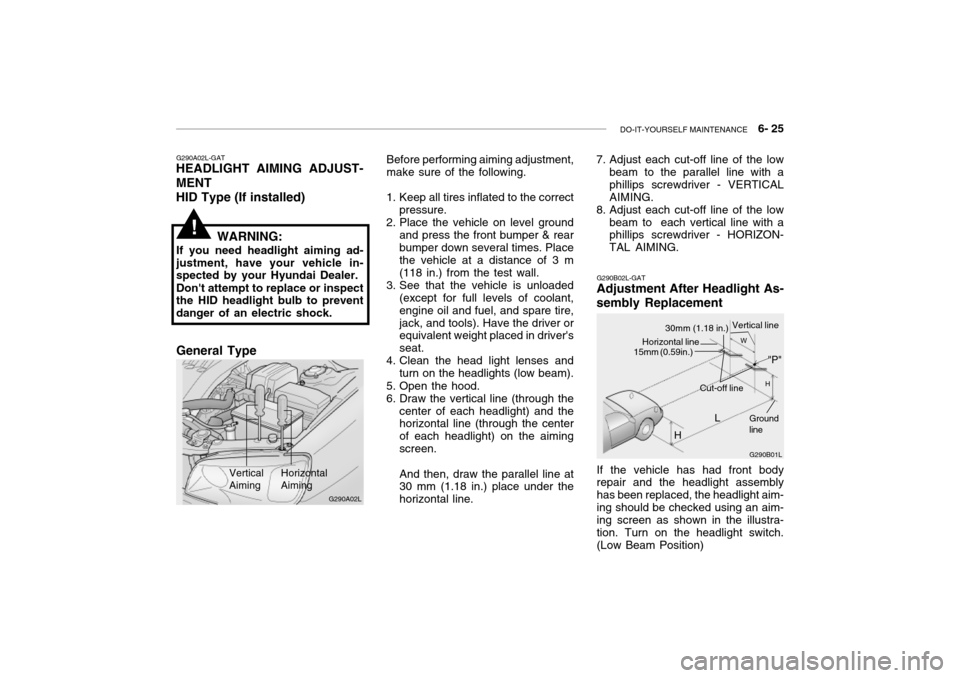
Vertical Aiming HorizontalAiming
Before performing aiming adjustment, make sure of the following.
1. Keep all tires inflated to the correct pressure.
2. Place the vehicle on level ground
and press the front bumper & rear bumper down several times. Place the vehicle at a distance of 3 m (118 in.) from the test wall.
3. See that the vehicle is unloaded (except for full levels of coolant,engine oil and fuel, and spare tire,jack, and tools). Have the driver or equivalent weight placed in driver's seat.
4. Clean the head light lenses and
turn on the headlights (low beam).
5. Open the hood.
6. Draw the vertical line (through the center of each headlight) and the horizontal line (through the center of each headlight) on the aimingscreen. And then, draw the parallel line at 30 mm (1.18 in.) place under the horizontal line.
!
G290B02L-GAT
Adjustment After Headlight As- sembly Replacement
G290B01L
LW
H
H Cut-off line
Ground line
If the vehicle has had front body repair and the headlight assembly has been replaced, the headlight aim-ing should be checked using an aim- ing screen as shown in the illustra- tion. Turn on the headlight switch.(Low Beam Position)
"P"
Horizontal line15mm (0.59in.)
30mm (1.18 in.) Vertical line
7. Adjust each cut-off line of the low
beam to the parallel line with a phillips screwdriver - VERTICALAIMING.
8. Adjust each cut-off line of the low
beam to each vertical line with a phillips screwdriver - HORIZON- TAL AIMING.
G290A02L
General Type
Page 203 of 230
6- 26 DO-IT-YOURSELF MAINTENANCE
Replacement instructions:
1. Allow the bulb to cool. Wear eye protection.
2. Always grasp the bulb by its plastic base, avoid touching the glass.
G260A01L-GAT
REPLACEMENT OF LIGHT BULBS
Before attempting to replace a light
bulb, be sure the switch is turned to the "OFF" position. The next paragraph shows how to
reach the light bulbs so they may be changed. Be sure to replace the burned-out bulb with one of the samenumber and wattage rating. See page 6-33 for the wattage de-
scriptions.
G270A03L
G270A01L-GAT
HEADLIGHT AND FRONT TURN SIGNAL LIGHT
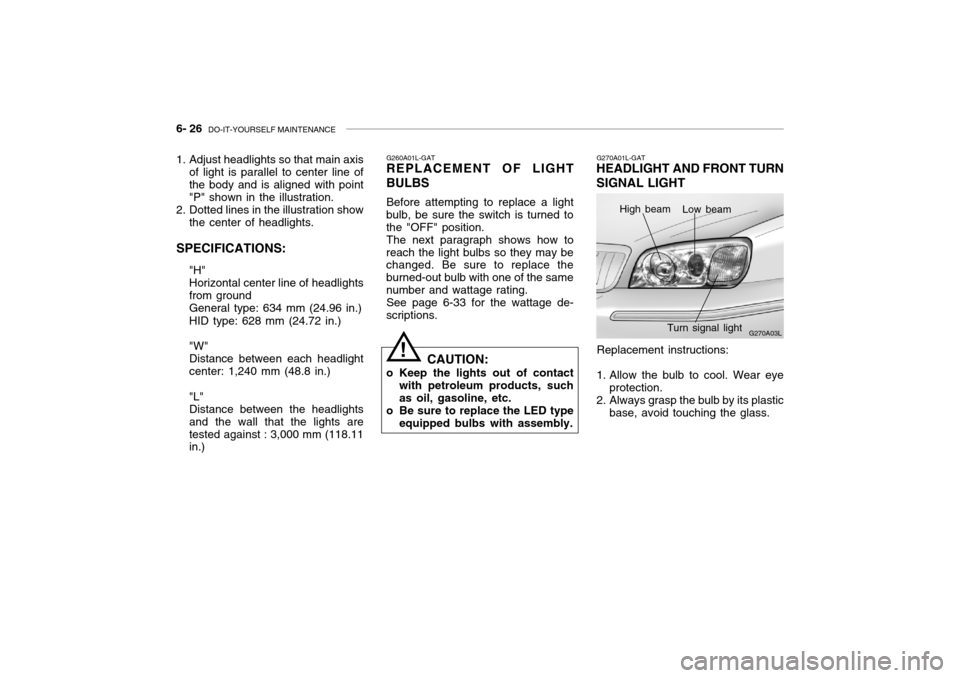
High beam Low beam
Turn signal light
! CAUTION:
o Keep the lights out of contact with petroleum products, such as oil, gasoline, etc.
o Be sure to replace the LED type equipped bulbs with assembly.
1. Adjust headlights so that main axis
of light is parallel to center line ofthe body and is aligned with point"P" shown in the illustration.
2. Dotted lines in the illustration show
the center of headlights.
SPECIFICATIONS: "H"Horizontal center line of headlightsfrom groundGeneral type: 634 mm (24.96 in.) HID type: 628 mm (24.72 in.) "W" Distance between each headlightcenter: 1,240 mm (48.8 in.) "L" Distance between the headlightsand the wall that the lights aretested against : 3,000 mm (118.11 in.)
Page 204 of 230
DO-IT-YOURSELF MAINTENANCE 6- 27
G270A07L
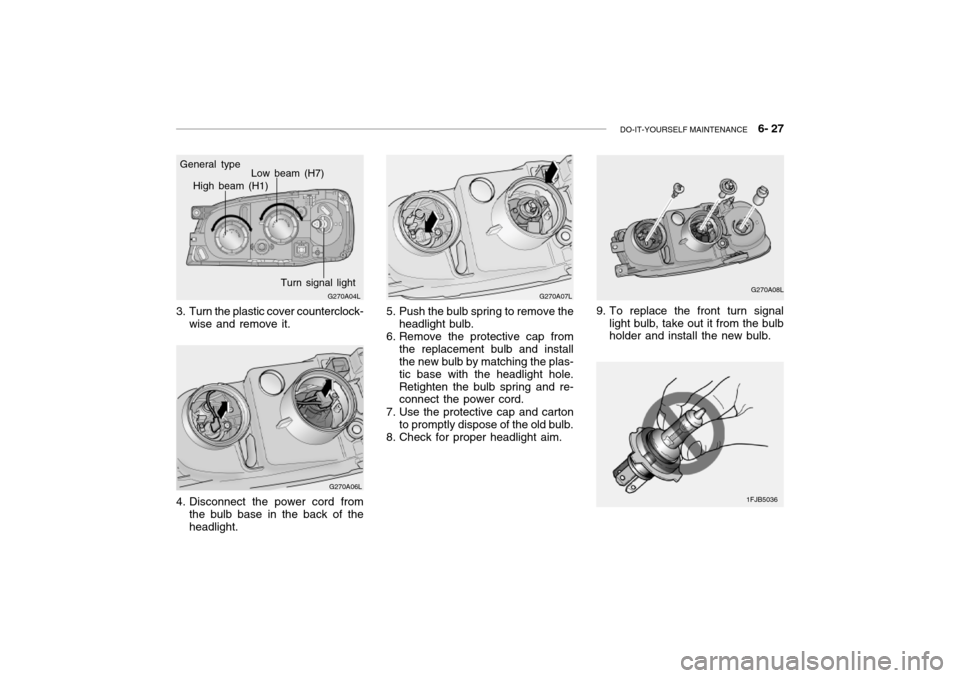
5. Push the bulb spring to remove the headlight bulb.
6. Remove the protective cap from the replacement bulb and install the new bulb by matching the plas- tic base with the headlight hole.Retighten the bulb spring and re- connect the power cord.
7. Use the protective cap and carton to promptly dispose of the old bulb.
8. Check for proper headlight aim.G270A08LG270A04L
General type
High beam (H1)
Low beam (H7)
Turn signal light
3. Turn the plastic cover counterclock- wise and remove it.
G270A06L
4. Disconnect the power cord from the bulb base in the back of the headlight. 9. To replace the front turn signal
light bulb, take out it from the bulb holder and install the new bulb.
1FJB5036
Page 205 of 230
6- 28 DO-IT-YOURSELF MAINTENANCE
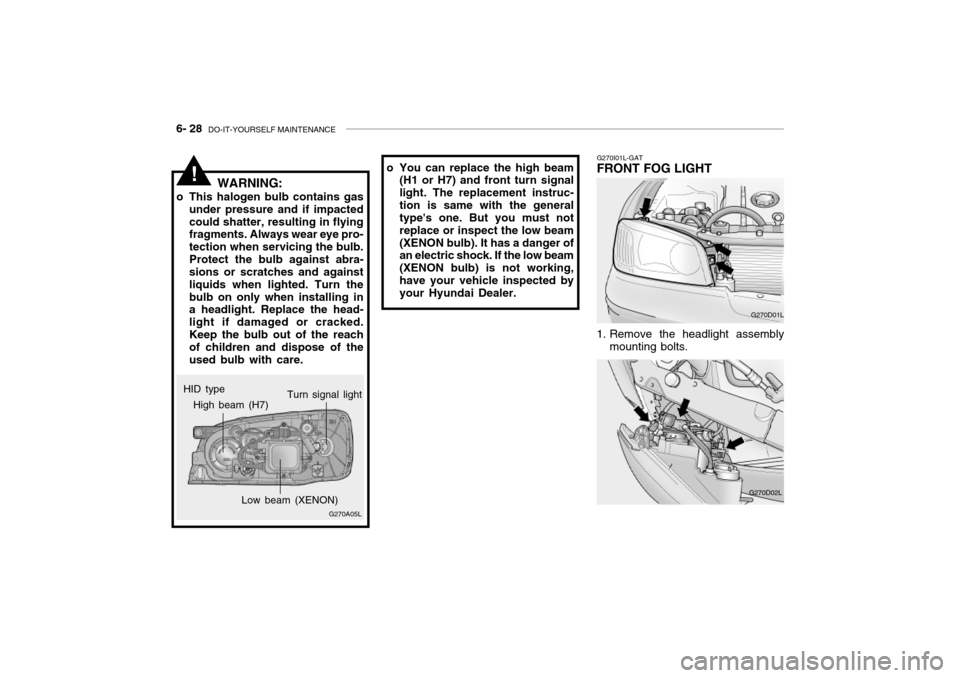
G270I01L-GAT
FRONT FOG LIGHT
G270D01L
1. Remove the headlight assembly mounting bolts.
G270D02L
o You can replace the high beam(H1 or H7) and front turn signal light. The replacement instruc-tion is same with the general type's one. But you must not replace or inspect the low beam(XENON bulb). It has a danger of an electric shock. If the low beam (XENON bulb) is not working,have your vehicle inspected by your Hyundai Dealer.
WARNING:
o This halogen bulb contains gas under pressure and if impacted could shatter, resulting in flying fragments. Always wear eye pro- tection when servicing the bulb.Protect the bulb against abra- sions or scratches and against liquids when lighted. Turn thebulb on only when installing in a headlight. Replace the head- light if damaged or cracked.Keep the bulb out of the reach of children and dispose of the used bulb with care.
HID type!
G270A05L
High beam (H7)
Low beam (XENON)Turn signal light
Page 206 of 230
DO-IT-YOURSELF MAINTENANCE 6- 29
G270D03L
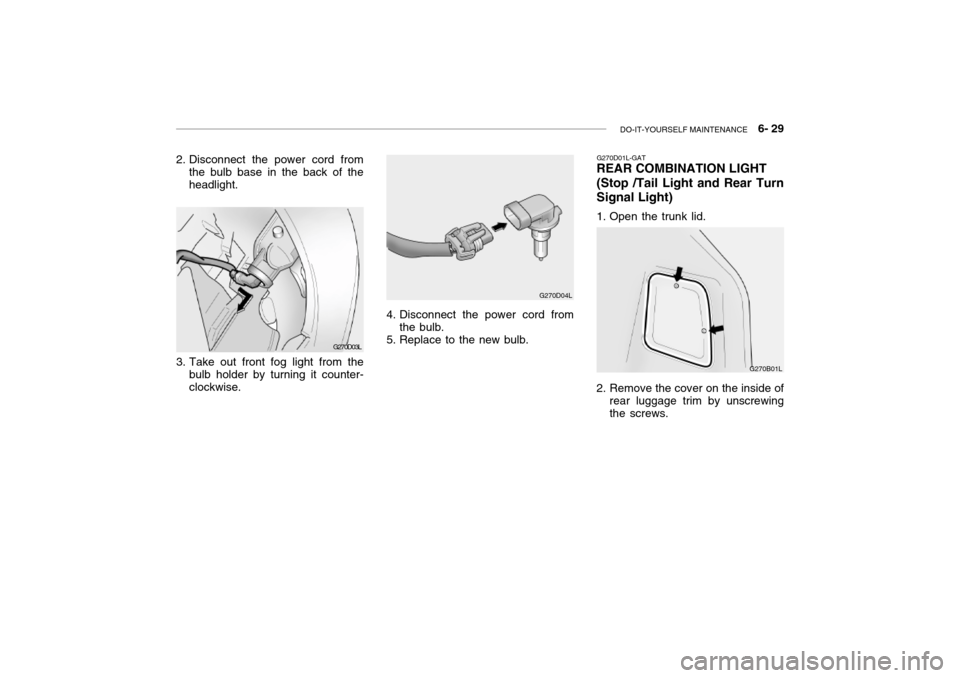
2. Disconnect the power cord from
the bulb base in the back of the headlight.
3. Take out front fog light from the bulb holder by turning it counter-clockwise.
G270B01L
G270D01L-GAT
REAR COMBINATION LIGHT
(Stop /Tail Light and Rear Turn
Signal Light)
1. Open the trunk lid.
2. Remove the cover on the inside of
rear luggage trim by unscrewing the screws.
4. Disconnect the power cord fromthe bulb.
5. Replace to the new bulb. G270D04L
Page 226 of 230
10- 2 INDEX
A Accessory Box .......................................................... 1-68
Air Bag .......................................................... 1-31 ~ 1-38
Air Cleaner Fil ter ....................................................... 6-11
Air Conditioning
Care ....................................................................... 6-17
Operation ..................................................... 1-83, 6-17
Switch ..................................................................... 1-82
Antenna ..................................................... 1-115 ~ 1-116
Ashtray ...................................................................... 1-56 Audio Remote Control Switch ................................... 1-75
Automatic Heating and Cooling Control System
................................................................... 1-84 ~ 1-89
B
Battery ............................................................. 2-16, 6-23Bi-Level Heating ........................................................ 1-80
Brake Anti-lock brake system .......................................... 2-11Checking the brakes .............................................. 6-15
Fluid ....................................................................... 6-15
Pedal clearance ..................................................... 6-21
Pedal freepl ay ........................................................ 6-20
Practices .................................................... 2-13 ~ 2-14
Breaking-In your New Hyundai ................................... 1-3
Bulbs wattage ........................................................... 6-33 C Care of Cassette Tapes
........................... 1-114 ~ 1-115
Cassette Tape Player Operation (H940B, H940A) ........................................... 1-96 ~1-97, 1-104 ~ 1-105
Catalytic Converter ..................................................... 7-3
CD Auto changer ...................................................... 1-69
CD Auto changer (H940B, H940A)
....................................... 1-98 ~ 1-100, 1-109 ~ 1-111
Child-Protector Rear Door Lock ................................. 1-7
Child Restraint S ystem ................................. 1-23 ~ 1-29
Cigarette Lighter ....................................................... 1-55
Clock ......................................................................... 1-53
Clutch
Checking fluid ........................................................ 6-16
Pedal freepl ay ........................................................ 6-20
Combination Light Headlight flasher .................................................... 1-50
Headlight swi tch ..................................................... 1-48
High-beam swi tch .................................................. 1-49
Lane change si gnal ................................................ 1-48
Turn signal oper ation............................................. 1-48
Compact Disc Player Operation (H940A) . 1-106 ~ 1-108 Cooling Fans ............................................................. 6-24
Corrosion protection Cleaning the interior ....................................... 4-5 ~ 4-6
Protecting your Hyundai from corrosion ........ 4-1 ~ 4-6Washing and waxing ...................................... 4-3 ~ 4-5
Cruise Control ............................................... 1-72 ~ 1-74