Hyundai H-1 (Grand Starex) 2003 Workshop Manual
Manufacturer: HYUNDAI, Model Year: 2003, Model line: H-1 (Grand Starex), Model: Hyundai H-1 (Grand Starex) 2003Pages: 173, PDF Size: 3.68 MB
Page 51 of 173
INSTRUMENTS & CONTROLS
INSTRUMENTS & CONTROLS INSTRUMENTS & CONTROLS
INSTRUMENTS & CONTROLS
INSTRUMENTS & CONTROLS
2-12 The headlights will go on when the lever is
pulled toward you and will go off when it is released.
The headlights can be flashed even though the
headlight switch is in the "OFF" position.
C180A01P-GATWINDSHIELD WIPER AND WASHER
WINDSHIELD WIPER AND WASHER WINDSHIELD WIPER AND WASHER
WINDSHIELD WIPER AND WASHER
WINDSHIELD WIPER AND WASHER
SWITCH
SWITCH SWITCH
SWITCH
SWITCH
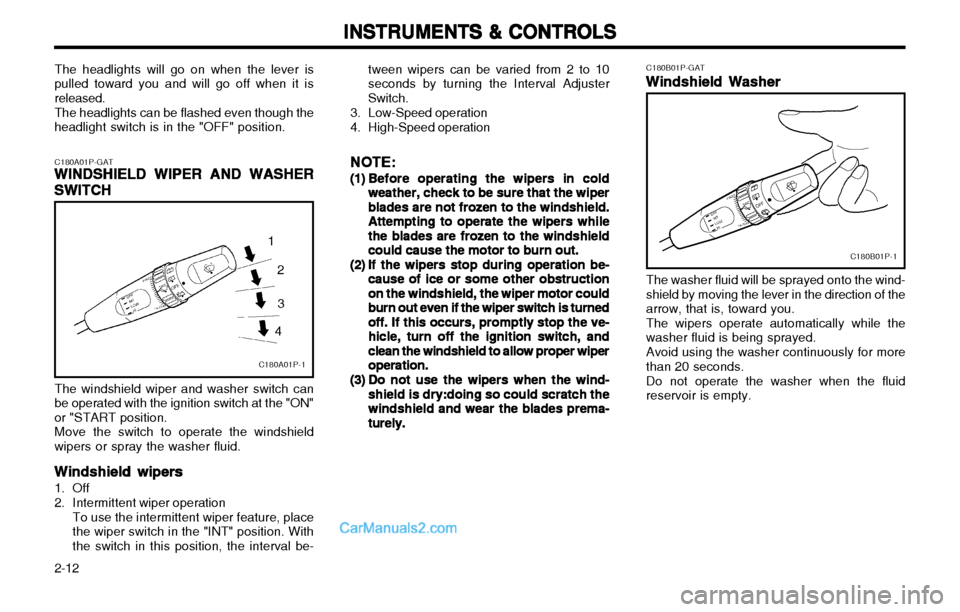
C180A01P-1 1
2
3
4
The windshield wiper and washer switch can
be operated with the ignition switch at the "ON" or "START position. Move the switch to operate the windshield
wipers or spray the washer fluid.
Windshield wipers
Windshield wipers Windshield wipers
Windshield wipers
Windshield wipers
1. Off
2. Intermittent wiper operation To use the intermittent wiper feature, place the wiper switch in the "INT" position. Withthe switch in this position, the interval be- tween wipers can be varied from 2 to 10seconds by turning the Interval AdjusterSwitch.
3. Low-Speed operation
4. High-Speed operation
NOTE:
NOTE: NOTE:
NOTE:
NOTE:
(1)(1)
(1)(1)
(1) Before operating the wipers in cold
Before operating the wipers in cold Before operating the wipers in cold
Before operating the wipers in cold
Before operating the wipers in cold
weather, check to be sure that the wiper
weather, check to be sure that the wiper weather, check to be sure that the wiper
weather, check to be sure that the wiper
weather, check to be sure that the wiper
blades are not frozen to the windshield.
blades are not frozen to the windshield. blades are not frozen to the windshield.
blades are not frozen to the windshield.
blades are not frozen to the windshield.
Attempting to operate the wipers while
Attempting to operate the wipers while Attempting to operate the wipers while
Attempting to operate the wipers while
Attempting to operate the wipers while
the blades are frozen to the windshield
the blades are frozen to the windshield the blades are frozen to the windshield
the blades are frozen to the windshield
the blades are frozen to the windshield
could cause the motor to burn out.
could cause the motor to burn out. could cause the motor to burn out.
could cause the motor to burn out.
could cause the motor to burn out.
(2)(2)
(2)(2)
(2) If the wipers stop during operation be-
If the wipers stop during operation be- If the wipers stop during operation be-
If the wipers stop during operation be-
If the wipers stop during operation be-
cause of ice or some other obstruction
cause of ice or some other obstruction cause of ice or some other obstruction
cause of ice or some other obstruction
cause of ice or some other obstruction
on the windshield, the wiper motor could
on the windshield, the wiper motor could on the windshield, the wiper motor could
on the windshield, the wiper motor could
on the windshield, the wiper motor could
burn out even if the wiper switch is turned
burn out even if the wiper switch is turned burn out even if the wiper switch is turned
burn out even if the wiper switch is turned
burn out even if the wiper switch is turned
off. If this occurs, promptly stop the ve-
off. If this occurs, promptly stop the ve- off. If this occurs, promptly stop the ve-
off. If this occurs, promptly stop the ve-
off. If this occurs, promptly stop the ve-
hicle, turn off the ignition switch, and
hicle, turn off the ignition switch, and hicle, turn off the ignition switch, and
hicle, turn off the ignition switch, and
hicle, turn off the ignition switch, and
clean the windshield to allow proper wiper
clean the windshield to allow proper wiper clean the windshield to allow proper wiper
clean the windshield to allow proper wiper
clean the windshield to allow proper wiper
operation.
operation. operation.
operation.
operation.
(3)(3)
(3)(3)
(3) Do not use the wipers when the wind-
Do not use the wipers when the wind- Do not use the wipers when the wind-
Do not use the wipers when the wind-
Do not use the wipers when the wind-
shield is dry:doing so could scratch the
shield is dry:doing so could scratch the shield is dry:doing so could scratch the
shield is dry:doing so could scratch the
shield is dry:doing so could scratch the
windshield and wear the blades prema-
windshield and wear the blades prema- windshield and wear the blades prema-
windshield and wear the blades prema-
windshield and wear the blades prema-
turely.
turely. turely.
turely.
turely. C180B01P-GAT
Windshield Washer
Windshield Washer Windshield Washer
Windshield Washer
Windshield Washer
C180B01P-1
The washer fluid will be sprayed onto the wind- shield by moving the lever in the direction of thearrow, that is, toward you.The wipers operate automatically while thewasher fluid is being sprayed. Avoid using the washer continuously for more than 20 seconds. Do not operate the washer when the fluid reservoir is empty.
Page 52 of 173
2-13
INSTRUMENTS & CONTROLS
INSTRUMENTS & CONTROLS INSTRUMENTS & CONTROLS
INSTRUMENTS & CONTROLS
INSTRUMENTS & CONTROLS
C190A01P-GAT
TAILGATE WIPER AND WASHER
TAILGATE WIPER AND WASHER TAILGATE WIPER AND WASHER
TAILGATE WIPER AND WASHER
TAILGATE WIPER AND WASHER
SWITCH (Minibus, Van)
SWITCH (Minibus, Van) SWITCH (Minibus, Van)
SWITCH (Minibus, Van)
SWITCH (Minibus, Van)
C190A01P-1
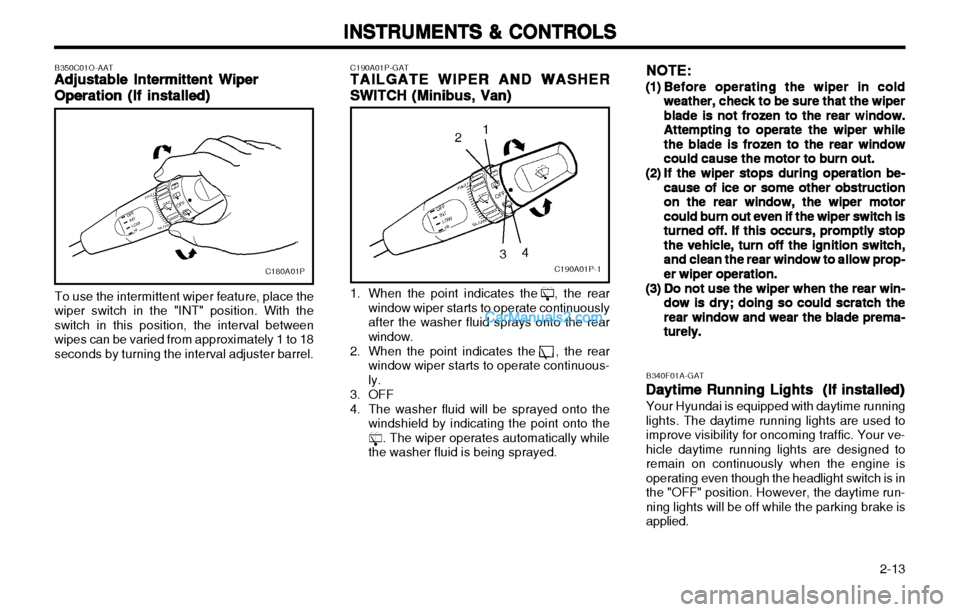
1. When the point indicates the , the rear window wiper starts to operate continuously after the washer fluid sprays onto the rearwindow.
2. When the point indicates the , the rear window wiper starts to operate continuous-ly.
3. OFF
4. The washer fluid will be sprayed onto the windshield by indicating the point onto the . The wiper operates automatically whilethe washer fluid is being sprayed.3 4
2
1
To use the intermittent wiper feature, place the
wiper switch in the "INT" position. With the switch in this position, the interval betweenwipes can be varied from approximately 1 to 18seconds by turning the interval adjuster barrel. B350C01O-AAT
Adjustable Intermittent Wiper
Adjustable Intermittent Wiper Adjustable Intermittent Wiper
Adjustable Intermittent Wiper
Adjustable Intermittent Wiper
Operation (If installed)
Operation (If installed) Operation (If installed)
Operation (If installed)
Operation (If installed)
C180A01P
NOTE:
NOTE: NOTE:
NOTE:
NOTE:
(1)(1)
(1)(1)
(1)
Before operating the wiper in cold
Before operating the wiper in cold Before operating the wiper in cold
Before operating the wiper in cold
Before operating the wiper in cold
weather, check to be sure that the wiper
weather, check to be sure that the wiper weather, check to be sure that the wiper
weather, check to be sure that the wiper
weather, check to be sure that the wiper
blade is not frozen to the rear window.
blade is not frozen to the rear window. blade is not frozen to the rear window.
blade is not frozen to the rear window.
blade is not frozen to the rear window.
Attempting to operate the wiper while
Attempting to operate the wiper while Attempting to operate the wiper while
Attempting to operate the wiper while
Attempting to operate the wiper while
the blade is frozen to the rear window
the blade is frozen to the rear window the blade is frozen to the rear window
the blade is frozen to the rear window
the blade is frozen to the rear window
could cause the motor to burn out.
could cause the motor to burn out. could cause the motor to burn out.
could cause the motor to burn out.
could cause the motor to burn out.
(2)(2)
(2)(2)
(2) If the wiper stops during operation be-
If the wiper stops during operation be- If the wiper stops during operation be-
If the wiper stops during operation be-
If the wiper stops during operation be-
cause of ice or some other obstruction
cause of ice or some other obstruction cause of ice or some other obstruction
cause of ice or some other obstruction
cause of ice or some other obstruction
on the rear window, the wiper motor
on the rear window, the wiper motor on the rear window, the wiper motor
on the rear window, the wiper motor
on the rear window, the wiper motor
could burn out even if the wiper switch is
could burn out even if the wiper switch is could burn out even if the wiper switch is
could burn out even if the wiper switch is
could burn out even if the wiper switch is
turned off. If this occurs, promptly stop
turned off. If this occurs, promptly stop turned off. If this occurs, promptly stop
turned off. If this occurs, promptly stop
turned off. If this occurs, promptly stop
the vehicle, turn off the ignition switch,
the vehicle, turn off the ignition switch, the vehicle, turn off the ignition switch,
the vehicle, turn off the ignition switch,
the vehicle, turn off the ignition switch,
and clean the rear window to allow prop-
and clean the rear window to allow prop- and clean the rear window to allow prop-
and clean the rear window to allow prop-
and clean the rear window to allow prop-
er wiper operation.
er wiper operation. er wiper operation.
er wiper operation.
er wiper operation.
(3)(3)
(3)(3)
(3) Do not use the wiper when the rear win-
Do not use the wiper when the rear win- Do not use the wiper when the rear win-
Do not use the wiper when the rear win-
Do not use the wiper when the rear win-
dow is dry; doing so could scratch the
dow is dry; doing so could scratch the dow is dry; doing so could scratch the
dow is dry; doing so could scratch the
dow is dry; doing so could scratch the
rear window and wear the blade prema-
rear window and wear the blade prema- rear window and wear the blade prema-
rear window and wear the blade prema-
rear window and wear the blade prema-
turely.
turely. turely.
turely.
turely.
B340F01A-GAT Daytime Running Lights (If installed)
Daytime Running Lights (If installed) Daytime Running Lights (If installed)
Daytime Running Lights (If installed)
Daytime Running Lights (If installed)
Your Hyundai is equipped with daytime running
lights. The daytime running lights are used to improve visibility for oncoming traffic. Your ve-
hicle daytime running lights are designed toremain on continuously when the engine isoperating even though the headlight switch is inthe "OFF" position. However, the daytime run-
ning lights will be off while the parking brake isapplied.
Page 53 of 173
INSTRUMENTS & CONTROLS
INSTRUMENTS & CONTROLS INSTRUMENTS & CONTROLS
INSTRUMENTS & CONTROLS
INSTRUMENTS & CONTROLS
2-14
MINIBUSVAN
2WD4WD 2WD
7/9
36
7
Driver only
Driver + Front passenger Driver, front pas-
senger + Farthest Rear Seat Full
Full passengers
Full passengers + Maximum Per- missible loading
LOADING
CONDITION
000
0
0 0
0
1 10
1 10
2 21
3 312
12
1
0
C220A01P-1
C220A01P-GAT
INSTRUMENT PANEL LIGHT CON-
INSTRUMENT PANEL LIGHT CON- INSTRUMENT PANEL LIGHT CON-
INSTRUMENT PANEL LIGHT CON-
INSTRUMENT PANEL LIGHT CON-
TROL
TROL TROL
TROL
TROL (=RHEOSTAT) (Minibus, Van)
(=RHEOSTAT) (Minibus, Van) (=RHEOSTAT) (Minibus, Van)
(=RHEOSTAT) (Minibus, Van)
(=RHEOSTAT) (Minibus, Van)
(If installed)
(If installed) (If installed)
(If installed)
(If installed) The instrument panel lights can be made brighter or dimmer by turning the instrument panel lightcontrol knob.
-
-
- -
- -
-
-
Driver+Maxi-
mum Permissi- ble loading
Loading condition Driver onlyDriver + PermissibleRR axle load
Truck 0 1
C210A01P-1
C210A04P-GAT
HEADLAMP LEVELING DEVICE SYS-
HEADLAMP LEVELING DEVICE SYS- HEADLAMP LEVELING DEVICE SYS-
HEADLAMP LEVELING DEVICE SYS-
HEADLAMP LEVELING DEVICE SYS-
TEM
TEM TEM
TEM
TEM (If installed)
(If installed) (If installed)
(If installed)
(If installed)
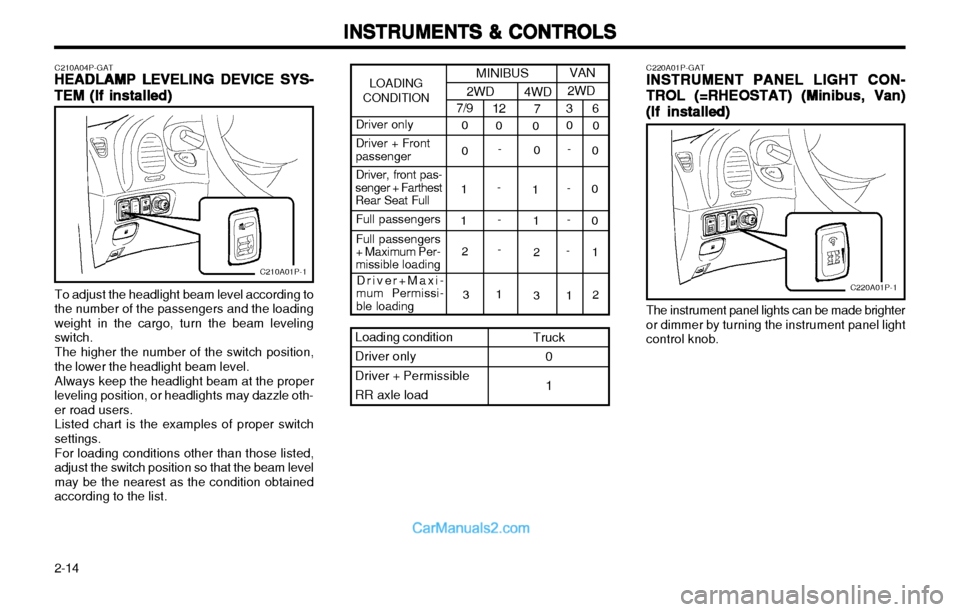
To adjust the headlight beam level according to
the number of the passengers and the loading weight in the cargo, turn the beam levelingswitch.
The higher the number of the switch position,
the lower the headlight beam level.
Always keep the headlight beam at the proper
leveling position, or headlights may dazzle oth-er road users. Listed chart is the examples of proper switch
settings.
For loading conditions other than those listed,
adjust the switch position so that the beam levelmay be the nearest as the condition obtainedaccording to the list.
Page 54 of 173
2-15
INSTRUMENTS & CONTROLS
INSTRUMENTS & CONTROLS INSTRUMENTS & CONTROLS
INSTRUMENTS & CONTROLS
INSTRUMENTS & CONTROLS
B620A01S-AATFRONT DOOR EDGE WARNING LIGHT
FRONT DOOR EDGE WARNING LIGHT FRONT DOOR EDGE WARNING LIGHT
FRONT DOOR EDGE WARNING LIGHT
FRONT DOOR EDGE WARNING LIGHT
(If installed)
(If installed) (If installed)
(If installed)
(If installed)
C230A01P-GAT
ENGINE RPM ADJUSTMENT KNOB
ENGINE RPM ADJUSTMENT KNOB ENGINE RPM ADJUSTMENT KNOB
ENGINE RPM ADJUSTMENT KNOB
ENGINE RPM ADJUSTMENT KNOB
(D(D
(D(D
(D iesel)
iesel) iesel)
iesel)
iesel)
C230A01P-1
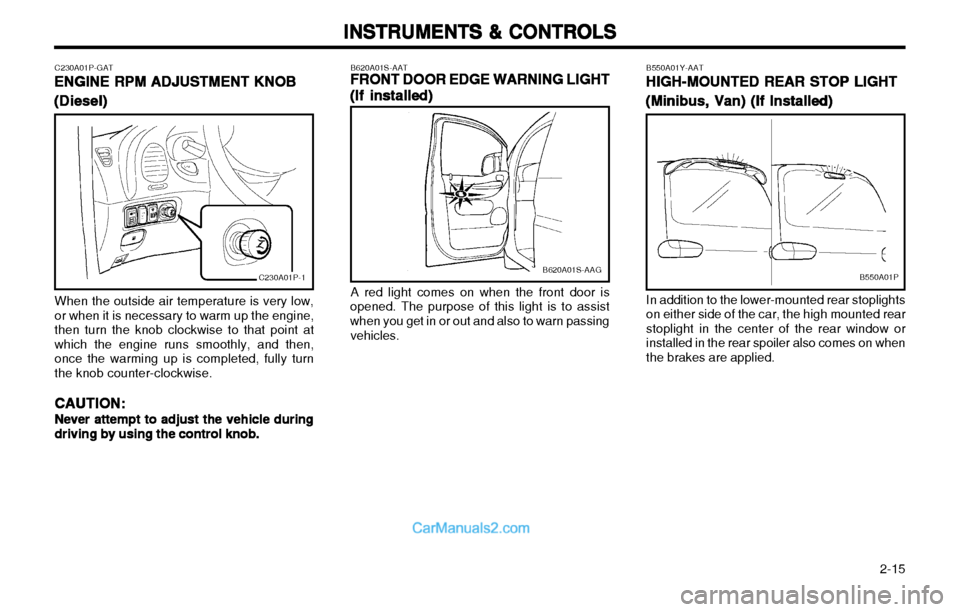
When the outside air temperature is very low, or when it is necessary to warm up the engine,then turn the knob clockwise to that point atwhich the engine runs smoothly, and then,once the warming up is completed, fully turnthe knob counter-clockwise.
CAUTION:
CAUTION: CAUTION:
CAUTION:
CAUTION:
Never attempt to adjust the vehicle during
Never attempt to adjust the vehicle during Never attempt to adjust the vehicle during
Never attempt to adjust the vehicle during
Never attempt to adjust the vehicle during
driving by using the control knob.
driving by using the control knob. driving by using the control knob.
driving by using the control knob.
driving by using the control knob.B620A01S-AAG
A red light comes on when the front door is
opened. The purpose of this light is to assist when you get in or out and also to warn passing
vehicles. B550A01Y-AAT
HIGH-MOUNTED REAR STOP LIGHT
HIGH-MOUNTED REAR STOP LIGHT HIGH-MOUNTED REAR STOP LIGHT
HIGH-MOUNTED REAR STOP LIGHT
HIGH-MOUNTED REAR STOP LIGHT
(Minibus, Van) (If Installed)
(Minibus, Van) (If Installed) (Minibus, Van) (If Installed)
(Minibus, Van) (If Installed)
(Minibus, Van) (If Installed)B550A01P
In addition to the lower-mounted rear stoplights on either side of the car, the high mounted rearstoplight in the center of the rear window orinstalled in the rear spoiler also comes on whenthe brakes are applied.
Page 55 of 173
INSTRUMENTS & CONTROLS
INSTRUMENTS & CONTROLS INSTRUMENTS & CONTROLS
INSTRUMENTS & CONTROLS
INSTRUMENTS & CONTROLS
2-16 B380A01A-AAT
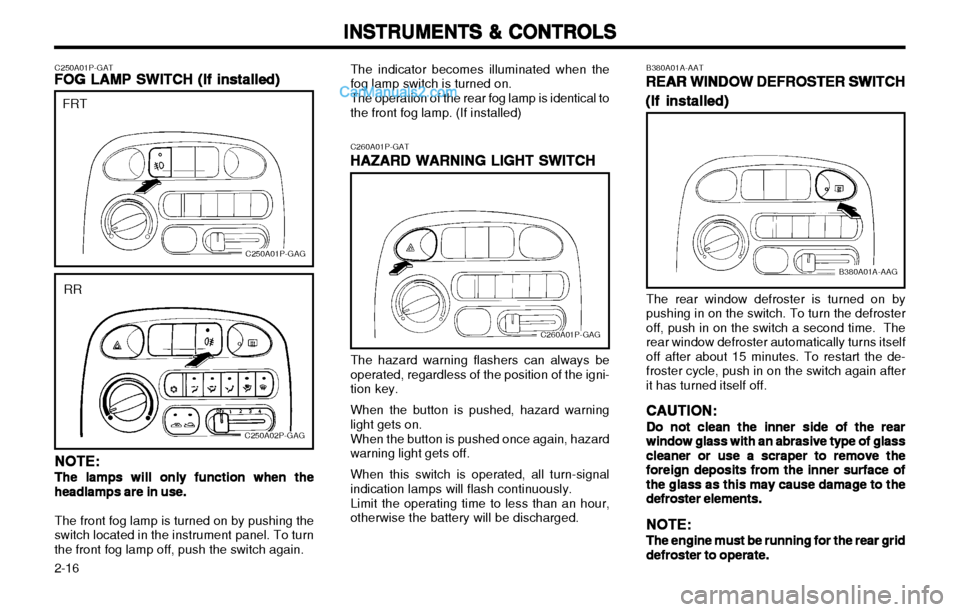
REAR WINDOW DEFROSTER SWITCH
REAR WINDOW DEFROSTER SWITCH REAR WINDOW DEFROSTER SWITCH
REAR WINDOW DEFROSTER SWITCH
REAR WINDOW DEFROSTER SWITCH
(If installed)
(If installed) (If installed)
(If installed)
(If installed)
B380A01A-AAG
The rear window defroster is turned on by
pushing in on the switch. To turn the defrosteroff, push in on the switch a second time. The
rear window defroster automatically turns itselfoff after about 15 minutes. To restart the de-froster cycle, push in on the switch again after
it has turned itself off. CAUTION:
CAUTION: CAUTION:
CAUTION:
CAUTION:
Do not clean the inner side of the rear
Do not clean the inner side of the rear Do not clean the inner side of the rear
Do not clean the inner side of the rear
Do not clean the inner side of the rear
window glass with an
window glass with an window glass with an
window glass with an
window glass with an abrasive type of glass
abrasive type of glass abrasive type of glass
abrasive type of glass
abrasive type of glass
cleaner or use a scraper to remove the
cleaner or use a scraper to remove the cleaner or use a scraper to remove the
cleaner or use a scraper to remove the
cleaner or use a scraper to remove the
foreign deposits
foreign deposits foreign deposits
foreign deposits
foreign deposits from the inner surface of
from the inner surface of from the inner surface of
from the inner surface of
from the inner surface of
the glass as this may cause damage to the
the glass as this may cause damage to the the glass as this may cause damage to the
the glass as this may cause damage to the
the glass as this may cause damage to the
defroster
defroster defroster
defroster
defroster
elements.
elements. elements.
elements.
elements.
NOTE:
NOTE: NOTE:
NOTE:
NOTE:
The engine must be running for the rear grid
The engine must be running for the rear grid The engine must be running for the rear grid
The engine must be running for the rear grid
The engine must be running for the rear grid
defroster to operate.
defroster to operate. defroster to operate.
defroster to operate.
defroster to operate.
C260A01P-GAT
HAZARD WARNING LIGHT SWITCH
HAZARD WARNING LIGHT SWITCH HAZARD WARNING LIGHT SWITCH
HAZARD WARNING LIGHT SWITCH
HAZARD WARNING LIGHT SWITCHThe indicator becomes illuminated when thefog lamp switch is turned on. The operation of the rear fog lamp is identical to the front fog lamp. (If installed)
C260A01P-GAG
The hazard warning flashers can always be operated, regardless of the position of the igni-tion key. When the button is pushed, hazard warning light gets on. When the button is pushed once again, hazard warning light gets off. When this switch is operated, all turn-signal indication lamps will flash continuously. Limit the operating time to less than an hour, otherwise the battery will be discharged.
C250A01P-GAT
FOG LAMP SWITCH
FOG LAMP SWITCH FOG LAMP SWITCH
FOG LAMP SWITCH
FOG LAMP SWITCH
(If installed)
(If installed) (If installed)
(If installed)
(If installed)
C250A01P-GAG
FRT
C250A02P-GAG
RR
NOTE:
NOTE: NOTE:
NOTE:
NOTE:
The lamps will only function when the
The lamps will only function when the The lamps will only function when the
The lamps will only function when the
The lamps will only function when the headlamps are in use.
headlamps are in use. headlamps are in use.
headlamps are in use.
headlamps are in use.
The front fog lamp is turned on by pushing the
switch located in the instrument panel. To turn the front fog lamp off, push the switch again.
Page 56 of 173
2-17
INSTRUMENTS & CONTROLS
INSTRUMENTS & CONTROLS INSTRUMENTS & CONTROLS
INSTRUMENTS & CONTROLS
INSTRUMENTS & CONTROLS
C280A01P-GAT HORN SWITCH
HORN SWITCH HORN SWITCH
HORN SWITCH
HORN SWITCH
C280A01P-GAG
The horn button is located in the steering wheel. The horn sounds when the horn button is pressed. B480A01P-AAT
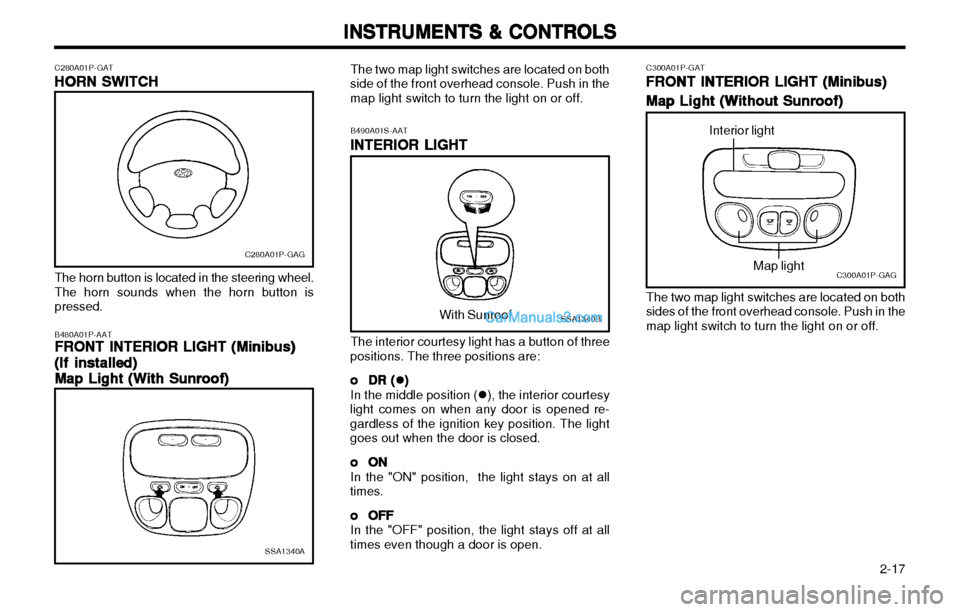
FRONT INTERIOR LIGHT (Minibus)
FRONT INTERIOR LIGHT (Minibus) FRONT INTERIOR LIGHT (Minibus)
FRONT INTERIOR LIGHT (Minibus)
FRONT INTERIOR LIGHT (Minibus)
(If installed)
(If installed) (If installed)
(If installed)
(If installed)
Map Light (With Sunroof)
Map Light (With Sunroof) Map Light (With Sunroof)
Map Light (With Sunroof)
Map Light (With Sunroof)
SSA1340A
The two map light switches are located on both
side of the front overhead console. Push in the map light switch to turn the light on or off.
B490A01S-AATINTERIOR LIGHT
INTERIOR LIGHT INTERIOR LIGHT
INTERIOR LIGHT
INTERIOR LIGHT
SSA1340BWith Sunroof
The interior courtesy light has a button of three
positions. The three positions are:
oo
oo
o DR (
DR ( DR (
DR (
DR ( �
))
))
)
In the middle position ( �), the interior courtesy
light comes on when any door is opened re- gardless of the ignition key position. The lightgoes out when the door is closed.
oo
oo
o ONON
ONON
ON
In the "ON" position, the light stays on at all
times.
oo
oo
o OFFOFF
OFFOFF
OFF
In the "OFF" position, the light stays off at all
times even though a door is open. C300A01P-GAT
FRONT INTERIOR LIGHT (Minibus)
FRONT INTERIOR LIGHT (Minibus) FRONT INTERIOR LIGHT (Minibus)
FRONT INTERIOR LIGHT (Minibus)
FRONT INTERIOR LIGHT (Minibus)
Map Light (Without Sunroof)
Map Light (Without Sunroof) Map Light (Without Sunroof)
Map Light (Without Sunroof)
Map Light (Without Sunroof)
C300A01P-GAG
Interior light
Map light
The two map light switches are located on both
sides of the front overhead console. Push in the map light switch to turn the light on or off.
Page 57 of 173
INSTRUMENTS & CONTROLS
INSTRUMENTS & CONTROLS INSTRUMENTS & CONTROLS
INSTRUMENTS & CONTROLS
INSTRUMENTS & CONTROLS
2-18 C320A01P-GAT
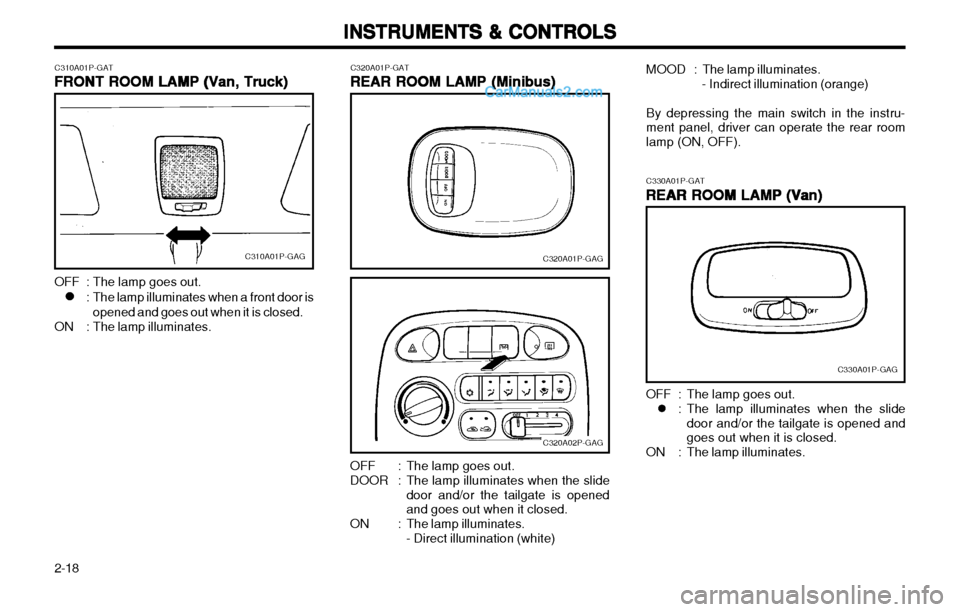
REAR ROOM LAMP (Minibus)
REAR ROOM LAMP (Minibus) REAR ROOM LAMP (Minibus)
REAR ROOM LAMP (Minibus)
REAR ROOM LAMP (Minibus)
C320A01P-GAG
C320A02P-GAGC330A01P-GAT
REAR ROOM LAMP (Van)
REAR ROOM LAMP (Van) REAR ROOM LAMP (Van)
REAR ROOM LAMP (Van)
REAR ROOM LAMP (Van)
C330A01P-GAG
OFF : The lamp goes out. � : The lamp illuminates when the slide
door and/or the tailgate is opened and goes out when it is closed.
ON : The lamp illuminates.
OFF : The lamp goes out.
DOOR : The lamp illuminates when the slide
door and/or the tailgate is opened and goes out when it closed.
ON : The lamp illuminates.
- Direct illumination (white) MOOD : The lamp illuminates.
- Indirect illumination (orange)
By depressing the main switch in the instru-ment panel, driver can operate the rear roomlamp (ON, OFF).
OFF : The lamp goes out.
� � : The lamp illuminates when a front door is
opened and goes out when it is closed.
ON : The lamp illuminates. C310A01P-GAT
FRONT ROOM LAMP (Van, Truck)
FRONT ROOM LAMP (Van, Truck) FRONT ROOM LAMP (Van, Truck)
FRONT ROOM LAMP (Van, Truck)
FRONT ROOM LAMP (Van, Truck)
C310A01P-GAG
Page 58 of 173
2-19
INSTRUMENTS & CONTROLS
INSTRUMENTS & CONTROLS INSTRUMENTS & CONTROLS
INSTRUMENTS & CONTROLS
INSTRUMENTS & CONTROLS
B470A01S-AAT SUNSHADE (Minibus) (If installed)
SUNSHADE (Minibus) (If installed) SUNSHADE (Minibus) (If installed)
SUNSHADE (Minibus) (If installed)
SUNSHADE (Minibus) (If installed)
B470A01S-AAG
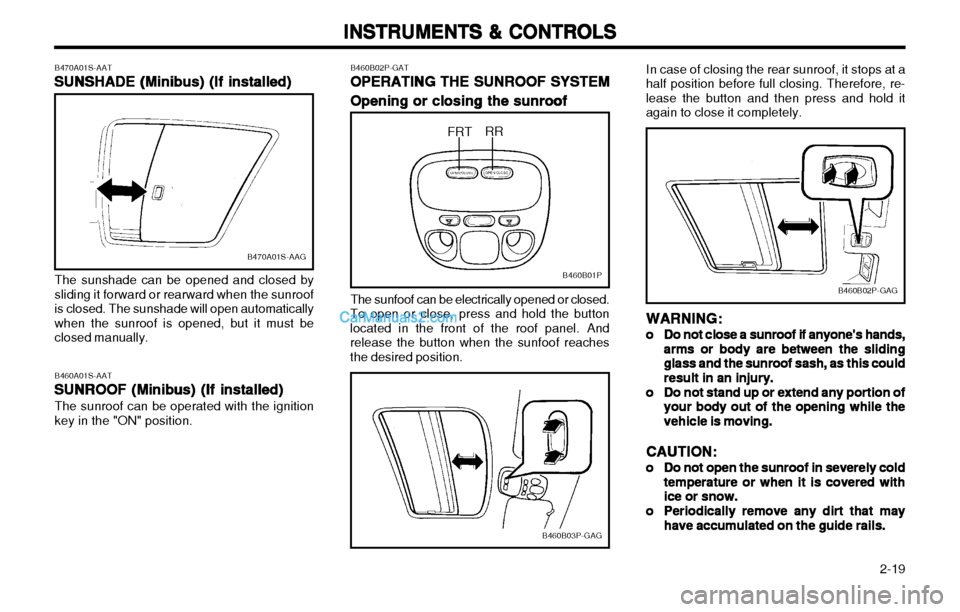
The sunshade can be opened and closed by
sliding it forward or rearward when the sunroof
is closed. The sunshade will open automaticallywhen the sunroof is opened, but it must beclosed manually. B460A01S-AAT
SUNROOF (Minibus) (If installed)
SUNROOF (Minibus) (If installed) SUNROOF (Minibus) (If installed)
SUNROOF (Minibus) (If installed)
SUNROOF (Minibus) (If installed)
The sunroof can be operated with the ignition
key in the "ON" position. B460B02P-GAT
OPERATING THE SUNROOF SYSTEM
OPERATING THE SUNROOF SYSTEM OPERATING THE SUNROOF SYSTEM
OPERATING THE SUNROOF SYSTEM
OPERATING THE SUNROOF SYSTEM
Opening or closing the sunroof
Opening or closing the sunroof Opening or closing the sunroof
Opening or closing the sunroof
Opening or closing the sunroofB460B01P
FRT RR
The sunfoof can be electrically opened or closed.
To open or close, press and hold the button located in the front of the roof panel. Andrelease the button when the sunfoof reachesthe desired position.
B460B03P-GAG
B460B02P-GAG
In case of closing the rear sunroof, it stops at a
half position before full closing. Therefore, re- lease the button and then press and hold itagain to close it completely.
WARNING:
WARNING: WARNING:
WARNING:
WARNING:
oo
oo
o Do not close a sunroof if anyone's hands,
Do not close a sunroof if anyone's hands, Do not close a sunroof if anyone's hands,
Do not close a sunroof if anyone's hands,
Do not close a sunroof if anyone's hands,
arms or body are between the sliding
arms or body are between the sliding arms or body are between the sliding
arms or body are between the sliding
arms or body are between the sliding
glass and the sunroof sash, as this could
glass and the sunroof sash, as this could glass and the sunroof sash, as this could
glass and the sunroof sash, as this could
glass and the sunroof sash, as this could
result in an injury.
result in an injury. result in an injury.
result in an injury.
result in an injury.
oo
oo
o Do not stand up or extend any portion of
Do not stand up or extend any portion of Do not stand up or extend any portion of
Do not stand up or extend any portion of
Do not stand up or extend any portion of
your body out of the opening while the
your body out of the opening while the your body out of the opening while the
your body out of the opening while the
your body out of the opening while the
vehicle is moving.
vehicle is moving. vehicle is moving.
vehicle is moving.
vehicle is moving.
CAUTION:
CAUTION: CAUTION:
CAUTION:
CAUTION:
oo
oo
o Do not open the sunroof in severely cold
Do not open the sunroof in severely cold Do not open the sunroof in severely cold
Do not open the sunroof in severely cold
Do not open the sunroof in severely cold
temperature or when it is covered with
temperature or when it is covered with temperature or when it is covered with
temperature or when it is covered with
temperature or when it is covered with
ice or snow.
ice or snow. ice or snow.
ice or snow.
ice or snow.
oo
oo
o Periodically remove any dirt that may
Periodically remove any dirt that may Periodically remove any dirt that may
Periodically remove any dirt that may
Periodically remove any dirt that may
have accumulated on the guide rails.
have accumulated on the guide rails. have accumulated on the guide rails.
have accumulated on the guide rails.
have accumulated on the guide rails.
Page 59 of 173
INSTRUMENTS & CONTROLS
INSTRUMENTS & CONTROLS INSTRUMENTS & CONTROLS
INSTRUMENTS & CONTROLS
INSTRUMENTS & CONTROLS
2-20
B460E01P-GAG
B460E01P-GAT Rear sunroof
Rear sunroof Rear sunroof
Rear sunroof
Rear sunroof
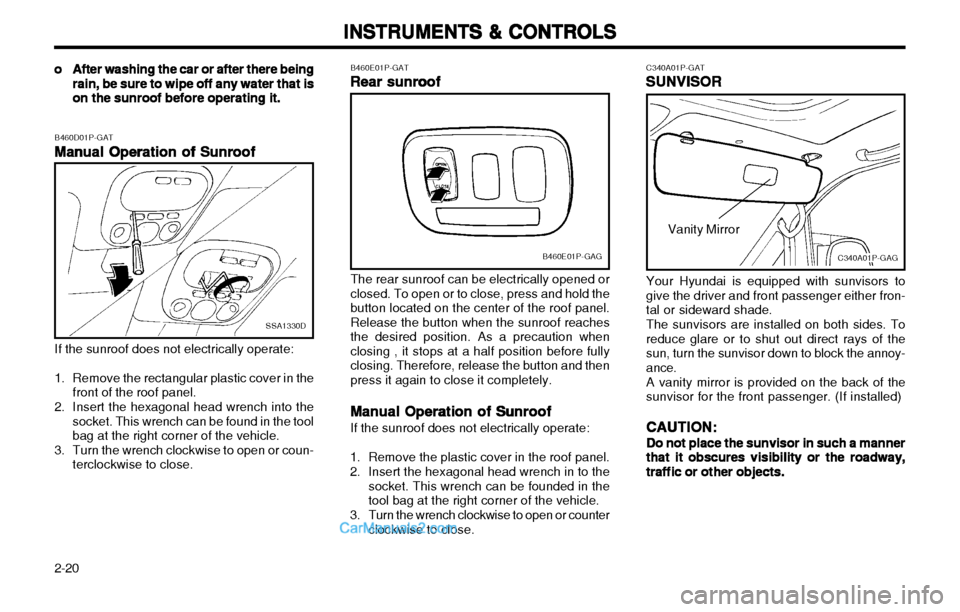
The rear sunroof can be electrically opened or closed. To open or to close, press and hold thebutton located on the center of the roof panel.Release the button when the sunroof reachesthe desired position. As a precaution whenclosing , it stops at a half position before fullyclosing. Therefore, release the button and thenpress it again to close it completely.Manual Operation of Sunroof
Manual Operation of Sunroof Manual Operation of Sunroof
Manual Operation of Sunroof
Manual Operation of Sunroof
If the sunroof does not electrically operate:
1. Remove the plastic cover in the roof panel.
2. Insert the hexagonal head wrench in to the socket. This wrench can be founded in the tool bag at the right corner of the vehicle.
3. Turn the wrench clockwise to open or counter clockwise to close. C340A01P-GAT
SUNVISOR
SUNVISOR SUNVISOR
SUNVISOR
SUNVISOR
C340A01P-GAG
Vanity Mirror
Your Hyundai is equipped with sunvisors to give the driver and front passenger either fron-tal or sideward shade. The sunvisors are installed on both sides. To reduce glare or to shut out direct rays of thesun, turn the sunvisor down to block the annoy-ance. A vanity mirror is provided on the back of the sunvisor for the front passenger. (If installed) CAUTION:
CAUTION: CAUTION:
CAUTION:
CAUTION:
Do not place the sunvisor in such a manner
Do not place the sunvisor in such a manner Do not place the sunvisor in such a manner
Do not place the sunvisor in such a manner
Do not place the sunvisor in such a manner
that it obscures visibility or the roadway,
that it obscures visibility or the roadway, that it obscures visibility or the roadway,
that it obscures visibility or the roadway,
that it obscures visibility or the roadway,
traffic or other objects.
traffic or other objects. traffic or other objects.
traffic or other objects.
traffic or other objects.
oo
oo
o After washing the car or after there being
After washing the car or after there being After washing the car or after there being
After washing the car or after there being
After washing the car or after there being
rain, be sure to wipe off any water that is
rain, be sure to wipe off any water that is rain, be sure to wipe off any water that is
rain, be sure to wipe off any water that is
rain, be sure to wipe off any water that is
on the sunroof before operating it.
on the sunroof before operating it. on the sunroof before operating it.
on the sunroof before operating it.
on the sunroof before operating it.
SSA1330D
B460D01P-GAT
Manual Operation of Sunroof
Manual Operation of Sunroof Manual Operation of Sunroof
Manual Operation of Sunroof
Manual Operation of Sunroof
If the sunroof does not electrically operate:
1. Remove the rectangular plastic cover in the front of the roof panel.
2. Insert the hexagonal head wrench into the socket. This wrench can be found in the tool bag at the right corner of the vehicle.
3. Turn the wrench clockwise to open or coun- terclockwise to close.
Page 60 of 173
2-21
INSTRUMENTS & CONTROLS
INSTRUMENTS & CONTROLS INSTRUMENTS & CONTROLS
INSTRUMENTS & CONTROLS
INSTRUMENTS & CONTROLS
B630A02P-GAT ROOF RACK (Minibus) (If installed)
ROOF RACK (Minibus) (If installed) ROOF RACK (Minibus) (If installed)
ROOF RACK (Minibus) (If installed)
ROOF RACK (Minibus) (If installed)
C630A01P-GAG
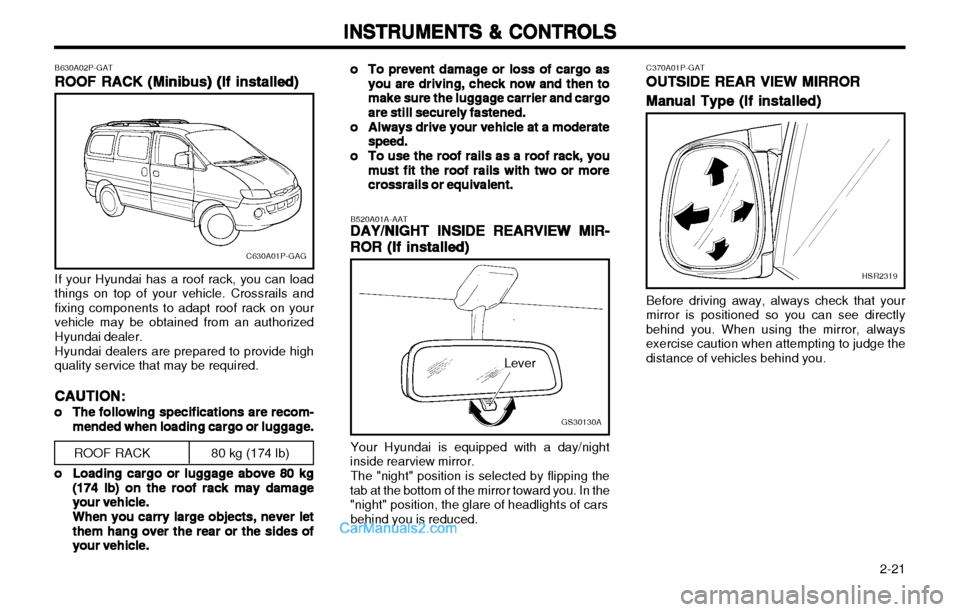
If your Hyundai has a roof rack, you can load things on top of your vehicle. Crossrails andfixing components to adapt roof rack on yourvehicle may be obtained from an authorizedHyundai dealer. Hyundai dealers are prepared to provide high quality service that may be required.
CAUTION:
CAUTION: CAUTION:
CAUTION:
CAUTION:
oo
oo
o The following specifications are recom-
The following specifications are recom- The following specifications are recom-
The following specifications are recom-
The following specifications are recom-
mended when loading cargo or luggage.
mended when loading cargo or luggage. mended when loading cargo or luggage.
mended when loading cargo or luggage.
mended when loading cargo or luggage.
ROOF RACK
80 kg (174 lb)
oo
oo
o Loading cargo or luggage above 80 kg
Loading cargo or luggage above 80 kg Loading cargo or luggage above 80 kg
Loading cargo or luggage above 80 kg
Loading cargo or luggage above 80 kg
(174 lb) on the roof rack may damage
(174 lb) on the roof rack may damage (174 lb) on the roof rack may damage
(174 lb) on the roof rack may damage
(174 lb) on the roof rack may damage
your vehicle.
your vehicle. your vehicle.
your vehicle.
your vehicle.
When you carry large objects, never let
When you carry large objects, never let When you carry large objects, never let
When you carry large objects, never let
When you carry large objects, never let
them hang over the rear or the sides of
them hang over the rear or the sides of them hang over the rear or the sides of
them hang over the rear or the sides of
them hang over the rear or the sides of
your vehicle.
your vehicle. your vehicle.
your vehicle.
your vehicle.
GS30130A
Lever
B520A01A-AAT
DAY/NIGHT INSIDE REARVIEW MIR-
DAY/NIGHT INSIDE REARVIEW MIR- DAY/NIGHT INSIDE REARVIEW MIR-
DAY/NIGHT INSIDE REARVIEW MIR-
DAY/NIGHT INSIDE REARVIEW MIR-
ROR (If installed)
ROR (If installed) ROR (If installed)
ROR (If installed)
ROR (If installed)
Your Hyundai is equipped with a day/night
inside rearview mirror.
The "night" position is selected by flipping the
tab at the bottom of the mirror toward you. In the "night" position, the glare of headlights of cars behind you is reduced.
oo
oo
o To prevent damage or loss of cargo as
To prevent damage or loss of cargo as To prevent damage or loss of cargo as
To prevent damage or loss of cargo as
To prevent damage or loss of cargo as
you are driving, check now and then to
you are driving, check now and then to you are driving, check now and then to
you are driving, check now and then to
you are driving, check now and then to
make sure the luggage carrier and cargo
make sure the luggage carrier and cargo make sure the luggage carrier and cargo
make sure the luggage carrier and cargo
make sure the luggage carrier and cargo
are still securely fastened.
are still securely fastened. are still securely fastened.
are still securely fastened.
are still securely fastened.
oo
oo
o
Always drive your vehicle at a moderate
Always drive your vehicle at a moderate Always drive your vehicle at a moderate
Always drive your vehicle at a moderate
Always drive your vehicle at a moderate
speed.
speed. speed.
speed.
speed.
oo
oo
o To use the roof rails as a roof rack, you
To use the roof rails as a roof rack, you To use the roof rails as a roof rack, you
To use the roof rails as a roof rack, you
To use the roof rails as a roof rack, you
must fit the roof rails with two or more
must fit the roof rails with two or more must fit the roof rails with two or more
must fit the roof rails with two or more
must fit the roof rails with two or more
crossrails or equivalent.
crossrails or equivalent. crossrails or equivalent.
crossrails or equivalent.
crossrails or equivalent. C370A01P-GAT
OUTSIDE REAR VIEW MIRROR
OUTSIDE REAR VIEW MIRROR OUTSIDE REAR VIEW MIRROR
OUTSIDE REAR VIEW MIRROR
OUTSIDE REAR VIEW MIRROR
Manual Type (If installed)
Manual Type (If installed) Manual Type (If installed)
Manual Type (If installed)
Manual Type (If installed) Before driving away, always check that your mirror is positioned so you can see directlybehind you. When using the mirror, alwaysexercise caution when attempting to judge thedistance of vehicles behind you.
HSR2319