brake Hyundai H-1 (Grand Starex) 2003 Owner's Manual
[x] Cancel search | Manufacturer: HYUNDAI, Model Year: 2003, Model line: H-1 (Grand Starex), Model: Hyundai H-1 (Grand Starex) 2003Pages: 173, PDF Size: 3.68 MB
Page 8 of 173
1-1
BEFORE DRIVING YOUR VEHICLE
BEFORE DRIVING YOUR VEHICLE BEFORE DRIVING YOUR VEHICLE
BEFORE DRIVING YOUR VEHICLE
BEFORE DRIVING YOUR VEHICLE
B000A01P-GAT 1.1.
1.1.
1.
BEFORE DRIVING
BEFORE DRIVING BEFORE DRIVING
BEFORE DRIVING
BEFORE DRIVING
YY
YY
Y
OUR
OUR OUR
OUR
OUR VEHICLE
VEHICLE VEHICLE
VEHICLE
VEHICLE
B010B01P-GAT Before entering the vehicle
Before entering the vehicle Before entering the vehicle
Before entering the vehicle
Before entering the vehicle
o Check that windows, mirrors and lights are clean.
o Check if any tire is low or flat.
o Look for fluid leaks.
o Check that area is clear if you’re about to back up.
B010C03P-GAT After entering the vehicle
After entering the vehicle After entering the vehicle
After entering the vehicle
After entering the vehicle
o Lock all doors.
o The driver and passengers are wearing prop- erly adjusted seat belts.
o The head restraints are properly adjusted, if so equipped.
o Adjust inside and outside mirrors.
o Check warning lights for correct operation, with the ignition key in the position "ON".
o Check all gauges, for normal operation.
B010A01P-GAT
BEFORE DRIVING YOUR VEHICLE
BEFORE DRIVING YOUR VEHICLE BEFORE DRIVING YOUR VEHICLE
BEFORE DRIVING YOUR VEHICLE
BEFORE DRIVING YOUR VEHICLE
SAFETY CHECKS
SAFETY CHECKS SAFETY CHECKS
SAFETY CHECKS
SAFETY CHECKS
Be sure you know your vehicle and its equip-
ment and how to use it safely.
B020A01P-GATRUNNING-IN RECOMMENDATIONS
RUNNING-IN RECOMMENDATIONS RUNNING-IN RECOMMENDATIONS
RUNNING-IN RECOMMENDATIONS
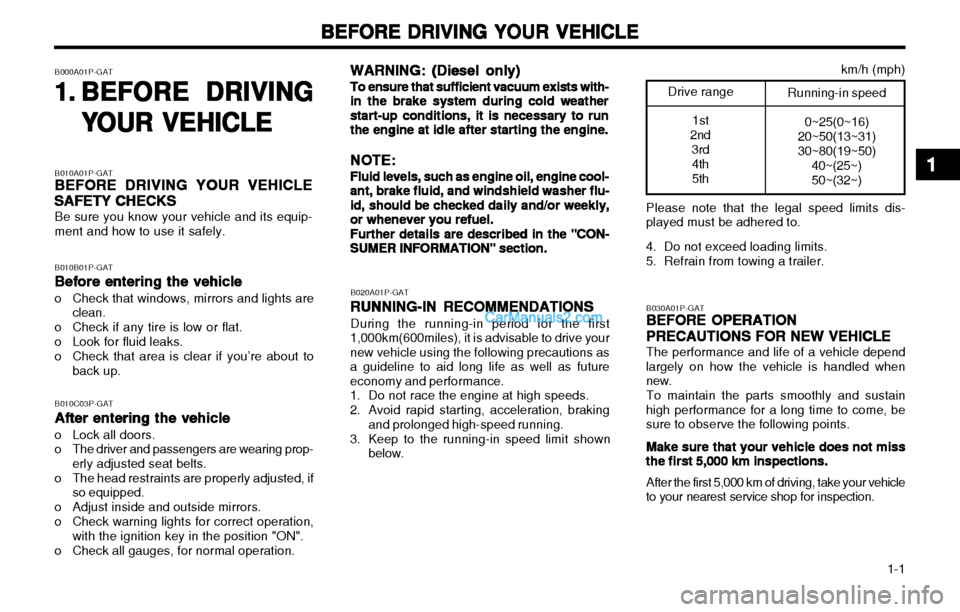
RUNNING-IN RECOMMENDATIONS During the running-in period for the first
1,000km(600miles), it is advisable to drive your new vehicle using the following precautions asa guideline to aid long life as well as futureeconomy and performance.
1. Do not race the engine at high speeds.
2. Avoid rapid starting, acceleration, braking and prolonged high-speed running.
3. Keep to the running-in speed limit shown below. B030A01P-GAT
BEFORE OPERATION
BEFORE OPERATION BEFORE OPERATION
BEFORE OPERATION
BEFORE OPERATION
PRECAUTIONS FOR NEW VEHICLE
PRECAUTIONS FOR NEW VEHICLE PRECAUTIONS FOR NEW VEHICLE
PRECAUTIONS FOR NEW VEHICLE
PRECAUTIONS FOR NEW VEHICLE The performance and life of a vehicle depend
largely on how the vehicle is handled when new.
To maintain the parts smoothly and sustain
high performance for a long time to come, besure to observe the following points.
Make sure that your vehicle does not miss
Make sure that your vehicle does not miss Make sure that your vehicle does not miss
Make sure that your vehicle does not miss
Make sure that your vehicle does not miss the first 5,000 km inspections.
the first 5,000 km inspections. the first 5,000 km inspections.
the first 5,000 km inspections.
the first 5,000 km inspections.
After the first 5,000 km of driving, take your vehicle
to your nearest service shop for inspection.
Drive range
1st
2nd 3rd4th 5thRunning-in speed
0~25(0~16)
20~50(13~31) 30~80(19~50)
40~(25~)50~(32~) km/h (mph)
WARNING: (Diesel only)
WARNING: (Diesel only) WARNING: (Diesel only)
WARNING: (Diesel only)
WARNING: (Diesel only)
To ensure that sufficient vacuum exists with-
To ensure that sufficient vacuum exists with- To ensure that sufficient vacuum exists with-
To ensure that sufficient vacuum exists with-
To ensure that sufficient vacuum exists with-in the brake system during cold weather
in the brake system during cold weather in the brake system during cold weather
in the brake system during cold weather
in the brake system during cold weather
start-up conditions, it is necessary to run
start-up conditions, it is necessary to run start-up conditions, it is necessary to run
start-up conditions, it is necessary to run
start-up conditions, it is necessary to run
the engine at idle after starting the engine.
the engine at idle after starting the engine. the engine at idle after starting the engine.
the engine at idle after starting the engine.
the engine at idle after starting the engine.
NOTE:
NOTE: NOTE:
NOTE:
NOTE:
Fluid levels, such as engine oil, engine cool-
Fluid levels, such as engine oil, engine cool- Fluid levels, such as engine oil, engine cool-
Fluid levels, such as engine oil, engine cool-
Fluid levels, such as engine oil, engine cool-ant, brake fluid, and windshield washer flu-
ant, brake fluid, and windshield washer flu- ant, brake fluid, and windshield washer flu-
ant, brake fluid, and windshield washer flu-
ant, brake fluid, and windshield washer flu-
id, should be checked daily and/or weekly,
id, should be checked daily and/or weekly, id, should be checked daily and/or weekly,
id, should be checked daily and/or weekly,
id, should be checked daily and/or weekly,
or whenever you refuel.
or whenever you refuel. or whenever you refuel.
or whenever you refuel.
or whenever you refuel.
Further details are described in the "CON-
Further details are described in the "CON- Further details are described in the "CON-
Further details are described in the "CON-
Further details are described in the "CON-SUMER INFORMATION" section.
SUMER INFORMATION" section. SUMER INFORMATION" section.
SUMER INFORMATION" section.
SUMER INFORMATION" section.
11
11
1
Please note that the legal speed limits dis-
played must be adhered to.
4. Do not exceed loading limits.
5. Refrain from towing a trailer.
Page 47 of 173
INSTRUMENTS & CONTROLS
INSTRUMENTS & CONTROLS INSTRUMENTS & CONTROLS
INSTRUMENTS & CONTROLS
INSTRUMENTS & CONTROLS
2-8 C130A04P-GAT
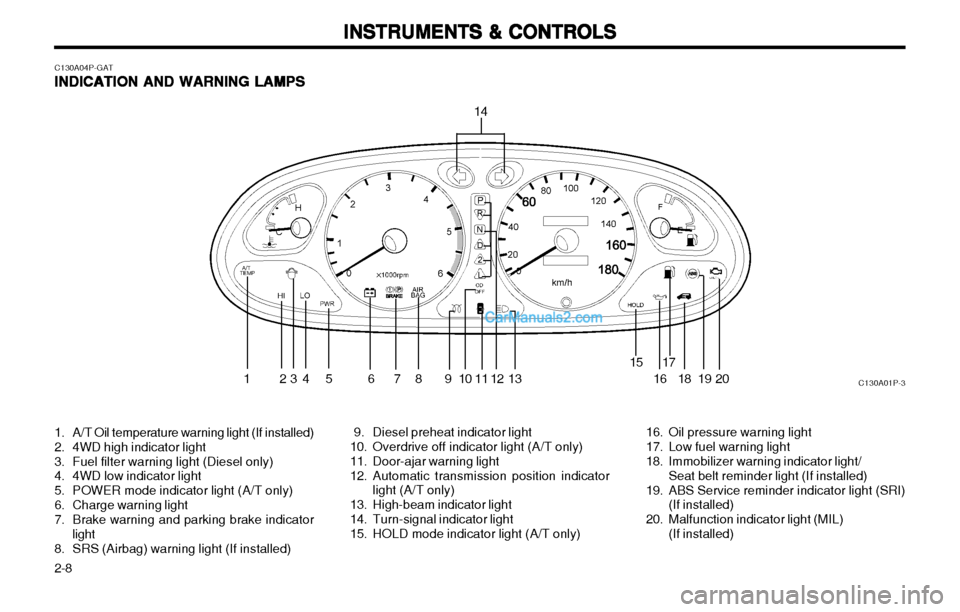
INDICATION AND WARNING LAMPS
INDICATION AND WARNING LAMPS INDICATION AND WARNING LAMPS
INDICATION AND WARNING LAMPS
INDICATION AND WARNING LAMPS
1. A/T Oil temperature warning light (If installed)
2. 4WD high indicator light
3. Fuel filter warning light (Diesel only)
4. 4WD low indicator light
5. POWER mode indicator light (A/T only)
6. Charge warning light
7. Brake warning and parking brake indicator
light
8. SRS (Airbag) warning light (If installed) 9. Diesel preheat indicator light
10. Overdrive off indicator light (A/T only)
11. Door-ajar warning light
12. Automatic transmission position indicator
light (A/T only)
13. High-beam indicator light
14. Turn-signal indicator light
15. HOLD mode indicator light (A/T only) 16. Oil pressure warning light
17. Low fuel warning light
18. Immobilizer warning indicator light/
Seat belt reminder light (If installed)
19. ABS Service reminder indicator light (SRI) (If installed)
20. Malfunction indicator light (MIL) (If installed)
2
C130A01P-3
14
13 678 1 618 19 20
17
12
111091 345
15
Page 48 of 173
2-9
INSTRUMENTS & CONTROLS
INSTRUMENTS & CONTROLS INSTRUMENTS & CONTROLS
INSTRUMENTS & CONTROLS
INSTRUMENTS & CONTROLS
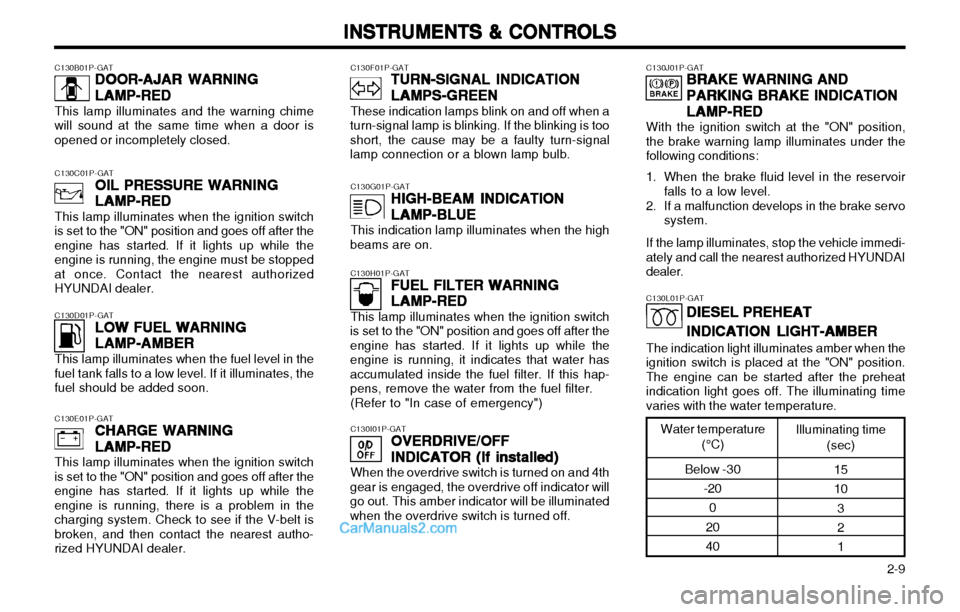
C130B01P-GAT DOOR-AJAR WARNING
DOOR-AJAR WARNING DOOR-AJAR WARNING
DOOR-AJAR WARNING
DOOR-AJAR WARNING
LAMP-RED
LAMP-RED LAMP-RED
LAMP-RED
LAMP-RED
This lamp illuminates and the warning chime
will sound at the same time when a door is opened or incompletely closed.
C130F01P-GAT TURN-SIGNAL INDICATION
TURN-SIGNAL INDICATION TURN-SIGNAL INDICATION
TURN-SIGNAL INDICATION
TURN-SIGNAL INDICATION
LAMPS-GREEN
LAMPS-GREEN LAMPS-GREEN
LAMPS-GREEN
LAMPS-GREEN
These indication lamps blink on and off when a
turn-signal lamp is blinking. If the blinking is too short, the cause may be a faulty turn-signallamp connection or a blown lamp bulb.
C130G01P-GAT HIGH-BEAM INDICATION
HIGH-BEAM INDICATION HIGH-BEAM INDICATION
HIGH-BEAM INDICATION
HIGH-BEAM INDICATION
LAMP-BLUE
LAMP-BLUE LAMP-BLUE
LAMP-BLUE
LAMP-BLUE
This indication lamp illuminates when the high
beams are on.
C130H01P-GAT FUEL FILTER WARNING
FUEL FILTER WARNING FUEL FILTER WARNING
FUEL FILTER WARNING
FUEL FILTER WARNING
LAMP-RED
LAMP-RED LAMP-RED
LAMP-RED
LAMP-RED
This lamp illuminates when the ignition switch
is set to the "ON" position and goes off after the engine has started. If it lights up while theengine is running, it indicates that water hasaccumulated inside the fuel filter. If this hap-pens, remove the water from the fuel filter.
(Refer to "In case of emergency")
C130I01P-GAT OVERDRIVE/OFF
OVERDRIVE/OFF OVERDRIVE/OFF
OVERDRIVE/OFF
OVERDRIVE/OFF
INDICATOR (If installed)
INDICATOR (If installed) INDICATOR (If installed)
INDICATOR (If installed)
INDICATOR (If installed)
When the overdrive switch is turned on and 4th
gear is engaged, the overdrive off indicator will go out. This amber indicator will be illuminatedwhen the overdrive switch is turned off.
C130J01P-GAT BRAKE WARNING AND
BRAKE WARNING AND BRAKE WARNING AND
BRAKE WARNING AND
BRAKE WARNING AND
PARKING BRAKE INDICATION
PARKING BRAKE INDICATION PARKING BRAKE INDICATION
PARKING BRAKE INDICATION
PARKING BRAKE INDICATION
LAMP-RED
LAMP-RED LAMP-RED
LAMP-RED
LAMP-RED
With the ignition switch at the "ON" position,
the brake warning lamp illuminates under the following conditions:
1. When the brake fluid level in the reservoir falls to a low level.
2. If a malfunction develops in the brake servo system.
If the lamp illuminates, stop the vehicle immedi-
ately and call the nearest authorized HYUNDAI dealer.
C130C01P-GAT
OIL PRESSURE WARNING
OIL PRESSURE WARNING OIL PRESSURE WARNING
OIL PRESSURE WARNING
OIL PRESSURE WARNING
LAMP-RED
LAMP-RED LAMP-RED
LAMP-RED
LAMP-RED
This lamp illuminates when the ignition switch
is set to the "ON" position and goes off after theengine has started. If it lights up while theengine is running, the engine must be stoppedat once. Contact the nearest authorizedHYUNDAI dealer.
C130D01P-GAT LOW FUEL WARNING
LOW FUEL WARNING LOW FUEL WARNING
LOW FUEL WARNING
LOW FUEL WARNING
LAMP-AMBER
LAMP-AMBER LAMP-AMBER
LAMP-AMBER
LAMP-AMBER
This lamp illuminates when the fuel level in the
fuel tank falls to a low level. If it illuminates, the fuel should be added soon.
C130E01P-GAT CHARGE WARNING
CHARGE WARNING CHARGE WARNING
CHARGE WARNING
CHARGE WARNING
LAMP-RED
LAMP-RED LAMP-RED
LAMP-RED
LAMP-RED
This lamp illuminates when the ignition switch
is set to the "ON" position and goes off after the engine has started. If it lights up while theengine is running, there is a problem in thecharging system. Check to see if the V-belt isbroken, and then contact the nearest autho-rized HYUNDAI dealer.
C130L01P-GAT
DIESEL PREHEAT
DIESEL PREHEAT DIESEL PREHEAT
DIESEL PREHEAT
DIESEL PREHEAT
INDICATION LIGHT-AMBER
INDICATION LIGHT-AMBER INDICATION LIGHT-AMBER
INDICATION LIGHT-AMBER
INDICATION LIGHT-AMBER
The indication light illuminates amber when the
ignition switch is placed at the "ON" position. The engine can be started after the preheatindication light goes off. The illuminating timevaries with the water temperature.
Water temperature
(°C)
Below -30 -20
0
20 40 Illuminating time
(sec)
151032 1
Page 49 of 173
INSTRUMENTS & CONTROLS
INSTRUMENTS & CONTROLS INSTRUMENTS & CONTROLS
INSTRUMENTS & CONTROLS
INSTRUMENTS & CONTROLS
2-10 C130P01P-GAT
A/T (AUTOMATIC TRANSMIS-
A/T (AUTOMATIC TRANSMIS- A/T (AUTOMATIC TRANSMIS-
A/T (AUTOMATIC TRANSMIS-
A/T (AUTOMATIC TRANSMIS-
SION) OIL TEMPERATURE
SION) OIL TEMPERATURE SION) OIL TEMPERATURE
SION) OIL TEMPERATURE
SION) OIL TEMPERATURE
WARNING LIGHT
WARNING LIGHT WARNING LIGHT
WARNING LIGHT
WARNING LIGHT
(If installed)
(If installed) (If installed)
(If installed)
(If installed)
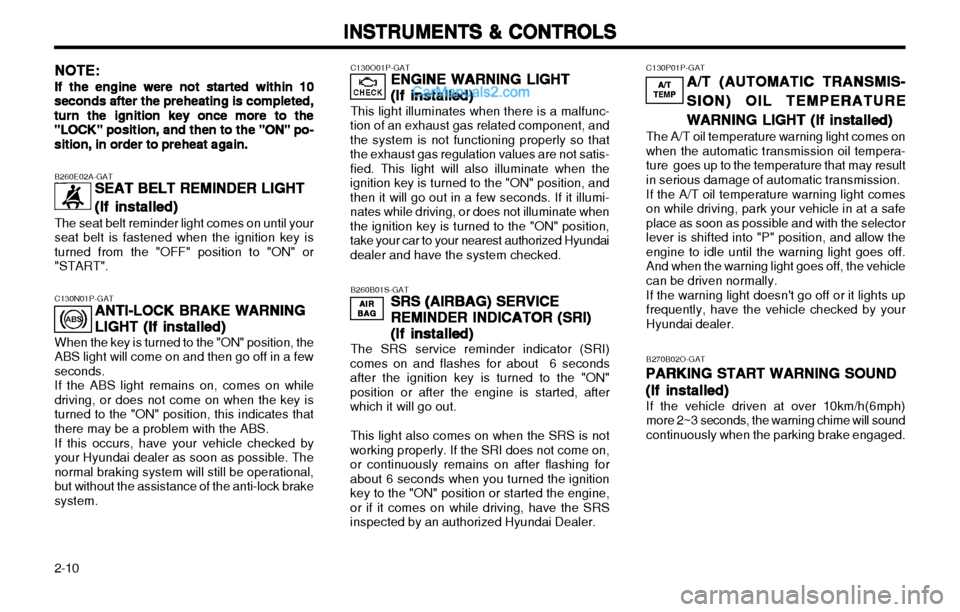
The A/T oil temperature warning light comes on when the automatic transmission oil tempera-ture goes up to the temperature that may resultin serious damage of automatic transmission. If the A/T oil temperature warning light comes on while driving, park your vehicle in at a safeplace as soon as possible and with the selectorlever is shifted into "P" position, and allow theengine to idle until the warning light goes off.And when the warning light goes off, the vehiclecan be driven normally. If the warning light doesn't go off or it lights up frequently, have the vehicle checked by yourHyundai dealer.
A/TA/T
A/TA/T
A/T
TEMPTEMP
TEMPTEMP
TEMP
NOTE:
NOTE: NOTE:
NOTE:
NOTE:
If the engine were not started within 10
If the engine were not started within 10 If the engine were not started within 10
If the engine were not started within 10
If the engine were not started within 10 seconds after the preheating is completed,
seconds after the preheating is completed, seconds after the preheating is completed,
seconds after the preheating is completed,
seconds after the preheating is completed,
turn the ignition key once more to the
turn the ignition key once more to the turn the ignition key once more to the
turn the ignition key once more to the
turn the ignition key once more to the
"LOCK" position, and then to the "ON" po-
"LOCK" position, and then to the "ON" po- "LOCK" position, and then to the "ON" po-
"LOCK" position, and then to the "ON" po-
"LOCK" position, and then to the "ON" po-
sition, in order to preheat again.
sition, in order to preheat again. sition, in order to preheat again.
sition, in order to preheat again.
sition, in order to preheat again. B260E02A-GAT
SEAT BELT REMINDER LIGHT
SEAT BELT REMINDER LIGHT SEAT BELT REMINDER LIGHT
SEAT BELT REMINDER LIGHT
SEAT BELT REMINDER LIGHT
(If installed)
(If installed) (If installed)
(If installed)
(If installed)
The seat belt reminder light comes on until your seat belt is fastened when the ignition key isturned from the "OFF" position to "ON" or"START". C130O01P-GAT
ENGINE WARNING LIGHT
ENGINE WARNING LIGHT ENGINE WARNING LIGHT
ENGINE WARNING LIGHT
ENGINE WARNING LIGHT
(If installed)
(If installed) (If installed)
(If installed)
(If installed)
This light illuminates when there is a malfunc-
tion of an exhaust gas related component, andthe system is not functioning properly so thatthe exhaust gas regulation values are not satis-fied. This light will also illuminate when theignition key is turned to the "ON" position, andthen it will go out in a few seconds. If it illumi-nates while driving, or does not illuminate whenthe ignition key is turned to the "ON" position,take your car to your nearest authorized Hyundaidealer and have the system checked.
B260B01S-GAT SRS (AIRBAG) SERVICE
SRS (AIRBAG) SERVICE SRS (AIRBAG) SERVICE
SRS (AIRBAG) SERVICE
SRS (AIRBAG) SERVICE
REMINDER INDICATOR
REMINDER INDICATOR REMINDER INDICATOR
REMINDER INDICATOR
REMINDER INDICATOR (SRI)
(SRI) (SRI)
(SRI)
(SRI)
(If installed)
(If installed) (If installed)
(If installed)
(If installed)
The SRS service reminder indicator (SRI)
comes on and flashes for about 6 secondsafter the ignition key is turned to the "ON"
position or after the engine is started, afterwhich it will go out.
This light also comes on when the SRS is not
working properly. If the SRI does not come on,or continuously remains on after flashing forabout 6 seconds when you turned the ignition
key to the "ON" position or started the engine,or if it comes on while driving, have the SRSinspected by an authorized Hyundai Dealer.
C130N01P-GAT
ANTI-LOCK BRAKE WARNING
ANTI-LOCK BRAKE WARNING ANTI-LOCK BRAKE WARNING
ANTI-LOCK BRAKE WARNING
ANTI-LOCK BRAKE WARNING
LIGHT (If installed)
LIGHT (If installed) LIGHT (If installed)
LIGHT (If installed)
LIGHT (If installed)
When the key is turned to the "ON" position, the
ABS light will come on and then go off in a fewseconds. If the ABS light remains on, comes on while
driving, or does not come on when the key isturned to the "ON" position, this indicates thatthere may be a problem with the ABS.
If this occurs, have your vehicle checked by
your Hyundai dealer as soon as possible. Thenormal braking system will still be operational,but without the assistance of the anti-lock brakesystem.
AIRAIR
AIRAIR
AIR
BAGBAG
BAGBAG
BAG
B270B02O-GATPARKING START WARNING SOUND
PARKING START WARNING SOUND PARKING START WARNING SOUND
PARKING START WARNING SOUND
PARKING START WARNING SOUND
(If installed)
(If installed) (If installed)
(If installed)
(If installed)
If the vehicle driven at over 10km/h(6mph) more 2~3 seconds, the warning chime will soundcontinuously when the parking brake engaged.
Page 52 of 173
2-13
INSTRUMENTS & CONTROLS
INSTRUMENTS & CONTROLS INSTRUMENTS & CONTROLS
INSTRUMENTS & CONTROLS
INSTRUMENTS & CONTROLS
C190A01P-GAT
TAILGATE WIPER AND WASHER
TAILGATE WIPER AND WASHER TAILGATE WIPER AND WASHER
TAILGATE WIPER AND WASHER
TAILGATE WIPER AND WASHER
SWITCH (Minibus, Van)
SWITCH (Minibus, Van) SWITCH (Minibus, Van)
SWITCH (Minibus, Van)
SWITCH (Minibus, Van)
C190A01P-1
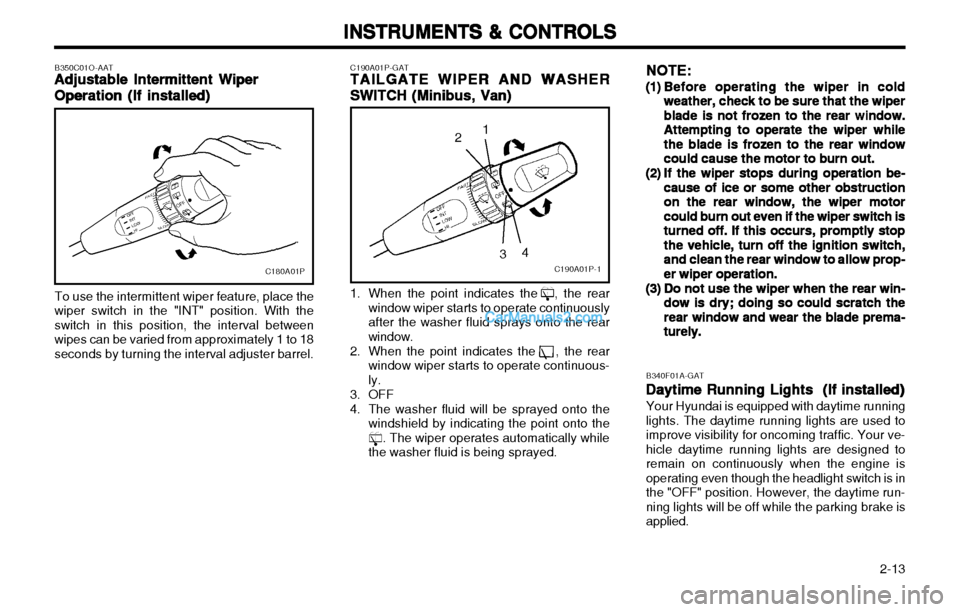
1. When the point indicates the , the rear window wiper starts to operate continuously after the washer fluid sprays onto the rearwindow.
2. When the point indicates the , the rear window wiper starts to operate continuous-ly.
3. OFF
4. The washer fluid will be sprayed onto the windshield by indicating the point onto the . The wiper operates automatically whilethe washer fluid is being sprayed.3 4
2
1
To use the intermittent wiper feature, place the
wiper switch in the "INT" position. With the switch in this position, the interval betweenwipes can be varied from approximately 1 to 18seconds by turning the interval adjuster barrel. B350C01O-AAT
Adjustable Intermittent Wiper
Adjustable Intermittent Wiper Adjustable Intermittent Wiper
Adjustable Intermittent Wiper
Adjustable Intermittent Wiper
Operation (If installed)
Operation (If installed) Operation (If installed)
Operation (If installed)
Operation (If installed)
C180A01P
NOTE:
NOTE: NOTE:
NOTE:
NOTE:
(1)(1)
(1)(1)
(1)
Before operating the wiper in cold
Before operating the wiper in cold Before operating the wiper in cold
Before operating the wiper in cold
Before operating the wiper in cold
weather, check to be sure that the wiper
weather, check to be sure that the wiper weather, check to be sure that the wiper
weather, check to be sure that the wiper
weather, check to be sure that the wiper
blade is not frozen to the rear window.
blade is not frozen to the rear window. blade is not frozen to the rear window.
blade is not frozen to the rear window.
blade is not frozen to the rear window.
Attempting to operate the wiper while
Attempting to operate the wiper while Attempting to operate the wiper while
Attempting to operate the wiper while
Attempting to operate the wiper while
the blade is frozen to the rear window
the blade is frozen to the rear window the blade is frozen to the rear window
the blade is frozen to the rear window
the blade is frozen to the rear window
could cause the motor to burn out.
could cause the motor to burn out. could cause the motor to burn out.
could cause the motor to burn out.
could cause the motor to burn out.
(2)(2)
(2)(2)
(2) If the wiper stops during operation be-
If the wiper stops during operation be- If the wiper stops during operation be-
If the wiper stops during operation be-
If the wiper stops during operation be-
cause of ice or some other obstruction
cause of ice or some other obstruction cause of ice or some other obstruction
cause of ice or some other obstruction
cause of ice or some other obstruction
on the rear window, the wiper motor
on the rear window, the wiper motor on the rear window, the wiper motor
on the rear window, the wiper motor
on the rear window, the wiper motor
could burn out even if the wiper switch is
could burn out even if the wiper switch is could burn out even if the wiper switch is
could burn out even if the wiper switch is
could burn out even if the wiper switch is
turned off. If this occurs, promptly stop
turned off. If this occurs, promptly stop turned off. If this occurs, promptly stop
turned off. If this occurs, promptly stop
turned off. If this occurs, promptly stop
the vehicle, turn off the ignition switch,
the vehicle, turn off the ignition switch, the vehicle, turn off the ignition switch,
the vehicle, turn off the ignition switch,
the vehicle, turn off the ignition switch,
and clean the rear window to allow prop-
and clean the rear window to allow prop- and clean the rear window to allow prop-
and clean the rear window to allow prop-
and clean the rear window to allow prop-
er wiper operation.
er wiper operation. er wiper operation.
er wiper operation.
er wiper operation.
(3)(3)
(3)(3)
(3) Do not use the wiper when the rear win-
Do not use the wiper when the rear win- Do not use the wiper when the rear win-
Do not use the wiper when the rear win-
Do not use the wiper when the rear win-
dow is dry; doing so could scratch the
dow is dry; doing so could scratch the dow is dry; doing so could scratch the
dow is dry; doing so could scratch the
dow is dry; doing so could scratch the
rear window and wear the blade prema-
rear window and wear the blade prema- rear window and wear the blade prema-
rear window and wear the blade prema-
rear window and wear the blade prema-
turely.
turely. turely.
turely.
turely.
B340F01A-GAT Daytime Running Lights (If installed)
Daytime Running Lights (If installed) Daytime Running Lights (If installed)
Daytime Running Lights (If installed)
Daytime Running Lights (If installed)
Your Hyundai is equipped with daytime running
lights. The daytime running lights are used to improve visibility for oncoming traffic. Your ve-
hicle daytime running lights are designed toremain on continuously when the engine isoperating even though the headlight switch is inthe "OFF" position. However, the daytime run-
ning lights will be off while the parking brake isapplied.
Page 54 of 173
2-15
INSTRUMENTS & CONTROLS
INSTRUMENTS & CONTROLS INSTRUMENTS & CONTROLS
INSTRUMENTS & CONTROLS
INSTRUMENTS & CONTROLS
B620A01S-AATFRONT DOOR EDGE WARNING LIGHT
FRONT DOOR EDGE WARNING LIGHT FRONT DOOR EDGE WARNING LIGHT
FRONT DOOR EDGE WARNING LIGHT
FRONT DOOR EDGE WARNING LIGHT
(If installed)
(If installed) (If installed)
(If installed)
(If installed)
C230A01P-GAT
ENGINE RPM ADJUSTMENT KNOB
ENGINE RPM ADJUSTMENT KNOB ENGINE RPM ADJUSTMENT KNOB
ENGINE RPM ADJUSTMENT KNOB
ENGINE RPM ADJUSTMENT KNOB
(D(D
(D(D
(D iesel)
iesel) iesel)
iesel)
iesel)
C230A01P-1
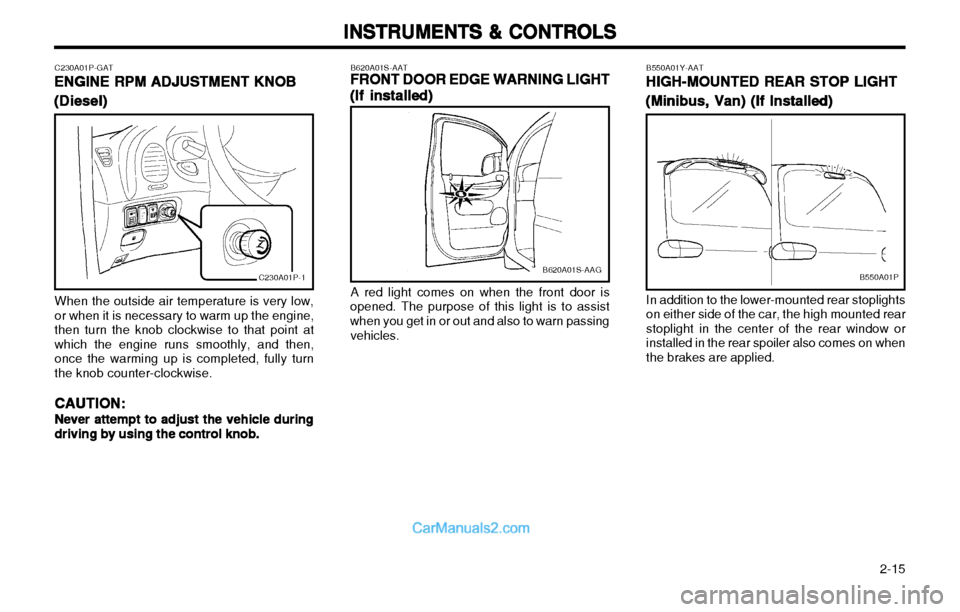
When the outside air temperature is very low, or when it is necessary to warm up the engine,then turn the knob clockwise to that point atwhich the engine runs smoothly, and then,once the warming up is completed, fully turnthe knob counter-clockwise.
CAUTION:
CAUTION: CAUTION:
CAUTION:
CAUTION:
Never attempt to adjust the vehicle during
Never attempt to adjust the vehicle during Never attempt to adjust the vehicle during
Never attempt to adjust the vehicle during
Never attempt to adjust the vehicle during
driving by using the control knob.
driving by using the control knob. driving by using the control knob.
driving by using the control knob.
driving by using the control knob.B620A01S-AAG
A red light comes on when the front door is
opened. The purpose of this light is to assist when you get in or out and also to warn passing
vehicles. B550A01Y-AAT
HIGH-MOUNTED REAR STOP LIGHT
HIGH-MOUNTED REAR STOP LIGHT HIGH-MOUNTED REAR STOP LIGHT
HIGH-MOUNTED REAR STOP LIGHT
HIGH-MOUNTED REAR STOP LIGHT
(Minibus, Van) (If Installed)
(Minibus, Van) (If Installed) (Minibus, Van) (If Installed)
(Minibus, Van) (If Installed)
(Minibus, Van) (If Installed)B550A01P
In addition to the lower-mounted rear stoplights on either side of the car, the high mounted rearstoplight in the center of the rear window orinstalled in the rear spoiler also comes on whenthe brakes are applied.
Page 98 of 173

3-1
STARTING & OPERATING
STARTING & OPERATING STARTING & OPERATING
STARTING & OPERATING
STARTING & OPERATING
D010A01P-GAT PRECAUTION FOR EXHAUST FUMES
PRECAUTION FOR EXHAUST FUMES PRECAUTION FOR EXHAUST FUMES
PRECAUTION FOR EXHAUST FUMES
PRECAUTION FOR EXHAUST FUMES
WHILE STARTING AND DRIVING
WHILE STARTING AND DRIVING WHILE STARTING AND DRIVING
WHILE STARTING AND DRIVING
WHILE STARTING AND DRIVING
1. Do not breathe exhaust fumes containing
carbons monoxide when starting or driving. Carbon monoxide is a colorless, odorlessgas and can cause unconsciousness ordeath by asphyxiation.
2. Open all the windows fully and get the back door closed if you smell exhaust fumesinside the vehicle. Have the cause immedi-ately located and corrected.
3. Check the exhaust system, from time to time, for holes or loose connections if youhear a change in the exhaust sound, or ifsomething has hit the exhaust system.
4. Do not race the engine in a garage or enclosed area any longer than it takes tostart the engine and drive the vehicle in orout. The sealed exhaust fume may make aparticularly dangerous situation.
5. Avoid idling the engine for prolonged periods with people inside the car. If it is unavoid-able, however, be sure to do so in an openarea and adjust the heating or cooling sys-tem to force outside into the vehicle. 6. Make sure that the ventilation air intakes
located just in front of the windshield arekept clear of snow, ice, leaves or otherobstructions, to assure proper operation ofthe ventilation system.
7. Get the back door closed while driving. An incompletely closed back door may causeexhaust fumes to be drawn into the vehicle.If you must drive with the back door open toaccommodate a large object, close the win-dows, open the dashboard vents and havethe heating or cooling system deliver freshair into the vehicle by turning the fan to highspeeds with the air intake control lever set inthe "Fresh" position (Minibus, Van). LOCK
LOCK LOCK
LOCK
LOCK ::
::
: The engine stops and the steeringwheel is locked. The key can be in-serted and removed only at this posi-tion.
ACC
ACC ACC
ACC
ACC ::
::
: The engine stops, but the radio, ciga-rette lighter, etc., can be operated.
ONON
ONON
ON
::
::
: The engine is running and all electricalsystems can be operated.
START
START START
START
START ::
::
: The starter motor operates. After theengine has started, release the keyand it will automatically return to the"ON" position.
CAUTION:
CAUTION: CAUTION:
CAUTION:
CAUTION: (1) If the engine is stopped while driving, the
(1) If the engine is stopped while driving, the (1) If the engine is stopped while driving, the
(1) If the engine is stopped while driving, the
(1) If the engine is stopped while driving, the
brake servomechanism will cease to func-
brake servomechanism will cease to func- brake servomechanism will cease to func-
brake servomechanism will cease to func-
brake servomechanism will cease to func-
tion and braking efficiency will deterio-
tion and braking efficiency will deterio- tion and braking efficiency will deterio-
tion and braking efficiency will deterio-
tion and braking efficiency will deterio-
rate.
rate. rate.
rate.
rate.
(2) Do not leave the key at the "ON" position
(2) Do not leave the key at the "ON" position (2) Do not leave the key at the "ON" position
(2) Do not leave the key at the "ON" position
(2) Do not leave the key at the "ON" position
for a long time when the engine is not
for a long time when the engine is not for a long time when the engine is not
for a long time when the engine is not
for a long time when the engine is not
running; doing so will cause the battery
running; doing so will cause the battery running; doing so will cause the battery
running; doing so will cause the battery
running; doing so will cause the battery
to be discharged.
to be discharged. to be discharged.
to be discharged.
to be discharged.
(3)(3)
(3)(3)
(3) Do not turn the key to the "START" posi-
Do not turn the key to the "START" posi- Do not turn the key to the "START" posi-
Do not turn the key to the "START" posi-
Do not turn the key to the "START" posi-
tion when the engine is running; doing
tion when the engine is running; doing tion when the engine is running; doing
tion when the engine is running; doing
tion when the engine is running; doing
so could damage the starter motor.
so could damage the starter motor. so could damage the starter motor.
so could damage the starter motor.
so could damage the starter motor.
D000A01P-GAT
3.3.
3.3.
3. ST
ST ST
ST
ST AR
AR AR
AR
AR TING &
TING & TING &
TING &
TING &
OPERA
OPERA OPERA
OPERA
OPERA TING
TING TING
TING
TING
D020A01P-GATIGNITION SWITCH
IGNITION SWITCH IGNITION SWITCH
IGNITION SWITCH
IGNITION SWITCH
GT30010A
33
33
3
Page 99 of 173

STARTING & OPERATING
STARTING & OPERATING STARTING & OPERATING
STARTING & OPERATING
STARTING & OPERATING
3-2 3. On vehicles equipped with the diesel pre-
heat indication lamp, turn the ignition key to the "ON" position. The diesel-preheat indi-cation lamp will first illuminate in amber, andthen after a short time, the amber illumina-tion will go off, indicating that preheating iscompleted.
NOTE:
NOTE: NOTE:
NOTE:
NOTE:
If the engine were not started 10 seconds
If the engine were not started 10 seconds If the engine were not started 10 seconds
If the engine were not started 10 seconds
If the engine were not started 10 seconds
after the preheating is completed, turn the
after the preheating is completed, turn the after the preheating is completed, turn the
after the preheating is completed, turn the
after the preheating is completed, turn the
ignition key once more to the "LOCK" posi-
ignition key once more to the "LOCK" posi- ignition key once more to the "LOCK" posi-
ignition key once more to the "LOCK" posi-
ignition key once more to the "LOCK" posi-
tion, and then to the "ON" position, in order
tion, and then to the "ON" position, in order tion, and then to the "ON" position, in order
tion, and then to the "ON" position, in order
tion, and then to the "ON" position, in order
to preheat again.
to preheat again. to preheat again.
to preheat again.
to preheat again.
TO LOCK
TO LOCK TO LOCK
TO LOCK
TO LOCK Remove the key at the "LOCK" position.Slightly turn the steering wheel until it is locked.
TO UNLOCK
TO UNLOCK TO UNLOCK
TO UNLOCK
TO UNLOCKTurn the key to the "ACC" position while mov-
ing the steering wheel slightly.
CAUTION:
CAUTION: CAUTION:
CAUTION:
CAUTION:
If the key is accidentally removed, the steer-
If the key is accidentally removed, the steer- If the key is accidentally removed, the steer-
If the key is accidentally removed, the steer-
If the key is accidentally removed, the steer-ing wheel will lock making it impossible to
ing wheel will lock making it impossible to ing wheel will lock making it impossible to
ing wheel will lock making it impossible to
ing wheel will lock making it impossible to
control the vehicle.
control the vehicle. control the vehicle.
control the vehicle.
control the vehicle. D030A02P-GAT
STARTING THE ENGINE
STARTING THE ENGINE STARTING THE ENGINE
STARTING THE ENGINE
STARTING THE ENGINE
D030A02P-GAG
1. Apply the parking brake.
C050B01HP
Amber lamp OFF
Amber lamp ON
D030A01P-1
GT30020A
D020B01P-GAT How to lock and unlock the steering
How to lock and unlock the steering How to lock and unlock the steering
How to lock and unlock the steering
How to lock and unlock the steering
wheel
wheel wheel
wheel
wheel
2. If your Hyundai is equipped with a manual
transmission, place the shift lever in neutral and depress the clutch pedal fully. If yourHyundai has an automatic transmission,place the shift lever in "P" (park).
Page 101 of 173

STARTING & OPERATING
STARTING & OPERATING STARTING & OPERATING
STARTING & OPERATING
STARTING & OPERATING
3-4 D050C02P-GAT
Good Driving Practices
Good Driving Practices Good Driving Practices
Good Driving Practices
Good Driving Practices
o Never take the vehicle out of gear and coast
down a hill. This is extremely hazardous. Always leave the vehicle in gear.
o Don't "ride" the brakes. This can cause them to overheat and malfunction. Instead,when you are driving down a long hill, slowdown and shift to a lower gear. When you dothis, engine braking will help slow the car.
o Slow down before shifting to a lower gear. This will help avoid over-running the engine,which can cause damage.
o Slow down when you encounter cross winds. This gives you much better control of yourcar.
o Be sure the vehicle is completely stopped before you attempt to shift into reverse. Thetransmission can be damaged if you do not.To shift into reverse, depress the clutch,move the shift lever to neutral, wait threeseconds, then shift to the reverse position.
o Exercise extreme caution when driving on a slippery surface. Be especially careful whenbraking, accelerating or shifting gears. On a slippery surface, an abrupt change in engine speed can cause the drive wheels tolose traction and the vehicle to go out ofcontrol.
D050A02P-GAT
MANUAL TRANSMISSION
MANUAL TRANSMISSION MANUAL TRANSMISSION
MANUAL TRANSMISSION
MANUAL TRANSMISSION
YN20060A
The shift pattern is shown on the gearshift lever knob. Be sure to always fully depress the clutchpedal before attempting to shift to lever. To shift into reverse from 5th gear,move the gearshift lever to neutral, and then shift it intoreverse.
NOTE:
NOTE: NOTE:
NOTE:
NOTE:
oo
oo
o
During cold weather, shifting may be dif-
During cold weather, shifting may be dif- During cold weather, shifting may be dif-
During cold weather, shifting may be dif-
During cold weather, shifting may be dif-
ficult until the transmission lubricant has
ficult until the transmission lubricant has ficult until the transmission lubricant has
ficult until the transmission lubricant has
ficult until the transmission lubricant has
warmed up. This is normal and not harm-
warmed up. This is normal and not harm- warmed up. This is normal and not harm-
warmed up. This is normal and not harm-
warmed up. This is normal and not harm-
ful to the transmission.
ful to the transmission. ful to the transmission.
ful to the transmission.
ful to the transmission.
oo
oo
o
If you 've come to a complete stop and
If you 've come to a complete stop and If you 've come to a complete stop and
If you 've come to a complete stop and
If you 've come to a complete stop and
it's hard to shift into 1st or R(Reverse),
it's hard to shift into 1st or R(Reverse), it's hard to shift into 1st or R(Reverse),
it's hard to shift into 1st or R(Reverse),
it's hard to shift into 1st or R(Reverse),
put the shift lever in N(Neutral) position
put the shift lever in N(Neutral) position put the shift lever in N(Neutral) position
put the shift lever in N(Neutral) position
put the shift lever in N(Neutral) position
and let up on the clutch. Press the clutch
and let up on the clutch. Press the clutch and let up on the clutch. Press the clutch
and let up on the clutch. Press the clutch
and let up on the clutch. Press the clutch
pedal back down, and then shift into 1st
pedal back down, and then shift into 1st pedal back down, and then shift into 1st
pedal back down, and then shift into 1st
pedal back down, and then shift into 1st
or R(Reverse) gear position.
or R(Reverse) gear position. or R(Reverse) gear position.
or R(Reverse) gear position.
or R(Reverse) gear position. D050B01P-GAT
Using the Clutch
Using the Clutch Using the Clutch
Using the Clutch
Using the Clutch
The clutch should be pressed all the way to the floor before shifting, then released slowly. Donot rest your foot on the clutch pedal whiledriving. This can cause unnecessary wear. Do not partially engage the clutch to hold the vehicle on an incline. This causes unnecessarywear. Use the parking brake to hold the vehicle on an incline. Do not operate the clutch pedal rapidlyand repeatedly.
oo
oo
o Do not use the shift lever as a handrest
Do not use the shift lever as a handrest Do not use the shift lever as a handrest
Do not use the shift lever as a handrest
Do not use the shift lever as a handrest
during driving, as this can result in pre-
during driving, as this can result in pre- during driving, as this can result in pre-
during driving, as this can result in pre-
during driving, as this can result in pre-
mature wear of the transmission shift
mature wear of the transmission shift mature wear of the transmission shift
mature wear of the transmission shift
mature wear of the transmission shift
forks.
forks. forks.
forks.
forks.
CAUTION:
CAUTION: CAUTION:
CAUTION:
CAUTION:
Do not move the gearshift lever into reverse
Do not move the gearshift lever into reverse Do not move the gearshift lever into reverse
Do not move the gearshift lever into reverse
Do not move the gearshift lever into reverse
while the vehicle is moving forward; doing
while the vehicle is moving forward; doing while the vehicle is moving forward; doing
while the vehicle is moving forward; doing
while the vehicle is moving forward; doing
so will damage the transmission.
so will damage the transmission. so will damage the transmission.
so will damage the transmission.
so will damage the transmission.
Page 102 of 173

3-5
STARTING & OPERATING
STARTING & OPERATING STARTING & OPERATING
STARTING & OPERATING
STARTING & OPERATING
CAUTION:
CAUTION: CAUTION:
CAUTION:
CAUTION:
oo
oo
o
The risk of rollover is greatly increased if
The risk of rollover is greatly increased if The risk of rollover is greatly increased if
The risk of rollover is greatly increased if
The risk of rollover is greatly increased if
you
you you
you
you
lose control of your vehicle at high-
lose control of your vehicle at high- lose control of your vehicle at high-
lose control of your vehicle at high-
lose control of your vehicle at high-
way speeds.
way speeds. way speeds.
way speeds.
way speeds.
oo
oo
o Loss of control often occurs if two or
Loss of control often occurs if two or Loss of control often occurs if two or
Loss of control often occurs if two or
Loss of control often occurs if two or
more wheels drop off the roadway and
more wheels drop off the roadway and more wheels drop off the roadway and
more wheels drop off the roadway and
more wheels drop off the roadway and
the driver oversteers to reenter the road-
the driver oversteers to reenter the road- the driver oversteers to reenter the road-
the driver oversteers to reenter the road-
the driver oversteers to reenter the road-
way.
way. way.
way.
way.
oo
oo
o In the event your vehicle leaves the road-
In the event your vehicle leaves the road- In the event your vehicle leaves the road-
In the event your vehicle leaves the road-
In the event your vehicle leaves the road-
way, do not steer sharply. Instead, slow
way, do not steer sharply. Instead, slow way, do not steer sharply. Instead, slow
way, do not steer sharply. Instead, slow
way, do not steer sharply. Instead, slow
down before pulling back into the travel
down before pulling back into the travel down before pulling back into the travel
down before pulling back into the travel
down before pulling back into the travel
lanes.
lanes. lanes.
lanes.
lanes.
oo
oo
o In a collision crash, an unbelted person
In a collision crash, an unbelted person In a collision crash, an unbelted person
In a collision crash, an unbelted person
In a collision crash, an unbelted person
is significantly more likely to die than a
is significantly more likely to die than a is significantly more likely to die than a
is significantly more likely to die than a
is significantly more likely to die than a
person wearing a seatbelt.
person wearing a seatbelt. person wearing a seatbelt.
person wearing a seatbelt.
person wearing a seatbelt.
D050D01P-GAT Changing Gears
Changing Gears Changing Gears
Changing Gears
Changing Gears
GS30090A
50 100 150
km/h
1st 2nd 3rd 4th 5th
Always use care to change the gear with the vehicle speed matched to the engine speed. Proper shifting will improve fuel economy andprolong engine life. Avoid shifting down at excessively high speed, doing so could damage the engine.
NOTE:
NOTE: NOTE:
NOTE:
NOTE:
:Economical driving range
:Economical driving range :Economical driving range
:Economical driving range
:Economical driving range
:Possible driving range
:Possible driving range :Possible driving range
:Possible driving range
:Possible driving range
D060A01P-GAT
AUTOMATIC TRANSMISSION
AUTOMATIC TRANSMISSION AUTOMATIC TRANSMISSION
AUTOMATIC TRANSMISSION
AUTOMATIC TRANSMISSION
(Minibus, Van) (If installed)
(Minibus, Van) (If installed) (Minibus, Van) (If installed)
(Minibus, Van) (If installed)
(Minibus, Van) (If installed)
D060A01P-GAG
Button
The highly efficient Hyundai automatic trans- mission has four forward speeds and one re-verse speed. It has a conventional shift patternas shown in the illustration. At night, with the side markers or headlights switched on, the appropriate symbol on thequadrant will be illuminated according to therange selected. CAUTION:
CAUTION: CAUTION:
CAUTION:
CAUTION:
Never shift into "R" or "P" position while
Never shift into "R" or "P" position while Never shift into "R" or "P" position while
Never shift into "R" or "P" position while
Never shift into "R" or "P" position while
the vehicle is moving.
the vehicle is moving. the vehicle is moving.
the vehicle is moving.
the vehicle is moving.
Depress the brake pedal and push the
Depress the brake pedal and push the Depress the brake pedal and push the
Depress the brake pedal and push the
Depress the brake pedal and push the
button when shifting.
button when shifting. button when shifting.
button when shifting.
button when shifting.
Push the button when shifting.
Push the button when shifting. Push the button when shifting.
Push the button when shifting.
Push the button when shifting.
The selector lever can be shifted freely.
The selector lever can be shifted freely. The selector lever can be shifted freely.
The selector lever can be shifted freely.
The selector lever can be shifted freely.
For optimum fuel economy, accelerate gradu-ally. The transmission will automatically shift tothe second, third and overdrive gears.
D060B01P-GAT The function of each position is as
The function of each position is as The function of each position is as
The function of each position is as
The function of each position is as
follows:
follows: follows:
follows:
follows:
oo
oo
o
P (Park):
P (Park): P (Park):
P (Park):
P (Park):
Use to hold the vehicle in place when parking or while starting the engine; shift the selector leverto the "P" position. Whenever parking the car,apply the parking brake and shift the selectorlever to the "P" position.
CAUTION:
CAUTION: CAUTION:
CAUTION:
CAUTION:
Never place the selector lever in the "P"
Never place the selector lever in the "P" Never place the selector lever in the "P"
Never place the selector lever in the "P"
Never place the selector lever in the "P"
position unless the vehicle is fully stopped.
position unless the vehicle is fully stopped. position unless the vehicle is fully stopped.
position unless the vehicle is fully stopped.
position unless the vehicle is fully stopped.
Failure to observe this caution will cause
Failure to observe this caution will cause Failure to observe this caution will cause
Failure to observe this caution will cause
Failure to observe this caution will cause
severe damage to the transmission.
severe damage to the transmission. severe damage to the transmission.
severe damage to the transmission.
severe damage to the transmission. D060C01P-GAT
oo
oo
o R (Reverse):
R (Reverse): R (Reverse):
R (Reverse):
R (Reverse):
Use for backing up the vehicle. Bring the vehi- cle to a complete stop before shifting the selec-tor lever to "R" position.