warning light Hyundai H-1 (Grand Starex) 2003 Owner's Manual
[x] Cancel search | Manufacturer: HYUNDAI, Model Year: 2003, Model line: H-1 (Grand Starex), Model: Hyundai H-1 (Grand Starex) 2003Pages: 173, PDF Size: 3.68 MB
Page 8 of 173
1-1
BEFORE DRIVING YOUR VEHICLE
BEFORE DRIVING YOUR VEHICLE BEFORE DRIVING YOUR VEHICLE
BEFORE DRIVING YOUR VEHICLE
BEFORE DRIVING YOUR VEHICLE
B000A01P-GAT 1.1.
1.1.
1.
BEFORE DRIVING
BEFORE DRIVING BEFORE DRIVING
BEFORE DRIVING
BEFORE DRIVING
YY
YY
Y
OUR
OUR OUR
OUR
OUR VEHICLE
VEHICLE VEHICLE
VEHICLE
VEHICLE
B010B01P-GAT Before entering the vehicle
Before entering the vehicle Before entering the vehicle
Before entering the vehicle
Before entering the vehicle
o Check that windows, mirrors and lights are clean.
o Check if any tire is low or flat.
o Look for fluid leaks.
o Check that area is clear if you’re about to back up.
B010C03P-GAT After entering the vehicle
After entering the vehicle After entering the vehicle
After entering the vehicle
After entering the vehicle
o Lock all doors.
o The driver and passengers are wearing prop- erly adjusted seat belts.
o The head restraints are properly adjusted, if so equipped.
o Adjust inside and outside mirrors.
o Check warning lights for correct operation, with the ignition key in the position "ON".
o Check all gauges, for normal operation.
B010A01P-GAT
BEFORE DRIVING YOUR VEHICLE
BEFORE DRIVING YOUR VEHICLE BEFORE DRIVING YOUR VEHICLE
BEFORE DRIVING YOUR VEHICLE
BEFORE DRIVING YOUR VEHICLE
SAFETY CHECKS
SAFETY CHECKS SAFETY CHECKS
SAFETY CHECKS
SAFETY CHECKS
Be sure you know your vehicle and its equip-
ment and how to use it safely.
B020A01P-GATRUNNING-IN RECOMMENDATIONS
RUNNING-IN RECOMMENDATIONS RUNNING-IN RECOMMENDATIONS
RUNNING-IN RECOMMENDATIONS
RUNNING-IN RECOMMENDATIONS During the running-in period for the first
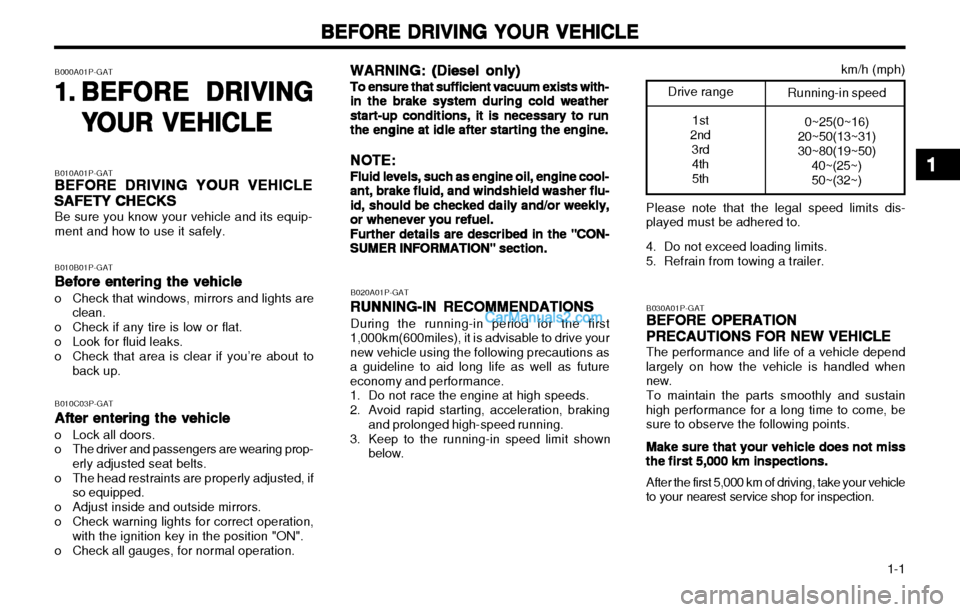
1,000km(600miles), it is advisable to drive your new vehicle using the following precautions asa guideline to aid long life as well as futureeconomy and performance.
1. Do not race the engine at high speeds.
2. Avoid rapid starting, acceleration, braking and prolonged high-speed running.
3. Keep to the running-in speed limit shown below. B030A01P-GAT
BEFORE OPERATION
BEFORE OPERATION BEFORE OPERATION
BEFORE OPERATION
BEFORE OPERATION
PRECAUTIONS FOR NEW VEHICLE
PRECAUTIONS FOR NEW VEHICLE PRECAUTIONS FOR NEW VEHICLE
PRECAUTIONS FOR NEW VEHICLE
PRECAUTIONS FOR NEW VEHICLE The performance and life of a vehicle depend
largely on how the vehicle is handled when new.
To maintain the parts smoothly and sustain
high performance for a long time to come, besure to observe the following points.
Make sure that your vehicle does not miss
Make sure that your vehicle does not miss Make sure that your vehicle does not miss
Make sure that your vehicle does not miss
Make sure that your vehicle does not miss the first 5,000 km inspections.
the first 5,000 km inspections. the first 5,000 km inspections.
the first 5,000 km inspections.
the first 5,000 km inspections.
After the first 5,000 km of driving, take your vehicle
to your nearest service shop for inspection.
Drive range
1st
2nd 3rd4th 5thRunning-in speed
0~25(0~16)
20~50(13~31) 30~80(19~50)
40~(25~)50~(32~) km/h (mph)
WARNING: (Diesel only)
WARNING: (Diesel only) WARNING: (Diesel only)
WARNING: (Diesel only)
WARNING: (Diesel only)
To ensure that sufficient vacuum exists with-
To ensure that sufficient vacuum exists with- To ensure that sufficient vacuum exists with-
To ensure that sufficient vacuum exists with-
To ensure that sufficient vacuum exists with-in the brake system during cold weather
in the brake system during cold weather in the brake system during cold weather
in the brake system during cold weather
in the brake system during cold weather
start-up conditions, it is necessary to run
start-up conditions, it is necessary to run start-up conditions, it is necessary to run
start-up conditions, it is necessary to run
start-up conditions, it is necessary to run
the engine at idle after starting the engine.
the engine at idle after starting the engine. the engine at idle after starting the engine.
the engine at idle after starting the engine.
the engine at idle after starting the engine.
NOTE:
NOTE: NOTE:
NOTE:
NOTE:
Fluid levels, such as engine oil, engine cool-
Fluid levels, such as engine oil, engine cool- Fluid levels, such as engine oil, engine cool-
Fluid levels, such as engine oil, engine cool-
Fluid levels, such as engine oil, engine cool-ant, brake fluid, and windshield washer flu-
ant, brake fluid, and windshield washer flu- ant, brake fluid, and windshield washer flu-
ant, brake fluid, and windshield washer flu-
ant, brake fluid, and windshield washer flu-
id, should be checked daily and/or weekly,
id, should be checked daily and/or weekly, id, should be checked daily and/or weekly,
id, should be checked daily and/or weekly,
id, should be checked daily and/or weekly,
or whenever you refuel.
or whenever you refuel. or whenever you refuel.
or whenever you refuel.
or whenever you refuel.
Further details are described in the "CON-
Further details are described in the "CON- Further details are described in the "CON-
Further details are described in the "CON-
Further details are described in the "CON-SUMER INFORMATION" section.
SUMER INFORMATION" section. SUMER INFORMATION" section.
SUMER INFORMATION" section.
SUMER INFORMATION" section.
11
11
1
Please note that the legal speed limits dis-
played must be adhered to.
4. Do not exceed loading limits.
5. Refrain from towing a trailer.
Page 15 of 173
BEFORE DRIVING YOUR VEHICLE
BEFORE DRIVING YOUR VEHICLE BEFORE DRIVING YOUR VEHICLE
BEFORE DRIVING YOUR VEHICLE
BEFORE DRIVING YOUR VEHICLE
1-8
B120A01P-GAG
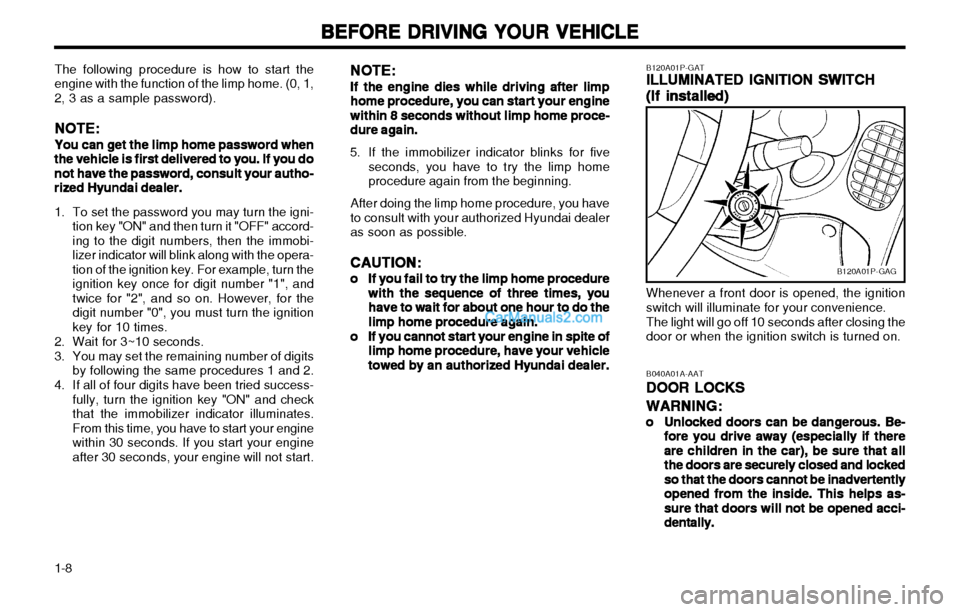
Whenever a front door is opened, the ignition switch will illuminate for your convenience. The light will go off 10 seconds after closing the door or when the ignition switch is turned on.
B120A01P-GAT
ILLUMINATED IGNITION SWITCH
ILLUMINATED IGNITION SWITCH ILLUMINATED IGNITION SWITCH
ILLUMINATED IGNITION SWITCH
ILLUMINATED IGNITION SWITCH
(If installed)
(If installed) (If installed)
(If installed)
(If installed) B040A01A-AAT
DOOR LOCKS
DOOR LOCKS DOOR LOCKS
DOOR LOCKS
DOOR LOCKS
WARNING:
WARNING: WARNING:
WARNING:
WARNING:
oo
oo
o Unlocked doors can be dangerous. Be-
Unlocked doors can be dangerous. Be- Unlocked doors can be dangerous. Be-
Unlocked doors can be dangerous. Be-
Unlocked doors can be dangerous. Be-
fore you drive away (especially if there
fore you drive away (especially if there fore you drive away (especially if there
fore you drive away (especially if there
fore you drive away (especially if there
are children in the car), be sure that all
are children in the car), be sure that all are children in the car), be sure that all
are children in the car), be sure that all
are children in the car), be sure that all
the doors are securely closed and locked
the doors are securely closed and locked the doors are securely closed and locked
the doors are securely closed and locked
the doors are securely closed and locked
so that the doors cannot be inadvertently
so that the doors cannot be inadvertently so that the doors cannot be inadvertently
so that the doors cannot be inadvertently
so that the doors cannot be inadvertently
opened from the inside. This helps as-
opened from the inside. This helps as- opened from the inside. This helps as-
opened from the inside. This helps as-
opened from the inside. This helps as-
sure that doors will not be opened acci-
sure that doors will not be opened acci- sure that doors will not be opened acci-
sure that doors will not be opened acci-
sure that doors will not be opened acci-
dentally.
dentally. dentally.
dentally.
dentally.
The following procedure is how to start the
engine with the function of the limp home. (0, 1, 2, 3 as a sample password).
NOTE:
NOTE: NOTE:
NOTE:
NOTE:
You can get the limp home password when
You can get the limp home password when You can get the limp home password when
You can get the limp home password when
You can get the limp home password when the vehicle is first delivered to you. If you do
the vehicle is first delivered to you. If you do the vehicle is first delivered to you. If you do
the vehicle is first delivered to you. If you do
the vehicle is first delivered to you. If you do
not have the password, consult your autho-
not have the password, consult your autho- not have the password, consult your autho-
not have the password, consult your autho-
not have the password, consult your autho-
rized Hyundai dealer.
rized Hyundai dealer. rized Hyundai dealer.
rized Hyundai dealer.
rized Hyundai dealer.
1. To set the password you may turn the igni-
tion key "ON" and then turn it "OFF" accord- ing to the digit numbers, then the immobi-lizer indicator will blink along with the opera-tion of the ignition key. For example, turn theignition key once for digit number "1", andtwice for "2", and so on. However, for thedigit number "0", you must turn the ignitionkey for 10 times.
2. Wait for 3~10 seconds.
3. You may set the remaining number of digits by following the same procedures 1 and 2.
4. If all of four digits have been tried success- fully, turn the ignition key "ON" and check that the immobilizer indicator illuminates.From this time, you have to start your enginewithin 30 seconds. If you start your engineafter 30 seconds, your engine will not start. NOTE:
NOTE: NOTE:
NOTE:
NOTE:
If the engine dies while driving after limp
If the engine dies while driving after limp If the engine dies while driving after limp
If the engine dies while driving after limp
If the engine dies while driving after limp
home procedure, you can start your engine
home procedure, you can start your engine home procedure, you can start your engine
home procedure, you can start your engine
home procedure, you can start your engine
within 8 seconds without limp home proce-
within 8 seconds without limp home proce- within 8 seconds without limp home proce-
within 8 seconds without limp home proce-
within 8 seconds without limp home proce-
dure again.
dure again. dure again.
dure again.
dure again.
5. If the immobilizer indicator blinks for five seconds, you have to try the limp homeprocedure again from the beginning.
After doing the limp home procedure, you haveto consult with your authorized Hyundai dealeras soon as possible.
CAUTION:
CAUTION: CAUTION:
CAUTION:
CAUTION:
oo
oo
o If you fail to try the limp home procedure
If you fail to try the limp home procedure If you fail to try the limp home procedure
If you fail to try the limp home procedure
If you fail to try the limp home procedure
with the sequence of three times, you
with the sequence of three times, you with the sequence of three times, you
with the sequence of three times, you
with the sequence of three times, you
have to wait for about one hour to do the
have to wait for about one hour to do the have to wait for about one hour to do the
have to wait for about one hour to do the
have to wait for about one hour to do the
limp home procedure again.
limp home procedure again. limp home procedure again.
limp home procedure again.
limp home procedure again.
oo
oo
o If you cannot start your engine in spite of
If you cannot start your engine in spite of If you cannot start your engine in spite of
If you cannot start your engine in spite of
If you cannot start your engine in spite of
limp home procedure, have your vehicle
limp home procedure, have your vehicle limp home procedure, have your vehicle
limp home procedure, have your vehicle
limp home procedure, have your vehicle
towed by an authorized Hyundai dealer.
towed by an authorized Hyundai dealer. towed by an authorized Hyundai dealer.
towed by an authorized Hyundai dealer.
towed by an authorized Hyundai dealer.
Page 22 of 173
1-15
BEFORE DRIVING YOUR VEHICLE
BEFORE DRIVING YOUR VEHICLE BEFORE DRIVING YOUR VEHICLE
BEFORE DRIVING YOUR VEHICLE
BEFORE DRIVING YOUR VEHICLE
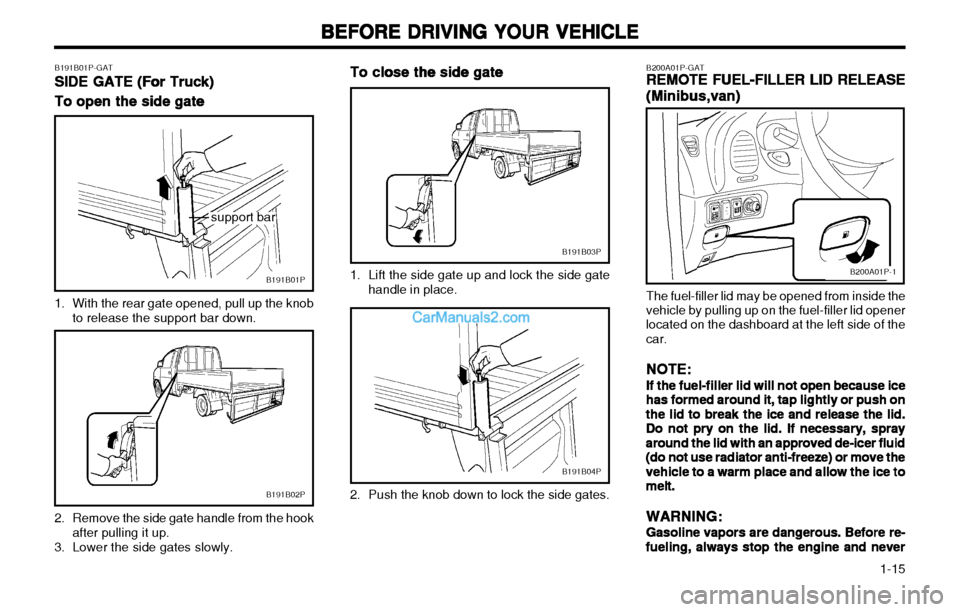
The fuel-filler lid may be opened from inside the
vehicle by pulling up on the fuel-filler lid opener located on the dashboard at the left side of thecar.
NOTE:
NOTE: NOTE:
NOTE:
NOTE:
If the fuel-filler lid will not open because ice
If the fuel-filler lid will not open because ice If the fuel-filler lid will not open because ice
If the fuel-filler lid will not open because ice
If the fuel-filler lid will not open because ice has formed around it, tap lightly or push on
has formed around it, tap lightly or push on has formed around it, tap lightly or push on
has formed around it, tap lightly or push on
has formed around it, tap lightly or push on
the lid to break the ice and release the lid.
the lid to break the ice and release the lid. the lid to break the ice and release the lid.
the lid to break the ice and release the lid.
the lid to break the ice and release the lid.
Do not pry on the lid. If necessary, spray
Do not pry on the lid. If necessary, spray Do not pry on the lid. If necessary, spray
Do not pry on the lid. If necessary, spray
Do not pry on the lid. If necessary, spray
around the lid with an approved de-icer fluid
around the lid with an approved de-icer fluid around the lid with an approved de-icer fluid
around the lid with an approved de-icer fluid
around the lid with an approved de-icer fluid
(do not use radiator anti-freeze) or move the
(do not use radiator anti-freeze) or move the (do not use radiator anti-freeze) or move the
(do not use radiator anti-freeze) or move the
(do not use radiator anti-freeze) or move the
vehicle to a warm place and allow the ice to
vehicle to a warm place and allow the ice to vehicle to a warm place and allow the ice to
vehicle to a warm place and allow the ice to
vehicle to a warm place and allow the ice to
melt.
melt. melt.
melt.
melt.
WARNING:
WARNING: WARNING:
WARNING:
WARNING:
Gasoline vapors are dangerous. Before re-
Gasoline vapors are dangerous. Before re- Gasoline vapors are dangerous. Before re-
Gasoline vapors are dangerous. Before re-
Gasoline vapors are dangerous. Before re-fueling, always stop the engine and never
fueling, always stop the engine and never fueling, always stop the engine and never
fueling, always stop the engine and never
fueling, always stop the engine and neverB200A01P-GAT
REMOTE FUEL-FILLER LID RELEASE
REMOTE FUEL-FILLER LID RELEASE REMOTE FUEL-FILLER LID RELEASE
REMOTE FUEL-FILLER LID RELEASE
REMOTE FUEL-FILLER LID RELEASE
(Minibus,van)
(Minibus,van) (Minibus,van)
(Minibus,van)
(Minibus,van)
B200A01P-1
To close the side gate
To close the side gate To close the side gate
To close the side gate
To close the side gate
1. Lift the side gate up and lock the side gate handle in place.
B191B03P
B191B04P
2. Push the knob down to lock the side gates.
B191B01P-GAT SIDE GATE (For Truck)
SIDE GATE (For Truck) SIDE GATE (For Truck)
SIDE GATE (For Truck)
SIDE GATE (For Truck)
To open the side gate
To open the side gate To open the side gate
To open the side gate
To open the side gate
1. With the rear gate opened, pull up the knob to release the support bar down.
B191B01P
2. Remove the side gate handle from the hookafter pulling it up.
3. Lower the side gates slowly.
B191B02P
support bar
Page 31 of 173
BEFORE DRIVING YOUR VEHICLE
BEFORE DRIVING YOUR VEHICLE BEFORE DRIVING YOUR VEHICLE
BEFORE DRIVING YOUR VEHICLE
BEFORE DRIVING YOUR VEHICLE
1-24
GS10520A
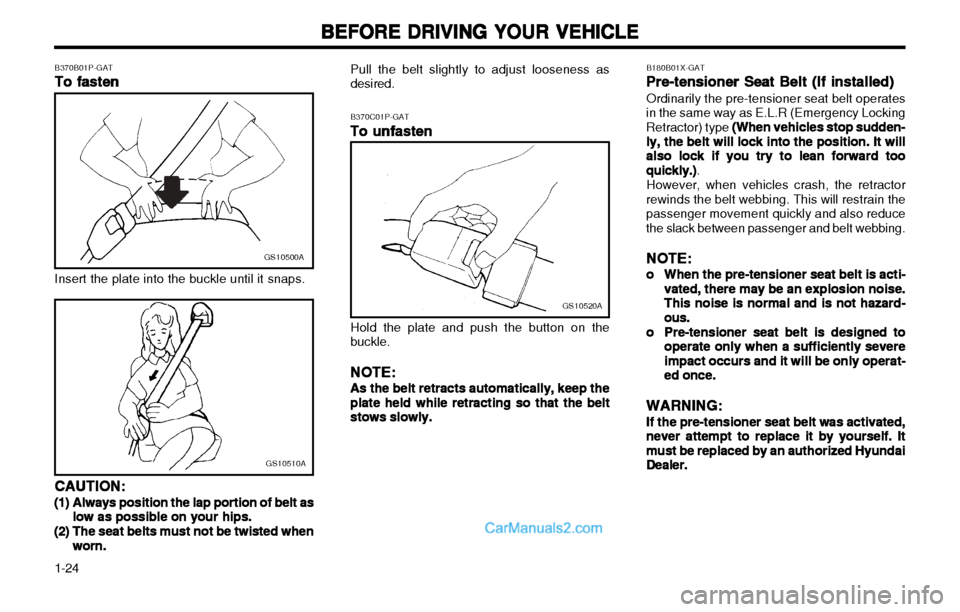
B370C01P-GAT To unfasten
To unfasten To unfasten
To unfasten
To unfasten Hold the plate and push the button on the buckle.
NOTE:
NOTE: NOTE:
NOTE:
NOTE:
As the belt retracts automatically, keep the
As the belt retracts automatically, keep the As the belt retracts automatically, keep the
As the belt retracts automatically, keep the
As the belt retracts automatically, keep the
plate held while retracting so that the belt
plate held while retracting so that the belt plate held while retracting so that the belt
plate held while retracting so that the belt
plate held while retracting so that the belt
stows slowly.
stows slowly. stows slowly.
stows slowly.
stows slowly.
Pull the belt slightly to adjust looseness asdesired.
B180B01X-GAT
Pre-tensioner Seat Belt (If installed)
Pre-tensioner Seat Belt (If installed) Pre-tensioner Seat Belt (If installed)
Pre-tensioner Seat Belt (If installed)
Pre-tensioner Seat Belt (If installed) Ordinarily the pre-tensioner seat belt operates
in the same way as E.L.R (Emergency Locking Retractor) type (When vehicles stop sudden-
(When vehicles stop sudden- (When vehicles stop sudden-
(When vehicles stop sudden-
(When vehicles stop sudden-
ly, the belt will lock into the position. It will
ly, the belt will lock into the position. It will ly, the belt will lock into the position. It will
ly, the belt will lock into the position. It will
ly, the belt will lock into the position. It will
also lock if you try to lean forward too
also lock if you try to lean forward too also lock if you try to lean forward too
also lock if you try to lean forward too
also lock if you try to lean forward too
quickly.)
quickly.) quickly.)
quickly.)
quickly.) .
However, when vehicles crash, the retractor
rewinds the belt webbing. This will restrain thepassenger movement quickly and also reducethe slack between passenger and belt webbing.
NOTE:
NOTE: NOTE:
NOTE:
NOTE:
oo
oo
o When the pre-tensioner seat belt is acti-
When the pre-tensioner seat belt is acti- When the pre-tensioner seat belt is acti-
When the pre-tensioner seat belt is acti-
When the pre-tensioner seat belt is acti-
vated,
vated, vated,
vated,
vated, there may be an explosion noise.
there may be an explosion noise. there may be an explosion noise.
there may be an explosion noise.
there may be an explosion noise.
This noise is normal and is not hazard-
This noise is normal and is not hazard- This noise is normal and is not hazard-
This noise is normal and is not hazard-
This noise is normal and is not hazard-
ous.ous.
ous.ous.
ous.
oo
oo
o Pre-tensioner seat belt is designed to
Pre-tensioner seat belt is designed to Pre-tensioner seat belt is designed to
Pre-tensioner seat belt is designed to
Pre-tensioner seat belt is designed to
operate only when a sufficiently
operate only when a sufficiently operate only when a sufficiently
operate only when a sufficiently
operate only when a sufficiently severe
severe severe
severe
severe
impact occurs and it will be only operat-
impact occurs and it will be only operat- impact occurs and it will be only operat-
impact occurs and it will be only operat-
impact occurs and it will be only operat-
ed once.
ed once. ed once.
ed once.
ed once.
WARNING:
WARNING: WARNING:
WARNING:
WARNING:
If the pre-tensioner seat belt was activated,
If the pre-tensioner seat belt was activated, If the pre-tensioner seat belt was activated,
If the pre-tensioner seat belt was activated,
If the pre-tensioner seat belt was activated, never attempt
never attempt never attempt
never attempt
never attempt to replace it by yourself. It
to replace it by yourself. It to replace it by yourself. It
to replace it by yourself. It
to replace it by yourself. It
must be replaced by an authorized Hyundai
must be replaced by an authorized Hyundai must be replaced by an authorized Hyundai
must be replaced by an authorized Hyundai
must be replaced by an authorized Hyundai
Dealer.
Dealer. Dealer.
Dealer.
Dealer.
GS10500A
B370B01P-GAT
To fasten
To fasten To fasten
To fasten
To fasten Insert the plate into the buckle until it snaps.
GS10510A
CAUTION:
CAUTION: CAUTION:
CAUTION:
CAUTION:
(1)(1)
(1)(1)
(1) Always position the lap portion of belt as
Always position the lap portion of belt as Always position the lap portion of belt as
Always position the lap portion of belt as
Always position the lap portion of belt as
low as possible on your hips.
low as possible on your hips. low as possible on your hips.
low as possible on your hips.
low as possible on your hips.
(2)(2)
(2)(2)
(2) The seat belts must not be twisted when
The seat belts must not be twisted when The seat belts must not be twisted when
The seat belts must not be twisted when
The seat belts must not be twisted when
worn.
worn. worn.
worn.
worn.
Page 32 of 173
1-25
BEFORE DRIVING YOUR VEHICLE
BEFORE DRIVING YOUR VEHICLE BEFORE DRIVING YOUR VEHICLE
BEFORE DRIVING YOUR VEHICLE
BEFORE DRIVING YOUR VEHICLE
B230A02P-GATCHILD RESTRAINT SYSTEM
CHILD RESTRAINT SYSTEM CHILD RESTRAINT SYSTEM
CHILD RESTRAINT SYSTEM
CHILD RESTRAINT SYSTEM
(Minibus, Van) (If installed)
(Minibus, Van) (If installed) (Minibus, Van) (If installed)
(Minibus, Van) (If installed)
(Minibus, Van) (If installed) Children riding in the car should sit in the rear
seat and must always be restrained to minimize the risk of injury in an accident, sudden stop orsudden maneuver. According to accident sta-tistics, children are safer when properly re-strained in the rear seats than in the front seat.Larger children should use one of the seat beltsprovided.
You are required by law to use safety restraints
for children. If small children ride in your vehicleyou must put them in a child restraint system(safety seat). Children could be injured in a crash if their
restraints are not properly secured. For smallchildren and babies, a child seat or infant seatmust be used. Before buying a particular childrestraint system, make sure it fits your car seatand seat belts, and fits your child. Follow all theinstructions provided by the manufacturer wheninstalling the child restraint system.
WARNING:
WARNING: WARNING:
WARNING:
WARNING:
oo
oo
o A child restraint system must be placed
A child restraint system must be placed A child restraint system must be placed
A child restraint system must be placed
A child restraint system must be placed
in the rear seat. Never install a child or
in the rear seat. Never install a child or in the rear seat. Never install a child or
in the rear seat. Never install a child or
in the rear seat. Never install a child or
infant seat on the front passenger's seat.
infant seat on the front passenger's seat. infant seat on the front passenger's seat.
infant seat on the front passenger's seat.
infant seat on the front passenger's seat.
Should an accident occur and cause the
Should an accident occur and cause the Should an accident occur and cause the
Should an accident occur and cause the
Should an accident occur and cause the
passenger side airbag to deploy, it could
passenger side airbag to deploy, it could passenger side airbag to deploy, it could
passenger side airbag to deploy, it could
passenger side airbag to deploy, it could
severely injure or kill an infant or child
severely injure or kill an infant or child severely injure or kill an infant or child
severely injure or kill an infant or child
severely injure or kill an infant or child
seated in an infant or child seat. Thus,
seated in an infant or child seat. Thus, seated in an infant or child seat. Thus,
seated in an infant or child seat. Thus,
seated in an infant or child seat. Thus,
only use a child restraint in the rear seat
only use a child restraint in the rear seat only use a child restraint in the rear seat
only use a child restraint in the rear seat
only use a child restraint in the rear seat
of your vehicle.
of your vehicle. of your vehicle.
of your vehicle.
of your vehicle.
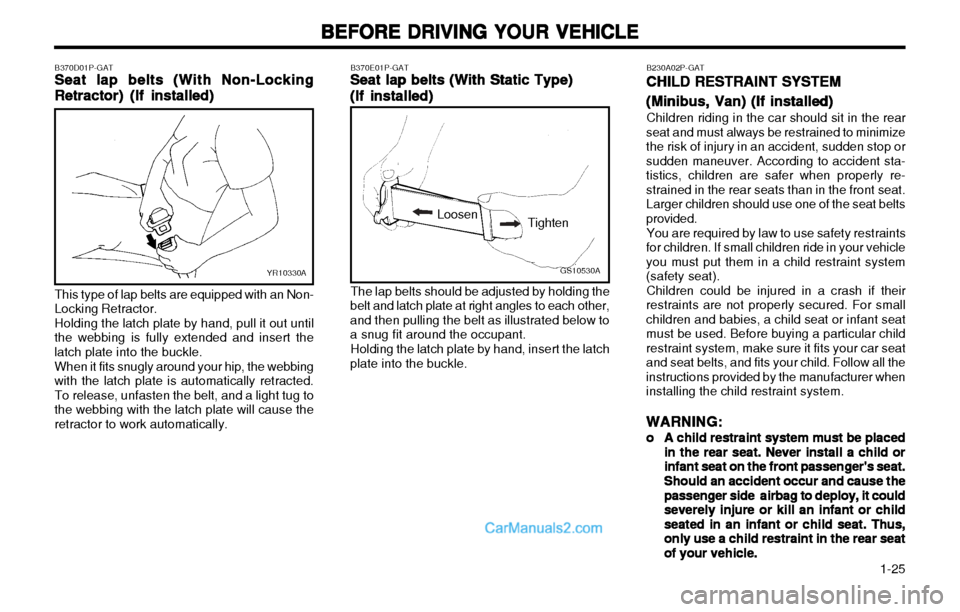
B370E01P-GAT
Seat lap belts (With Static Type)
Seat lap belts (With Static Type) Seat lap belts (With Static Type)
Seat lap belts (With Static Type)
Seat lap belts (With Static Type)
(If installed)
(If installed) (If installed)
(If installed)
(If installed)
GS10530A
Tighten
Loosen
The lap belts should be adjusted by holding the
belt and latch plate at right angles to each other, and then pulling the belt as illustrated below toa snug fit around the occupant.
Holding the latch plate by hand, insert the latch
plate into the buckle.
B370D01P-GAT
SS
SS
S eat lap belts (With Non-Locking
eat lap belts (With Non-Locking eat lap belts (With Non-Locking
eat lap belts (With Non-Locking
eat lap belts (With Non-Locking
Retractor) (If installed)
Retractor) (If installed) Retractor) (If installed)
Retractor) (If installed)
Retractor) (If installed)
YR10330A
This type of lap belts are equipped with an Non-
Locking Retractor. Holding the latch plate by hand, pull it out until
the webbing is fully extended and insert the latch plate into the buckle.
When it fits snugly around your hip, the webbing
with the latch plate is automatically retracted.To release, unfasten the belt, and a light tug tothe webbing with the latch plate will cause theretractor to work automatically.
Page 40 of 173
2-1
INSTRUMENTS & CONTROLS
INSTRUMENTS & CONTROLS INSTRUMENTS & CONTROLS
INSTRUMENTS & CONTROLS
INSTRUMENTS & CONTROLS
C020A01P-1
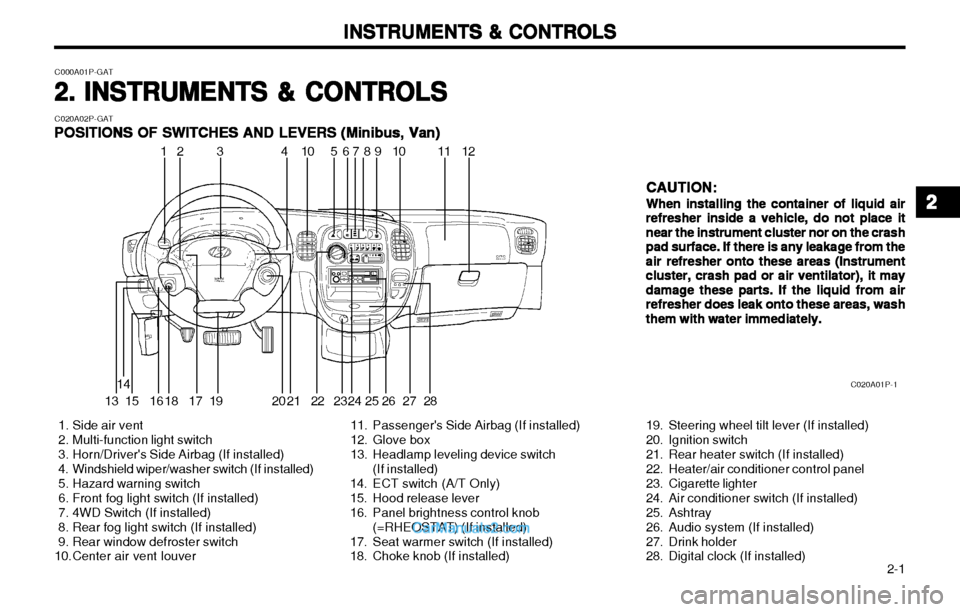
1. Side air vent
2. Multi-function light switch
3. Horn/Driver's Side Airbag (If installed)
4. Windshield wiper/washer switch (If installed)
5. Hazard warning switch
6. Front fog light switch (If installed)
7. 4WD Switch (If installed)
8. Rear fog light switch (If installed)
9. Rear window defroster switch
10.Center air vent louver 11. Passenger's Side Airbag (If installed)
12. Glove box
13. Headlamp leveling device switch
(If installed)
14. ECT switch (A/T Only)
15. Hood release lever
16. Panel brightness control knob (=RHEOSTAT) (If installed)
17. Seat warmer switch (If installed)
18. Choke knob (If installed) 19. Steering wheel tilt lever (If installed)
20. Ignition switch
21. Rear heater switch (If installed)
22. Heater/air conditioner control panel
23. Cigarette lighter
24. Air conditioner switch (If installed)
25. Ashtray
26. Audio system (If installed)
27. Drink holder
28. Digital clock (If installed) CAUTION:
CAUTION: CAUTION:
CAUTION:
CAUTION:
When installing the container of liquid air
When installing the container of liquid air When installing the container of liquid air
When installing the container of liquid air
When installing the container of liquid air refresher inside a vehicle, do not place it
refresher inside a vehicle, do not place it refresher inside a vehicle, do not place it
refresher inside a vehicle, do not place it
refresher inside a vehicle, do not place it
near the instrument cluster nor on the crash
near the instrument cluster nor on the crash near the instrument cluster nor on the crash
near the instrument cluster nor on the crash
near the instrument cluster nor on the crash
pad surface. If there is any leakage from the
pad surface. If there is any leakage from the pad surface. If there is any leakage from the
pad surface. If there is any leakage from the
pad surface. If there is any leakage from the
air refresher onto these areas (Instrument
air refresher onto these areas (Instrument air refresher onto these areas (Instrument
air refresher onto these areas (Instrument
air refresher onto these areas (Instrument
cluster, crash pad or air ventilator), it may
cluster, crash pad or air ventilator), it may cluster, crash pad or air ventilator), it may
cluster, crash pad or air ventilator), it may
cluster, crash pad or air ventilator), it may
damage these parts. If the liquid from air
damage these parts. If the liquid from air damage these parts. If the liquid from air
damage these parts. If the liquid from air
damage these parts. If the liquid from air
refresher does leak onto these areas, wash
refresher does leak onto these areas, wash refresher does leak onto these areas, wash
refresher does leak onto these areas, wash
refresher does leak onto these areas, wash
them with water immediately.
them with water immediately. them with water immediately.
them with water immediately.
them with water immediately.
C000A01P-GAT
2.2.
2.2.
2.
INSTR
INSTR INSTR
INSTR
INSTR
UMENTS & CONTR
UMENTS & CONTR UMENTS & CONTR
UMENTS & CONTR
UMENTS & CONTR
OLS
OLS OLS
OLS
OLS
12
31 051 0
12 4 6 9 78
C020A02P-GAT
POSITIONS OF SWITCHES AND LEVERS (M
POSITIONS OF SWITCHES AND LEVERS (M POSITIONS OF SWITCHES AND LEVERS (M
POSITIONS OF SWITCHES AND LEVERS (M
POSITIONS OF SWITCHES AND LEVERS (M inibus, Van)
inibus, Van) inibus, Van)
inibus, Van)
inibus, Van)
14
24 26
13 15 17 16 18 19 20 21 22 23 25 27
28
11
22
22
2
Page 41 of 173
INSTRUMENTS & CONTROLS
INSTRUMENTS & CONTROLS INSTRUMENTS & CONTROLS
INSTRUMENTS & CONTROLS
INSTRUMENTS & CONTROLS
2-2
C020A02P-1
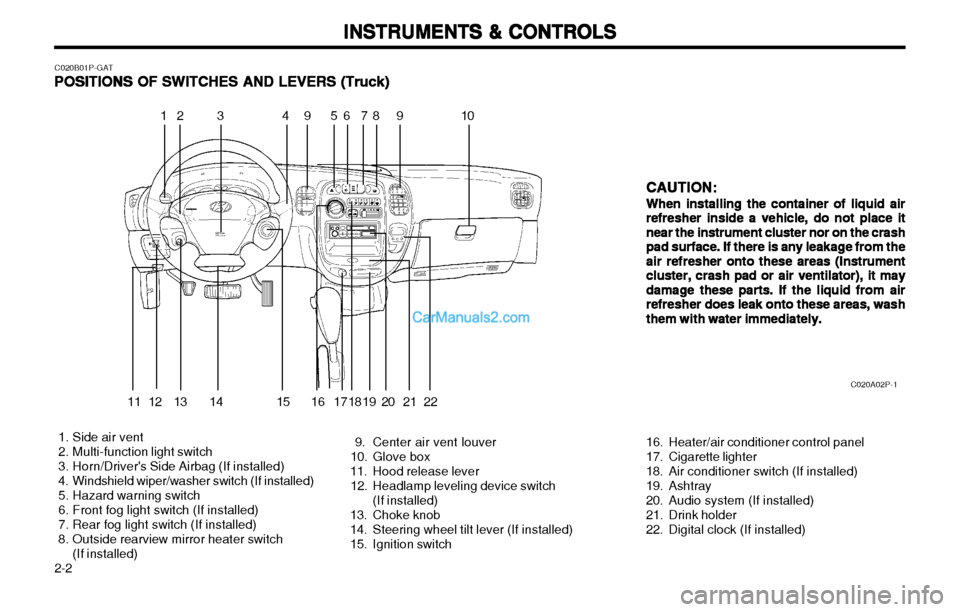
1. Side air vent
2. Multi-function light switch
3. Horn/Driver's Side Airbag (If installed)
4. Windshield wiper/washer switch (If installed)
5. Hazard warning switch
6. Front fog light switch (If installed)
7. Rear fog light switch (If installed)
8. Outside rearview mirror heater switch (If installed) 9. Center air vent louver
10. Glove box
11. Hood release lever
12. Headlamp leveling device switch (If installed)
13. Choke knob
14. Steering wheel tilt lever (If installed)
15. Ignition switch 16. Heater/air conditioner control panel
17. Cigarette lighter
18. Air conditioner switch (If installed)
19. Ashtray
20. Audio system (If installed)
21. Drink holder
22. Digital clock (If installed)CAUTION:
CAUTION: CAUTION:
CAUTION:
CAUTION:
When installing the container of liquid air
When installing the container of liquid air When installing the container of liquid air
When installing the container of liquid air
When installing the container of liquid air
refresher inside a vehicle, do not place it
refresher inside a vehicle, do not place it refresher inside a vehicle, do not place it
refresher inside a vehicle, do not place it
refresher inside a vehicle, do not place it
near the instrument cluster nor on the crash
near the instrument cluster nor on the crash near the instrument cluster nor on the crash
near the instrument cluster nor on the crash
near the instrument cluster nor on the crash
pad surface. If there is any leakage from the
pad surface. If there is any leakage from the pad surface. If there is any leakage from the
pad surface. If there is any leakage from the
pad surface. If there is any leakage from the
air refresher onto these areas (Instrument
air refresher onto these areas (Instrument air refresher onto these areas (Instrument
air refresher onto these areas (Instrument
air refresher onto these areas (Instrument
cluster, crash pad or air ventilator), it may
cluster, crash pad or air ventilator), it may cluster, crash pad or air ventilator), it may
cluster, crash pad or air ventilator), it may
cluster, crash pad or air ventilator), it may
damage these parts. If the liquid from air
damage these parts. If the liquid from air damage these parts. If the liquid from air
damage these parts. If the liquid from air
damage these parts. If the liquid from air
refresher does leak onto these areas, wash
refresher does leak onto these areas, wash refresher does leak onto these areas, wash
refresher does leak onto these areas, wash
refresher does leak onto these areas, wash
them with water immediately.
them with water immediately. them with water immediately.
them with water immediately.
them with water immediately.
11 39
5 1 0
12 4 6 9 78
C020B01P-GAT
POSITIONS OF SWITCHES AND LEVERS (T
POSITIONS OF SWITCHES AND LEVERS (T POSITIONS OF SWITCHES AND LEVERS (T
POSITIONS OF SWITCHES AND LEVERS (T
POSITIONS OF SWITCHES AND LEVERS (T ruck)
ruck) ruck)
ruck)
ruck)
13
12 14 16 15 17 18 19 20 21 22
Page 47 of 173
INSTRUMENTS & CONTROLS
INSTRUMENTS & CONTROLS INSTRUMENTS & CONTROLS
INSTRUMENTS & CONTROLS
INSTRUMENTS & CONTROLS
2-8 C130A04P-GAT
INDICATION AND WARNING LAMPS
INDICATION AND WARNING LAMPS INDICATION AND WARNING LAMPS
INDICATION AND WARNING LAMPS
INDICATION AND WARNING LAMPS
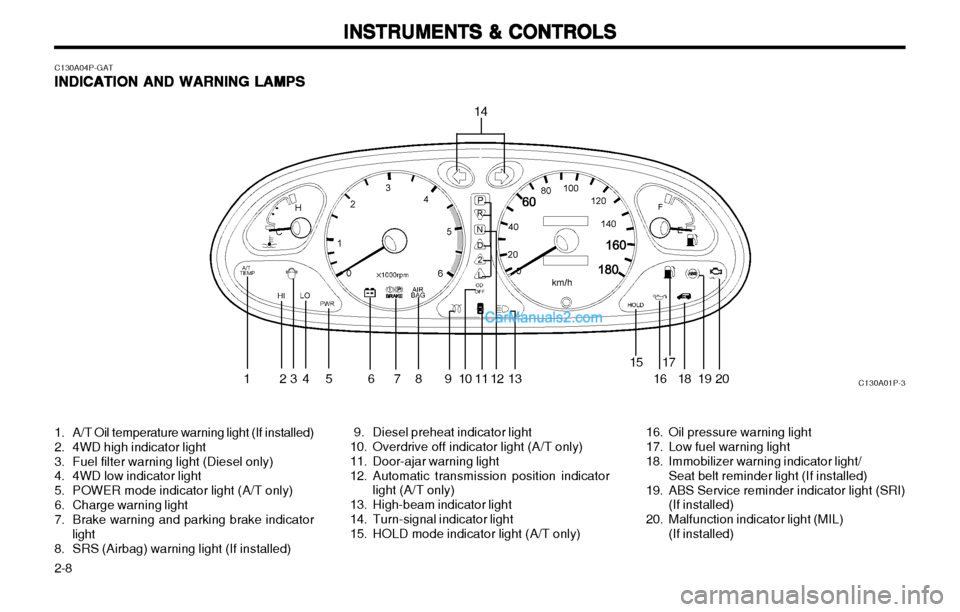
1. A/T Oil temperature warning light (If installed)
2. 4WD high indicator light
3. Fuel filter warning light (Diesel only)
4. 4WD low indicator light
5. POWER mode indicator light (A/T only)
6. Charge warning light
7. Brake warning and parking brake indicator
light
8. SRS (Airbag) warning light (If installed) 9. Diesel preheat indicator light
10. Overdrive off indicator light (A/T only)
11. Door-ajar warning light
12. Automatic transmission position indicator
light (A/T only)
13. High-beam indicator light
14. Turn-signal indicator light
15. HOLD mode indicator light (A/T only) 16. Oil pressure warning light
17. Low fuel warning light
18. Immobilizer warning indicator light/
Seat belt reminder light (If installed)
19. ABS Service reminder indicator light (SRI) (If installed)
20. Malfunction indicator light (MIL) (If installed)
2
C130A01P-3
14
13 678 1 618 19 20
17
12
111091 345
15
Page 48 of 173
2-9
INSTRUMENTS & CONTROLS
INSTRUMENTS & CONTROLS INSTRUMENTS & CONTROLS
INSTRUMENTS & CONTROLS
INSTRUMENTS & CONTROLS
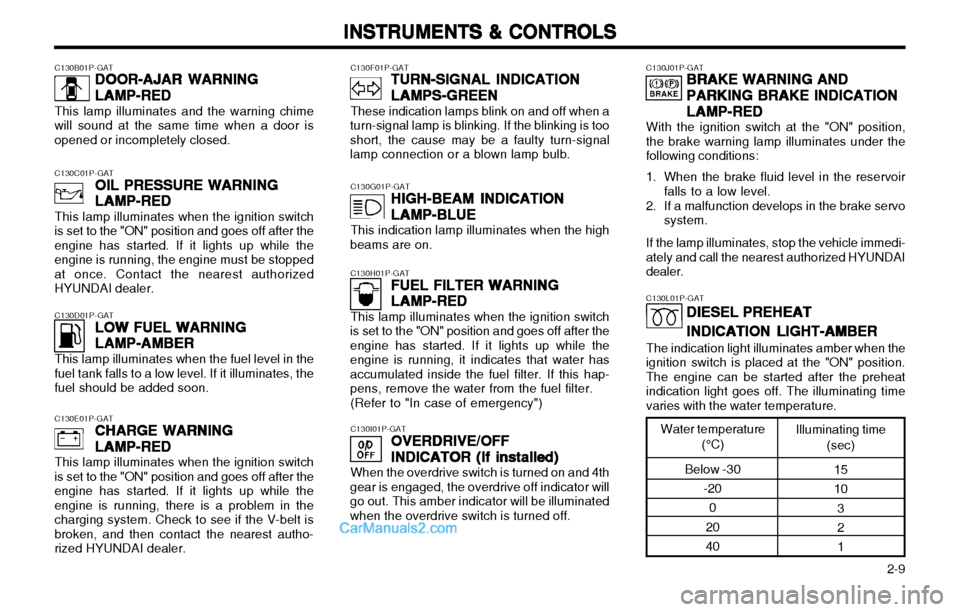
C130B01P-GAT DOOR-AJAR WARNING
DOOR-AJAR WARNING DOOR-AJAR WARNING
DOOR-AJAR WARNING
DOOR-AJAR WARNING
LAMP-RED
LAMP-RED LAMP-RED
LAMP-RED
LAMP-RED
This lamp illuminates and the warning chime
will sound at the same time when a door is opened or incompletely closed.
C130F01P-GAT TURN-SIGNAL INDICATION
TURN-SIGNAL INDICATION TURN-SIGNAL INDICATION
TURN-SIGNAL INDICATION
TURN-SIGNAL INDICATION
LAMPS-GREEN
LAMPS-GREEN LAMPS-GREEN
LAMPS-GREEN
LAMPS-GREEN
These indication lamps blink on and off when a
turn-signal lamp is blinking. If the blinking is too short, the cause may be a faulty turn-signallamp connection or a blown lamp bulb.
C130G01P-GAT HIGH-BEAM INDICATION
HIGH-BEAM INDICATION HIGH-BEAM INDICATION
HIGH-BEAM INDICATION
HIGH-BEAM INDICATION
LAMP-BLUE
LAMP-BLUE LAMP-BLUE
LAMP-BLUE
LAMP-BLUE
This indication lamp illuminates when the high
beams are on.
C130H01P-GAT FUEL FILTER WARNING
FUEL FILTER WARNING FUEL FILTER WARNING
FUEL FILTER WARNING
FUEL FILTER WARNING
LAMP-RED
LAMP-RED LAMP-RED
LAMP-RED
LAMP-RED
This lamp illuminates when the ignition switch
is set to the "ON" position and goes off after the engine has started. If it lights up while theengine is running, it indicates that water hasaccumulated inside the fuel filter. If this hap-pens, remove the water from the fuel filter.
(Refer to "In case of emergency")
C130I01P-GAT OVERDRIVE/OFF
OVERDRIVE/OFF OVERDRIVE/OFF
OVERDRIVE/OFF
OVERDRIVE/OFF
INDICATOR (If installed)
INDICATOR (If installed) INDICATOR (If installed)
INDICATOR (If installed)
INDICATOR (If installed)
When the overdrive switch is turned on and 4th
gear is engaged, the overdrive off indicator will go out. This amber indicator will be illuminatedwhen the overdrive switch is turned off.
C130J01P-GAT BRAKE WARNING AND
BRAKE WARNING AND BRAKE WARNING AND
BRAKE WARNING AND
BRAKE WARNING AND
PARKING BRAKE INDICATION
PARKING BRAKE INDICATION PARKING BRAKE INDICATION
PARKING BRAKE INDICATION
PARKING BRAKE INDICATION
LAMP-RED
LAMP-RED LAMP-RED
LAMP-RED
LAMP-RED
With the ignition switch at the "ON" position,
the brake warning lamp illuminates under the following conditions:
1. When the brake fluid level in the reservoir falls to a low level.
2. If a malfunction develops in the brake servo system.
If the lamp illuminates, stop the vehicle immedi-
ately and call the nearest authorized HYUNDAI dealer.
C130C01P-GAT
OIL PRESSURE WARNING
OIL PRESSURE WARNING OIL PRESSURE WARNING
OIL PRESSURE WARNING
OIL PRESSURE WARNING
LAMP-RED
LAMP-RED LAMP-RED
LAMP-RED
LAMP-RED
This lamp illuminates when the ignition switch
is set to the "ON" position and goes off after theengine has started. If it lights up while theengine is running, the engine must be stoppedat once. Contact the nearest authorizedHYUNDAI dealer.
C130D01P-GAT LOW FUEL WARNING
LOW FUEL WARNING LOW FUEL WARNING
LOW FUEL WARNING
LOW FUEL WARNING
LAMP-AMBER
LAMP-AMBER LAMP-AMBER
LAMP-AMBER
LAMP-AMBER
This lamp illuminates when the fuel level in the
fuel tank falls to a low level. If it illuminates, the fuel should be added soon.
C130E01P-GAT CHARGE WARNING
CHARGE WARNING CHARGE WARNING
CHARGE WARNING
CHARGE WARNING
LAMP-RED
LAMP-RED LAMP-RED
LAMP-RED
LAMP-RED
This lamp illuminates when the ignition switch
is set to the "ON" position and goes off after the engine has started. If it lights up while theengine is running, there is a problem in thecharging system. Check to see if the V-belt isbroken, and then contact the nearest autho-rized HYUNDAI dealer.
C130L01P-GAT
DIESEL PREHEAT
DIESEL PREHEAT DIESEL PREHEAT
DIESEL PREHEAT
DIESEL PREHEAT
INDICATION LIGHT-AMBER
INDICATION LIGHT-AMBER INDICATION LIGHT-AMBER
INDICATION LIGHT-AMBER
INDICATION LIGHT-AMBER
The indication light illuminates amber when the
ignition switch is placed at the "ON" position. The engine can be started after the preheatindication light goes off. The illuminating timevaries with the water temperature.
Water temperature
(°C)
Below -30 -20
0
20 40 Illuminating time
(sec)
151032 1
Page 49 of 173
INSTRUMENTS & CONTROLS
INSTRUMENTS & CONTROLS INSTRUMENTS & CONTROLS
INSTRUMENTS & CONTROLS
INSTRUMENTS & CONTROLS
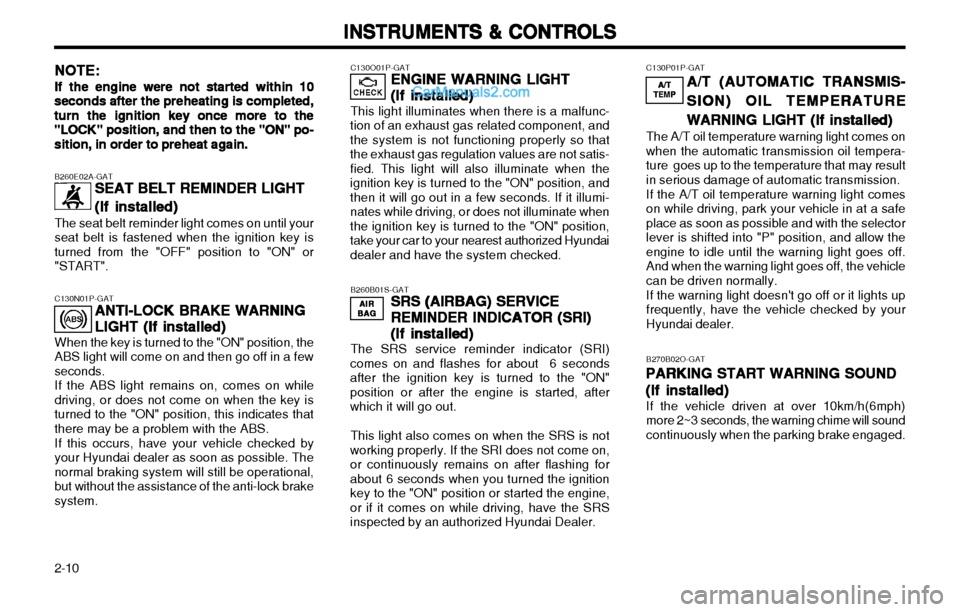
2-10 C130P01P-GAT
A/T (AUTOMATIC TRANSMIS-
A/T (AUTOMATIC TRANSMIS- A/T (AUTOMATIC TRANSMIS-
A/T (AUTOMATIC TRANSMIS-
A/T (AUTOMATIC TRANSMIS-
SION) OIL TEMPERATURE
SION) OIL TEMPERATURE SION) OIL TEMPERATURE
SION) OIL TEMPERATURE
SION) OIL TEMPERATURE
WARNING LIGHT
WARNING LIGHT WARNING LIGHT
WARNING LIGHT
WARNING LIGHT
(If installed)
(If installed) (If installed)
(If installed)
(If installed)
The A/T oil temperature warning light comes on when the automatic transmission oil tempera-ture goes up to the temperature that may resultin serious damage of automatic transmission. If the A/T oil temperature warning light comes on while driving, park your vehicle in at a safeplace as soon as possible and with the selectorlever is shifted into "P" position, and allow theengine to idle until the warning light goes off.And when the warning light goes off, the vehiclecan be driven normally. If the warning light doesn't go off or it lights up frequently, have the vehicle checked by yourHyundai dealer.
A/TA/T
A/TA/T
A/T
TEMPTEMP
TEMPTEMP
TEMP
NOTE:
NOTE: NOTE:
NOTE:
NOTE:
If the engine were not started within 10
If the engine were not started within 10 If the engine were not started within 10
If the engine were not started within 10
If the engine were not started within 10 seconds after the preheating is completed,
seconds after the preheating is completed, seconds after the preheating is completed,
seconds after the preheating is completed,
seconds after the preheating is completed,
turn the ignition key once more to the
turn the ignition key once more to the turn the ignition key once more to the
turn the ignition key once more to the
turn the ignition key once more to the
"LOCK" position, and then to the "ON" po-
"LOCK" position, and then to the "ON" po- "LOCK" position, and then to the "ON" po-
"LOCK" position, and then to the "ON" po-
"LOCK" position, and then to the "ON" po-
sition, in order to preheat again.
sition, in order to preheat again. sition, in order to preheat again.
sition, in order to preheat again.
sition, in order to preheat again. B260E02A-GAT
SEAT BELT REMINDER LIGHT
SEAT BELT REMINDER LIGHT SEAT BELT REMINDER LIGHT
SEAT BELT REMINDER LIGHT
SEAT BELT REMINDER LIGHT
(If installed)
(If installed) (If installed)
(If installed)
(If installed)
The seat belt reminder light comes on until your seat belt is fastened when the ignition key isturned from the "OFF" position to "ON" or"START". C130O01P-GAT
ENGINE WARNING LIGHT
ENGINE WARNING LIGHT ENGINE WARNING LIGHT
ENGINE WARNING LIGHT
ENGINE WARNING LIGHT
(If installed)
(If installed) (If installed)
(If installed)
(If installed)
This light illuminates when there is a malfunc-
tion of an exhaust gas related component, andthe system is not functioning properly so thatthe exhaust gas regulation values are not satis-fied. This light will also illuminate when theignition key is turned to the "ON" position, andthen it will go out in a few seconds. If it illumi-nates while driving, or does not illuminate whenthe ignition key is turned to the "ON" position,take your car to your nearest authorized Hyundaidealer and have the system checked.
B260B01S-GAT SRS (AIRBAG) SERVICE
SRS (AIRBAG) SERVICE SRS (AIRBAG) SERVICE
SRS (AIRBAG) SERVICE
SRS (AIRBAG) SERVICE
REMINDER INDICATOR
REMINDER INDICATOR REMINDER INDICATOR
REMINDER INDICATOR
REMINDER INDICATOR (SRI)
(SRI) (SRI)
(SRI)
(SRI)
(If installed)
(If installed) (If installed)
(If installed)
(If installed)
The SRS service reminder indicator (SRI)
comes on and flashes for about 6 secondsafter the ignition key is turned to the "ON"
position or after the engine is started, afterwhich it will go out.
This light also comes on when the SRS is not
working properly. If the SRI does not come on,or continuously remains on after flashing forabout 6 seconds when you turned the ignition
key to the "ON" position or started the engine,or if it comes on while driving, have the SRSinspected by an authorized Hyundai Dealer.
C130N01P-GAT
ANTI-LOCK BRAKE WARNING
ANTI-LOCK BRAKE WARNING ANTI-LOCK BRAKE WARNING
ANTI-LOCK BRAKE WARNING
ANTI-LOCK BRAKE WARNING
LIGHT (If installed)
LIGHT (If installed) LIGHT (If installed)
LIGHT (If installed)
LIGHT (If installed)
When the key is turned to the "ON" position, the
ABS light will come on and then go off in a fewseconds. If the ABS light remains on, comes on while
driving, or does not come on when the key isturned to the "ON" position, this indicates thatthere may be a problem with the ABS.
If this occurs, have your vehicle checked by
your Hyundai dealer as soon as possible. Thenormal braking system will still be operational,but without the assistance of the anti-lock brakesystem.
AIRAIR
AIRAIR
AIR
BAGBAG
BAGBAG
BAG
B270B02O-GATPARKING START WARNING SOUND
PARKING START WARNING SOUND PARKING START WARNING SOUND
PARKING START WARNING SOUND
PARKING START WARNING SOUND
(If installed)
(If installed) (If installed)
(If installed)
(If installed)
If the vehicle driven at over 10km/h(6mph) more 2~3 seconds, the warning chime will soundcontinuously when the parking brake engaged.