shift Hyundai H-1 (Grand Starex) 2011 Owner's Manual
[x] Cancel search | Manufacturer: HYUNDAI, Model Year: 2011, Model line: H-1 (Grand Starex), Model: Hyundai H-1 (Grand Starex) 2011Pages: 338, PDF Size: 8.16 MB
Page 16 of 338
Your vehicle at a glance
4 2
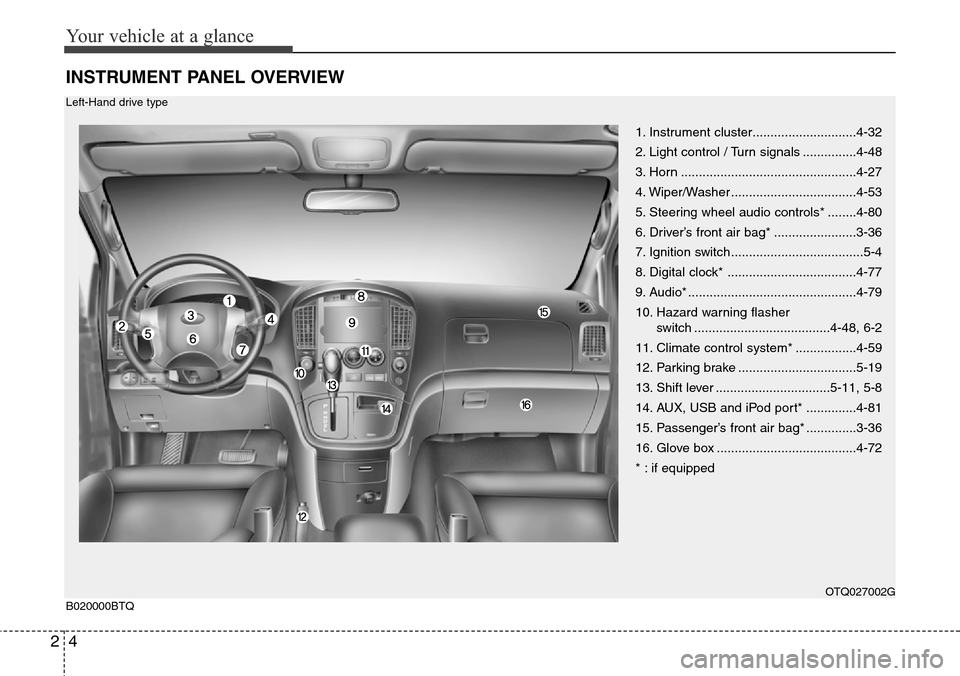
INSTRUMENT PANEL OVERVIEW
1. Instrument cluster.............................4-32
2. Light control / Turn signals ...............4-48
3. Horn .................................................4-27
4. Wiper/Washer ...................................4-53
5. Steering wheel audio controls* ........4-80
6. Driver’s front air bag* .......................3-36
7. Ignition switch .....................................5-4
8. Digital clock* ....................................4-77
9. Audio* ...............................................4-79
10. Hazard warning flasher
switch ......................................4-48, 6-2
11. Climate control system* .................4-59
12. Parking brake .................................5-19
13. Shift lever ................................5-11, 5-8
14. AUX, USB and iPod port* ..............4-81
15. Passenger’s front air bag* ..............3-36
16. Glove box .......................................4-72
* : if equipped
OTQ027002GB020000BTQ Left-Hand drive type
Page 17 of 338
25
Your vehicle at a glance
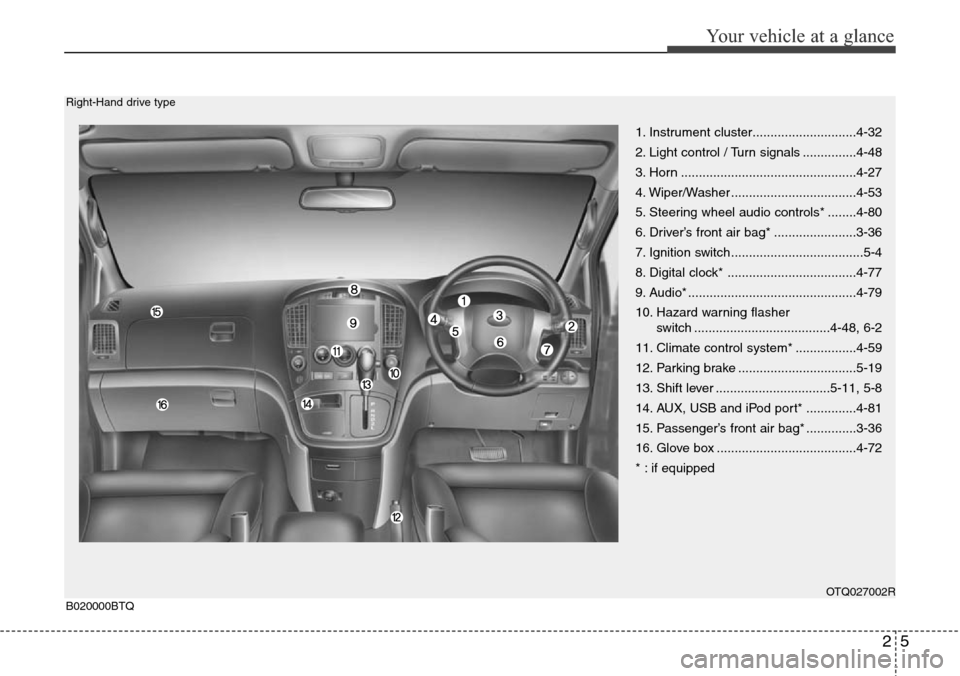
1. Instrument cluster.............................4-32
2. Light control / Turn signals ...............4-48
3. Horn .................................................4-27
4. Wiper/Washer ...................................4-53
5. Steering wheel audio controls* ........4-80
6. Driver’s front air bag* .......................3-36
7. Ignition switch .....................................5-4
8. Digital clock* ....................................4-77
9. Audio* ...............................................4-79
10. Hazard warning flasher
switch ......................................4-48, 6-2
11. Climate control system* .................4-59
12. Parking brake .................................5-19
13. Shift lever ................................5-11, 5-8
14. AUX, USB and iPod port* ..............4-81
15. Passenger’s front air bag* ..............3-36
16. Glove box .......................................4-72
* : if equipped
OTQ027002RB020000BTQ Right-Hand drive type
Page 31 of 338
313
Safety features of your vehicle
OUN026140
WARNING
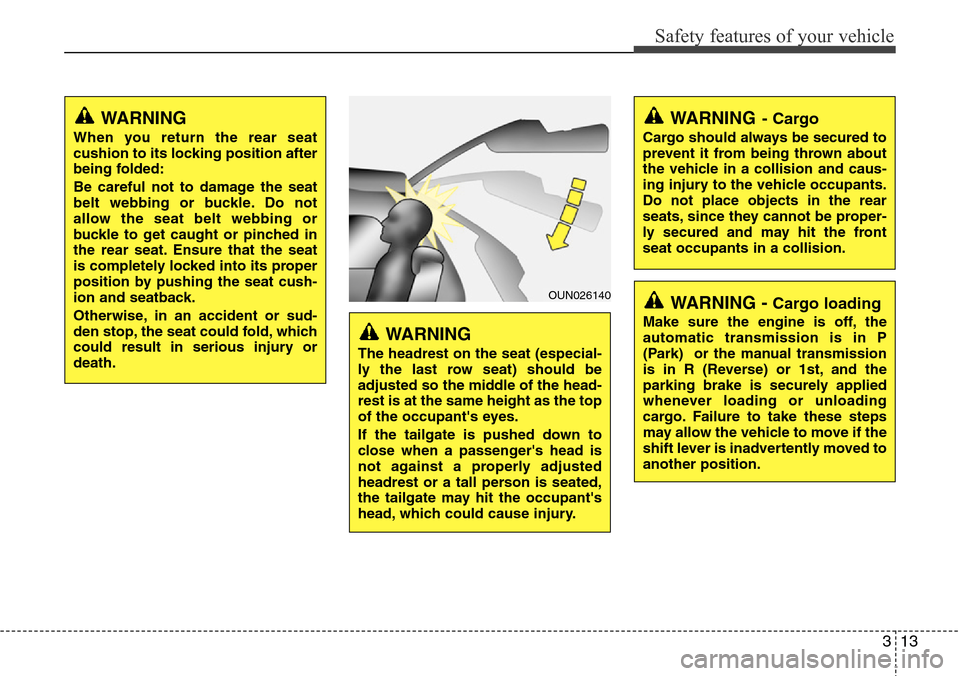
The headrest on the seat (especial-
ly the last row seat) should be
adjusted so the middle of the head-
rest is at the same height as the top
of the occupant's eyes.
If the tailgate is pushed down to
close when a passenger's head is
not against a properly adjusted
headrest or a tall person is seated,
the tailgate may hit the occupant's
head, which could cause injury.
WARNING
When you return the rear seat
cushion to its locking position after
being folded:
Be careful not to damage the seat
belt webbing or buckle. Do not
allow the seat belt webbing or
buckle to get caught or pinched in
the rear seat. Ensure that the seat
is completely locked into its proper
position by pushing the seat cush-
ion and seatback.
Otherwise, in an accident or sud-
den stop, the seat could fold, which
could result in serious injury or
death.
WARNING- Cargo
Cargo should always be secured to
prevent it from being thrown about
the vehicle in a collision and caus-
ing injury to the vehicle occupants.
Do not place objects in the rear
seats, since they cannot be proper-
ly secured and may hit the front
seat occupants in a collision.
WARNING - Cargo loading
Make sure the engine is off, the
automatic transmission is in P
(Park) or the manual transmission
is in R (Reverse) or 1st, and the
parking brake is securely applied
whenever loading or unloading
cargo. Failure to take these steps
may allow the vehicle to move if the
shift lever is inadvertently moved to
another position.
Page 40 of 338
Safety features of your vehicle
22 3
C020300AUN
Seat belt precautions
C020306AUN
Infant or small child
You should be aware of the specific
requirements in your country. Child
and/or infant seats must be properly
placed and installed in the rear seat. For
more information about the use of these
restraints, refer to “Child restraint sys-
tem” in this section.
WARNING
All occupants of the vehicle must
wear their seat belts at all times.
Seat belts and child restraints
reduce the risk of serious or fatal
injuries for all occupants in the
event of a collision or sudden stop.
Without a seat belt, occupants
could be shifted too close to a
deploying air bag, strike the interior
structure or be thrown from the
vehicle. Properly worn seat belts
greatly reduce these hazards.
Always follow the precautions
about seat belts, air bags and occu-
pant seating contained in this man-
ual.
(Continued)
• Improper handling of the pre-ten-
sioner seat belt assemblies, and
failure to heed the warnings not
to strike, modify, inspect, replace,
service or repair the pre-tension-
er seat belt assemblies may lead
to improper operation or inadver-
tent activation and serious injury.
• Always wear the seat belts when
driving or riding in a motor vehi-
cle.
• If the vehicle or pre-tensioner
seat belt must be discarded, con-
tact an authorized HYUNDAI deal-
er.
WARNING
Every person in your vehicle needs
to be properly restrained at all
times, including infants and chil-
dren. Never hold a child in your
arms or lap when riding in a vehi-
cle. The violent forces created dur-
ing a crash will tear the child from
your arms and throw the child
against the interior. Always use a
child restraint appropriate for your
child's height and weight.
Page 70 of 338
•Keep occupants away from the air
bag covers.All occupants should sit
upright, fully back in their seats with
their seat belts on and their feet on the
floor. If occupants are too close to the
air bag covers, they could be injured if
the air bags inflate.
•Do not attach or place objects on or
near the air bag covers.Any object
attached to or placed on the front air
bag covers could interfere with the
proper operation of the air bags.
•Do not modify the front seats.
Modification of the front seats could
interfere with the operation of the sup-
plemental restraint system sensing
components.
•Do not place items under the front
seats.Placing items under the front
seats could interfere with the operation
of the supplemental restraint system
sensing components and wiring har-
nesses.
•Never hold an infant or child on your
lap.The infant or child could be seri-
ously injured or killed in the event of a
crash. All infants and children should
be properly restrained in appropriate
child safety seats or seat belts in the
rear seat.
C041400AUN
Adding equipment to or modifying
your air bag-equipped vehicle
If you modify your vehicle by changing
your vehicle's frame, bumper system,
front end or side sheet metal or ride
height, this may affect the operation of
your vehicle's air bag system.
C041200AUN
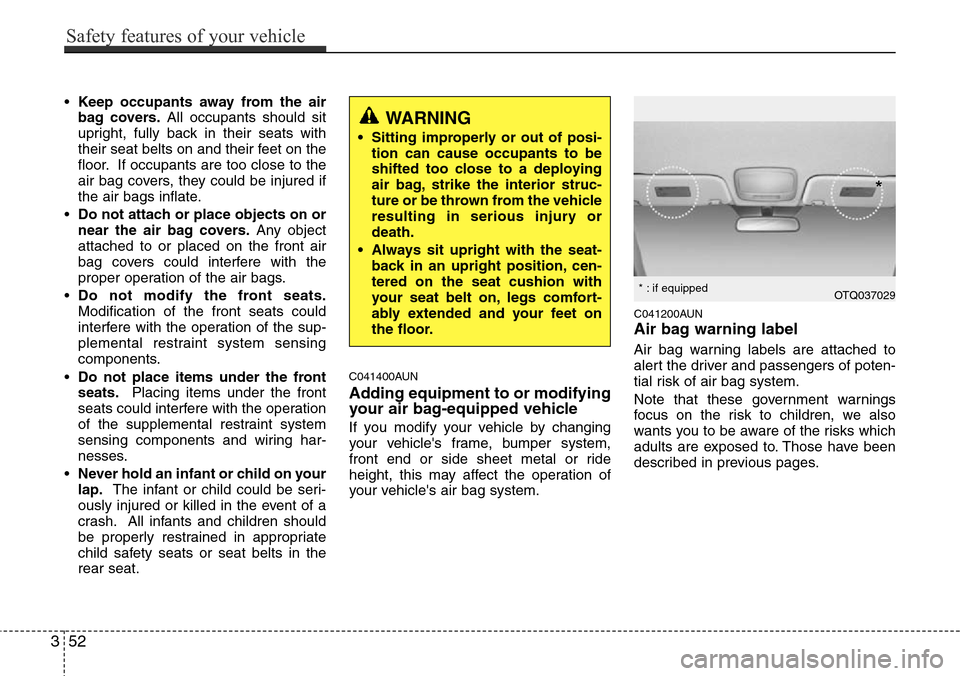
Air bag warning label
Air bag warning labels are attached to
alert the driver and passengers of poten-
tial risk of air bag system.
Note that these government warnings
focus on the risk to children, we also
wants you to be aware of the risks which
adults are exposed to. Those have been
described in previous pages.
WARNING
• Sitting improperly or out of posi-
tion can cause occupants to be
shifted too close to a deploying
air bag, strike the interior struc-
ture or be thrown from the vehicle
resulting in serious injury or
death.
• Always sit upright with the seat-
back in an upright position, cen-
tered on the seat cushion with
your seat belt on, legs comfort-
ably extended and your feet on
the floor.
OTQ037029
*
* : if equipped
352
Safety features of your vehicle
Page 91 of 338
421
Features of your vehicle
D090100BUN
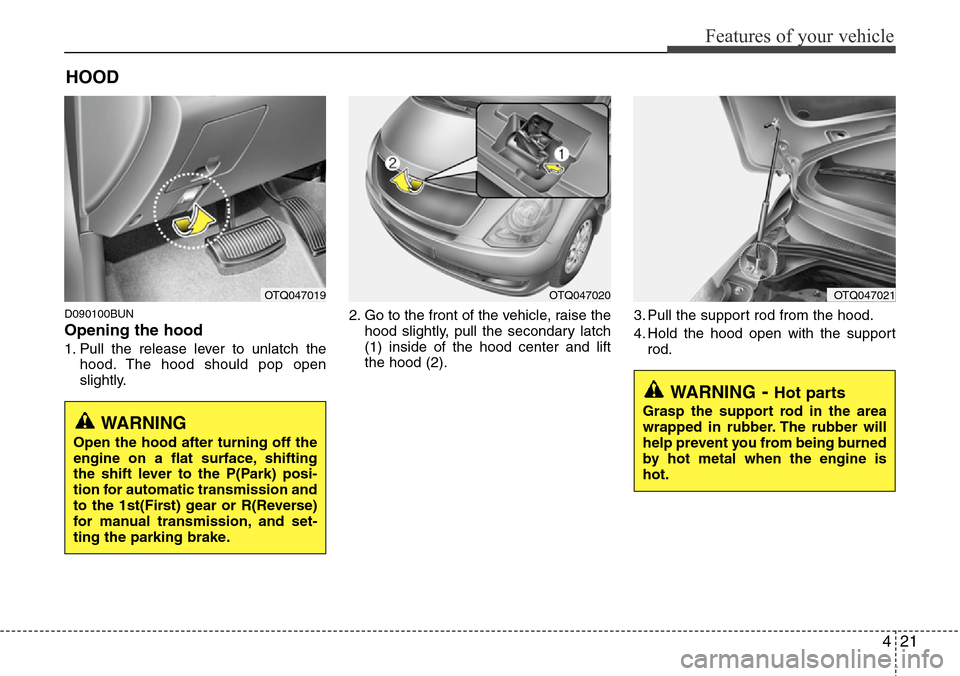
Opening the hood
1. Pull the release lever to unlatch the
hood. The hood should pop open
slightly.2. Go to the front of the vehicle, raise the
hood slightly, pull the secondary latch
(1) inside of the hood center and lift
the hood (2).3. Pull the support rod from the hood.
4. Hold the hood open with the support
rod.
HOOD
OTQ047019OTQ047020OTQ047021
WARNING- Hot parts
Grasp the support rod in the area
wrapped in rubber. The rubber will
help prevent you from being burned
by hot metal when the engine is
hot.WARNING
Open the hood after turning off the
engine on a flat surface, shifting
the shift lever to the P(Park) posi-
tion for automatic transmission and
to the 1st(First) gear or R(Reverse)
for manual transmission, and set-
ting the parking brake.
Page 98 of 338
Features of your vehicle
28 4
D140100BUN
Inside rearview mirror
Adjust the rearview mirror to center on
the view through the rear window. Make
this adjustment before you start driving.
D140101AUN
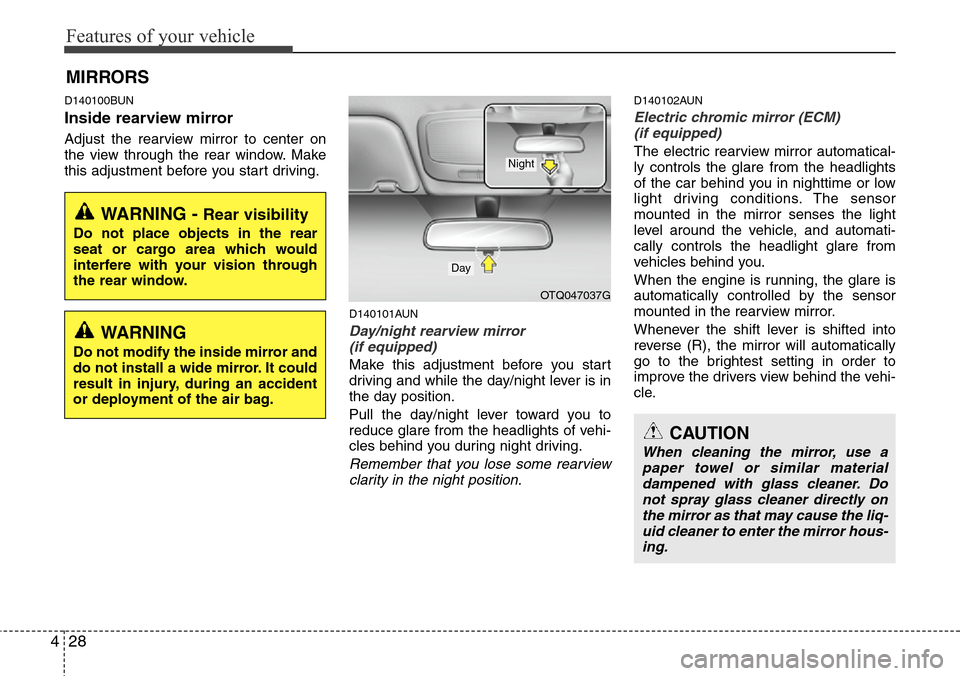
Day/night rearview mirror
(if equipped)
Make this adjustment before you start
driving and while the day/night lever is in
the day position.
Pull the day/night lever toward you to
reduce glare from the headlights of vehi-
cles behind you during night driving.
Remember that you lose some rearview
clarity in the night position.
D140102AUN
Electric chromic mirror (ECM)
(if equipped)
The electric rearview mirror automatical-
ly controls the glare from the headlights
of the car behind you in nighttime or low
light driving conditions. The sensor
mounted in the mirror senses the light
level around the vehicle, and automati-
cally controls the headlight glare from
vehicles behind you.
When the engine is running, the glare is
automatically controlled by the sensor
mounted in the rearview mirror.
Whenever the shift lever is shifted into
reverse (R), the mirror will automatically
go to the brightest setting in order to
improve the drivers view behind the vehi-
cle.
MIRRORS
WARNING - Rear visibility
Do not place objects in the rear
seat or cargo area which would
interfere with your vision through
the rear window.
OTQ047037G
CAUTION
When cleaning the mirror, use a
paper towel or similar material
dampened with glass cleaner. Do
not spray glass cleaner directly on
the mirror as that may cause the liq-
uid cleaner to enter the mirror hous-
ing.
Day
Night
WARNING
Do not modify the inside mirror and
do not install a wide mirror. It could
result in injury, during an accident
or deployment of the air bag.
Page 102 of 338
Features of your vehicle
32 4
INSTRUMENT CLUSTER
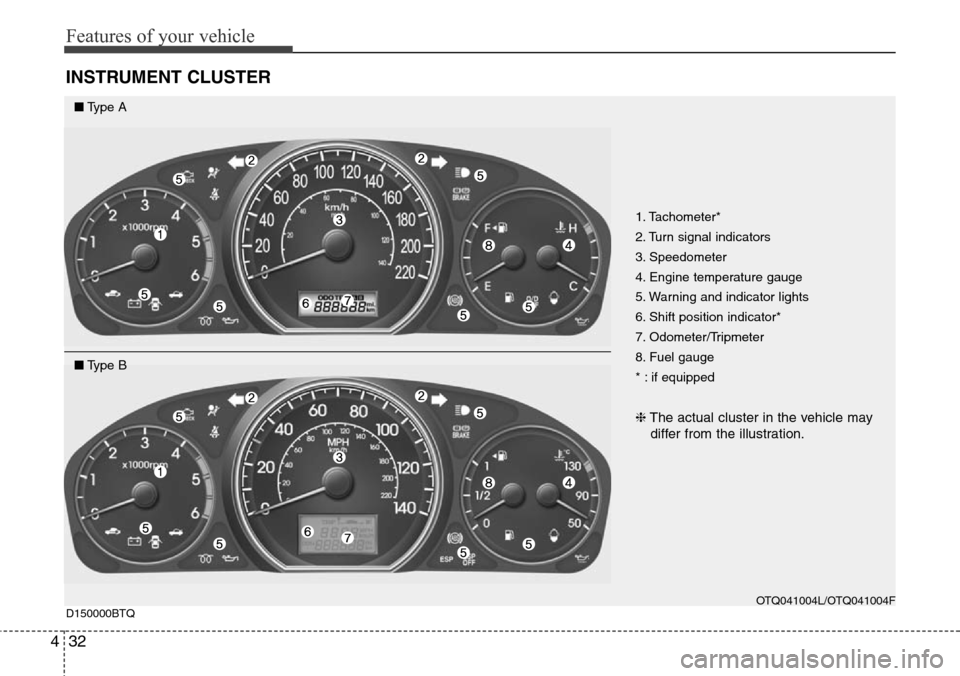
1. Tachometer*
2. Turn signal indicators
3. Speedometer
4. Engine temperature gauge
5. Warning and indicator lights
6. Shift position indicator*
7. Odometer/Tripmeter
8. Fuel gauge
* : if equipped
❈The actual cluster in the vehicle may
differ from the illustration.
OTQ041004L/OTQ041004F
D150000BTQ
■Type A
■Type B
Page 103 of 338
433
Features of your vehicle
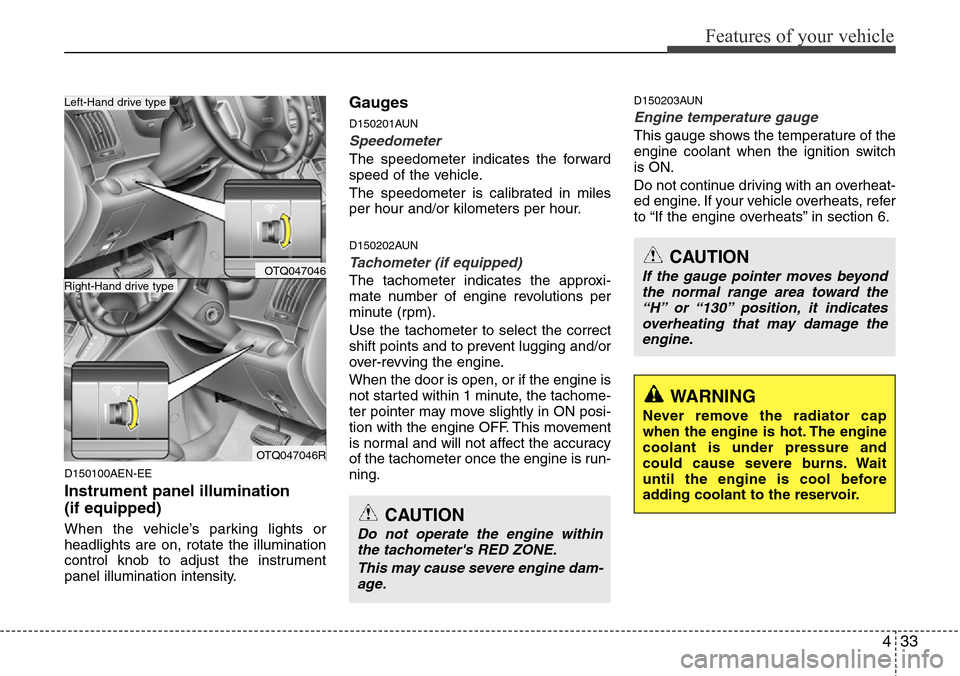
D150100AEN-EE
Instrument panel illumination
(if equipped)
When the vehicle’s parking lights or
headlights are on, rotate the illumination
control knob to adjust the instrument
panel illumination intensity.
Gauges
D150201AUN
Speedometer
The speedometer indicates the forward
speed of the vehicle.
The speedometer is calibrated in miles
per hour and/or kilometers per hour.
D150202AUN
Tachometer (if equipped)
The tachometer indicates the approxi-
mate number of engine revolutions per
minute (rpm).
Use the tachometer to select the correct
shift points and to prevent lugging and/or
over-revving the engine.
When the door is open, or if the engine is
not started within 1 minute, the tachome-
ter pointer may move slightly in ON posi-
tion with the engine OFF. This movement
is normal and will not affect the accuracy
of the tachometer once the engine is run-
ning.
D150203AUN
Engine temperature gauge
This gauge shows the temperature of the
engine coolant when the ignition switch
is ON.
Do not continue driving with an overheat-
ed engine. If your vehicle overheats, refer
to “If the engine overheats” in section 6.
CAUTION
Do not operate the engine within
the tachometer's RED ZONE.
This may cause severe engine dam-
age.
CAUTION
If the gauge pointer moves beyond
the normal range area toward the
“H” or “130” position, it indicates
overheating that may damage the
engine.
WARNING
Never remove the radiator cap
when the engine is hot. The engine
coolant is under pressure and
could cause severe burns. Wait
until the engine is cool before
adding coolant to the reservoir.
OTQ047046
OTQ047046R
Right-Hand drive type
Left-Hand drive type
Page 110 of 338
Features of your vehicle
40 4
D150308AEN
Parking brake & brake fluid
warning light
Parking brake warning
This light is illuminated when the parking
brake is applied with the ignition switch in
the START or ON position. The warning
light should go off when the parking
brake is released while engine is run-
ning.
The parking brake warning chime will
sound to remind you that the parking
brake is applied when you are driving
above 10 km/h (6 mph). Always release
the parking brake before you drive.
Low brake fluid level warning
If the warning light remains on, it may
indicate that the brake fluid level in the
reservoir is low.
If the warning light remains on:
1. Drive carefully to the nearest safe
location and stop your vehicle.
2. With the engine stopped, check the
brake fluid level immediately and add
fluid as required. Then check all brake
components for fluid leaks.3. Do not drive the vehicle if leaks are
found, the warning light remains on or
the brakes do not operate properly.
Have the vehicle towed to any author-
ized HYUNDAI dealer for a brake sys-
tem inspection and necessary repairs.
Your vehicle is equipped with dual-diago-
nal braking systems. This means you still
have braking on two wheels even if one
of the dual systems should fail. With only
one of the dual systems working, more
than normal pedal travel and greater
pedal pressure are required to stop the
car. Also, the car will not stop in as short
a distance with only a portion of the
brake system working. If the brakes fail
while you are driving, shift to a lower gear
for additional engine braking and stop the
car as soon as it is safe to do so.
To check bulb operation, check whether
the parking brake and brake fluid warning
light illuminates when the ignition switch
is in the ON position.
WARNING
Driving the vehicle with a warning
light on is dangerous. If the brake
warning light remains on, have the
brakes checked and repaired imme-
diately by an authorized HYUNDAI
dealer.
CAUTION
• If the light comes on continuous-
ly after adding the engine oil and
driving the vehicle for 1 hour, take
your vehicle to your nearest
authorized HYUNDAI dealer and
have the system checked.
• Even if this light does not come
on after the engine has started,
the engine oil should be checked
and supplied periodically.