warning Hyundai H-1 (Grand Starex) 2016 - RHD (UK, Australia) User Guide
[x] Cancel search | Manufacturer: HYUNDAI, Model Year: 2016, Model line: H-1 (Grand Starex), Model: Hyundai H-1 (Grand Starex) 2016Pages: 332, PDF Size: 6.89 MB
Page 26 of 332
Safety features of your vehicle
8 3
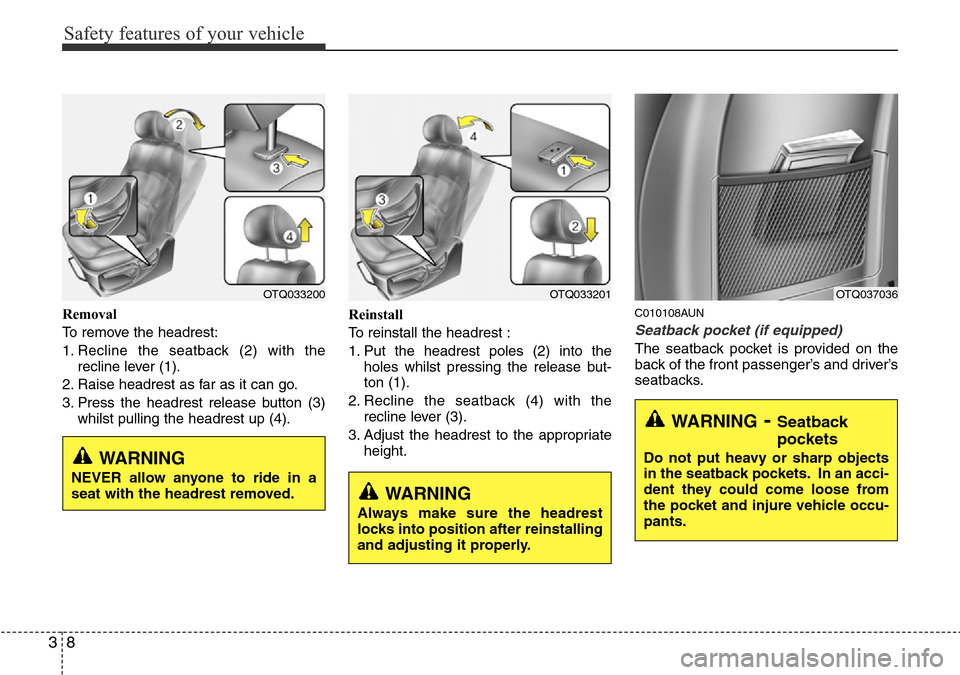
Removal
To remove the headrest:
1. Recline the seatback (2) with the
recline lever (1).
2. Raise headrest as far as it can go.
3. Press the headrest release button (3)
whilst pulling the headrest up (4).Reinstall
To reinstall the headrest :
1. Put the headrest poles (2) into the
holes whilst pressing the release but-
ton (1).
2. Recline the seatback (4) with the
recline lever (3).
3. Adjust the headrest to the appropriate
height.C010108AUN
Seatback pocket (if equipped)
The seatback pocket is provided on the
back of the front passenger’s and driver’s
seatbacks.
WARNING- Seatback
pockets
Do not put heavy or sharp objects
in the seatback pockets. In an acci-
dent they could come loose from
the pocket and injure vehicle occu-
pants.
OTQ037036OTQ033201
WARNING
Always make sure the headrest
locks into position after reinstalling
and adjusting it properly.
OTQ033200
WARNING
NEVER allow anyone to ride in a
seat with the headrest removed.
Page 28 of 332
Safety features of your vehicle
10 3
To recline the seatback:
1. Pull up the seatback recline lever.
2. Carefully lean back the seat and adjust
the seatback to the position you
desire.
3. Release the lever and make sure the
seatback is locked in place. (The lever
MUST return to its original position for
the seatback to lock.)
C010303CTQ-EA
Headrest
The rear seats is equipped with head-
rests in the outboard seating positions
(except centre seating position) for the
occupant's safety and comfort.
The headrest not only provides comfort
for passengers, but also helps to protect
the head and neck in the event of a colli-
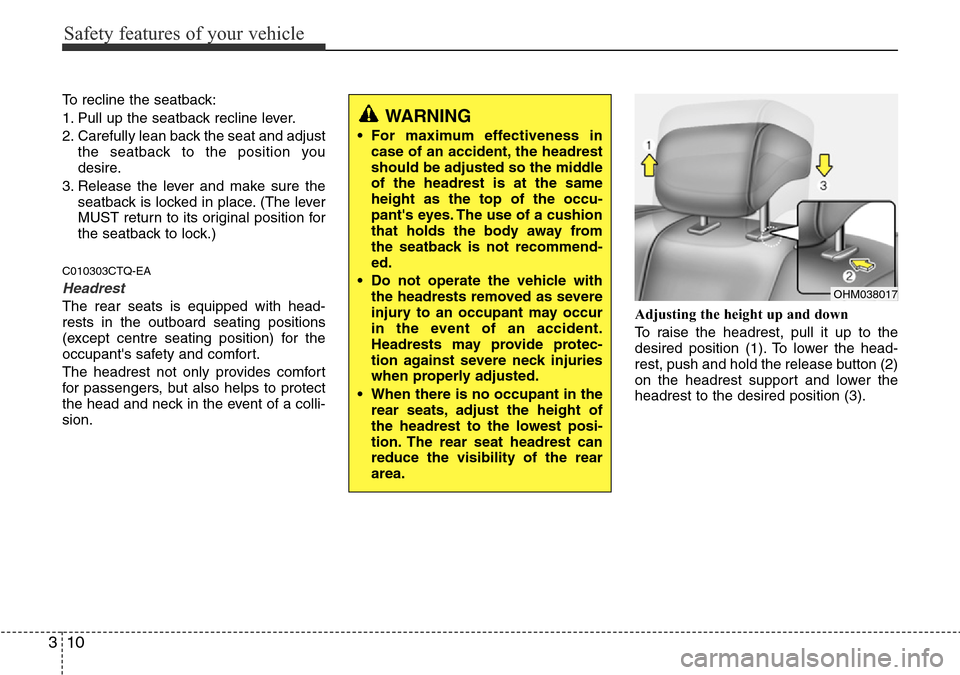
sion.Adjusting the height up and down
To raise the headrest, pull it up to the
desired position (1). To lower the head-
rest, push and hold the release button (2)
on the headrest support and lower the
headrest to the desired position (3).OHM038017
WARNING
• For maximum effectiveness in
case of an accident, the headrest
should be adjusted so the middle
of the headrest is at the same
height as the top of the occu-
pant's eyes. The use of a cushion
that holds the body away from
the seatback is not recommend-
ed.
• Do not operate the vehicle with
the headrests removed as severe
injury to an occupant may occur
in the event of an accident.
Headrests may provide protec-
tion against severe neck injuries
when properly adjusted.
• When there is no occupant in the
rear seats, adjust the height of
the headrest to the lowest posi-
tion. The rear seat headrest can
reduce the visibility of the rear
area.
Page 29 of 332
311
Safety features of your vehicle
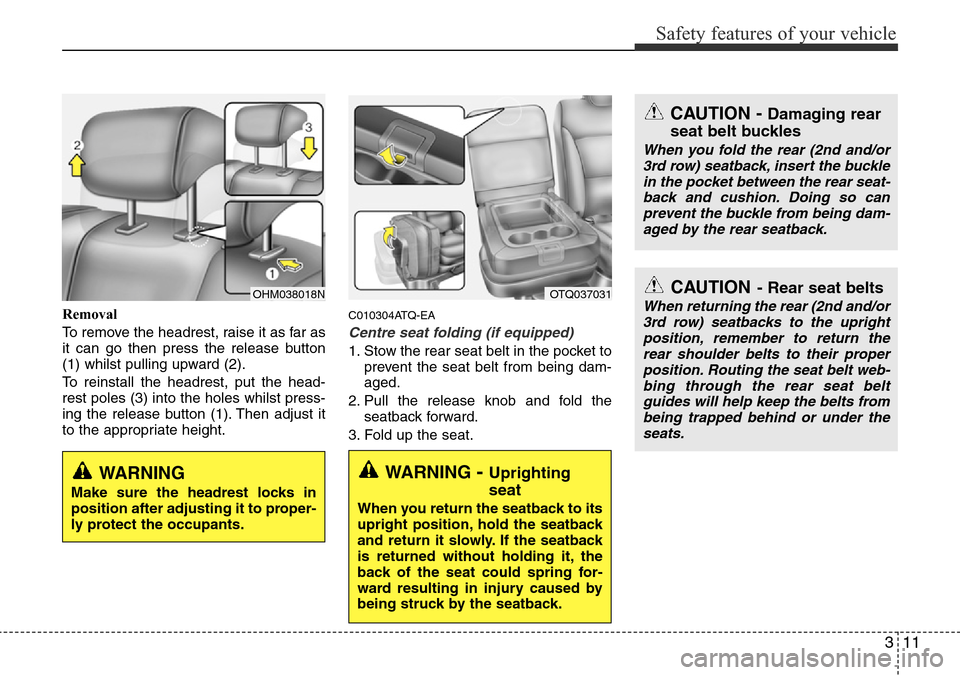
Removal
To remove the headrest, raise it as far as
it can go then press the release button
(1) whilst pulling upward (2).
To reinstall the headrest, put the head-
rest poles (3) into the holes whilst press-
ing the release button (1). Then adjust it
to the appropriate height.C010304ATQ-EA
Centre seat folding (if equipped)
1. Stow the rear seat belt in the pocket to
prevent the seat belt from being dam-
aged.
2. Pull the release knob and fold the
seatback forward.
3. Fold up the seat.
OHM038018NOTQ037031
WARNING - Uprighting
seat
When you return the seatback to its
upright position, hold the seatback
and return it slowly. If the seatback
is returned without holding it, the
back of the seat could spring for-
ward resulting in injury caused by
being struck by the seatback.
WARNING
Make sure the headrest locks in
position after adjusting it to proper-
ly protect the occupants.
CAUTION- Rear seat belts
When returning the rear (2nd and/or
3rd row) seatbacks to the upright
position, remember to return the
rear shoulder belts to their proper
position. Routing the seat belt web-
bing through the rear seat belt
guides will help keep the belts from
being trapped behind or under the
seats.
CAUTION - Damaging rear
seat belt buckles
When you fold the rear (2nd and/or
3rd row) seatback, insert the buckle
in the pocket between the rear seat-
back and cushion. Doing so can
prevent the buckle from being dam-
aged by the rear seatback.
Page 30 of 332
Safety features of your vehicle
12 3
C010307ATQ
Folding the rear seat
(4th row seat, if equipped)
The rear seat cushion may be folded to
facilitate carrying long items or to
increase the luggage capacity of the
vehicle.To fold the rear seat:
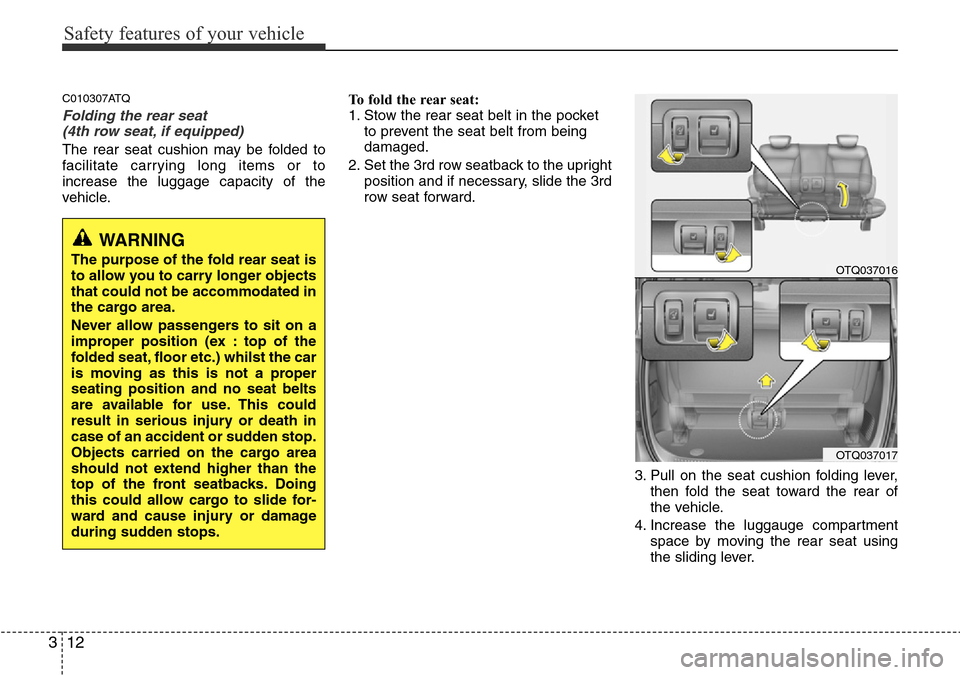
1. Stow the rear seat belt in the pocket
to prevent the seat belt from being
damaged.
2. Set the 3rd row seatback to the upright
position and if necessary, slide the 3rd
row seat forward.
3. Pull on the seat cushion folding lever,
then fold the seat toward the rear of
the vehicle.
4. Increase the luggauge compartment
space by moving the rear seat using
the sliding lever.
WARNING
The purpose of the fold rear seat is
to allow you to carry longer objects
that could not be accommodated in
the cargo area.
Never allow passengers to sit on a
improper position (ex : top of the
folded seat, floor etc.) whilst the car
is moving as this is not a proper
seating position and no seat belts
are available for use. This could
result in serious injury or death in
case of an accident or sudden stop.
Objects carried on the cargo area
should not extend higher than the
top of the front seatbacks. Doing
this could allow cargo to slide for-
ward and cause injury or damage
during sudden stops.OTQ037016
OTQ037017
Page 31 of 332
313
Safety features of your vehicle
WARNING
When you return the rear seat
cushion to its locking position after
being folded:
Be careful not to damage the seat
belt webbing or buckle. Do not
allow the seat belt webbing or
buckle to get caught or pinched in
the rear seat. Ensure that the seat
is completely locked into its proper
position by pushing the seat cush-
ion and seatback.
Otherwise, in an accident or sud-
den stop, the seat could fold, which
could result in serious injury or
death.
OUN026140
WARNING
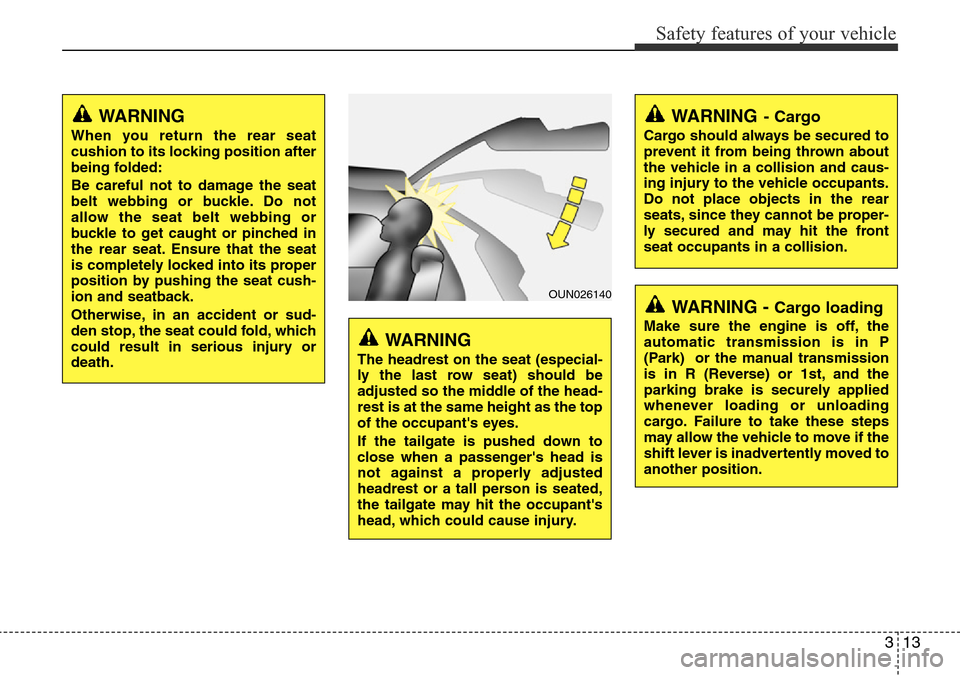
The headrest on the seat (especial-
ly the last row seat) should be
adjusted so the middle of the head-
rest is at the same height as the top
of the occupant's eyes.
If the tailgate is pushed down to
close when a passenger's head is
not against a properly adjusted
headrest or a tall person is seated,
the tailgate may hit the occupant's
head, which could cause injury.
WARNING- Cargo
Cargo should always be secured to
prevent it from being thrown about
the vehicle in a collision and caus-
ing injury to the vehicle occupants.
Do not place objects in the rear
seats, since they cannot be proper-
ly secured and may hit the front
seat occupants in a collision.
WARNING - Cargo loading
Make sure the engine is off, the
automatic transmission is in P
(Park) or the manual transmission
is in R (Reverse) or 1st, and the
parking brake is securely applied
whenever loading or unloading
cargo. Failure to take these steps
may allow the vehicle to move if the
shift lever is inadvertently moved to
another position.
Page 32 of 332
Safety features of your vehicle
14 3
C020100CUN-EA
Seat belt restraint system
The use of seat belts reduces the risk of
accident injury by avoiding collision with
the interior of the car and by preventing
the occupants from being thrown out of
the car. This makes them the most impor-
tant safety feature available for you and
your passengers. Adequate protection is
afforded only when the belt is worn cor-
rectly. You should always fasten and
adjust your seatbelts before the car is put
in motion and encourage your passen-
gers to do the same.
SEAT BELTS
WARNING
• For maximum restraint system
protection, the seat belts must
always be used whenever the car
is moving.
• Seat belts are most effective
when seatbacks are in the
upright position.
• Children age 12 and younger
must always be properly
restrained in the rear seat. Never
allow children to ride in the front
passenger seat.
(Continued)
WARNING
Seat belts are designed to bear upon
the bony structure of the body, and
should be worn low across the front
of the pelvis, or the pelvis, chest and
shoulders, as applicable; wearing the
lap section of the belt across the
abdominal area must be avoided.
Seat belts should be adjusted as
firmly as possible, consistent with
comfort, to provide the protection for
which they have been designed.
A slack belt will greatly reduce the
protection afforded to the wearer.
Care should be taken to avoid con-
tamination of the webbing with pol-
ishes, oils and chemicals and partic-
ularly battery acid. Cleaning may
safely be carried out using mild soap
and water. The belt should be
replaced if webbing becomes frayed,
contaminated or damaged. It is
essential to replace the entire assem-
bly after it has been worn in a severe
impact even if damage to the assem-
bly is not obvious. Belts should not
be worn with straps twisted. Each
seat belt assembly must only be
used by one occupant; it is danger-
ous to put a belt around a child being
carried on the occupant's lap.
(Continued)
If a child over 12 must be seated
in the front seat, he/she must be
properly belted and the seat
should be moved as far back as
possible.
• Never wear a seat belt over frag-
ile objects. If there is a sudden
stop or impact, the seat belt can
damage it.
• Never wear the shoulder belt
under your arm or behind your
back. An improperly positioned
shoulder belt can cause serious
injuries in a crash. The shoulder
belt should be positioned midway
over your shoulder across your
collarbone.
• Avoid wearing twisted seat belts.
A twisted belt can't do its job as
well. In a collision, it could even
cut into you. Be sure the belt
webbing is straight and not twist-
ed.
• Be careful not to damage the belt
webbing or hardware. If the belt
webbing or hardware is dam-
aged, replace it.
Page 33 of 332
315
Safety features of your vehicle
D150302AEN-EA
Seat belt warning (if equipped)
As a reminder to the driver, the seat belt
warning light will blink for approximately
6 seconds each time you turn the ignition
switch ON regardless of belt fastening.
If the driver’s seat belt is unfastened after
the ignition switch is ON, the seat belt
warning light blinks again for approxi-
mately 6 seconds.
Seat belt warning chime (if equipped)
If the driver's seat belt is not fastened
when the ignition switch is turned ON or
if it is unfastened after the ignition switch
is ON, the seat belt warning chime will
sound for approximately 6 seconds.
Once the seat belt is fastened the chime
will stop.
C020102AEN
Lap/shoulder belt
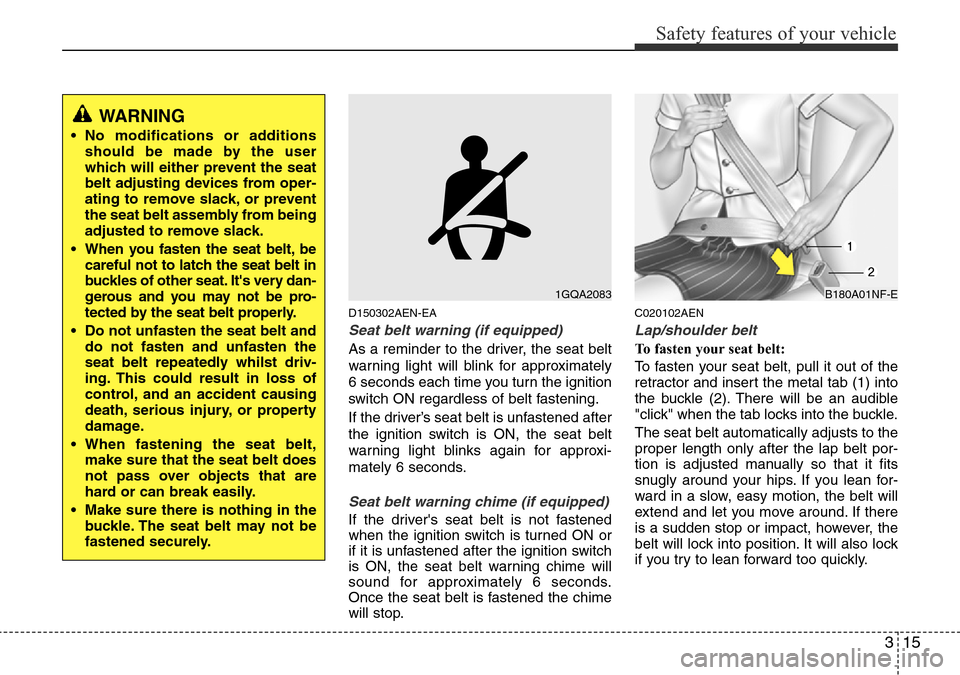
To fasten your seat belt:
To fasten your seat belt, pull it out of the
retractor and insert the metal tab (1) into
the buckle (2). There will be an audible
"click" when the tab locks into the buckle.
The seat belt automatically adjusts to the
proper length only after the lap belt por-
tion is adjusted manually so that it fits
snugly around your hips. If you lean for-
ward in a slow, easy motion, the belt will
extend and let you move around. If there
is a sudden stop or impact, however, the
belt will lock into position. It will also lock
if you try to lean forward too quickly.
1GQA2083B180A01NF-E
WARNING
• No modifications or additions
should be made by the user
which will either prevent the seat
belt adjusting devices from oper-
ating to remove slack, or prevent
the seat belt assembly from being
adjusted to remove slack.
• When you fasten the seat belt, be
careful not to latch the seat belt in
buckles of other seat. It's very dan-
gerous and you may not be pro-
tected by the seat belt properly.
• Do not unfasten the seat belt and
do not fasten and unfasten the
seat belt repeatedly whilst driv-
ing. This could result in loss of
control, and an accident causing
death, serious injury, or property
damage.
• When fastening the seat belt,
make sure that the seat belt does
not pass over objects that are
hard or can break easily.
• Make sure there is nothing in the
buckle. The seat belt may not be
fastened securely.
Page 34 of 332
Safety features of your vehicle
16 3
✽NOTICE
If you are not able to pull out the seat
belt from the retractor, firmly pull the
belt out and release it. Then you will be
able to pull the belt out smoothly.
Height adjustment (if equipped)
You can adjust the height of the shoulder
belt anchor to one of 5 positions for max-
imum comfort and safety.
The height of the adjusting seat belt
should not be too near your neck. The
shoulder portion should be adjusted so
that it lies across your chest and midway
over your shoulder nearest the door and
not your neck.
To adjust the height of the seat belt
anchor, lower or raise the height adjuster
into an appropriate position.
B200A02NF/H
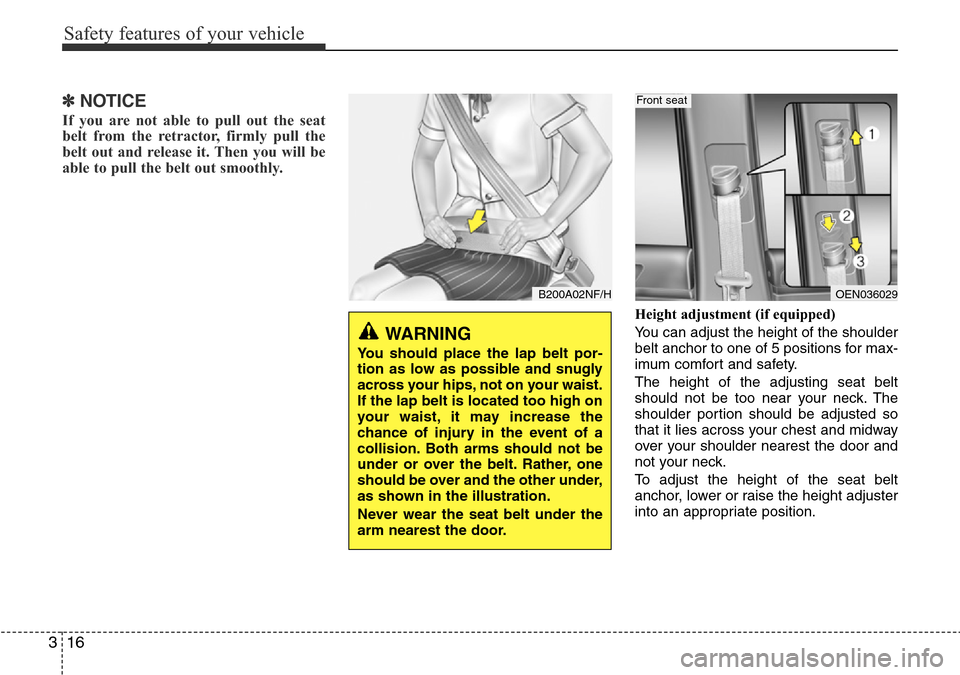
WARNING
You should place the lap belt por-
tion as low as possible and snugly
across your hips, not on your waist.
If the lap belt is located too high on
your waist, it may increase the
chance of injury in the event of a
collision. Both arms should not be
under or over the belt. Rather, one
should be over and the other under,
as shown in the illustration.
Never wear the seat belt under the
arm nearest the door.
OEN036029
Front seat
Page 35 of 332
317
Safety features of your vehicle
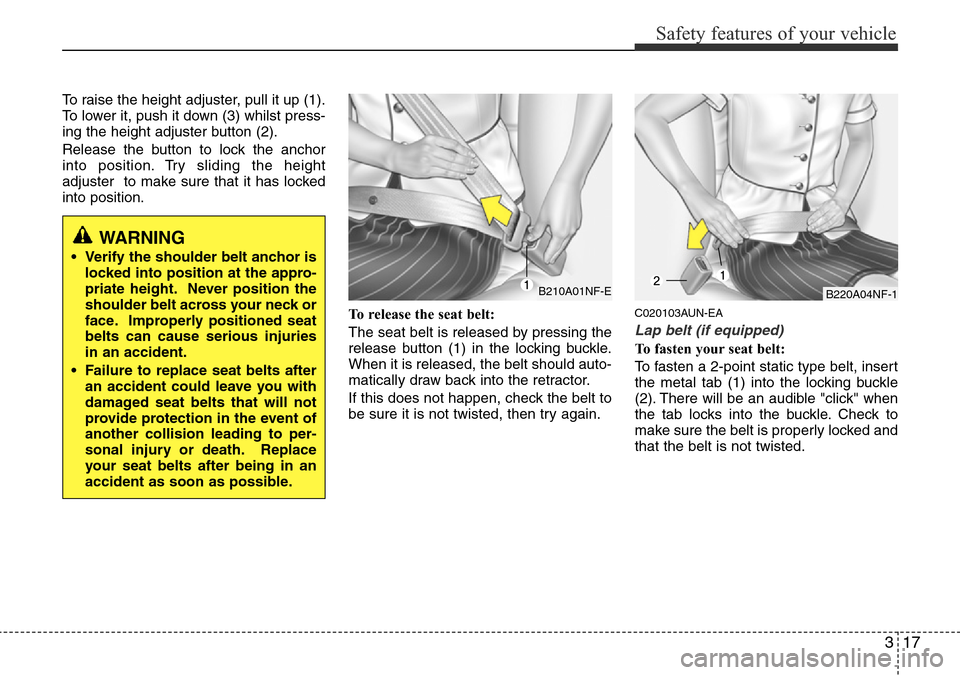
To raise the height adjuster, pull it up (1).
To lower it, push it down (3) whilst press-
ing the height adjuster button (2).
Release the button to lock the anchor
into position. Try sliding the height
adjuster to make sure that it has locked
into position.
To release the seat belt:
The seat belt is released by pressing the
release button (1) in the locking buckle.
When it is released, the belt should auto-
matically draw back into the retractor.
If this does not happen, check the belt to
be sure it is not twisted, then try again.
C020103AUN-EA
Lap belt (if equipped)
To fasten your seat belt:
To fasten a 2-point static type belt, insert
the metal tab (1) into the locking buckle
(2). There will be an audible "click" when
the tab locks into the buckle. Check to
make sure the belt is properly locked and
that the belt is not twisted.
B210A01NF-EB220A04NF-1
WARNING
• Verify the shoulder belt anchor is
locked into position at the appro-
priate height. Never position the
shoulder belt across your neck or
face. Improperly positioned seat
belts can cause serious injuries
in an accident.
• Failure to replace seat belts after
an accident could leave you with
damaged seat belts that will not
provide protection in the event of
another collision leading to per-
sonal injury or death. Replace
your seat belts after being in an
accident as soon as possible.
Page 36 of 332
Safety features of your vehicle
18 3
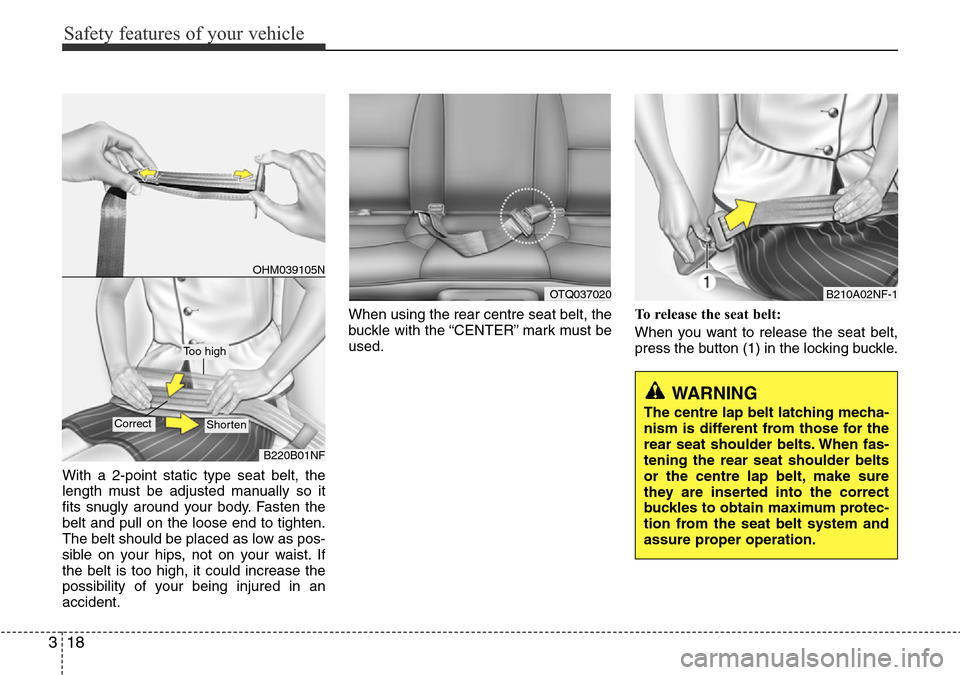
With a 2-point static type seat belt, the
length must be adjusted manually so it
fits snugly around your body. Fasten the
belt and pull on the loose end to tighten.
The belt should be placed as low as pos-
sible on your hips, not on your waist. If
the belt is too high, it could increase the
possibility of your being injured in an
accident.When using the rear centre seat belt, the
buckle with the “CENTER” mark must be
used.To release the seat belt:
When you want to release the seat belt,
press the button (1) in the locking buckle.
OTQ037020
OHM039105N
B220B01NF
Too high
ShortenCorrect
B210A02NF-1
WARNING
The centre lap belt latching mecha-
nism is different from those for the
rear seat shoulder belts. When fas-
tening the rear seat shoulder belts
or the centre lap belt, make sure
they are inserted into the correct
buckles to obtain maximum protec-
tion from the seat belt system and
assure proper operation.