fog light Hyundai H-1 (Grand Starex) 2016 Owner's Manual - RHD (UK, Australia)
[x] Cancel search | Manufacturer: HYUNDAI, Model Year: 2016, Model line: H-1 (Grand Starex), Model: Hyundai H-1 (Grand Starex) 2016Pages: 332, PDF Size: 6.89 MB
Page 16 of 332
Your vehicle at a glance
2 2
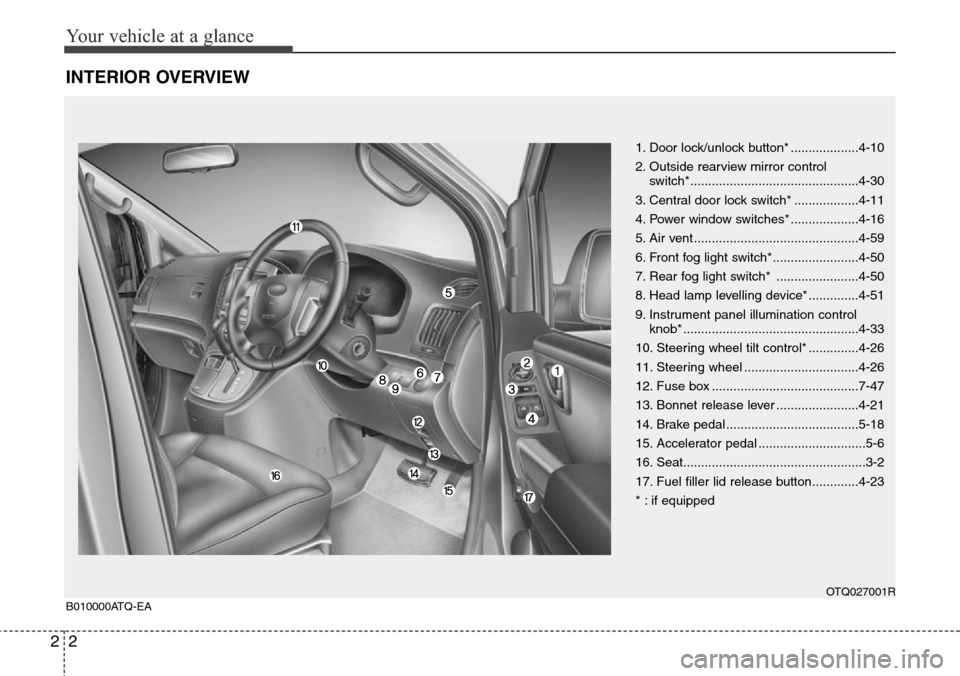
INTERIOR OVERVIEW
1. Door lock/unlock button* ...................4-10
2. Outside rearview mirror control
switch*...............................................4-30
3. Central door lock switch* ..................4-11
4. Power window switches* ...................4-16
5. Air vent ..............................................4-59
6. Front fog light switch*........................4-50
7. Rear fog light switch* .......................4-50
8. Head lamp levelling device* ..............4-51
9. Instrument panel illumination control
knob* .................................................4-33
10. Steering wheel tilt control* ..............4-26
11. Steering wheel ................................4-26
12. Fuse box .........................................7-47
13. Bonnet release lever .......................4-21
14. Brake pedal .....................................5-18
15. Accelerator pedal ..............................5-6
16. Seat...................................................3-2
17. Fuel filler lid release button.............4-23
* : if equipped
OTQ027001RB010000ATQ-EA
Page 69 of 332
4
Keys / 4-2
Remote keyless entry / 4-4
Theft-alarm system / 4-6
Door locks / 4-8
Tailgate / 4-13
Windows / 4-16
Bonnet / 4-21
Fuel filler lid / 4-23
Steering wheel / 4-26
Mirrors / 4-28
Instrument cluster / 4-32
Rear parking assist system / 4-44
Hazard warning flasher / 4-47
Lighting / 4-47
Wipers and washers / 4-52
Interior light / 4-55
Defroster / 4-57
Manual climate control system / 4-58
Windshield defrosting and defogging / 4-69
Storage compartment / 4-71
Interior features / 4-73
Audio system / 4-78
Features of your vehicle
Page 118 of 332
Features of your vehicle
50 4
D190700AEN
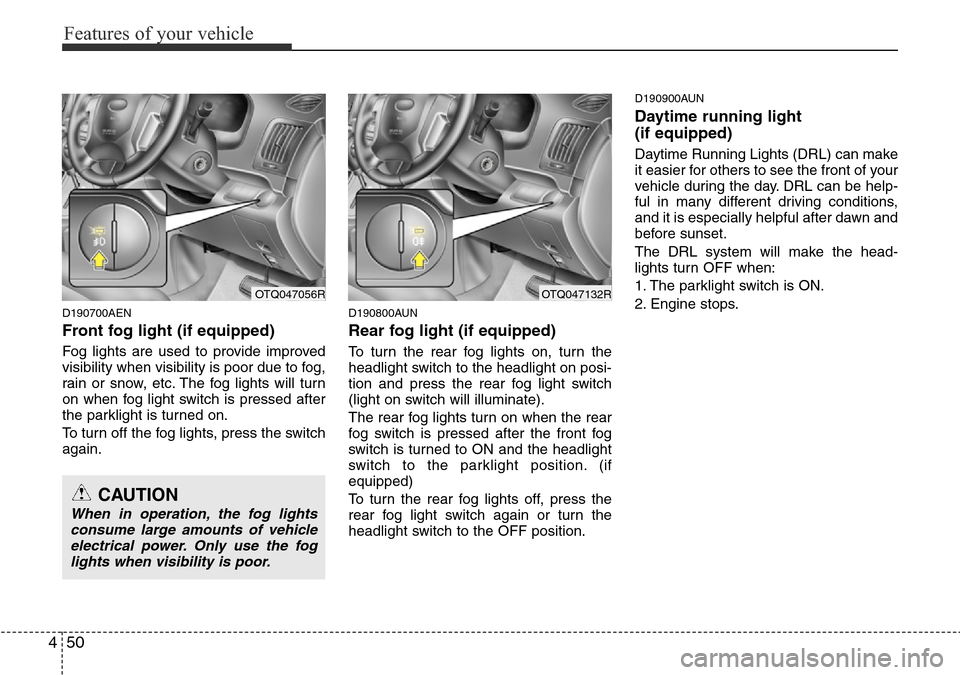
Front fog light (if equipped)
Fog lights are used to provide improved
visibility when visibility is poor due to fog,
rain or snow, etc. The fog lights will turn
on when fog light switch is pressed after
the parklight is turned on.
To turn off the fog lights, press the switch
again.
D190800AUN
Rear fog light (if equipped)
To turn the rear fog lights on, turn the
headlight switch to the headlight on posi-
tion and press the rear fog light switch
(light on switch will illuminate).
The rear fog lights turn on when the rear
fog switch is pressed after the front fog
switch is turned to ON and the headlight
switch to the parklight position. (if
equipped)
To turn the rear fog lights off, press the
rear fog light switch again or turn the
headlight switch to the OFF position.
D190900AUN
Daytime running light
(if equipped)
Daytime Running Lights (DRL) can make
it easier for others to see the front of your
vehicle during the day. DRL can be help-
ful in many different driving conditions,
and it is especially helpful after dawn and
before sunset.
The DRL system will make the head-
lights turn OFF when:
1. The parklight switch is ON.
2. Engine stops.
OTQ047056R
CAUTION
When in operation, the fog lights
consume large amounts of vehicle
electrical power. Only use the fog
lights when visibility is poor.
OTQ047132R
Page 125 of 332
457
Features of your vehicle
DEFROSTER (IF EQUIPPED)
➃MOOD : Push the switch to turn the
mood lamp on when the
room lamp is off. Once the
mood lamp is on, each time
you press the button the
colour of the light will change.
The mood lamp will turn off
when the button is pressed
again after the last colour or
when the mood lamp button
is pressed for approximately
4 seconds or when the
ROOM, DOOR or DIMMER
button is pressed.
➄DIMMER : If you push this button
when the room lamp is illu-
minated, the brightness of
the room lamp will dim in
three stages.
D220000AUN
✽NOTICE
If you want to defrost and defog the
front windshield, refer to “Windshield
defrosting and defogging” in this sec-
tion.
D220100AUN-EA
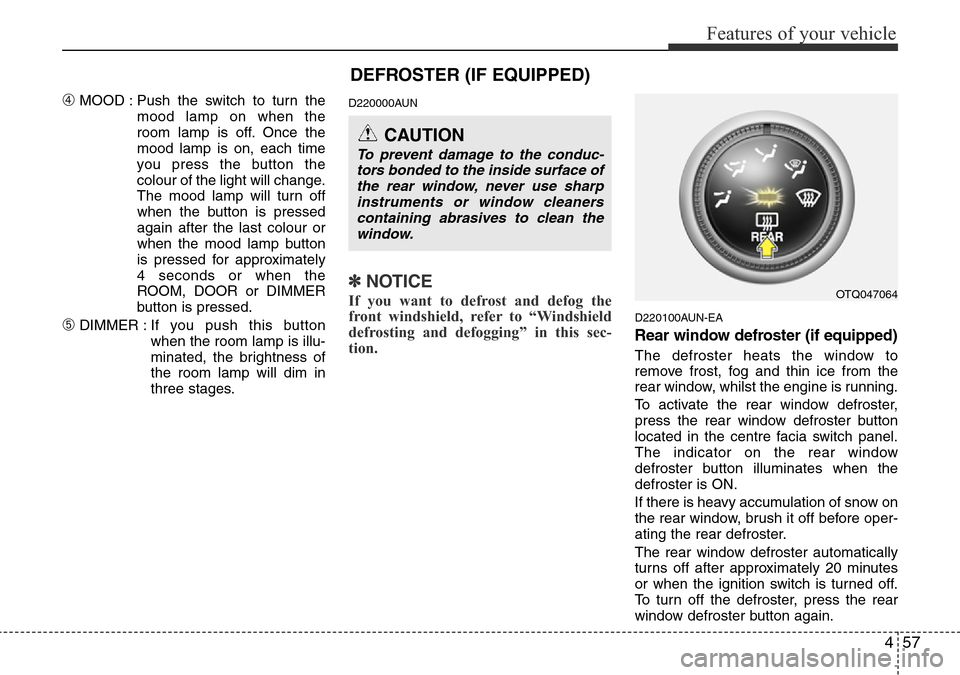
Rear window defroster (if equipped)
The defroster heats the window to
remove frost, fog and thin ice from the
rear window, whilst the engine is running.
To activate the rear window defroster,
press the rear window defroster button
located in the centre facia switch panel.
The indicator on the rear window
defroster button illuminates when the
defroster is ON.
If there is heavy accumulation of snow on
the rear window, brush it off before oper-
ating the rear defroster.
The rear window defroster automatically
turns off after approximately 20 minutes
or when the ignition switch is turned off.
To turn off the defroster, press the rear
window defroster button again.
OTQ047064
CAUTION
To prevent damage to the conduc-
tors bonded to the inside surface of
the rear window, never use sharp
instruments or window cleaners
containing abrasives to clean the
window.
Page 138 of 332
Features of your vehicle
70 4
D250102AFD
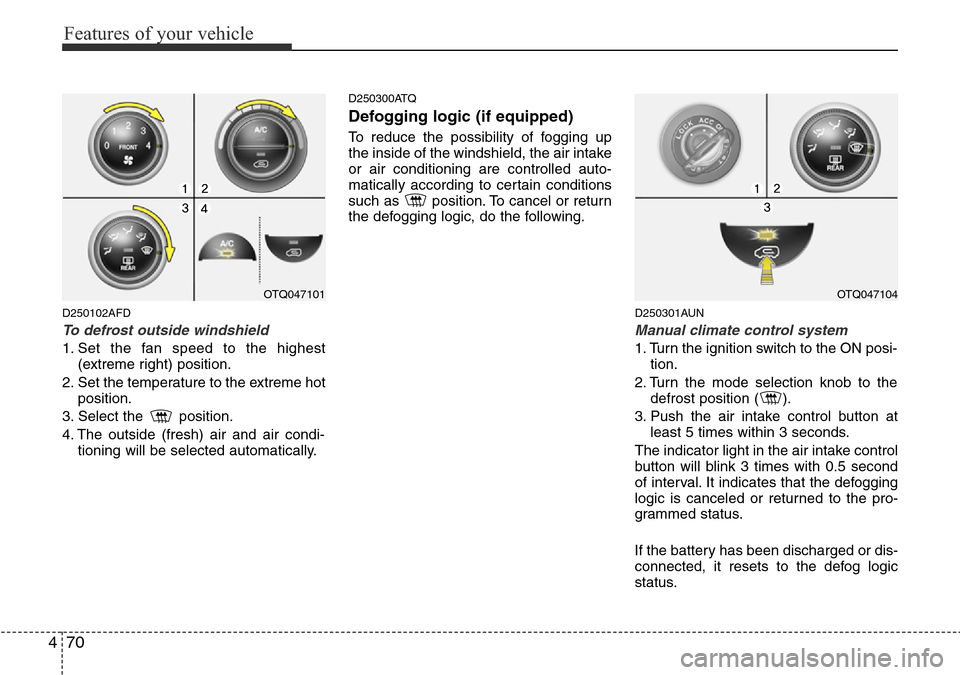
To defrost outside windshield
1. Set the fan speed to the highest
(extreme right) position.
2. Set the temperature to the extreme hot
position.
3. Select the position.
4. The outside (fresh) air and air condi-
tioning will be selected automatically.
D250300ATQ
Defogging logic (if equipped)
To reduce the possibility of fogging up
the inside of the windshield, the air intake
or air conditioning are controlled auto-
matically according to certain conditions
such as position. To cancel or return
the defogging logic, do the following.
D250301AUN
Manual climate control system
1. Turn the ignition switch to the ON posi-
tion.
2. Turn the mode selection knob to the
defrost position ( ).
3. Push the air intake control button at
least 5 times within 3 seconds.
The indicator light in the air intake control
button will blink 3 times with 0.5 second
of interval. It indicates that the defogging
logic is canceled or returned to the pro-
grammed status.
If the battery has been discharged or dis-
connected, it resets to the defog logic
status.
OTQ047101OTQ047104
Page 302 of 332
751
Maintenance
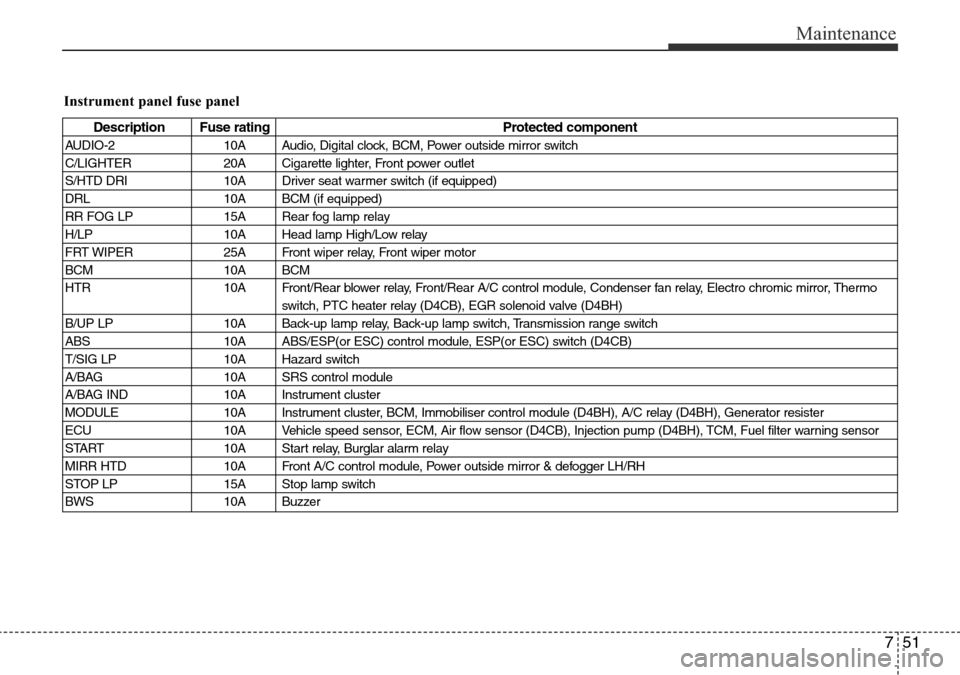
Instrument panel fuse panel
Description Fuse rating Protected component
AUDIO-2 10A Audio, Digital clock, BCM, Power outside mirror switch
C/LIGHTER 20A Cigarette lighter, Front power outlet
S/HTD DRI 10A Driver seat warmer switch (if equipped)
DRL 10A BCM (if equipped)
RR FOG LP 15A Rear fog lamp relay
H/LP 10A Head lamp High/Low relay
FRT WIPER 25A Front wiper relay, Front wiper motor
BCM 10A BCM
HTR 10A Front/Rear blower relay, Front/Rear A/C control module, Condenser fan relay, Electro chromic mirror, Thermo
switch, PTC heater relay (D4CB), EGR solenoid valve (D4BH)
B/UP LP 10A Back-up lamp relay, Back-up lamp switch, Transmission range switch
ABS 10A ABS/ESP(or ESC) control module, ESP(or ESC) switch (D4CB)
T/SIG LP 10A Hazard switch
A/BAG 10A SRS control module
A/BAG IND 10A Instrument cluster
MODULE 10A Instrument cluster, BCM, Immobiliser control module (D4BH), A/C relay (D4BH), Generator resister
ECU 10A Vehicle speed sensor, ECM, Air flow sensor (D4CB), Injection pump (D4BH), TCM, Fuel filter warning sensor
START 10A Start relay, Burglar alarm relay
MIRR HTD 10A Front A/C control module, Power outside mirror & defogger LH/RH
STOP LP 15A Stop lamp switch
BWS 10A Buzzer
Page 307 of 332
Maintenance
56 7
LIGHT BULBS
G220000AEN-EA
Use only the bulbs of the specified
wattage.
All bulbs are available from your
HYUNDAI dealers Parts Department.
✽NOTICE
After washing or driving through heavy
rain, condensation may form in the head
and tail lamp lenses. This condition is
caused by the temperature difference
between the lamp inside and outside.
This is similar to the condensation on
your windows inside your vehicle during
the rain and doesn’t indicate a problem
with your vehicle. If the water leaks into
the lamp bulb circuitry, have the vehicle
checked by an authorised HYUNDAI
dealer.
G220100AUN
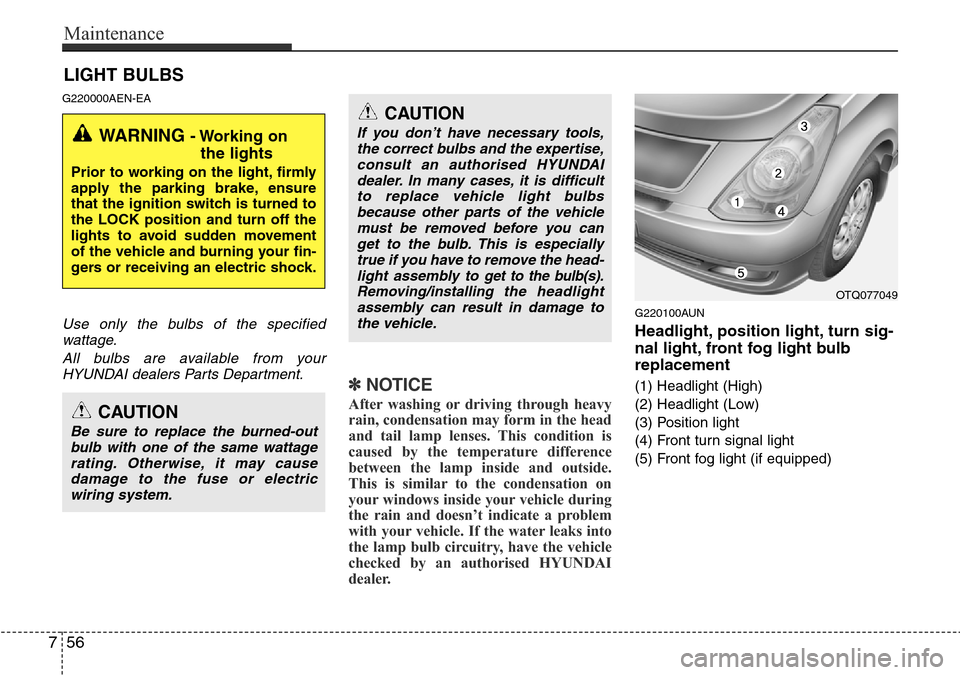
Headlight, position light, turn sig-
nal light, front fog light bulb
replacement
(1) Headlight (High)
(2) Headlight (Low)
(3) Position light
(4) Front turn signal light
(5) Front fog light (if equipped)
WARNING - Working on
the lights
Prior to working on the light, firmly
apply the parking brake, ensure
that the ignition switch is turned to
the LOCK position and turn off the
lights to avoid sudden movement
of the vehicle and burning your fin-
gers or receiving an electric shock.
CAUTION
Be sure to replace the burned-out
bulb with one of the same wattage
rating. Otherwise, it may cause
damage to the fuse or electric
wiring system.
CAUTION
If you don’t have necessary tools,
the correct bulbs and the expertise,
consult an authorised HYUNDAI
dealer. In many cases, it is difficult
to replace vehicle light bulbs
because other parts of the vehicle
must be removed before you can
get to the bulb. This is especially
true if you have to remove the head-
light assembly to
get to the bulb(s).
Removing/installingthe headlight
assembly can result in damage to
the vehicle.OTQ077049
Page 309 of 332
Maintenance
58 7
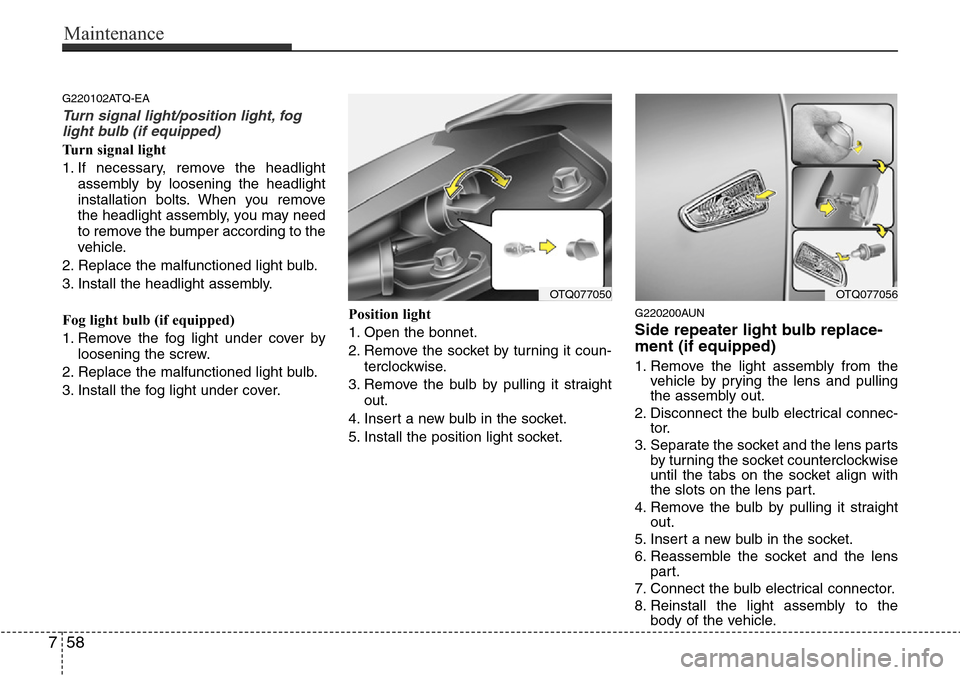
G220102ATQ-EA
Turn signal light/position light, fog
light bulb (if equipped)
Turn signal light
1. If necessary, remove the headlight
assembly by loosening the headlight
installation bolts. When you remove
the headlight assembly, you may need
to remove the bumper according to the
vehicle.
2. Replace the malfunctioned light bulb.
3. Install the headlight assembly.
Fog light bulb (if equipped)
1. Remove the fog light under cover by
loosening the screw.
2. Replace the malfunctioned light bulb.
3. Install the fog light under cover.Position light
1. Open the bonnet.
2. Remove the socket by turning it coun-
terclockwise.
3. Remove the bulb by pulling it straight
out.
4. Insert a new bulb in the socket.
5. Install the position light socket.
G220200AUN
Side repeater light bulb replace-
ment (if equipped)
1. Remove the light assembly from the
vehicle by prying the lens and pulling
the assembly out.
2. Disconnect the bulb electrical connec-
tor.
3. Separate the socket and the lens parts
by turning the socket counterclockwise
until the tabs on the socket align with
the slots on the lens part.
4. Remove the bulb by pulling it straight
out.
5. Insert a new bulb in the socket.
6. Reassemble the socket and the lens
part.
7. Connect the bulb electrical connector.
8. Reinstall the light assembly to the
body of the vehicle.
OTQ077056OTQ077050
Page 310 of 332
759
Maintenance
G220300ATQ
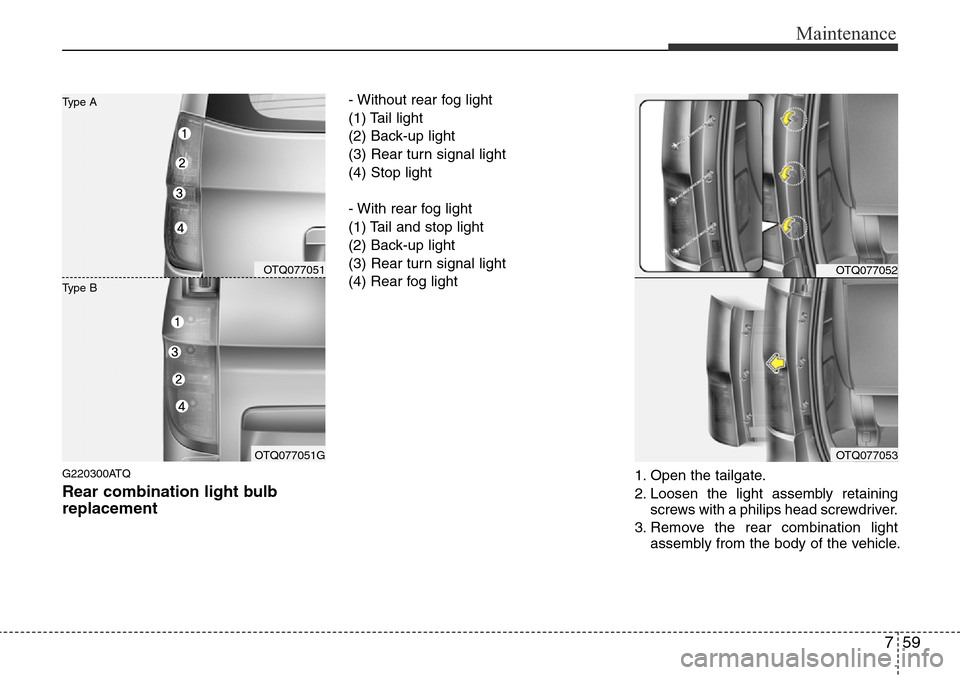
Rear combination light bulb
replacement
- Without rear fog light
(1) Tail light
(2) Back-up light
(3) Rear turn signal light
(4) Stop light
- With rear fog light
(1) Tail and stop light
(2) Back-up light
(3) Rear turn signal light
(4) Rear fog light
1. Open the tailgate.
2. Loosen the light assembly retaining
screws with a philips head screwdriver.
3. Remove the rear combination light
assembly from the body of the vehicle.
OTQ077052
OTQ077053
OTQ077051
OTQ077051G
Type B
Type A
Page 328 of 332
Specifications
2 9
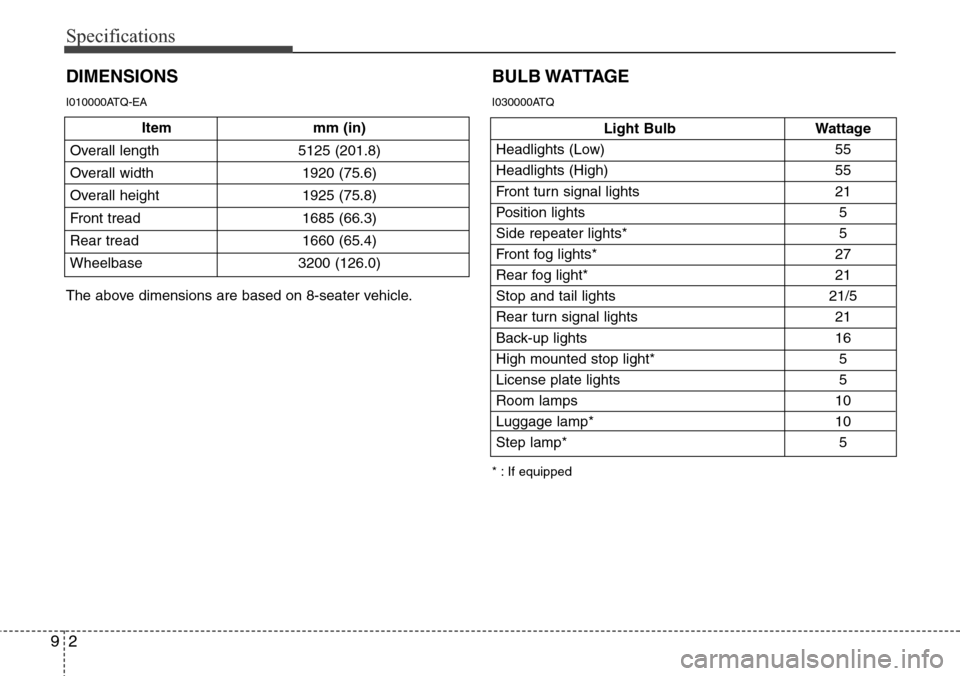
Item mm (in)
Overall length 5125 (201.8)
Overall width 1920 (75.6)
Overall height 1925 (75.8)
Front tread 1685 (66.3)
Rear tread 1660 (65.4)
Wheelbase 3200 (126.0)
DIMENSIONS
Light Bulb Wattage
Headlights (Low) 55
Headlights (High) 55
Front turn signal lights 21
Position lights 5
Side repeater lights* 5
Front fog lights* 27
Rear fog light* 21
Stop and tail lights 21/5
Rear turn signal lights 21
Back-up lights 16
High mounted stop light* 5
License plate lights 5
Room lamps 10
Luggage lamp* 10
Step lamp* 5
BULB WATTAGE
* : If equipped
The above dimensions are based on 8-seater vehicle.
I010000ATQ-EA I030000ATQ