transmission Hyundai H-1 (Grand Starex) 2016 Owner's Manual - RHD (UK, Australia)
[x] Cancel search | Manufacturer: HYUNDAI, Model Year: 2016, Model line: H-1 (Grand Starex), Model: Hyundai H-1 (Grand Starex) 2016Pages: 332, PDF Size: 6.89 MB
Page 4 of 332
F4FOREWORD
Thank you for choosing Hyundai. We are pleased to welcome you to the growing number of discriminating people who drive
Hyundai. The advanced engineering and high-quality construction of each Hyundai we build is something of which we're very
proud.
Your Owner's Manual will introduce you to the features and operation of your new Hyundai. It is suggested that you read it care-
fully because the information it contains can contribute greatly to the satisfaction you receive from your new car.
The manufacturer also recommends that all service and maintenance on your car be performed by an authorised Hyundai deal-
er. Hyundai dealers are prepared to provide high-quality service, maintenance and any other assistance that may be required.
HYUNDAI MOTOR COMPANY
Note: If for any reason in the future you should sell your Hyundai, please leave this manual in the vehicle for the new owner's use.
Copyright 2015 Hyundai Motor Company. All rights reserved. No part of this publication may be reproduced, stored in any retrieval
system or transmitted in any form or by any means without the prior written permission of Hyundai Motor Company.
CAUTION
Severe engine and transmission damage may result from the use of poor quality fuels and lubricants that do not meet
Hyundai specifications. You must always use high quality fuels and lubricants that meet the specifications listed on Page
9-4 in the Vehicle Specifications section of the Owner's Manual.
Page 18 of 332
Your vehicle at a glance
4 2
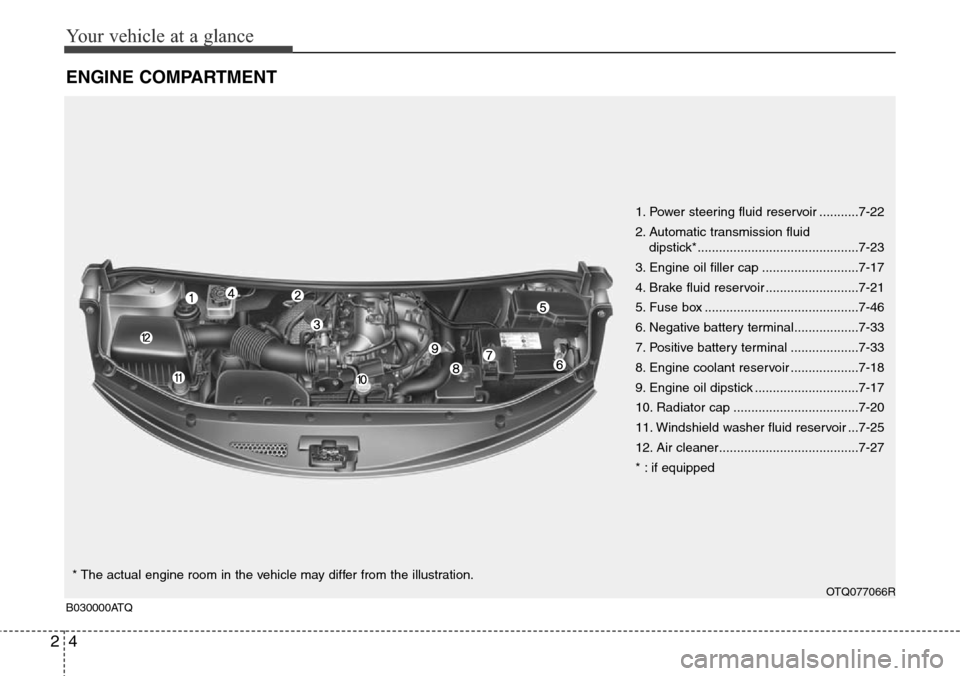
ENGINE COMPARTMENT
1. Power steering fluid reservoir ...........7-22
2. Automatic transmission fluid
dipstick*.............................................7-23
3. Engine oil filler cap ...........................7-17
4. Brake fluid reservoir ..........................7-21
5. Fuse box ...........................................7-46
6. Negative battery terminal..................7-33
7. Positive battery terminal ...................7-33
8. Engine coolant reservoir ...................7-18
9. Engine oil dipstick .............................7-17
10. Radiator cap ...................................7-20
11. Windshield washer fluid reservoir ...7-25
12. Air cleaner.......................................7-27
* : if equipped
OTQ077066RB030000ATQ
* The actual engine room in the vehicle may differ from the illustration.
Page 31 of 332
313
Safety features of your vehicle
WARNING
When you return the rear seat
cushion to its locking position after
being folded:
Be careful not to damage the seat
belt webbing or buckle. Do not
allow the seat belt webbing or
buckle to get caught or pinched in
the rear seat. Ensure that the seat
is completely locked into its proper
position by pushing the seat cush-
ion and seatback.
Otherwise, in an accident or sud-
den stop, the seat could fold, which
could result in serious injury or
death.
OUN026140
WARNING
The headrest on the seat (especial-
ly the last row seat) should be
adjusted so the middle of the head-
rest is at the same height as the top
of the occupant's eyes.
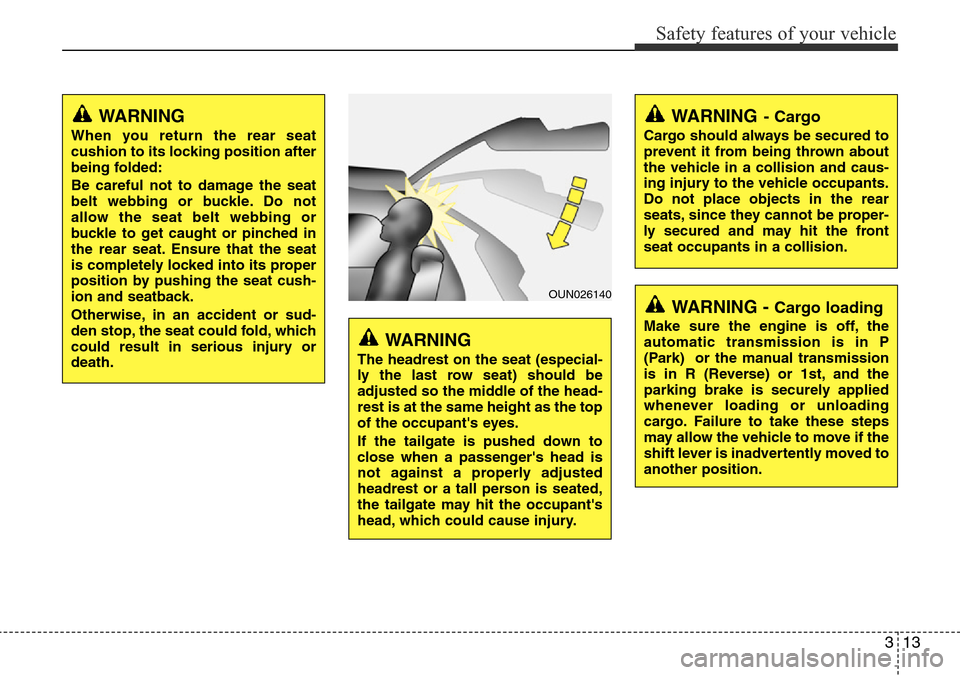
If the tailgate is pushed down to
close when a passenger's head is
not against a properly adjusted
headrest or a tall person is seated,
the tailgate may hit the occupant's
head, which could cause injury.
WARNING- Cargo
Cargo should always be secured to
prevent it from being thrown about
the vehicle in a collision and caus-
ing injury to the vehicle occupants.
Do not place objects in the rear
seats, since they cannot be proper-
ly secured and may hit the front
seat occupants in a collision.
WARNING - Cargo loading
Make sure the engine is off, the
automatic transmission is in P
(Park) or the manual transmission
is in R (Reverse) or 1st, and the
parking brake is securely applied
whenever loading or unloading
cargo. Failure to take these steps
may allow the vehicle to move if the
shift lever is inadvertently moved to
another position.
Page 89 of 332
421
Features of your vehicle
D090100BUN-EA
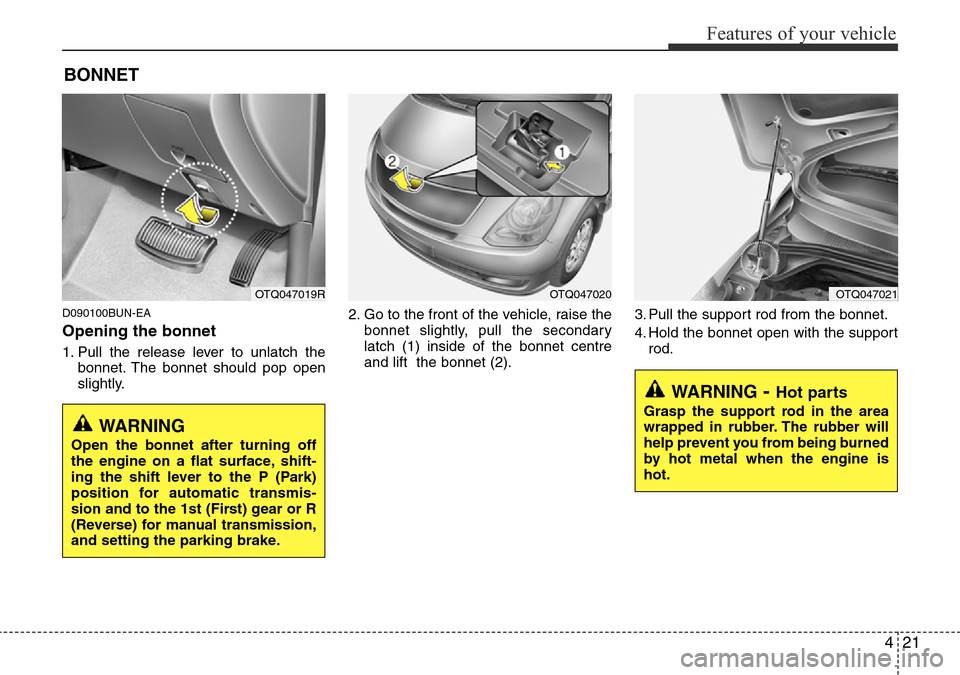
Opening the bonnet
1. Pull the release lever to unlatch the
bonnet. The bonnet should pop open
slightly.2. Go to the front of the vehicle, raise the
bonnet slightly, pull the secondary
latch (1) inside of the bonnet centre
and lift the bonnet (2).3. Pull the support rod from the bonnet.
4. Hold the bonnet open with the support
rod.
BONNET
OTQ047019ROTQ047020OTQ047021
WARNING- Hot parts
Grasp the support rod in the area
wrapped in rubber. The rubber will
help prevent you from being burned
by hot metal when the engine is
hot.WARNING
Open the bonnet after turning off
the engine on a flat surface, shift-
ing the shift lever to the P (Park)
position for automatic transmis-
sion and to the 1st (First) gear or R
(Reverse) for manual transmission,
and setting the parking brake.
Page 100 of 332
Features of your vehicle
32 4
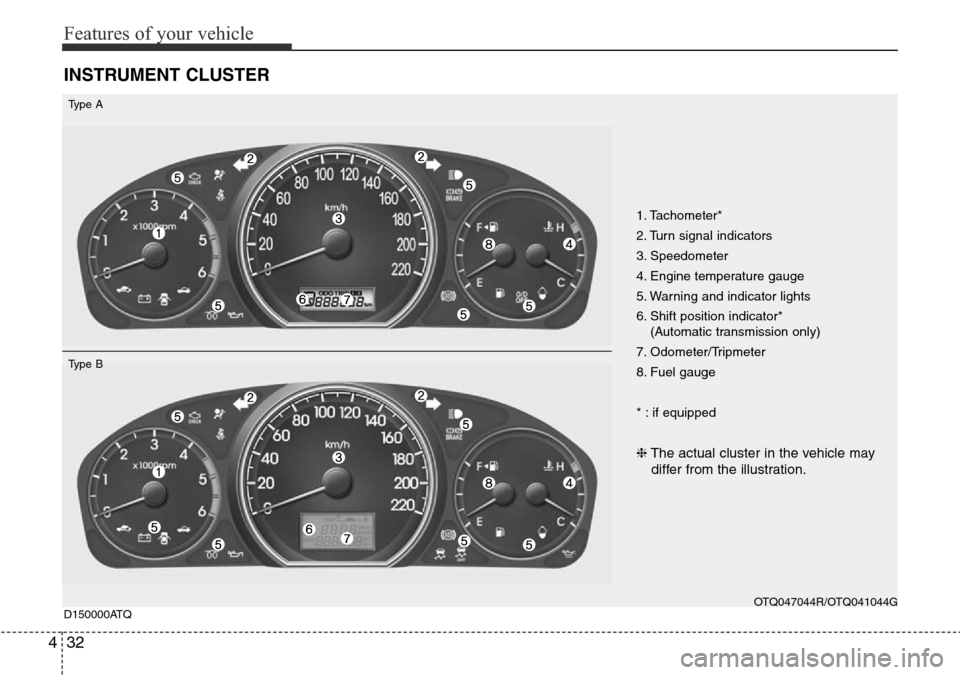
INSTRUMENT CLUSTER
1. Tachometer*
2. Turn signal indicators
3. Speedometer
4. Engine temperature gauge
5. Warning and indicator lights
6. Shift position indicator*
(Automatic transmission only)
7. Odometer/Tripmeter
8. Fuel gauge
* : if equipped
❈The actual cluster in the vehicle may
differ from the illustration.
OTQ047044R/OTQ041044G
D150000ATQ
Type A
Type B
Page 108 of 332
Features of your vehicle
40 4
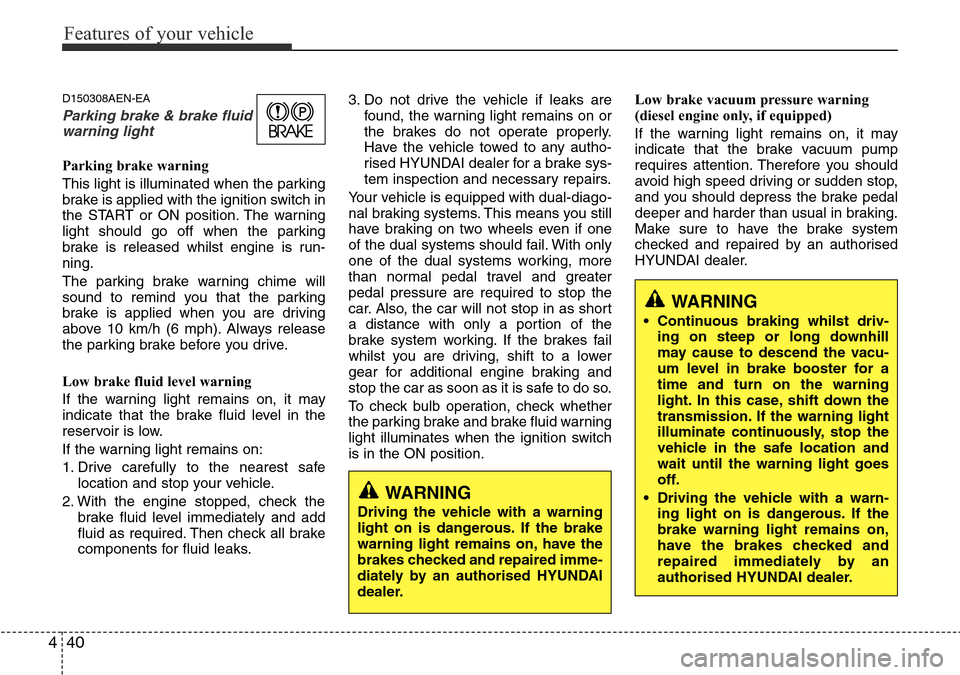
D150308AEN-EA
Parking brake & brake fluid
warning light
Parking brake warning
This light is illuminated when the parking
brake is applied with the ignition switch in
the START or ON position. The warning
light should go off when the parking
brake is released whilst engine is run-
ning.
The parking brake warning chime will
sound to remind you that the parking
brake is applied when you are driving
above 10 km/h (6 mph). Always release
the parking brake before you drive.
Low brake fluid level warning
If the warning light remains on, it may
indicate that the brake fluid level in the
reservoir is low.
If the warning light remains on:
1. Drive carefully to the nearest safe
location and stop your vehicle.
2. With the engine stopped, check the
brake fluid level immediately and add
fluid as required. Then check all brake
components for fluid leaks.3. Do not drive the vehicle if leaks are
found, the warning light remains on or
the brakes do not operate properly.
Have the vehicle towed to any autho-
rised HYUNDAI dealer for a brake sys-
tem inspection and necessary repairs.
Your vehicle is equipped with dual-diago-
nal braking systems. This means you still
have braking on two wheels even if one
of the dual systems should fail. With only
one of the dual systems working, more
than normal pedal travel and greater
pedal pressure are required to stop the
car. Also, the car will not stop in as short
a distance with only a portion of the
brake system working. If the brakes fail
whilst you are driving, shift to a lower
gear for additional engine braking and
stop the car as soon as it is safe to do so.
To check bulb operation, check whether
the parking brake and brake fluid warning
light illuminates when the ignition switch
is in the ON position.Low brake vacuum pressure warning
(diesel engine only, if equipped)
If the warning light remains on, it may
indicate that the brake vacuum pump
requires attention. Therefore you should
avoid high speed driving or sudden stop,
and you should depress the brake pedal
deeper and harder than usual in braking.
Make sure to have the brake system
checked and repaired by an authorised
HYUNDAI dealer.
WARNING
Driving the vehicle with a warning
light on is dangerous. If the brake
warning light remains on, have the
brakes checked and repaired imme-
diately by an authorised HYUNDAI
dealer.
WARNING
• Continuous braking whilst driv-
ing on steep or long downhill
may cause to descend the vacu-
um level in brake booster for a
time and turn on the warning
light. In this case, shift down the
transmission. If the warning light
illuminate continuously, stop the
vehicle in the safe location and
wait until the warning light goes
off.
• Driving the vehicle with a warn-
ing light on is dangerous. If the
brake warning light remains on,
have the brakes checked and
repaired immediately by an
authorised HYUNDAI dealer.
Page 109 of 332
441
Features of your vehicle
D150312AUN
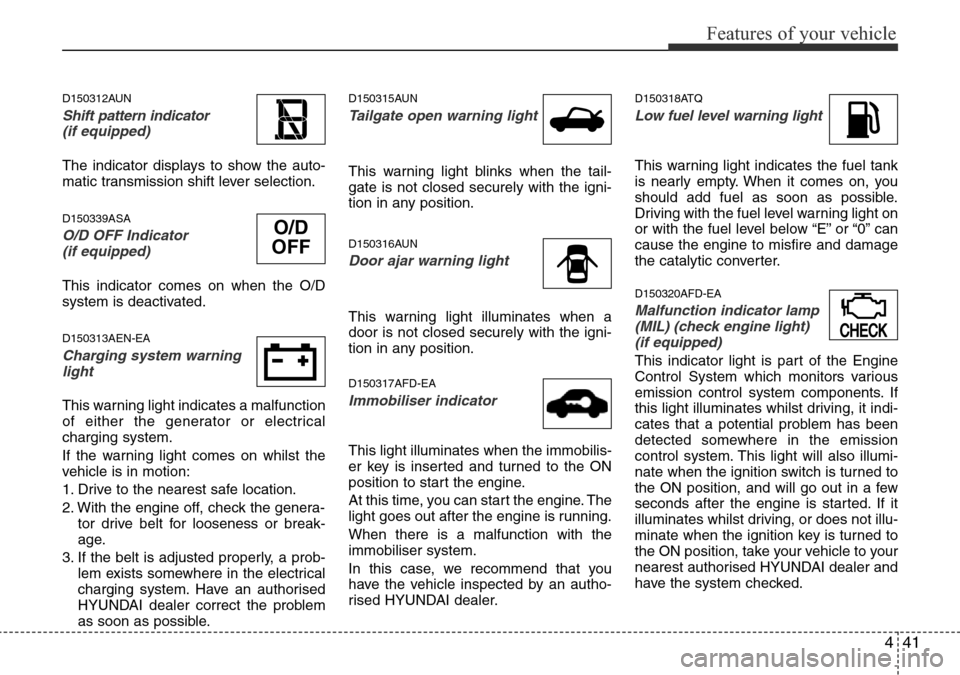
Shift pattern indicator
(if equipped)
The indicator displays to show the auto-
matic transmission shift lever selection.
D150339ASA
O/D OFF Indicator
(if equipped)
This indicator comes on when the O/D
system is deactivated.
D150313AEN-EA
Charging system warning
light
This warning light indicates a malfunction
of either the generator or electrical
charging system.
If the warning light comes on whilst the
vehicle is in motion:
1. Drive to the nearest safe location.
2. With the engine off, check the genera-
tor drive belt for looseness or break-
age.
3. If the belt is adjusted properly, a prob-
lem exists somewhere in the electrical
charging system. Have an authorised
HYUNDAI dealer correct the problem
as soon as possible.
D150315AUN
Tailgate open warning light
This warning light blinks when the tail-
gate is not closed securely with the igni-
tion in any position.
D150316AUN
Door ajar warning light
This warning light illuminates when a
door is not closed securely with the igni-
tion in any position.
D150317AFD-EA
Immobiliser indicator
This light illuminates when the immobilis-
er key is inserted and turned to the ON
position to start the engine.
At this time, you can start the engine. The
light goes out after the engine is running.
When there is a malfunction with the
immobiliser system.
In this case, we recommend that you
have the vehicle inspected by an autho-
rised HYUNDAI dealer.
D150318ATQ
Low fuel level warning light
This warning light indicates the fuel tank
is nearly empty. When it comes on, you
should add fuel as soon as possible.
Driving with the fuel level warning light on
or with the fuel level below “E” or “0” can
cause the engine to misfire and damage
the catalytic converter.
D150320AFD-EA
Malfunction indicator lamp
(MIL) (check engine light)
(if equipped)
This indicator light is part of the Engine
Control System which monitors various
emission control system components. If
this light illuminates whilst driving, it indi-
cates that a potential problem has been
detected somewhere in the emission
control system. This light will also illumi-
nate when the ignition switch is turned to
the ON position, and will go out in a few
seconds after the engine is started. If it
illuminates whilst driving, or does not illu-
minate when the ignition key is turned to
the ON position, take your vehicle to your
nearest authorised HYUNDAI dealer and
have the system checked.
CHECK
O/D
OFF
Page 186 of 332
5
Before driving / 5-3
Key positions / 5-4
Starting the engine / 5-6
Manual transmission / 5-8
Automatic transmission / 5-11
Brake system / 5-18
Locking differential / 5-28
Economical operation / 5-29
Special driving conditions / 5-31
Winter driving / 5-36
Trailer towing / 5-40
Vehicle weight / 5-48
Driving your vehicle
Page 190 of 332
55
Driving your vehicle
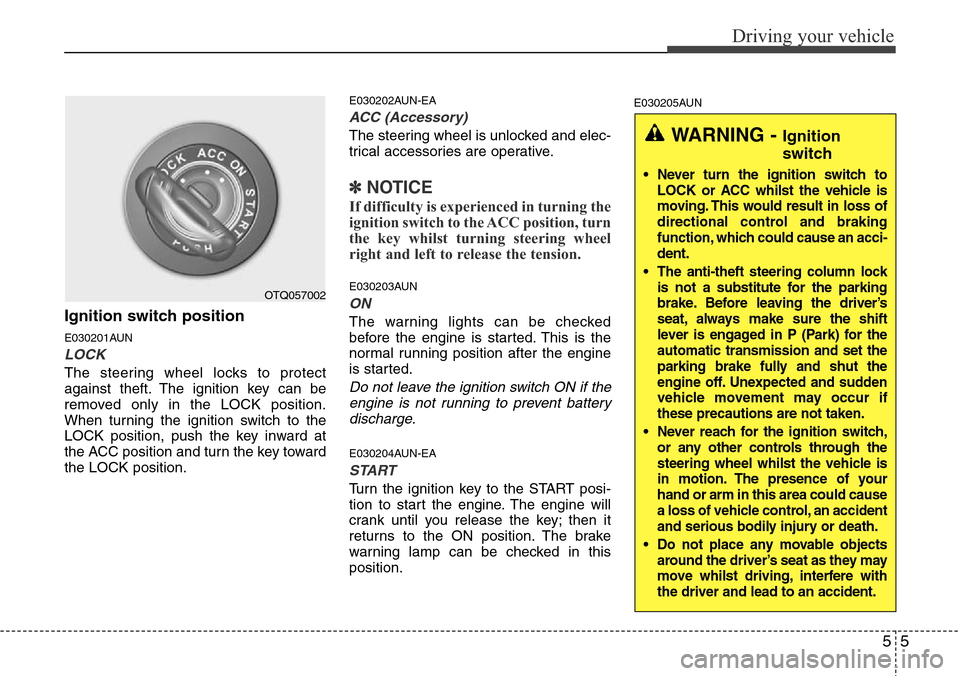
Ignition switch position
E030201AUN
LOCK
The steering wheel locks to protect
against theft. The ignition key can be
removed only in the LOCK position.
When turning the ignition switch to the
LOCK position, push the key inward at
the ACC position and turn the key toward
the LOCK position.
E030202AUN-EA
ACC (Accessory)
The steering wheel is unlocked and elec-
trical accessories are operative.
✽NOTICE
If difficulty is experienced in turning the
ignition switch to the ACC position, turn
the key whilst turning steering wheel
right and left to release the tension.
E030203AUN
ON
The warning lights can be checked
before the engine is started. This is the
normal running position after the engine
is started.
Do not leave the ignition switch ON if the
engine is not running to prevent battery
discharge.
E030204AUN-EA
START
Turn the ignition key to the START posi-
tion to start the engine. The engine will
crank until you release the key; then it
returns to the ON position. The brake
warning lamp can be checked in this
position.
E030205AUN
WARNING - Ignition
switch
• Never turn the ignition switch to
LOCK or ACC whilst the vehicle is
moving. This would result in loss of
directional control and braking
function, which could cause an acci-
dent.
• The anti-theft steering column lock
is not a substitute for the parking
brake. Before leaving the driver’s
seat, always make sure the shift
lever is engaged in P (Park) for the
automatic transmission and set the
parking brake fully and shut the
engine off. Unexpected and sudden
vehicle movement may occur if
these precautions are not taken.
• Never reach for the ignition switch,
or any other controls through the
steering wheel whilst the vehicle is
in motion. The presence of your
hand or arm in this area could cause
a loss of vehicle control, an accident
and serious bodily injury or death.
• Do not place any movable objects
around the driver’s seat as they may
move whilst driving, interfere with
the driver and lead to an accident
.
OTQ057002
Page 191 of 332
Driving your vehicle
6 5
E040000BUN
E040100BUN-EA
Starting the petrol engine
1. Make sure the parking brake is
applied.
2.Manual Transmission- Depress the
clutch pedal fully and shift the trans-
mission into Neutral. Keep the clutch
pedal and brake pedal depressed
whilst turning the ignition switch to the
start position.Automatic Transmission- Place the
transmission shift lever in P (Park).
Depress the brake pedal fully.
You can also start the engine when
the shift lever is in the N (Neutral)
position.
3. Turn the ignition switch to START and
hold it there until the engine starts (a
maximum of 10 seconds), then
release the key.
4. Do not wait for the engine to warm up
whilst the vehicle remains stationary.
Start driving at moderate engine
speeds. (Steep accelerating and decel-
erating should be avoided.)
It should be started without depressing
the accelerator.
E040101AUN-EA
Starting the diesel engine
To start the diesel engine when the
engine is cold, it has to be pre-heated
before starting the engine and then have
to be warmed up before starting to drive.
1. Make sure the parking brake is
applied.
2.Manual Transmission- Depress the
clutch pedal fully and shift the trans-
mission into Neutral. Keep the clutch
pedal and brake pedal depressed
whilst turning the ignition switch to the
start position.
Automatic Transmission- Place the
transmission shift lever in P(park).
Depress the brake pedal fully.
You can also start the engine when the
shift lever is in the N(neutral) position.
STARTING THE ENGINE
WARNING
• Always wear appropriate shoes
when operating your vehicle.
Unsuitable shoes (high heels, ski
boots,etc.) may interfere with
your ability to use the brake and
accelerator pedal, and the clutch
(if equipped).
• Do not start the vehicle with the
accelerator pedal depressed. The
vehicle can move and lead to an
accident.
• Wait until the engine rpm is nor-
mal. The vehicle may suddenly
move if the brake padel is
released when the rpm is high.
CAUTION
If the engine stalls whilst you are in
motion, do not attempt to move the
shift lever to the P (Park) position. If
traffic and road conditions permit,
you may put the shift lever in the N
(Neutral) position whilst the vehicle
is still moving and turn the ignition
switch to the START position in an
attempt to restart the engine.
CAUTION
• Do not crank the engine for more
than 10 seconds. If the engine
stalls or fails to start, wait 5 to 10
seconds before cranking the
engine again. Improper use of the
starter motor may cause damage
to it.
• Do not turn the ignition switch to
the START position with the engine
running. It may damage the starter.