Call HYUNDAI I10 2014 Owners Manual
[x] Cancel search | Manufacturer: HYUNDAI, Model Year: 2014, Model line: I10, Model: HYUNDAI I10 2014Pages: 343, PDF Size: 9.14 MB
Page 8 of 343

13
Introduction
Unleaded
Your new vehicle is designed to use only
unleaded fuel having an Octane Rating
of RON (Research Octane Number) 91 /
AKI (Anti-Knock Index) 87 or higher.
Your new vehicle is designed to obtain
maximum performance with UNLEADED
FUEL, as well as minimize exhaust emis-
sions and spark plug fouling.
Leaded (if equipped)
For some countries, your vehicle is
designed to use leaded gasoline. When
you are going to use leaded gasoline, we
recommend that you ask an authorzied
HYUNDAI dealer whether leaded gaso-
line in your vehicle is available or not.
Octane Rating of leaded gasoline is
same with unleaded one.
FUEL REQUIREMENTS
CAUTION
NEVER USE LEADED FUEL. The
use of leaded fuel is detrimental to
the catalytic converter and will
damage the engine control sys-
tem’s oxygen sensor and affect
emission control.
Never add any fuel system cleaning
agents to the fuel tank other than
what has been specified. (We rec-
ommend that you contact an
authorized HYUNDAI dealer for
details)
WARNING
• Do not "top off" after the nozzle
automatically shuts off when
refueling.
• Always check that the fuel cap is
installed securely to prevent fuel
spillage in the event of an acci-
dent.
Page 28 of 343

Safety system of your vehicle
12 3
Seat belt warning
As a reminder to the driver, the seat belt
warning light on the instrument cluster
will blink for approximately 6 seconds
each time you place the ignition switch in
the ON position regardless of belt fasten-
ing.
If the driver's seat belt is unfastened after
the ignition switch is in the ON position,
the seat belt warning light will blink again
for approximately 6 seconds.
If the driver's seat belt is unfastened
when the ignition switch is in the ON
position or if it is unfastened after the
ignition switch is in the ON position, the
seat belt warning chime will sound for
approximately 6 seconds. At this time, if
the seat belt is fastened, the chime will
stop at once. (if equipped)
Lap/shoulder belt
To fasten your seat belt:
Pull the seat belt out of the retractor and
insert the metal tab (1) into the buckle
(2). There will be an audible "click" when
the tab locks into the buckle.
The seat belt automatically adjusts to the
proper length only after the lap belt por-
tion is adjusted manually so that it fits
snugly around your hips. If you lean for-
ward in a slow, easy motion, the belt will
extend and let you move around. If there
is a sudden stop or impact, however, the
belt will lock into position. It will also lock
if you try to lean forward too quickly.
✽NOTICE
If you are not able to smoothly pull
enough of the seat belt out from the
retractor, firmly pull the seat belt out
and release it. After release, you will be
able to pull the belt out smoothly.
1GQA2083B180A01NF
1
2
Page 30 of 343

Safety system of your vehicle
14 3
To release the seat belt:
The seat belt is released by pressing the
release button (1) in the locking buckle.
When it is released, the belt should auto-
matically draw back into the retractor.
If this does not happen, check the belt to
be sure it is not twisted, then try again.Lap belt (if equipped)
To fasten your seat belt:
To fasten a 2-point static type belt, insert
the metal tab (1) into the locking buckle
(2). There will be an audible "click" when
the tab locks into the buckle. Make sure
the belt is properly locked and that the
belt is not twisted.
With a 2-point static type seat belt, the
length must be adjusted manually so it
fits snugly around your hip. Fasten the
belt and pull on the loose end to tighten
the belt. The belt should be placed as low
as possible on your hips, not on your
waist. If the belt is too high, it could
increase the possibility of injury in an
accident.
B210A01NF/Q1B220A04NF-1/Q
OEN036030
B220B01NF
Too high
ShortenCorrect
Page 34 of 343

Safety system of your vehicle
18 3
Additional seat belt safety pre-
cautions
Seat belt use during pregnancy
The seat belt should always be used dur-
ing pregnancy. The best way to protect
your unborn child is to protect yourself by
always wearing the seat belt.
Pregnant women should always wear a
lap-shoulder seat belt. Place the shoul-
der belt across the chest, routed away
from the neck. Place the lap belt below
the belt line so that it fits snugly and as
low as possible across the hips, not
across the abdomen.
Seat belt use and children
Infant and small children
Most countries have child restraint laws
which require children to travel in
approved child restraint devices, includ-
ing booster seats. The age at which seat
belts can be used instead of child
restraints differs among countries, so you
should be aware of the specific require-
ments in your country, and where you are
travelling. Infant and child restraints must
be properly placed and installed in a rear
seat. For more information refer to the
“Child Restraint Systems” in this chapter.Small children are best protected from
injury in an accident when properly
restrained in the rear seat by a child
restraint system that meets the require-
ments of the Safety Standards of your
country. Before buying any child restraint
system, make sure that it has a label cer-
tifying that it meets Safety Standard of
your country. The restraint must be
appropriate for your child's height and
weight. Check the label on the child
restraint for this information. Refer to
“Child Restraint Systems” in this chapter.
Larger children
Children under age 13 and who are too
large for a booster seat must always
occupy the rear seat and use the avail-
able lap/shoulder belts. A seat belt
should lie across the upper thighs and be
snug across the shoulder and chest to
restrain the child safely. Check belt fit
periodically. A child's squirming could put
the belt out of position. In the event of an
accident, children are safest when they
are seated in the rear seat and restrained
by the seat belts or by a child restraint
system.
WARNING
To reduce the risk of serious injury
or death to an unborn child during
an accident, pregnant women
should NEVER place the lap por-
tion of the seat belt above or over
the area of the abdomen where the
unborn child is located.
WARNING
ALWAYS properly restrain infants
and small children in a child
restraint appropriate for the child’s
height and weight.
To reduce the risk of serious injury
or death to a child and other pas-
sengers, NEVER hold a child in
your lap or arms when the vehicle
is moving. The violent forces creat-
ed during an accident will tear the
child from your arms and throw the
child against the interior of the
vehicle.
Page 36 of 343

Safety system of your vehicle
20 3
Care of seat belts
Seat belt systems should never be disas-
sembled or modified. In addition, care
should be taken to assure that seat belts
and belt hardware are not damaged by
seat hinges, doors or other abuse.
Periodic inspection
All seat belts should be inspected peri-
odically for wear or damage of any kind.
Any damaged parts should be replaced
as soon as possible.
Keep belts clean and dry
Seat belts should be kept clean and dry.
If belts become dirty, they can be
cleaned by using a mild soap solution
and warm water. Bleach, dye, strong
detergents or abrasives should not be
used because they may damage and
weaken the fabric.
When to replace seat belts
The entire seat belt assembly or assem-
blies should be replaced if the vehicle
has been involved in an accident. This
should be done even if no damage is vis-
ible. We recommend that you consult an
authorized HYUNDAI dealer.
Page 38 of 343

Safety system of your vehicle
22 3
Selecting a Child Restraint
System (CRS)
When selecting a CRS for your child,
always:
• Make sure the CRS has a label certify-
ing that it meets applicable Safety
Standards of your country.
• Select a child restraint system based
on your child’s height and weight. The
required label or the instructions for
use typically provide this information.
• Select a child restraint system that fits
the vehicle seating position where it
will be used.
• Read and comply with the warnings
and instructions for installation and use
provided with the child restraint system.
Child restraint system types
There are three main types of child
restraint systems: rear-facing seats, for-
ward-facing seats, and booster seats.
They are classified according to the
child’s age, height and weight.
Rear-facing child seats
WARNING
NEVER install a child or infant
restraint in the front passenger’s
seat.
Placing a rear-facing child restraint
in the front seat can result in SERI-
OUS INJURY or DEATH if the child
restraint is struck by an inflating air
bag.
(Continued)
• Always properly restrain your
child in the child restraint.
• Do not use an infant carrier or a
child safety seat that "hooks“ over
a seatback, it may not provide ade-
quate protection in an accident.
• After an accident, we recommend
a HYUNDAI dealer check the child
restraint system, seat belts,
ISOFIX lower anchorages and top-
tether anchorages.
Page 39 of 343

323
Safety system of your vehicle
A rear-facing child seat provides restraint
with the seating surface against the back
of the child. The harness system holds
the child in place, and in an accident,
acts to keep the child positioned in the
seat and reduce the stress to the neck
and spinal cord.
All children under age one must always
ride in a rear-facing infant child restraint.
Convertible and 3-in-1 child seats typi-
cally have higher height and weight limits
for the rear-facing position, allowing you
to keep your child rear-facing for a longer
period of time.Continue to use a rear-facing child seat
for as long as your child will fit within the
height and weight limits allowed by the
child seat manufacturer. It’s the best way
to keep them safe. Once your child has
outgrown the rear-facing child restraint,
your child is ready for a forward-facing
child restraint with a harness.
Forward-facing child seats
A forward-facing child seat provides
restraint for the child’s body with a har-
ness. Keep children in a forward-facing
child seat with a harness until they reach
the top height or weight limit allowed by
your child restraint’s manufacturer.
Once your child outgrows the forward-
facing child restraint, your child is ready
for a booster seat.
CRS09OUN026150
Page 49 of 343
333
Safety system of your vehicle
• Air bag deployment depends on a
number of factors including vehicle
speed, angles of impact and the densi-
ty and stiffness of the vehicles or
objects which your vehicle impacts
during a collision. The determining fac-
tors are not limited to those mentioned
above.
• The front air bags will completely
inflate and deflate in an instant. It is vir-
tually impossible for you to see the air
bags inflate during an accident. It is
much more likely that you will simply
see the deflated air bags hanging out
of their storage compartments after the
collision.
• To help provide protection, the air bags
must inflate rapidly. The speed of air
bag inflation is a consequence of
extremely short time in which to inflate
the air bag between the occupant and
the vehicle structures before the occu-
pant impacts those structures. This
speed of inflation reduces the risk of
serious or life-threatening injuries and
is thus a necessary part of air bag
design.
However, the rapid air bag inflation can
also cause injuries which can include
facial abrasions, bruises and broken
bones because the inflation speed also
causes the air bags to expand with a
great deal of force.• There are even circumstances under
which contact with the air bag can
cause fatal injuries, especially if the
occupant is positioned excessively
close to the air bag.
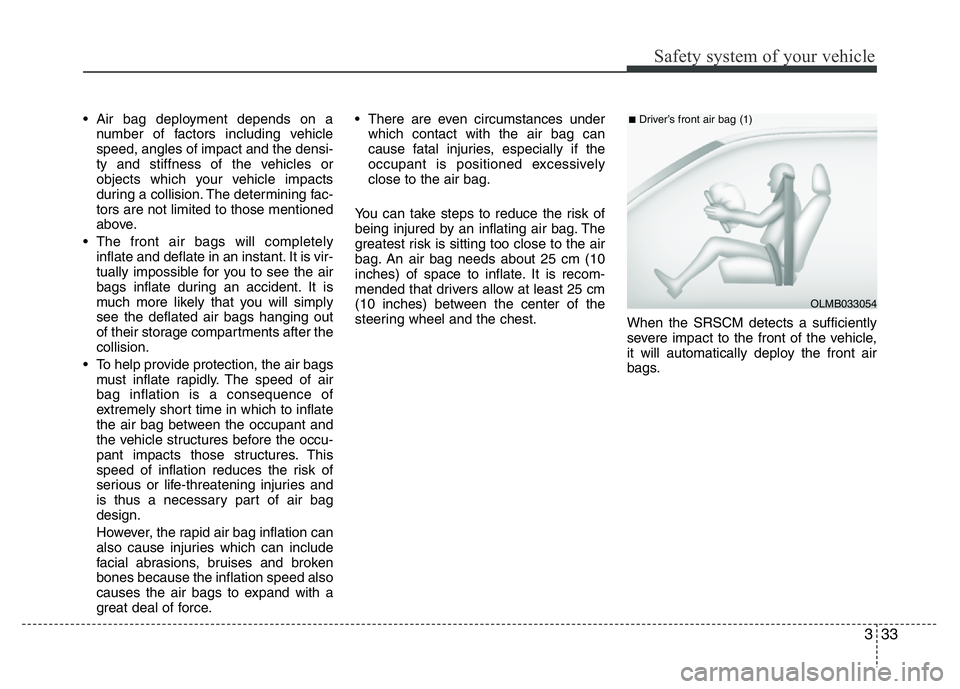
You can take steps to reduce the risk of
being injured by an inflating air bag. The
greatest risk is sitting too close to the air
bag. An air bag needs about 25 cm (10
inches) of space to inflate. It is recom-
mended that drivers allow at least 25 cm
(10 inches) between the center of the
steering wheel and the chest.
When the SRSCM detects a sufficiently
severe impact to the front of the vehicle,
it will automatically deploy the front air
bags.
OLMB033054
■Driver’s front air bag (1)
Page 65 of 343

Features of your vehicle
4 4
Immobilizer system (if equipped)
■ Type A
Your vehicle may be equipped with an
electronic engine immobilizer system to
reduce the risk of unauthorized vehicle
use.
Your immobilizer system is comprised of
a small transponder in the ignition key
and electronic devices inside the vehicle.
With the immobilizer system, whenever
you insert your ignition key into the igni-
tion switch and turn it to ON, it checks
and determines and verifies if the ignition
key is valid or not.
If the key is determined to be valid, the
engine will start.
If the key is determined to be invalid, the
engine will not start.
To deactivate the immobilizer system:
Insert the ignition key into the key cylin-
der and turn it to the ON position.
To activate the immobilizer system:
Turn the ignition key to the OFF position.
The immobilizer system activates auto-
matically. Without a valid ignition key for
your vehicle, the engine will not start.
✽NOTICE
When starting the engine, do not use the
key with other immobilizer keys around.
Otherwise the engine may not start or
may stop soon after it starts. Keep each
key separate in order to avoid a starting
malfunction.
✽NOTICE
If you need additional keys or lose your
keys, we recommend that you consult an
authorized HYUNDAI dealer.
OHD046100
CAUTION
Do not put metal accessories near
the ignition switch.
Metal accessories may interrupt the
transponder signal and may pre-
vent the engine from starting.
WARNING
In order to prevent theft of your vehi-
cle, do not leave spare keys any-
where in your vehicle. Your immobi-
lizer password is a customer unique
password and should be kept confi-
dential. Do not leave this number
anywhere in your vehicle.
Page 66 of 343

45
Features of your vehicle
■ Type B
Your vehicle is equipped with an electron-
ic engine immobilizer system to reduce
the risk of unauthorized vehicle use.
Your immobilizer system is comprised of
a small transponder in the smart key and
electronic devices inside the vehicle.
With the immobilizer system, whenever
you turn the engine start/stop button to
the ON position by pressing the button
while carrying the smart key, it checks
and determines and verifies if the smart
key is valid or not.
If the key is determined to be valid, the
engine will start.
If the key is determined to be invalid, the
engine will not start.
To deactivate the immobilizer sys-
tem:
Turn the engine start/stop button to the
ON position by pressing the button while
carrying the smart key.
To activate the immobilizer system:
Turn the engine start/stop button to the
OFF position. The immobilizer system
activates automatically. Without a valid
smart key for your vehicle, the engine will
not start.
CAUTION
The transponder in your ignition
key is an important part of the
immobilizer system. It is designed
to give years of trouble-free service,
however you should avoid expo-
sure to moisture, static electricity
and rough handling. Immobilizer
system malfunction could occur.
CAUTION
Do not change, alter or adjust the
immobilizer system because it
could cause the immobilizer sys-
tem to malfunction.We recommend
that the system be serviced by an
authorized HYUNDAI dealer.
Malfunctions caused by improper
alterations, adjustments or modifi-
cations to the immobilizer system
are not covered by your vehicle
manufacturer warranty.
WARNING
In order to prevent theft of your
vehicle, do not leave spare keys
anywhere in your vehicle. Your
Immobilizer password is a cus-
tomer unique password and should
be kept confidential. Do not leave
this number anywhere in your vehi-
cle.