Auto start HYUNDAI I30 2023 User Guide
[x] Cancel search | Manufacturer: HYUNDAI, Model Year: 2023, Model line: I30, Model: HYUNDAI I30 2023Pages: 533, PDF Size: 59.13 MB
Page 146 of 533
3-63
Convenient features of your vehicle
3
Press START button whilst turn-
ing wheel
(for smart key system)
This warning message is displayed if
the steering wheel does not unlock
normally when the Engine Start/Stop
button is pressed.
You should press the Engine Start/Stop
button whilst turning the steering wheel
right and left.
Steering wheel not locked
(for smart key system)
This warning message is displayed if
the steering wheel is not locked
whilst the Engine Start/Stop button
changes to the OFF position.
Check Steering Wheel Lock
System (for smart key system)
This warning message is displayed if
the steering wheel does not lock nor-
mally whilst the Engine Start/Stop but-
ton changes to the OFF position.
Press brake pedal to start engine
(for smart key system and auto-
matic transmission/dual clutch
transmission)
This warning message is displayed if
the Engine Start/Stop button changes
to the ACC position by pressing the
button repeatedly without depressing
the brake pedal.
You can start the vehicle by depressing
the brake pedal.
Press clutch pedal to start
engine (for smart key system
and manual transmission)
This warning message is displayed if
the Engine Start/Stop button is in the
ACC position by pressing the button
repeatedly without depressing the
clutch pedal.
Depress the clutch pedal to start the
engine.
Key not in vehicle
(for smart key system)
This warning message is displayed if
the smart key is not in the vehicle
when you press the Engine Start/Stop
button.
When attempting to start the vehicle
always have the smart key with you.
Key not detected
(for smart key system)
This warning message is displayed if
the smart key is not detected when you
press the Engine Start/Stop button.
Press START button with key
(for smart key system)
This warning message is displayed if
you press the Engine Start/Stop but-
ton whilst the warning message “Key
not detected” is displayed.
At this time, the immobiliser indicator
light blinks.
Page 147 of 533
3-64
Convenient features of your vehicle
Press START button again
(for smart key system)
This message is displayed if you
were unable to start the vehicle when
the Engine Start/Stop button was
pressed.
If this occurs, attempt to start the
engine by pressing the Engine
Start/Stop button again.
If the warning message appears
each time you press the Engine
Start/Stop button, we recommend
that you have your vehicle inspected
by an authorised HYUNDAI dealer.
Check BRAKE SWITCH fuse
(for smart key system and auto-
matic transmission/dual clutch
transmission)
This warning message is displayed if
the brake switch fuse is disconnected.
You need to replace the fuse with a
new one. If that is not possible, you
can start the engine by pressing the
Engine Start/Stop button for 10 sec-
onds in the ACC position.
Shift to P or N to start engine
(for smart key system and auto-
matic transmission/dual clutch
transmission)
This warning message is displayed if
you try to start the engine with the
shift lever not in the P (Park) or N
(Neutral) position.
Information
You can start the engine with the shift
lever in the N (Neutral) position. But,
for your safety, we recommend that
you start the engine with the shift
lever in the P (Park) position.
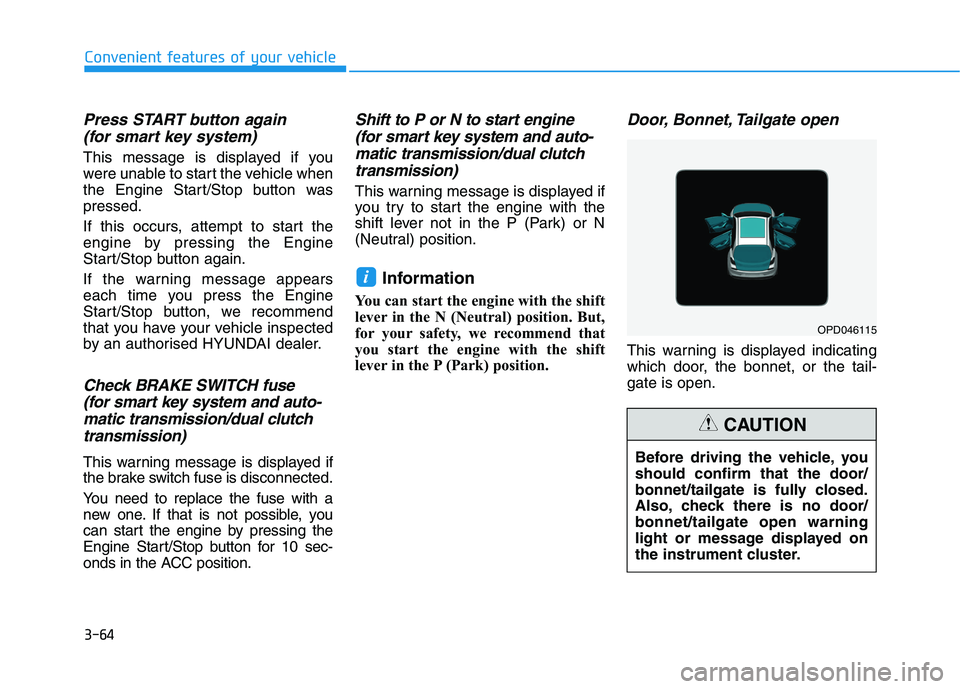
Door, Bonnet, Tailgate open
This warning is displayed indicating
which door, the bonnet, or the tail-
gate is open.
i
Before driving the vehicle, you
should confirm that the door/
bonnet/tailgate is fully closed.
Also, check there is no door/
bonnet/tailgate open warning
light or message displayed on
the instrument cluster.
CAUTION
OPD046115
Page 157 of 533
3-74
Convenient features of your vehicle
2. Door
- Disable: The auto door lock opera-
tion will be cancelled.
- Enable on Speed: All doors will be
automatically locked when the vehi-
cle speed exceeds 15km/h.
- Enable on Shift: All doors will be
automatically locked if the automat-
ic transmission/dual clutch trans-
mission shift lever is shifted from
the P (Park) position to the R
(Reverse), N (Neutral), or D (Drive)
position.
- Disable: The auto door unlock oper-
ation will be cancelled.
- Vehicle Off: All doors will be auto-
matically unlocked when the
Engine Start/Stop button is set to
the OFF position (if equipped with
smart key).- On Key Out: All doors will be auto-
matically unlocked when the igni-
tion key is removed from the igni-
tion switch (if equipped with remote
key).
- On Shift to P: All doors will be auto-
matically unlocked if the automatic
transmission/dual clutch transmis-
sion shift lever is shifted to the P
(Park) position.
- Driver Door Unlock: All doors will be
automatically unlocked when the
driver’s door is opened.
To activate or deactivate the horn
feedback.
If the horn feedback is activated,
after locking the door by pressing the
lock button on the remote key, and
pressing it again within 4 seconds,
the horn feedback sound will operate
once to indicate that all doors are
locked (if equipped with remote key).3. Lights
- Off: The one touch turn signal func-
tion will be deactivated.
- 3, 5, 7 Flashes: The turn signal indi-
cator will blink 3, 5, or 7 times when
the turn signal lever is moved slightly.
For more information, refer to
"Lighting" in this chapter.
To activate or deactivate the head-
lamp delay function.
For more information, refer to
"Lighting" in this chapter
To activate or deactivate the wel-
come light function.
For more information, refer to
"Lighting" in this chapter.
Page 161 of 533
3-78
Convenient features of your vehicle
Fuel economy
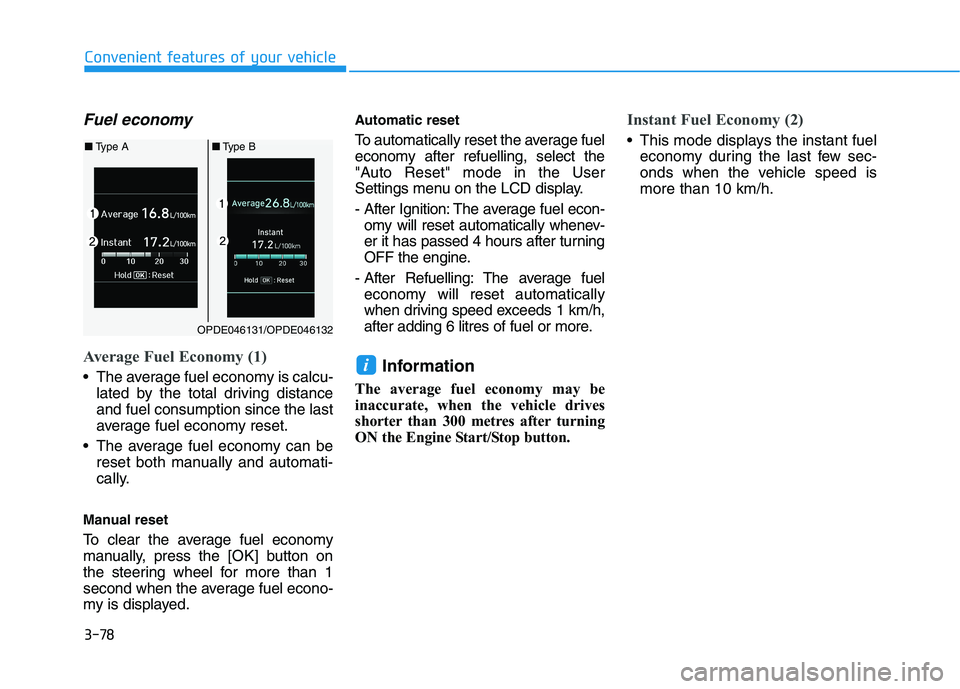
Average Fuel Economy (1)
The average fuel economy is calcu-
lated by the total driving distance
and fuel consumption since the last
average fuel economy reset.
The average fuel economy can be
reset both manually and automati-
cally.
Manual reset
To clear the average fuel economy
manually, press the [OK] button on
the steering wheel for more than 1
second when the average fuel econo-
my is displayed.
Automatic reset
To automatically reset the average fuel
economy after refuelling, select the
"Auto Reset" mode in the User
Settings menu on the LCD display.
- After Ignition: The average fuel econ-
omy will reset automatically whenev-
er it has passed 4 hours after turning
OFF the engine.
- After Refuelling: The average fuel
economy will reset automatically
when driving speed exceeds 1 km/h,
after adding 6 litres of fuel or more.
Information
The average fuel economy may be
inaccurate, when the vehicle drives
shorter than 300 metres after turning
ON the Engine Start/Stop button.
Instant Fuel Economy (2)
This mode displays the instant fuel
economy during the last few sec-
onds when the vehicle speed is
more than 10 km/h.
i
OPDE046131/OPDE046132
■Type A■Type B
Page 199 of 533
3-116
Convenient features of your vehicle
Information
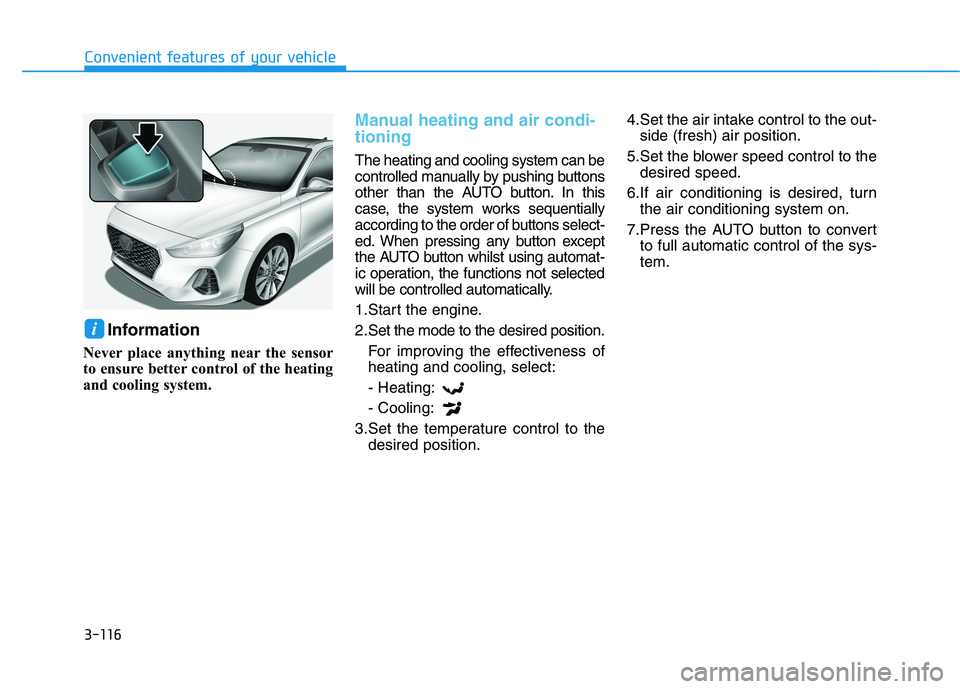
Never place anything near the sensor
to ensure better control of the heating
and cooling system.
Manual heating and air condi-
tioning
The heating and cooling system can be
controlled manually by pushing buttons
other than the AUTO button. In this
case, the system works sequentially
according to the order of buttons select-
ed. When pressing any button except
the AUTO button whilst using automat-
ic operation, the functions not selected
will be controlled automatically.
1.Start the engine.
2.Set the mode to the desired position.
For improving the effectiveness of
heating and cooling, select:
- Heating:
- Cooling:
3.Set the temperature control to the
desired position.4.Set the air intake control to the out-
side (fresh) air position.
5.Set the blower speed control to the
desired speed.
6.If air conditioning is desired, turn
the air conditioning system on.
7.Press the AUTO button to convert
to full automatic control of the sys-
tem.
i
Page 209 of 533
3-126
Convenient features of your vehicle
For maximum windscreen defrost-
ing, set the temperature control
knob to the highest temperature
setting and the blower speed con-
trol knob to the highest blower
speed. Select the front defrost but-
ton on the climate control display.
After the engine warm-up period,
warm air will be directed to the
front windscreen.
If warm air to the floor is desired
whilst defrosting or defogging, set the
mode to the floor-defrost position.
Before driving, clear all snow and
ice from the windscreen, rear win-
dow, outside rear view mirrors, and
all side windows.
Clear all snow and ice from the bon-
net and air inlet in the cowl grill to
improve heater and defroster effi-
ciency and to reduce the probability
of fogging up inside of the wind-
screen.
Information
If the engine temperature is still cold
after starting, then a brief engine
warm up period may be required for
the vented air flow to become warm or
hot.
Manual climate control system
To defog inside windscreen
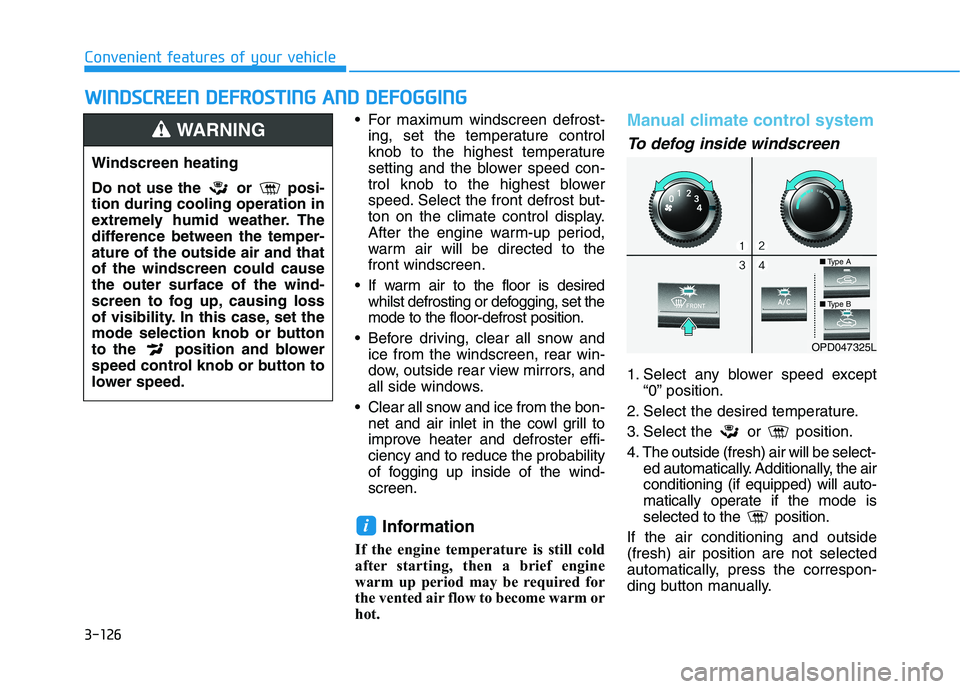
1. Select any blower speed except
“0” position.
2. Select the desired temperature.
3. Select the or position.
4. The outside (fresh) air will be select-
ed automatically. Additionally, the air
conditioning (if equipped) will auto-
matically operate if the mode is
selected to the position.
If the air conditioning and outside
(fresh) air position are not selected
automatically, press the correspon-
ding button manually.
i
W WI
IN
ND
DS
SC
CR
RE
EE
EN
N
D
DE
EF
FR
RO
OS
ST
TI
IN
NG
G
A
AN
ND
D
D
DE
EF
FO
OG
GG
GI
IN
NG
G
Windscreen heating
Do not use the or posi-
tion during cooling operation in
extremely humid weather. The
difference between the temper-
ature of the outside air and that
of the windscreen could cause
the outer surface of the wind-
screen to fog up, causing loss
of visibility. In this case, set the
mode selection knob or button
to the position and blower
speed control knob or button to
lower speed.
WARNING
OPD047325L
■Type A
■Type B
Page 257 of 533
4-32
Multimedia System
(Continued)
• When Bluetooth
®is connected and
calls are attempted through a con-
nected mobile phone from outside
the vehicle, the call is connected
through the Bluetooth
®Handsfree
function of the vehicle.
• Please be sure to disconnect the
Bluetooth
®Handsfree function
throughyour Bluetooth®device or
the audio screen.
Safety precautions
The Bluetooth®Handsfree function
helps drivers to drive safely. By
connecting a Bluetooth
®-enabled
phone to the vehicle’s audio sys-
tem, phone calls can be made and
received through the audio system
and contacts can be managed.
Consult the user manual before
use.
Excessive manipulation of controls
whilst driving, making it difficult to
pay attention to the road ahead,
can lead to accidents. Do not oper-
ate the device excessively whilst
driving.
Looking at the screen for a pro-
longed time increases the risk of
accidents. Keep time spent looking
at the screen to a minimum.
Precautions when connecting
Bluetooth®devices
The vehicle supports the following
Bluetooth®functions. Some
Bluetooth®devices may not sup-
port some functions.
1) Bluetooth
®Handsfree phone
calls
2) Operations during a call
(Private, Switch, Out Vol. con-
trols)
3) Download call history saved to
the Bluetooth
®device
4) Download contacts saved to the
Bluetooth
®device
5) Automatic contacts/call history
download when Bluetooth
®is
connected
6) Automatic Bluetooth
®device
connection when the vehicle is
started
7) Bluetooth
®audio streaming
playback
Before connecting the audio sys-
tem to your device, make sure your
device supports Bluetooth
®.
Page 258 of 533
4-33
Multimedia System
4
Even if your device supports
Bluetooth®, a Bluetooth®connec-
tion cannot be established if the
device’s Bluetooth
®function is
switched off. Search and connect
with the Bluetooth
®function
enabled.
Pair or connect Bluetooth
®devices
to the audio system with the vehi-
cle at a standstill.
If a Bluetooth
®connection is lost
due to abnormal conditions whilst
a Bluetooth
®device is connected
(communication range exceeded,
device power OFF, communication
errors, etc.), the disconnected
Bluetooth
®device is searched for
and automatically reconnected.
If you want to disable the
Bluetooth
®device auto-connect
function, turn the Bluetooth®func-
tion OFF on your device. Consult
the user manuals for individual
devices to see whether Bluetooth
®
is supported.
Handsfree call quality and volume
may vary depending on the type of
Bluetooth
®device. Some Bluetooth
®devices are sub-
ject to intermittent Bluetooth®con-
nection failures. In this case, use
the following method.
1) Turn the Bluetooth
®function off
on your Bluetooth®device ➟
Turn it on and try again.
2) Delete the paired device from
both the audio system and
Bluetooth
®device, then pair
again.
3) Power down your Bluetooth
®
device ➟Turn it on and try
again.
4) Completely remove the battery
from your Bluetooth
®device;
reinsert it, reboot, and attempt
connection.
5) Restart the vehicle and reat-
tempt connection.
Pairing a Bluetooth®device
Information on pairing Bluetooth®
devices
Pairing refers to the process of
pairing Bluetooth®mobile phones
or devices with the system prior to
connection. This is a necessary
procedure for Bluetooth
®connec-
tion and usage.
Up to five devices can be paired.
Pairing Bluetooth
®device is not
allowed whilst vehicle is moving.
Page 260 of 533
![HYUNDAI I30 2023 User Guide 4-35
Multimedia System
4
Pairing a second Bluetooth®device
Press the [SETUP]button on the
audio system ➟ Select [Bluetooth] ➟
Select [Connections] ➟Select [Add
New].
- The pairing procedure fro HYUNDAI I30 2023 User Guide 4-35
Multimedia System
4
Pairing a second Bluetooth®device
Press the [SETUP]button on the
audio system ➟ Select [Bluetooth] ➟
Select [Connections] ➟Select [Add
New].
- The pairing procedure fro](/img/35/56144/w960_56144-259.png)
4-35
Multimedia System
4
Pairing a second Bluetooth®device
Press the [SETUP]button on the
audio system ➟ Select [Bluetooth] ➟
Select [Connections] ➟Select [Add
New].
- The pairing procedure from this
point is identical to [Pairing the first
Bluetooth device].Information
• Bluetooth®standby mode lasts for
three minutes. If a device is not
paired within three minutes, pairing
is cancelled. Start over from the
beginning.
• For most Bluetooth
®devices, a con-
nection is established automatically
after pairing. Some devices, howev-
er, require separate confirmation
when connecting after pairing. Be
sure to check your Bluetooth
®
device after pairing to confirm that
it has connected.
Connecting Bluetooth®devices
If there are no connected devices
Press the [PHONE]button on the
audio system or the [CALL]button in
the steering wheel remote control ➟
List of paired Bluetooth
®devices ➟
Select the desired Bluetooth®device
from the list ➟Connect Bluetooth®.
i
Page 265 of 533
![HYUNDAI I30 2023 User Guide 4-40
Multimedia System
Date/Time
Press the [SETUP]button on the
audio system ➟Select [Date/Time].
Set Time: Set the time displayed on
the audio screen.
Time Format: Choose between 12-
hour and 24- HYUNDAI I30 2023 User Guide 4-40
Multimedia System
Date/Time
Press the [SETUP]button on the
audio system ➟Select [Date/Time].
Set Time: Set the time displayed on
the audio screen.
Time Format: Choose between 12-
hour and 24-](/img/35/56144/w960_56144-264.png)
4-40
Multimedia System
Date/Time
Press the [SETUP]button on the
audio system ➟Select [Date/Time].
Set Time: Set the time displayed on
the audio screen.
Time Format: Choose between 12-
hour and 24-hour time formats.
Set Date: Set the date displayed on
the audio screen.
Bluetooth (if equipped)
Press the [SETUP]button on the
audio system ➟Select [Bluetooth].
Connections: Control pairing, dele-
tion, connection and disconnection
of Bluetooth
®devices.
Auto Connection Priority: Set the
connection priority of Bluetooth
®
devices when the vehicle is start-
ed.
Download Contacts: Contacts can
be downloaded from connected
Bluetooth
®devices.
Information
• When paired devices are deleted,
the call history and contacts of the
device saved to the audio system are
deleted.
• For Bluetooth
®connections with
low connection priority, some time
may be required for the connection
to be established.
• Contacts can be downloaded only
from the currently connected
Bluetooth
®device.
• If no Bluetooth
®device is connected,
the Download Contacts button is
disabled.
System
Press the [SETUP]button on the
audio system ➟Select [System].
Memory Information: View My
Music memory usage.
Language: Change the user language.
Default: Reset the audio system.
Information
The system resets to the default val-
ues, and all saved data and settings
are lost.
Screen Saver
Set the information displayed when
the audio system is switched off or
the screen is turned off.
Press the [SETUP]button on the
audio system ➟Select [Screen
Saver].
Analog: An analog clock is dis-
played.
Digital: A digital clock is displayed.
None: No information is displayed.
Display Off
To prevent glare, the screen can be
turned off with the audio system in
operation.
Press the [SETUP]button on the
audio system ➟Select [Display Off].
Information
Use ‘Screen Saver’ to set the informa-
tion to be displayed when the screen is
turned off.
i
i
i