instrument cluster HYUNDAI I800 2016 Owners Manual
[x] Cancel search | Manufacturer: HYUNDAI, Model Year: 2016, Model line: I800, Model: HYUNDAI I800 2016Pages: 419, PDF Size: 9.23 MB
Page 14 of 419
23
Your vehicle at a glance
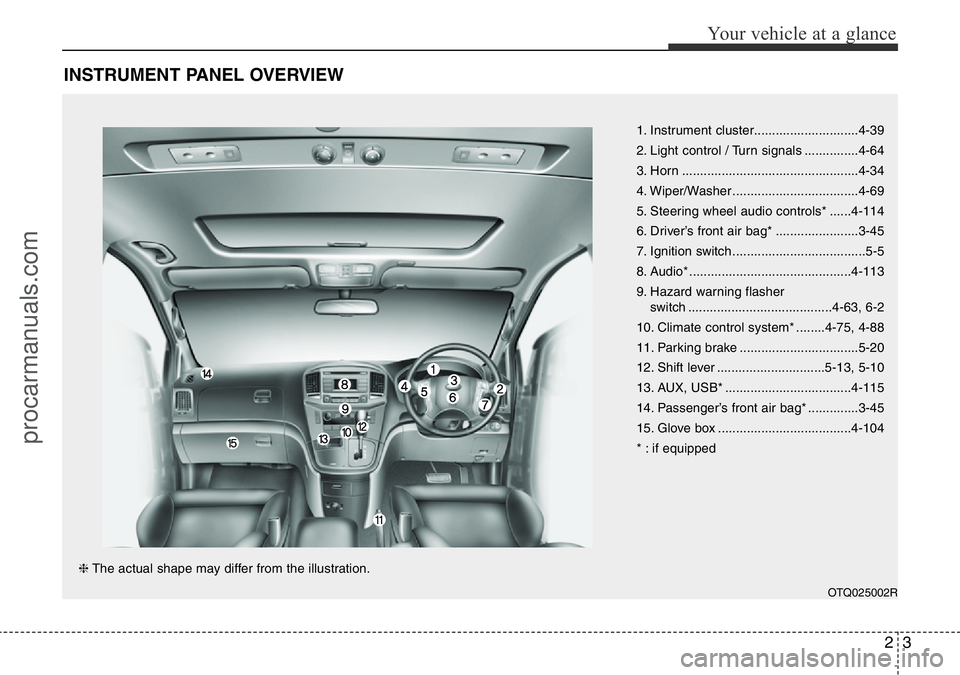
INSTRUMENT PANEL OVERVIEW
1. Instrument cluster.............................4-39
2. Light control / Turn signals ...............4-64
3. Horn .................................................4-34
4. Wiper/Washer ...................................4-69
5. Steering wheel audio controls* ......4-114
6. Driver’s front air bag* .......................3-45
7. Ignition switch .....................................5-5
8. Audio* .............................................4-113
9. Hazard warning flasher
switch ........................................4-63, 6-2
10. Climate control system* ........4-75, 4-88
11. Parking brake .................................5-20
12. Shift lever ..............................5-13, 5-10
13. AUX, USB* ...................................4-115
14. Passenger’s front air bag* ..............3-45
15. Glove box .....................................4-104
* : if equipped
OTQ025002R
❈The actual shape may differ from the illustration.
procarmanuals.com
Page 61 of 419

Safety features of your vehicle
46 3
Upon deployment, tear seams moulded
directly into the pad covers will separate
under pressure from the expansion of the
air bags. Further opening of the covers
then allows full inflation of the air bags.A fully inflated air bag, in combination
with a properly worn seat belt, slows the
driver's or the passenger's forward
motion, reducing the risk of head and
chest injury.
After complete inflation, the air bag
immediately starts deflating, enabling the
driver to maintain forward visibility and
the ability to steer or operate other con-
trols.
B240B02L-RB240B03L-R
Driver’s front air bag (2)Driver’s front air bag (3)
WARNING
• Do not install or place any acces-
sories (drink holder, cassette
holder, sticker, etc.) on the front
passenger's panel above the
glove box in a vehicle with a pas-
senger's air bag. Such objects
may become dangerous projec-
tiles and cause injury if the pas-
senger's air bag inflates.
• When installing a container of liq-
uid air freshener inside the vehi-
cle, do not place it near the
instrument cluster nor on the
instrument panel surface.
It may become a dangerous pro-
jectile and cause injury if the pas-
senger's air bag inflates.
B240B05L-R
Passenger’s front air bag
procarmanuals.com
Page 75 of 419
4
Keys / 4-2
Remote keyless entry / 4-4
Theft-alarm system / 4-7
Door locks / 4-9
Tailgate / 4-14
Windows / 4-17
Bonnet / 4-22
Fuel filler lid / 4-24
Sunroof / 4-27
Steering wheel / 4-32
Mirrors / 4-35
Instrument cluster / 4-39
Rear parking assist system / 4-60
Hazard warning flasher / 4-63
Rearview camera / 4-63
Lighting / 4-64
Wipers and washers / 4-69
Interior light / 4-72
Defroster / 4-74
Manual climate control system / 4-75
Automatic climate control system / 4-88
Windscreen defrosting and defogging / 4-100
Storage compartment / 4-104
Interior features / 4-107
Audio system / 4-131
Features of your vehicle
procarmanuals.com
Page 113 of 419
439
Features of your vehicle
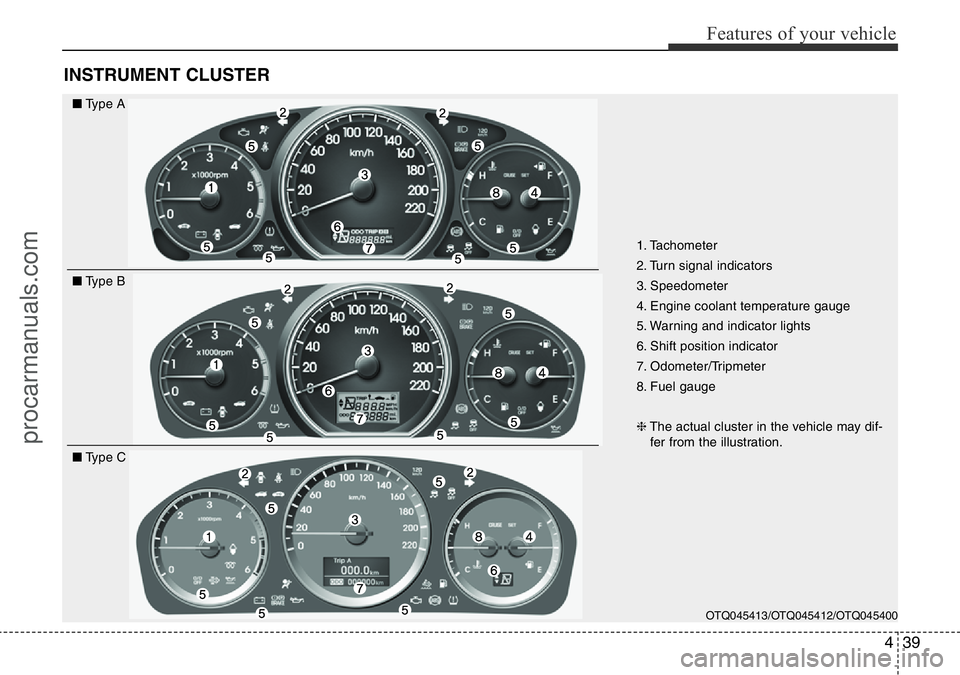
INSTRUMENT CLUSTER
1. Tachometer
2. Turn signal indicators
3. Speedometer
4. Engine coolant temperature gauge
5. Warning and indicator lights
6. Shift position indicator
7. Odometer/Tripmeter
8. Fuel gauge
❈The actual cluster in the vehicle may dif-
fer from the illustration.
OTQ045413/OTQ045412/OTQ045400
■Type A
■Type B
■Type C
procarmanuals.com
Page 114 of 419
Features of your vehicle
40 4
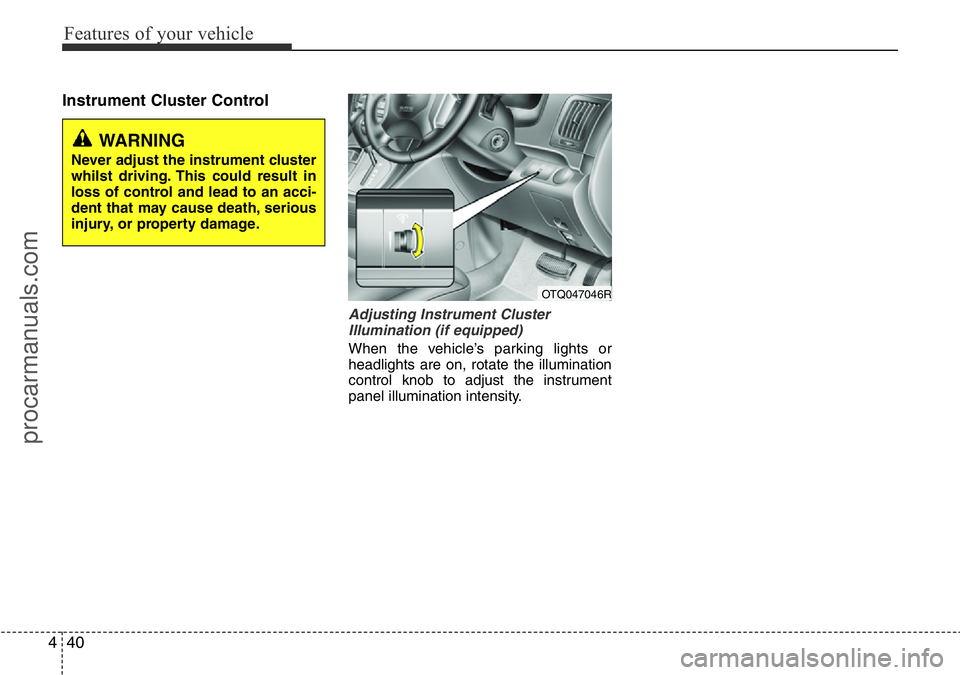
Instrument Cluster Control
Adjusting Instrument Cluster
Illumination (if equipped)
When the vehicle’s parking lights or
headlights are on, rotate the illumination
control knob to adjust the instrument
panel illumination intensity.
OTQ047046R
WARNING
Never adjust the instrument cluster
whilst driving. This could result in
loss of control and lead to an acci-
dent that may cause death, serious
injury, or property damage.
procarmanuals.com
Page 261 of 419
515
Driving your vehicle
Transmission ranges
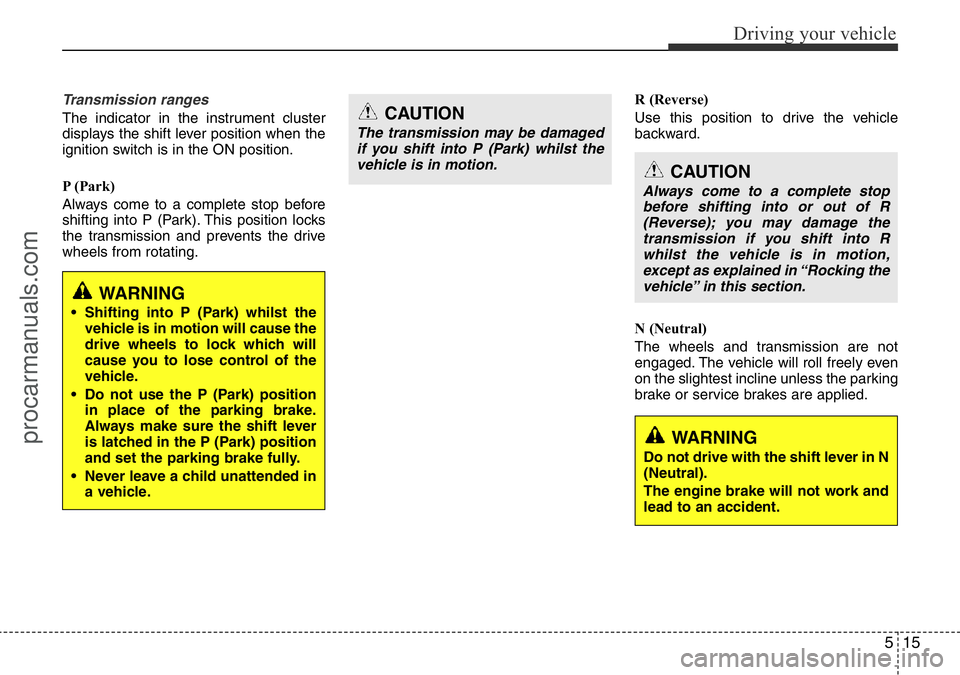
The indicator in the instrument cluster
displays the shift lever position when the
ignition switch is in the ON position.
P (Park)
Always come to a complete stop before
shifting into P (Park). This position locks
the transmission and prevents the drive
wheels from rotating.R (Reverse)
Use this position to drive the vehicle
backward.
N (Neutral)
The wheels and transmission are not
engaged. The vehicle will roll freely even
on the slightest incline unless the parking
brake or service brakes are applied.CAUTION
The transmission may be damaged
if you shift into P (Park) whilst the
vehicle is in motion.
CAUTION
Always come to a complete stop
before shifting into or out of R
(Reverse); you may damage the
transmission if you shift into R
whilst the vehicle is in motion,
except as explained in “Rocking the
vehicle” in this section.
WARNING
• Shifting into P (Park) whilst the
vehicle is in motion will cause the
drive wheels to lock which will
cause you to lose control of the
vehicle.
• Do not use the P (Park) position
in place of the parking brake.
Always make sure the shift lever
is latched in the P (Park) position
and set the parking brake fully.
• Never leave a child unattended in
a vehicle.
WARNING
Do not drive with the shift lever in N
(Neutral).
The engine brake will not work and
lead to an accident.
procarmanuals.com
Page 277 of 419
531
Driving your vehicle
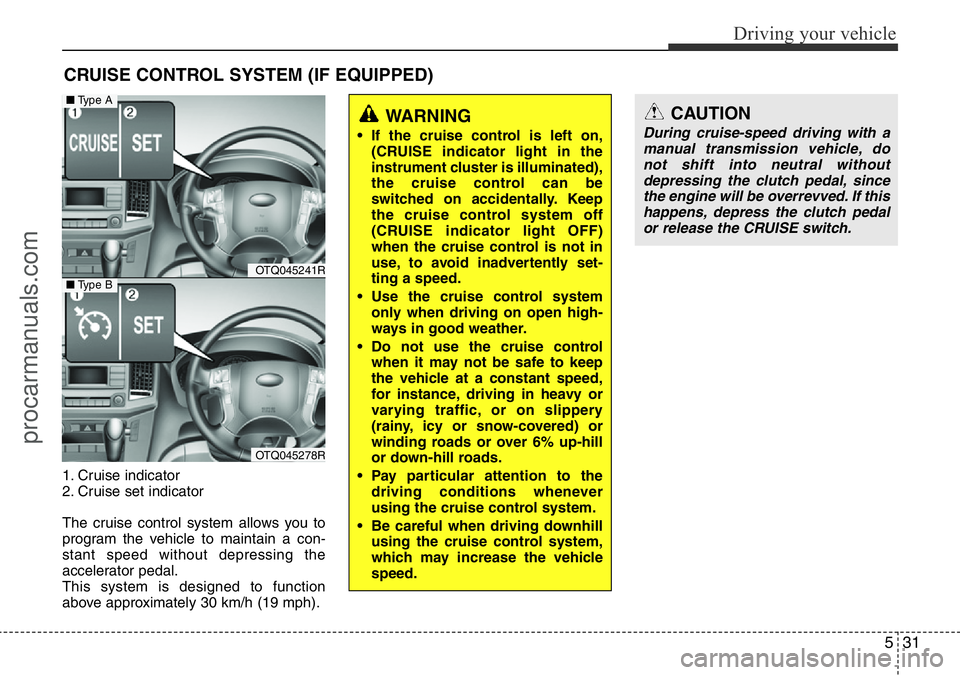
1. Cruise indicator
2. Cruise set indicator
The cruise control system allows you to
program the vehicle to maintain a con-
stant speed without depressing the
accelerator pedal.
This system is designed to function
above approximately 30 km/h (19 mph).
CRUISE CONTROL SYSTEM (IF EQUIPPED)
WARNING
• If the cruise control is left on,
(CRUISE indicator light in the
instrument cluster is illuminated),
the cruise control can be
switched on accidentally. Keep
the cruise control system off
(CRUISE indicator light OFF)
when the cruise control is not in
use, to avoid inadvertently set-
ting a speed.
• Use the cruise control system
only when driving on open high-
ways in good weather.
• Do not use the cruise control
when it may not be safe to keep
the vehicle at a constant speed,
for instance, driving in heavy or
varying traffic, or on slippery
(rainy, icy or snow-covered) or
winding roads or over 6% up-hill
or down-hill roads.
• Pay particular attention to the
driving conditions whenever
using the cruise control system.
• Be careful when driving downhill
using the cruise control system,
which may increase the vehicle
speed.
CAUTION
During cruise-speed driving with a
manual transmission vehicle, do
not shift into neutral without
depressing the clutch pedal, since
the engine will be overrevved. If this
happens, depress the clutch pedal
or release the CRUISE switch.
OTQ045241R
OTQ045278R
■Type A
■Type B
procarmanuals.com
Page 281 of 419
535
Driving your vehicle
• Decrease the vehicle speed lower than
the memory speed by 20 km/h (12
mph).
• Decrease the vehicle speed to less
than approximately 30 km/h (19 mph).
Each of these actions will cancel cruise
control operation (the SET indicator light
in the instrument cluster will go off), but it
will not turn the system off. If you wish to
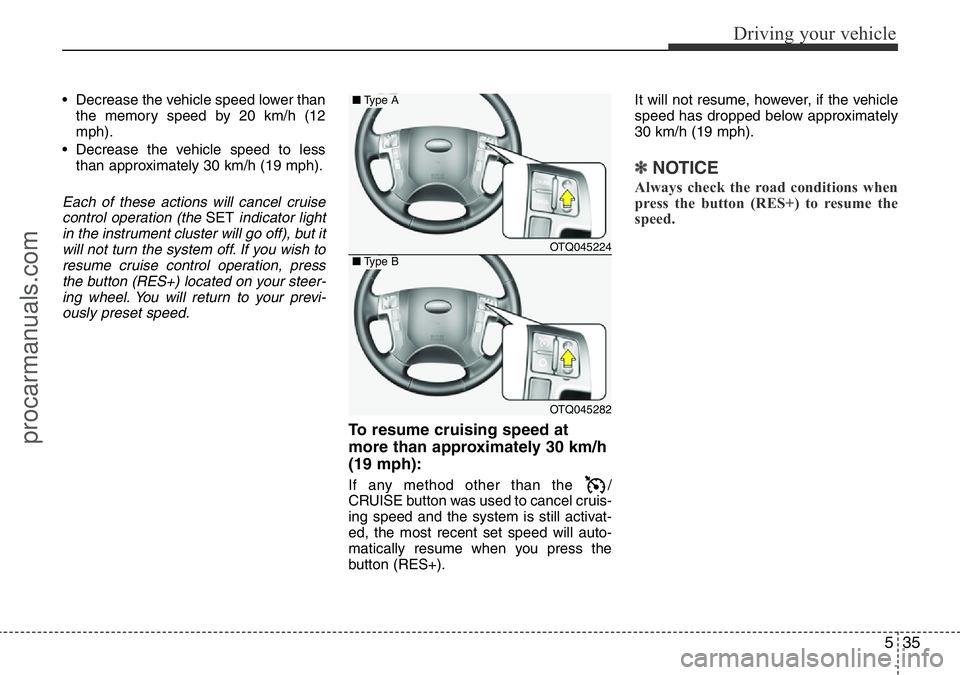
resume cruise control operation, press
the button (RES+) located on your steer-
ing wheel. You will return to your previ-
ously preset speed.
To resume cruising speed at
more than approximately 30 km/h
(19 mph):
If any method other than the /
CRUISE button was used to cancel cruis-
ing speed and the system is still activat-
ed, the most recent set speed will auto-
matically resume when you press the
button (RES+).It will not resume, however, if the vehicle
speed has dropped below approximately
30 km/h (19 mph).
✽NOTICE
Always check the road conditions when
press the button (RES+) to resume the
speed.
OTQ045224
OTQ045282
■Type A
■Type B
procarmanuals.com
Page 380 of 419
Maintenance
50 7
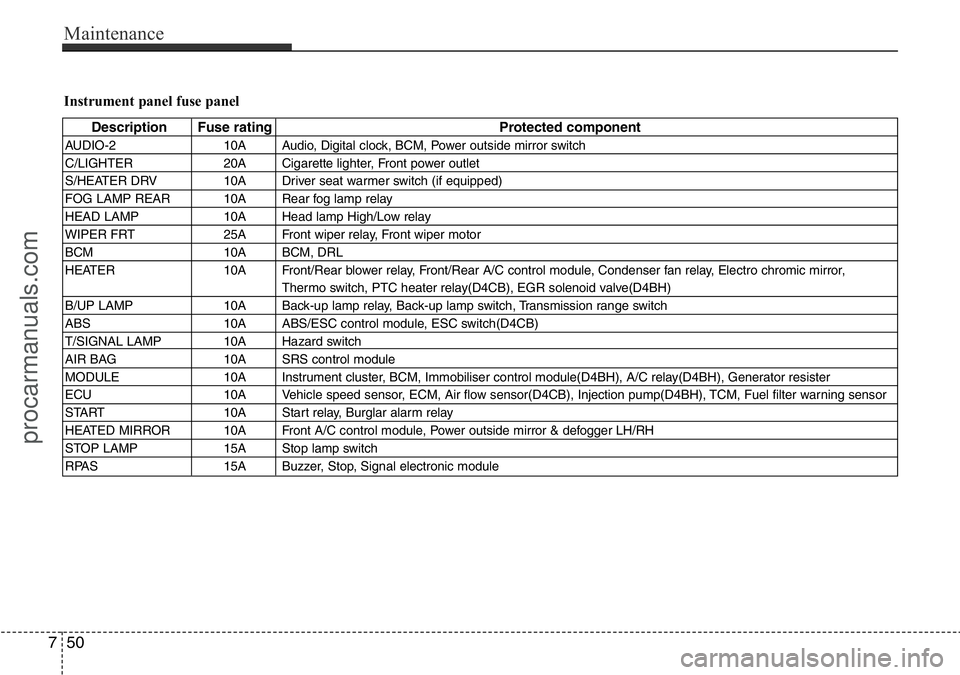
Instrument panel fuse panel
Description Fuse rating Protected component
AUDIO-2 10A Audio, Digital clock, BCM, Power outside mirror switch
C/LIGHTER 20A Cigarette lighter, Front power outlet
S/HEATER DRV 10A Driver seat warmer switch (if equipped)
FOG LAMP REAR 10A Rear fog lamp relay
HEAD LAMP 10A Head lamp High/Low relay
WIPER FRT 25A Front wiper relay, Front wiper motor
BCM 10A BCM, DRL
HEATER 10A Front/Rear blower relay, Front/Rear A/C control module, Condenser fan relay, Electro chromic mirror,
Thermo switch, PTC heater relay(D4CB), EGR solenoid valve(D4BH)
B/UP LAMP 10A Back-up lamp relay, Back-up lamp switch, Transmission range switch
ABS 10A ABS/ESC control module, ESC switch(D4CB)
T/SIGNAL LAMP 10A Hazard switch
AIR BAG 10A SRS control module
MODULE 10A Instrument cluster, BCM, Immobiliser control module(D4BH), A/C relay(D4BH), Generator resister
ECU 10A Vehicle speed sensor, ECM, Air flow sensor(D4CB), Injection pump(D4BH), TCM, Fuel filter warning sensor
START 10A Start relay, Burglar alarm relay
HEATED MIRROR 10A Front A/C control module, Power outside mirror & defogger LH/RH
STOP LAMP 15A Stop lamp switch
RPAS 15A Buzzer, Stop, Signal electronic module
procarmanuals.com
Page 381 of 419
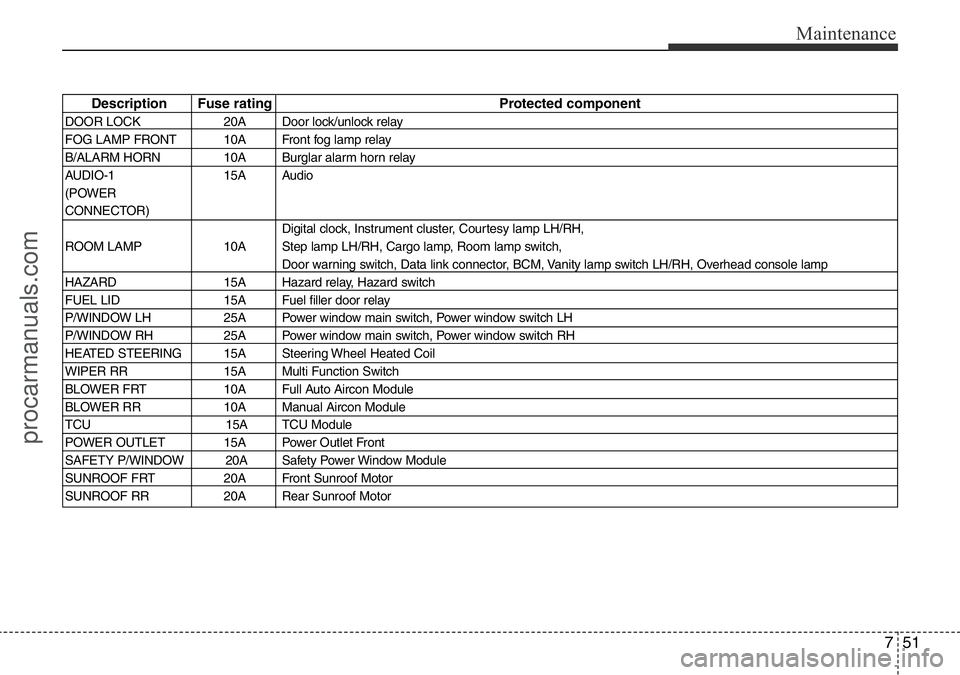
751
Maintenance
Description Fuse rating Protected component
DOOR LOCK 20A Door lock/unlock relay
FOG LAMP FRONT 10A Front fog lamp relay
B/ALARM HORN 10A Burglar alarm horn relay
AUDIO-1 15A Audio
(POWER
CONNECTOR)
Digital clock, Instrument cluster, Courtesy lamp LH/RH,
ROOM LAMP 10A Step lamp LH/RH, Cargo lamp, Room lamp switch,
Door warning switch, Data link connector, BCM, Vanity lamp switch LH/RH, Overhead console lamp
HAZARD 15A Hazard relay, Hazard switch
FUEL LID 15A Fuel filler door relay
P/WINDOW LH 25A Power window main switch, Power window switch LH
P/WINDOW RH 25A Power window main switch, Power window switch RH
HEATED STEERING 15A Steering Wheel Heated Coil
WIPER RR 15A Multi Function Switch
BLOWER FRT 10A Full Auto Aircon Module
BLOWER RR 10A Manual Aircon Module
TCU 15A TCU Module
POWER OUTLET 15A Power Outlet Front
SAFETY P/WINDOW 20A Safety Power Window Module
SUNROOF FRT 20A Front Sunroof Motor
SUNROOF RR 20A Rear Sunroof Motor
procarmanuals.com