climate control Hyundai Ioniq Hybrid 2020 - RHD (UK, Australia) User Guide
[x] Cancel search | Manufacturer: HYUNDAI, Model Year: 2020, Model line: Ioniq Hybrid, Model: Hyundai Ioniq Hybrid 2020Pages: 613, PDF Size: 58.64 MB
Page 281 of 613
3-134
Convenient features of your vehicle
A AU
UT
TO
OM
MA
AT
TI
IC
C
C
CL
LI
IM
MA
AT
TE
E
C
CO
ON
NT
TR
RO
OL
L
S
SY
YS
ST
TE
EM
M
OAEPH049500L
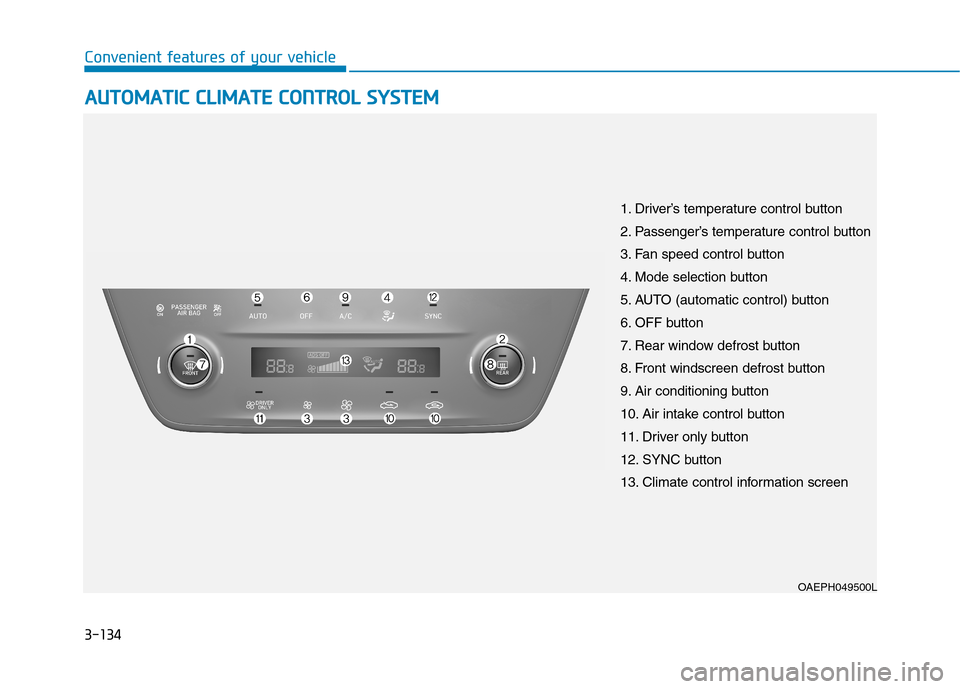
1. Driver’s temperature control button
2. Passenger’s temperature control button
3. Fan speed control button
4. Mode selection button
5. AUTO (automatic control) button
6. OFF button
7. Rear window defrost button
8. Front windscreen defrost button
9. Air conditioning button
10. Air intake control button
11. Driver only button
12. SYNC button
13. Climate control information screen
Page 286 of 613
3-139
Convenient features of your vehicle
3
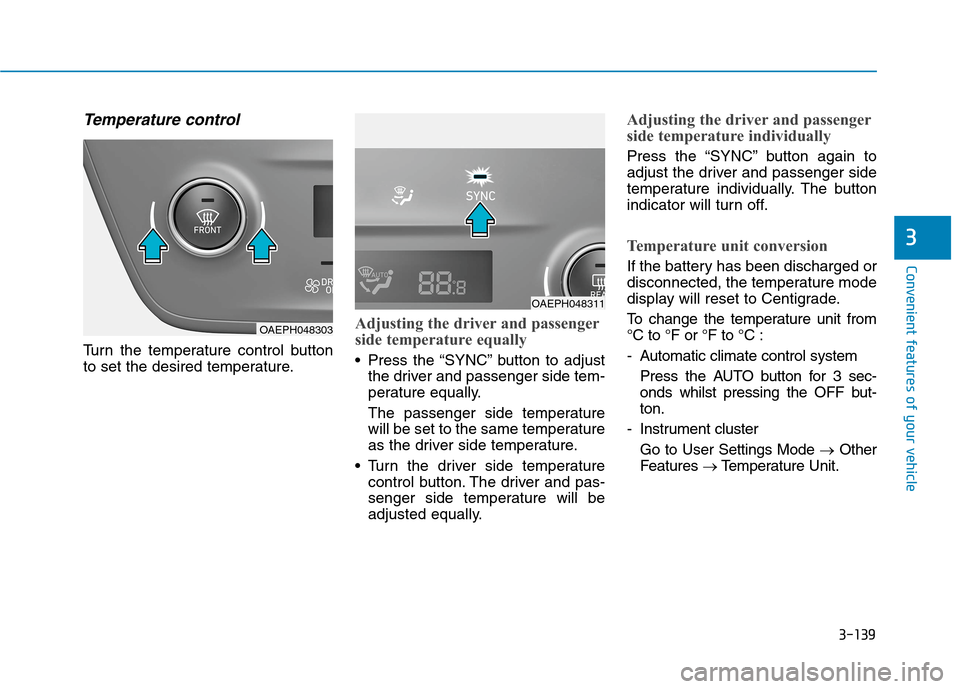
Temperature control
Turn the temperature control button
to set the desired temperature.
Adjusting the driver and passenger
side temperature equally
Press the “SYNC” button to adjust
the driver and passenger side tem-
perature equally.
The passenger side temperature
will be set to the same temperature
as the driver side temperature.
Turn the driver side temperature
control button. The driver and pas-
senger side temperature will be
adjusted equally.
Adjusting the driver and passenger
side temperature individually
Press the “SYNC” button again to
adjust the driver and passenger side
temperature individually. The button
indicator will turn off.
Temperature unit conversion
If the battery has been discharged or
disconnected, the temperature mode
display will reset to Centigrade.
To change the temperature unit from
°C to °F or °F to °C :
- Automatic climate control system
Press the AUTO button for 3 sec-
onds whilst pressing the OFF but-
ton.
- Instrument cluster
Go to User Settings Mode →Other
Features →Temperature Unit.
OAEPH048303
OAEPH048311
Page 288 of 613
3-141
Convenient features of your vehicle
3
Fan speed control
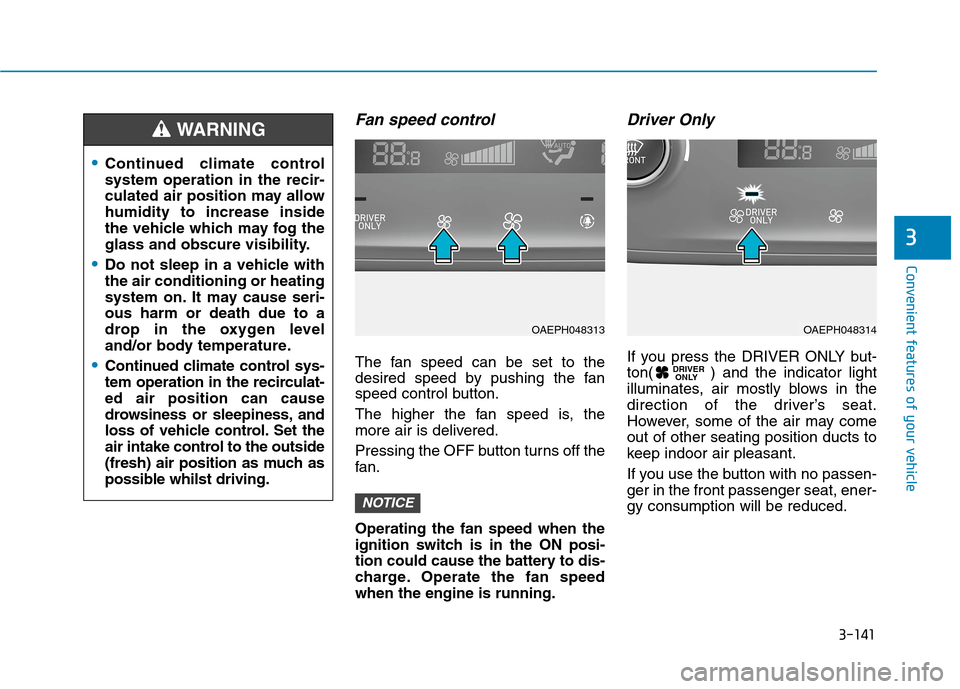
The fan speed can be set to the
desired speed by pushing the fan
speed control button.
The higher the fan speed is, the
more air is delivered.
Pressing the OFF button turns off the
fan.
Operating the fan speed when the
ignition switch is in the ON posi-
tion could cause the battery to dis-
charge. Operate the fan speed
when the engine is running.
Driver Only
If you press the DRIVER ONLY but-
ton( ) and the indicator light
illuminates, air mostly blows in the
direction of the driver’s seat.
However, some of the air may come
out of other seating position ducts to
keep indoor air pleasant.
If you use the button with no passen-
ger in the front passenger seat, ener-
gy consumption will be reduced.DRIVER
ONLY
NOTICE
Continued climate control
system operation in the recir-
culated air position may allow
humidity to increase inside
the vehicle which may fog the
glass and obscure visibility.
Do not sleep in a vehicle with
the air conditioning or heating
system on. It may cause seri-
ous harm or death due to a
drop in the oxygen level
and/or body temperature.
Continued climate control sys-
tem operation in the recirculat-
ed air position can cause
drowsiness or sleepiness, and
loss of vehicle control. Set the
air intake control to the outside
(fresh) air position as much as
possible whilst driving.
WARNING
OAEPH048313OAEPH048314
Page 292 of 613
3-145
Convenient features of your vehicle
3
Operating the air conditioning sys-
tem in the recirculated air position
provides maximum cooling, how-
ever, continual operation in this
mode may cause the air inside the
vehicle to become stale.
During cooling operation, you may
occasionally notice a misty air flow
because of rapid cooling and
humid air intake. This is a normal
system operation characteristic.System maintenance
Climate control air filter
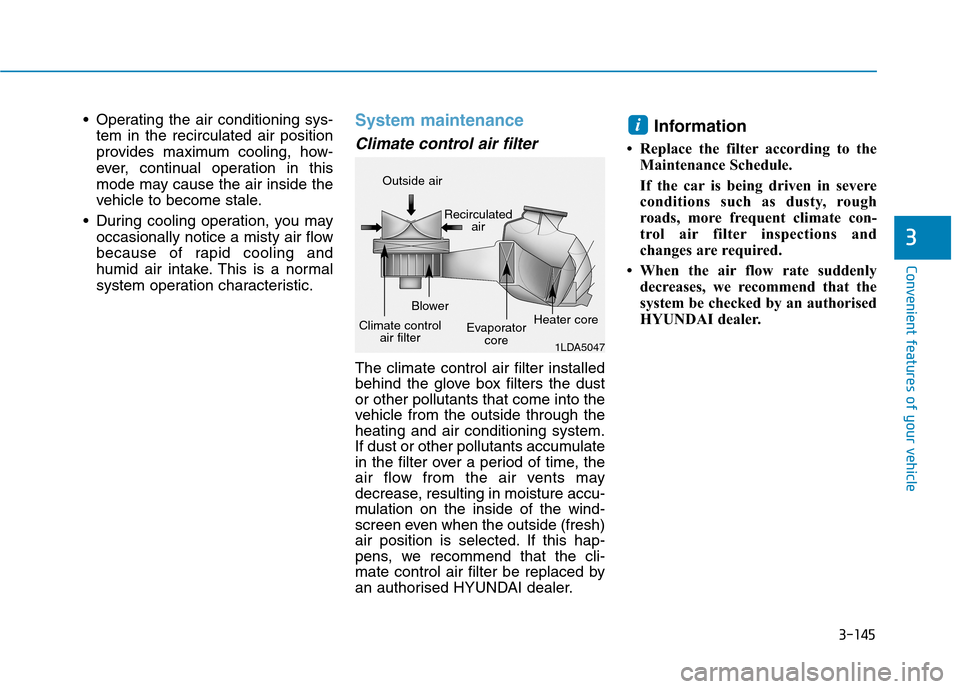
The climate control air filter installed
behind the glove box filters the dust
or other pollutants that come into the
vehicle from the outside through the
heating and air conditioning system.
If dust or other pollutants accumulate
in the filter over a period of time, the
air flow from the air vents may
decrease, resulting in moisture accu-
mulation on the inside of the wind-
screen even when the outside (fresh)
air position is selected. If this hap-
pens, we recommend that the cli-
mate control air filter be replaced by
an authorised HYUNDAI dealer.
Information
• Replace the filter according to the
Maintenance Schedule.
If the car is being driven in severe
conditions such as dusty, rough
roads, more frequent climate con-
trol air filter inspections and
changes are required.
• When the air flow rate suddenly
decreases, we recommend that the
system be checked by an authorised
HYUNDAI dealer.
i
1LDA5047
Outside air
Recirculated
air
Climate control
air filterBlower
Evaporator
coreHeater core
Page 295 of 613
3-148
Convenient features of your vehicle
For maximum defrosting, set the
temperature control to the extreme
right/hot position and the fan speed
control to the highest speed.
If warm air to the floor is desired
whilst defrosting or defogging, set
the mode to the floor-defrost posi-
tion.
Before driving, clear all snow and
ice from the windscreen, rear win-
dow, outside rear view mirrors, and
all side windows.
Clear all snow and ice from the
bonnet and air inlet in the cowl grill
to improve heater and defroster
efficiency and to reduce the proba-
bility of fogging up inside of the
windscreen.
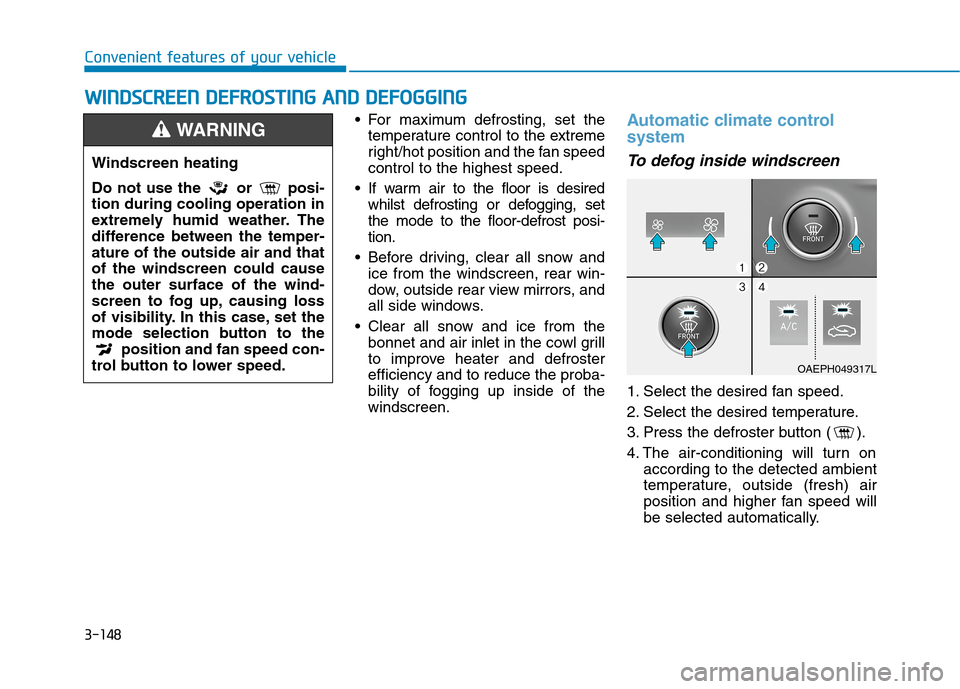
Automatic climate control
system
To defog inside windscreen
1. Select the desired fan speed.
2. Select the desired temperature.
3. Press the defroster button ( ).
4. The air-conditioning will turn on
according to the detected ambient
temperature, outside (fresh) air
position and higher fan speed will
be selected automatically.
W WI
IN
ND
DS
SC
CR
RE
EE
EN
N
D
DE
EF
FR
RO
OS
ST
TI
IN
NG
G
A
AN
ND
D
D
DE
EF
FO
OG
GG
GI
IN
NG
G
Windscreen heating
Do not use the or posi-
tion during cooling operation in
extremely humid weather. The
difference between the temper-
ature of the outside air and that
of the windscreen could cause
the outer surface of the wind-
screen to fog up, causing loss
of visibility. In this case, set the
mode selection button to the
position and fan speed con-
trol button to lower speed.
WARNING
OAEPH049317L
Page 296 of 613
3-149
Convenient features of your vehicle
3
If the air-conditioning, outside (fresh)
air position and higher fan speed are
not selected automatically, adjust the
corresponding button manually.
If the position is selected, lower
fan speed is controlled to higher fan
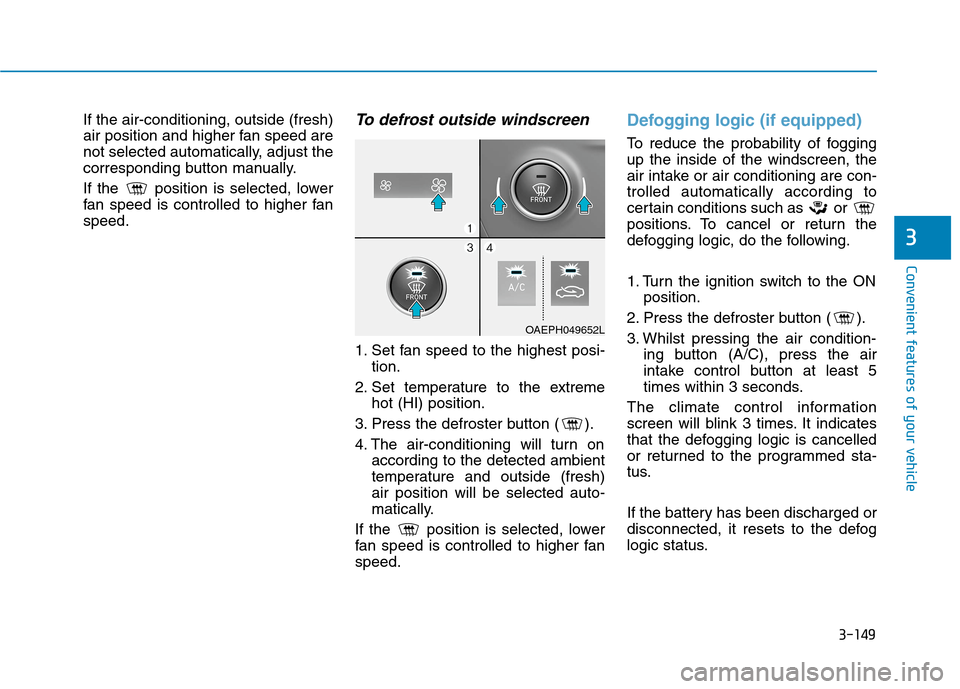
speed.To defrost outside windscreen
1. Set fan speed to the highest posi-
tion.
2. Set temperature to the extreme
hot (HI) position.
3. Press the defroster button ( ).
4. The air-conditioning will turn on
according to the detected ambient
temperature and outside (fresh)
air position will be selected auto-
matically.
If the position is selected, lower
fan speed is controlled to higher fan
speed.
Defogging logic (if equipped)
To reduce the probability of fogging
up the inside of the windscreen, the
air intake or air conditioning are con-
trolled automatically according to
certain conditions such as or
positions. To cancel or return the
defogging logic, do the following.
1. Turn the ignition switch to the ON
position.
2. Press the defroster button ( ).
3. Whilst pressing the air condition-
ing button (A/C), press the air
intake control button at least 5
times within 3 seconds.
The climate control information
screen will blink 3 times. It indicates
that the defogging logic is cancelled
or returned to the programmed sta-
tus.
If the battery has been discharged or
disconnected, it resets to the defog
logic status.
OAEPH049652L
Page 297 of 613
3-150
Convenient features of your vehicle
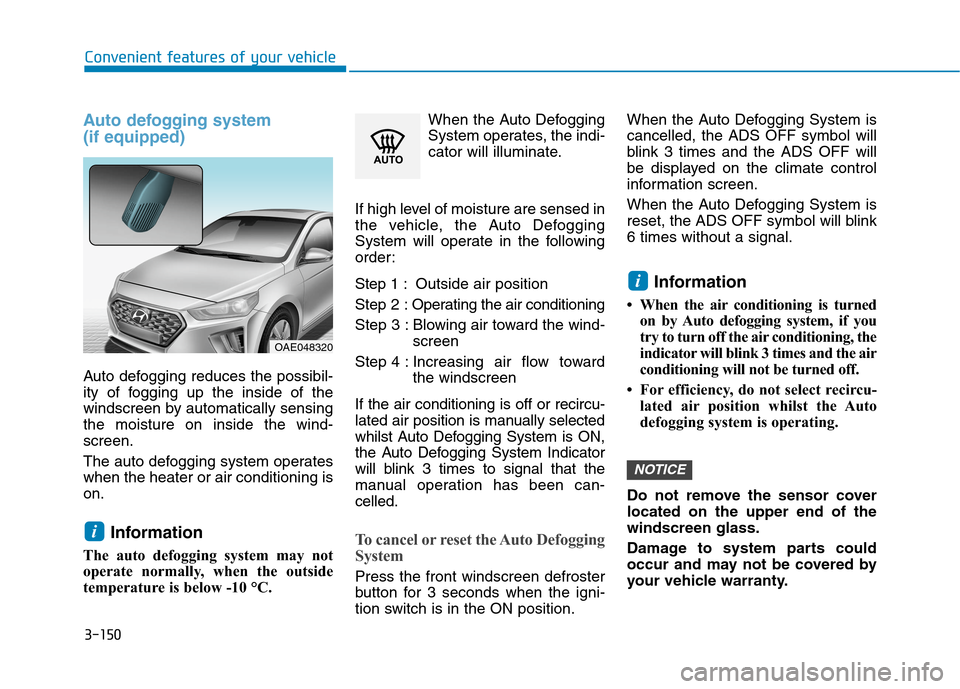
Auto defogging system
(if equipped)
Auto defogging reduces the possibil-
ity of fogging up the inside of the
windscreen by automatically sensing
the moisture on inside the wind-
screen.
The auto defogging system operates
when the heater or air conditioning is
on.
Information
The auto defogging system may not
operate normally, when the outside
temperature is below -10 °C.When the Auto Defogging
System operates, the indi-
cator will illuminate.
If high level of moisture are sensed in
the vehicle, the Auto Defogging
System will operate in the following
order:
Step 1 : Outside air position
Step 2 :Operating the air conditioning
Step 3 : Blowing air toward the wind-
screen
Step 4 : Increasing air flow toward
the windscreen
If the air conditioning is off or recircu-
lated air position is manually selected
whilst Auto Defogging System is ON,
the Auto Defogging System Indicator
will blink 3 times to signal that the
manual operation has been can-
celled.To cancel or reset the Auto Defogging
System
Press the front windscreen defroster
button for 3 seconds when the igni-
tion switch is in the ON position.When the Auto Defogging System is
cancelled, the ADS OFF symbol will
blink 3 times and the ADS OFF will
be displayed on the climate control
information screen.
When the Auto Defogging System is
reset, the ADS OFF symbol will blink
6 times without a signal.
Information
• When the air conditioning is turned
on by Auto defogging system, if you
try to turn off the air conditioning, the
indicator will blink 3 times and the air
conditioning will not be turned off.
• For efficiency, do not select recircu-
lated air position whilst the Auto
defogging system is operating.
Do not remove the sensor cover
located on the upper end of the
windscreen glass.
Damage to system parts could
occur and may not be covered by
your vehicle warranty.
NOTICE
i
i
OAE048320
Page 479 of 613
6-6
The following items may need to be
reset after the battery has been dis-
charged or the battery has been dis-
connected.
See chapter 3 or 4 for:
Power Windows
Trip Computer
Climate Control System
Clock
Audio System
Sunroof
Driver Position Memory System
External power source using 12V
battery
The use of external power acces-
sories may reduce performance
and function of the vehicle.
Especially, the use of dash cam-
eras may shut off the power of the
vehicle prior to the dash camera's
automatic shut-down.
If the power of the vehicle is shut
off, start the vehicle as explained.
(refer to "Using the 12V Battery
Reset Switch")Jump starting
In the event vehicle still does not
have a functional 12V battery (check
if interior lights will not turn on) then
you can try a jump start to the engine
compartment jumper terminals using
a 12V booster pack or jumper cables
from another vehicle's 12V battery
according to the following instruc-
tions.1. Position the vehicles close enough
that the jumper cables will reach,
but do not allow the vehicles to
touch.
2. Avoid fans or any moving parts in
the engine compartment at all
times, even when the vehicles are
turned off.
3. Turn off all electrical devices such
as radios, lights, air conditioning,
etc. Put the vehicles in P (Park)
and set the parking brake. Turn
both vehicles OFF.
NOTICE
What to do in an emergency
Jump starting can be danger-
ous if done incorrectly. Follow
the jump starting procedure in
this section to avoid serious
injury or damage to your vehi-
cle. If in doubt about how to
properly jump start your vehi-
cle, we strongly recommend
that you have a service techni-
cian or towing service do it for
you.
CAUTION
Page 519 of 613
7
Maintenance
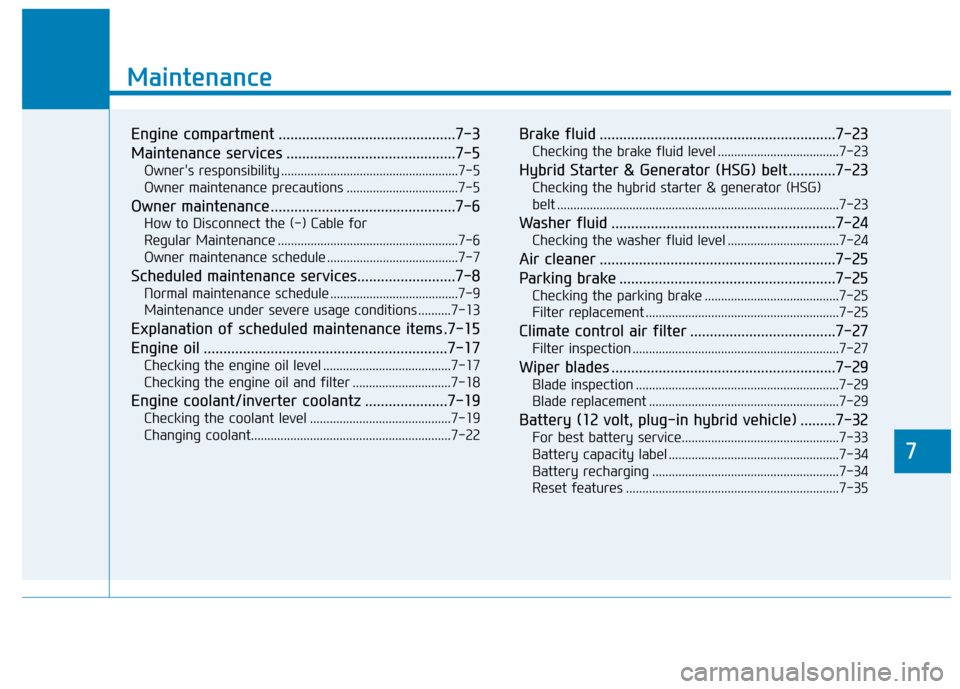
7
Maintenance
Engine compartment .............................................7-3
Maintenance services ...........................................7-5
Owner's responsibility ......................................................7-5
Owner maintenance precautions ..................................7-5
Owner maintenance ...............................................7-6
How to Disconnect the (-) Cable for
Regular Maintenance .......................................................7-6
Owner maintenance schedule ........................................7-7
Scheduled maintenance services.........................7-8
Normal maintenance schedule .......................................7-9
Maintenance under severe usage conditions ..........7-13
Explanation of scheduled maintenance items .7-15
Engine oil ..............................................................7-17
Checking the engine oil level .......................................7-17
Checking the engine oil and filter ..............................7-18
Engine coolant/inverter coolantz .....................7-19
Checking the coolant level ...........................................7-19
Changing coolant.............................................................7-22
Brake fluid ............................................................7-23
Checking the brake fluid level .....................................7-23
Hybrid Starter & Generator (HSG) belt ............7-23
Checking the hybrid starter & generator (HSG)
belt ......................................................................................7-23
Washer fluid .........................................................7-24
Checking the washer fluid level ..................................7-24
Air cleaner ............................................................7-25
Parking brake .......................................................7-25
Checking the parking brake .........................................7-25
Filter replacement ...........................................................7-25
Climate control air filter .....................................7-27
Filter inspection ...............................................................7-27
Wiper blades .........................................................7-29
Blade inspection ..............................................................7-29
Blade replacement ..........................................................7-29
Battery (12 volt, plug-in hybrid vehicle) .........7-32
For best battery service................................................7-33
Battery capacity label ....................................................7-34
Battery recharging .........................................................7-34
Reset features .................................................................7-35
7
Page 530 of 613
7-12
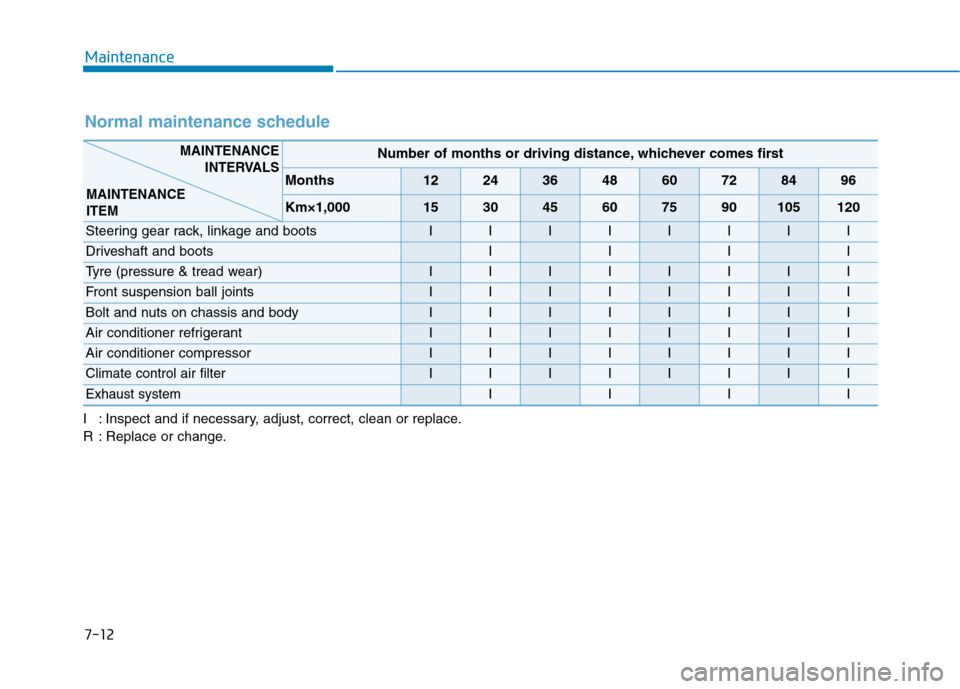
Maintenance
Normal maintenance schedule
Number of months or driving distance, whichever comes first
Months1224364860728496
Km×1,000153045607590105120
Steering gear rack, linkage and bootsIIIIIIII
Driveshaft and bootsIIII
Tyre (pressure & tread wear) IIIIIIII
Front suspension ball jointsIIIIIIII
Bolt and nuts on chassis and bodyIIIIIIII
Air conditioner refrigerant IIIIIIII
Air conditioner compressorIIIIIIII
Climate control air filterIIIIIIII
Exhaust systemIIII
MAINTENANCE
INTERVALS
MAINTENANCE
ITEM
I : Inspect and if necessary, adjust, correct, clean or replace.
R : Replace or change.