electric Hyundai Ioniq Plug-in Hybrid 2020 Owner's Manual
[x] Cancel search | Manufacturer: HYUNDAI, Model Year: 2020, Model line: Ioniq Plug-in Hybrid, Model: Hyundai Ioniq Plug-in Hybrid 2020Pages: 635, PDF Size: 52.13 MB
Page 31 of 635
2-9
Safety system of your vehicle
2
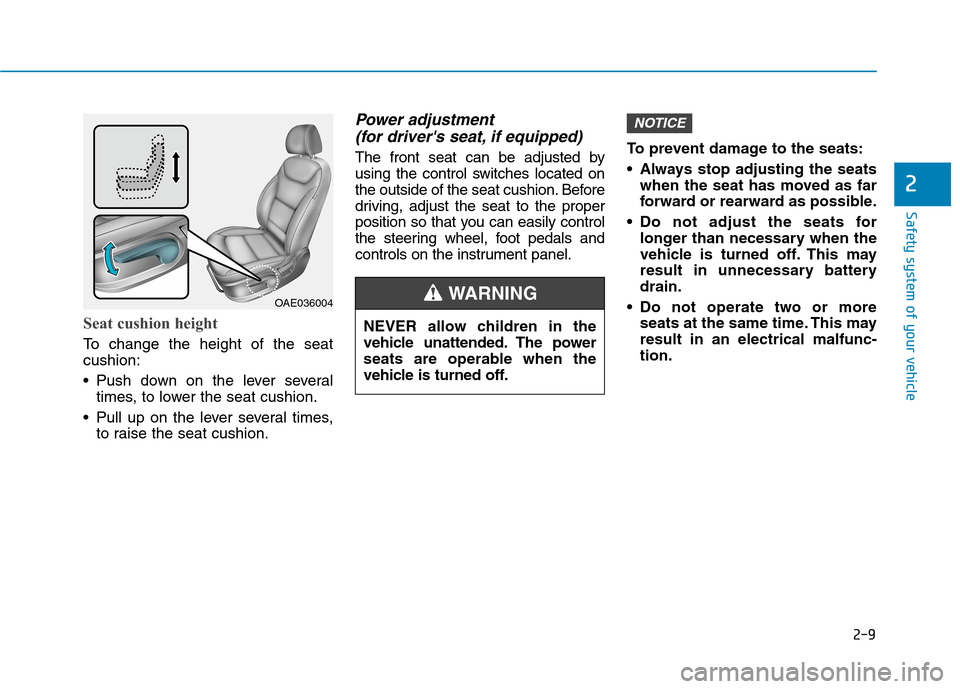
Seat cushion height
To change the height of the seat
cushion:
Push down on the lever several
times, to lower the seat cushion.
Pull up on the lever several times,
to raise the seat cushion.
Power adjustment
(for driver's seat, if equipped)
The front seat can be adjusted by
using the control switches located on
the outside of the seat cushion. Before
driving, adjust the seat to the proper
position so that you can easily control
the steering wheel, foot pedals and
controls on the instrument panel.To prevent damage to the seats:
Always stop adjusting the seats
when the seat has moved as far
forward or rearward as possible.
Do not adjust the seats for
longer than necessary when the
vehicle is turned off. This may
result in unnecessary battery
drain.
Do not operate two or more
seats at the same time. This may
result in an electrical malfunc-
tion.
NOTICE
NEVER allow children in the
vehicle unattended. The power
seats are operable when the
vehicle is turned off.
WARNING OAE036004
Page 81 of 635
2-59
Safety system of your vehicle
2
Always be sure that you and all vehi-
cle occupants are seated properly
and wearing the seat belt properly for
the most effective protection by the
air bag and the seat belt.
The OCS may not function properly if
the passenger takes actions which
can affect the classification system.
These include:
Failing to sit in an upright position.
Leaning against the door or center
console.
Sitting towards the sides of the
front of the seat.
Putting their legs on the dashboard
or resting them on other locations
which reduce the passenger
weight on the front seat.
Wearing the seat belt improperly.
Reclining the seatback.
Wearing a thick cloth like ski wear
or hip protection wear.
Putting an additional thick cushion
on the seat.
Putting electrical devices (e.g.
notebook, satellite radio) on the
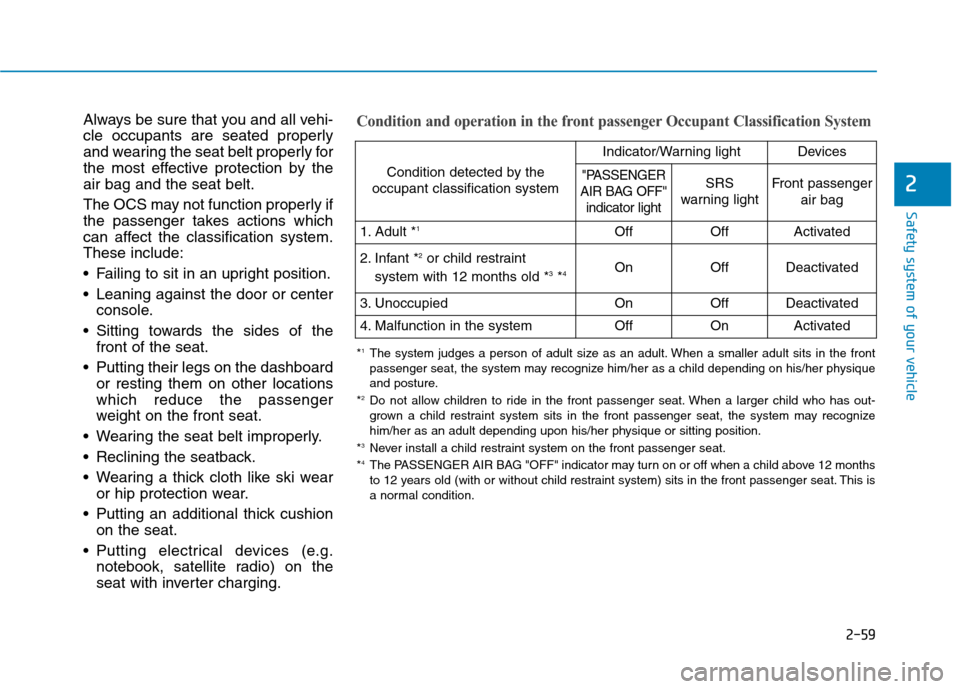
seat with inverter charging.Condition and operation in the front passenger Occupant Classification System
Condition detected by the
occupant classification system
Indicator/Warning lightDevices
"PASSENGER
AIR BAG OFF"
indicator lightSRS
warning lightFront passenger
air bag
1. Adult *1OffOffActivated
2. Infant *2or child restraint
system with 12 months old *3*4 OnOffDeactivated
3. Unoccupied OnOffDeactivated
4. Malfunction in the systemOffOnActivated
*1The system judges a person of adult size as an adult. When a smaller adult sits in the front
passenger seat, the system may recognize him/her as a child depending on his/her physique
and posture.
*
2Do not allow children to ride in the front passenger seat. When a larger child who has out-
grown a child restraint system sits in the front passenger seat, the system may recognize
him/her as an adult depending upon his/her physique or sitting position.
*
3Never install a child restraint system on the front passenger seat.
*4The PASSENGER AIR BAG "OFF" indicator may turn on or off when a child above 12 months
to 12 years old (with or without child restraint system) sits in the front passenger seat. This is
a normal condition.
Page 93 of 635
Convenient features of your vehicle
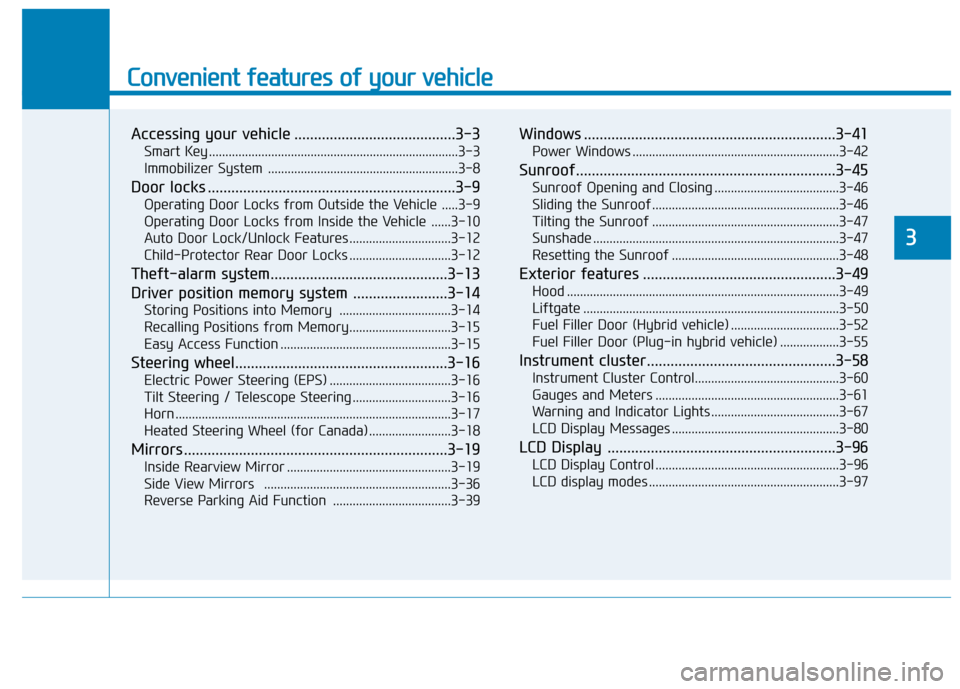
Accessing your vehicle .........................................3-3
Smart Key ............................................................................3-3
Immobilizer System ..........................................................3-8
Door locks ...............................................................3-9
Operating Door Locks from Outside the Vehicle .....3-9
Operating Door Locks from Inside the Vehicle ......3-10
Auto Door Lock/Unlock Features ...............................3-12
Child-Protector Rear Door Locks ...............................3-12
Theft-alarm system.............................................3-13
Driver position memory system ........................3-14
Storing Positions into Memory ..................................3-14
Recalling Positions from Memory...............................3-15
Easy Access Function ....................................................3-15
Steering wheel......................................................3-16
Electric Power Steering (EPS) .....................................3-16
Tilt Steering / Telescope Steering ..............................3-16
Horn ....................................................................................3-17
Heated Steering Wheel (for Canada) .........................3-18
Mirrors ...................................................................3-19
Inside Rearview Mirror ..................................................3-19
Side View Mirrors .........................................................3-36
Reverse Parking Aid Function ....................................3-39
Windows ................................................................3-41
Power Windows ...............................................................3-42
Sunroof..................................................................3-45
Sunroof Opening and Closing ......................................3-46
Sliding the Sunroof .........................................................3-46
Tilting the Sunroof .........................................................3-47
Sunshade ...........................................................................3-47
Resetting the Sunroof ...................................................3-48
Exterior features .................................................3-49
Hood ...................................................................................3-49
Liftgate ..............................................................................3-50
Fuel Filler Door (Hybrid vehicle) .................................3-52
Fuel Filler Door (Plug-in hybrid vehicle) ..................3-55
Instrument cluster................................................3-58
Instrument Cluster Control............................................3-60
Gauges and Meters ........................................................3-61
Warning and Indicator Lights .......................................3-67
LCD Display Messages ...................................................3-80
LCD Display ..........................................................3-96
LCD Display Control ........................................................3-96
LCD display modes ..........................................................3-97
3
Page 100 of 635
3-8
Convenient features of your vehicle
Immobilizer System
The immobilizer system helps protects
your vehicle from theft. If an improper-
ly coded key (or other device) is used,
the engine's fuel system is disabled.
When the Engine Start/Stop button is
placed in the ON position, the immo-
bilizer system indicator should come
on briefly, then go off. If the indicator
starts to blink, the system does not
recognize the coding of the key.
Place the Engine Start/Stop button to
the OFF position, then place the
Engine Start/Stop button to the ON
position again.
The system may not recognize your
key's coding if another immobilizer
key or other metal object (i.e., key
chain) is near the key. The vehicle
may not start because the metal may
interrupt the transponder signal from
transmitting normally.
If the system repeatedly does not
recognize the coding of the key, it is
recommended that you contact your
HYUNDAI dealer.Do not attempt to alter this system or
add other devices to it. Electrical
problems could result that may make
your vehicle inoperable.
The transponder in your key is an
important part of the immobilizer
system. It is designed to give
years of trouble-free service, how-
ever you should avoid exposure to
moisture, static electricity and
rough handling. Immobilizer sys-
tem malfunction could occur.
Information
This device complies with Part 15 of
the FCC rules.
Operation is subject to the following
three conditions:
1. This device may not cause harmful
interference, and
2. This device must accept any interfer-
ence received, including interference
that may cause undesired operation.
3. Changes or modifications not
expressly approved by the party
responsible for compliance could
void the user's authority to operate
the device.
i
NOTICE
In order to prevent theft of your
vehicle, do not leave spare keys
anywhere in your vehicle. Your
immobilizer password is a cus-
tomer unique password and
should be kept confidential.
WARNING
Page 108 of 635
3-16
Convenient features of your vehicle
S ST
TE
EE
ER
RI
IN
NG
G
W
WH
HE
EE
EL
L
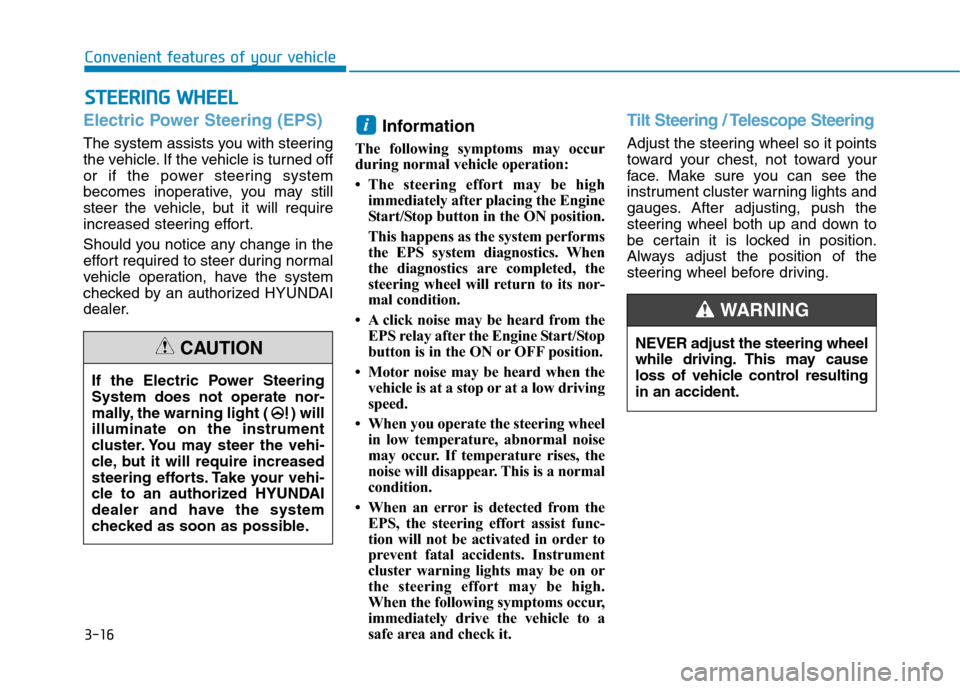
Electric Power Steering (EPS)
The system assists you with steering
the vehicle. If the vehicle is turned off
or if the power steering system
becomes inoperative, you may still
steer the vehicle, but it will require
increased steering effort.
Should you notice any change in the
effort required to steer during normal
vehicle operation, have the system
checked by an authorized HYUNDAI
dealer.
Information
The following symptoms may occur
during normal vehicle operation:
• The steering effort may be high
immediately after placing the Engine
Start/Stop button in the ON position.
This happens as the system performs
the EPS system diagnostics. When
the diagnostics are completed, the
steering wheel will return to its nor-
mal condition.
• A click noise may be heard from the
EPS relay after the Engine Start/Stop
button is in the ON or OFF position.
• Motor noise may be heard when the
vehicle is at a stop or at a low driving
speed.
• When you operate the steering wheel
in low temperature, abnormal noise
may occur. If temperature rises, the
noise will disappear. This is a normal
condition.
• When an error is detected from the
EPS, the steering effort assist func-
tion will not be activated in order to
prevent fatal accidents. Instrument
cluster warning lights may be on or
the steering effort may be high.
When the following symptoms occur,
immediately drive the vehicle to a
safe area and check it.
Tilt Steering / Telescope Steering
Adjust the steering wheel so it points
toward your chest, not toward your
face. Make sure you can see the
instrument cluster warning lights and
gauges. After adjusting, push the
steering wheel both up and down to
be certain it is locked in position.
Always adjust the position of the
steering wheel before driving.
i
If the Electric Power Steering
System does not operate nor-
mally, the warning light ( ) will
illuminate on the instrument
cluster. You may steer the vehi-
cle, but it will require increased
steering efforts. Take your vehi-
cle to an authorized HYUNDAI
dealer and have the system
checked as soon as possible.
CAUTIONNEVER adjust the steering wheel
while driving. This may cause
loss of vehicle control resulting
in an accident.
WARNING
Page 112 of 635

3-20
Convenient features of your vehicle
Blue Link®center (if equipped)
For details, refer to the Blue Link®
Owner's Guide, Navigation Manual
or Audio Manual.
Electrochromic mirror (ECM) with
HomeLink®system, compass and
Blue Link®(if equipped)
Your vehicle may be equipped with a
Gentex Automatic-Dimming Mirror
with a Z-Nav™ Electronic Compass
Display and an Integrated HomeLink
®
Wireless Control System. During
nighttime driving, this feature will
automatically detect and reduce
rearview mirror glare while the com-
pass indicates the direction the vehicle
is traveling. The HomeLink
®Universal
Transceiver allows you to activate your
garage door(s), electric gate, home
lighting, etc.(1) HomeLink Channel 1
(2) HomeLink Channel 2
(3) HomeLink Channel 3
(4) Garage Door Opener Status
Indicator : Closing or Closed
(5) HomeLink Operation Indicator
(6) Garage Door Opener Status
Indicator : Opening or Opened
(7) HomeLink User Interface Indicator
OOS047093N
HomeLink Indicator
HomeLink ButtonTelematics buttons
OAD045011N
Page 121 of 635
3-29
Convenient features of your vehicle
- If the indicator (4) or (6) does not
turn to Green, it indicates that the
last status of garage door was
not received properly. The
HomeLink mirror tries to receive
the last known status of the
garage door for a few seconds.Recalling Garage Door Status
Homelink mirror with two way com-
munication provides a way to view
the last stored message from the
garage door opener. In order to recall
the last known status of the last acti-
vated device, press the buttons "1
and 2" OR "2 and 3" simultaneously.
If the indicator (4) is ON continu-
ously in Green, it indicates that the
last activated device was "closed"
properly.
If the indicator (6) is ON continu-
ously in Green, it indicates that the
last activated device was "open"
properly.
Information
Two way communication range dis-
tance between "vehicle" and "garage
door opener" is 100m.
The range may be reduced or
increased a little due to obstacle condi-
tions around the garage door opener,
such as houses or trees
Electric chromic mirror (ECM)
with compass and HomeLink®
system (for Canada)
Your vehicle may be equipped with a
Gentex Automatic-Dimming Mirror
with a Z-Nav™ Electronic Compass
Display and an Integrated HomeLink
®
Wireless Control System.
During nighttime driving, this feature
will automatically detect and reduce
rearview mirror glare while the com-
pass indicates the direction the vehi-
cle is pointed. The HomeLink
®
Universal Transceiver allows you to
activate your garage door(s), electric
gate, home lighting, etc.
i
3
Page 131 of 635
3-39
Convenient features of your vehicle
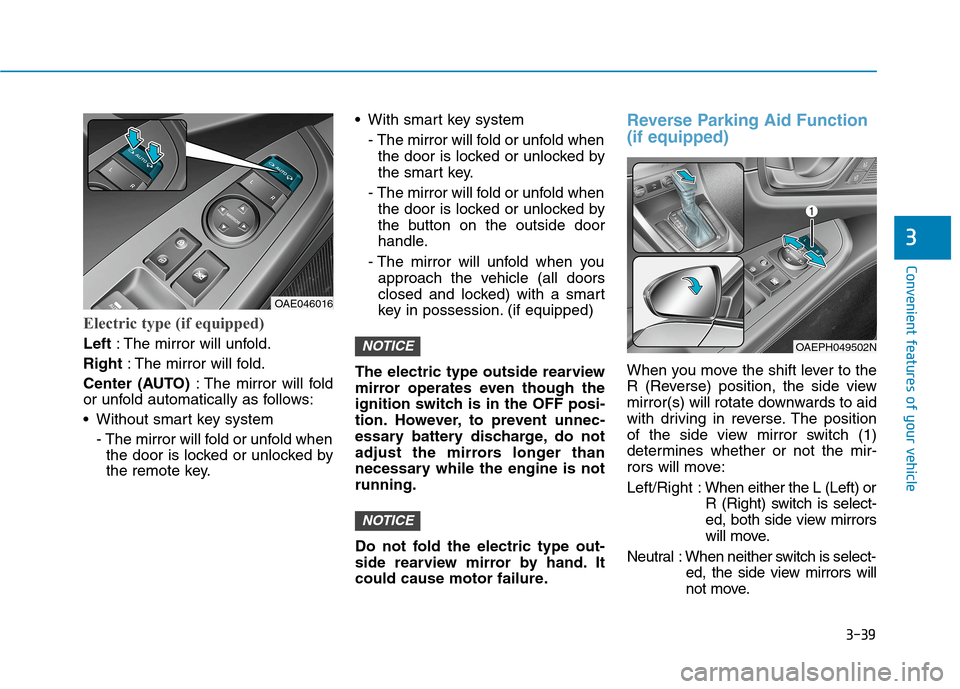
Electric type (if equipped)
Left: The mirror will unfold.
Right: The mirror will fold.
Center (AUTO): The mirror will fold
or unfold automatically as follows:
Without smart key system
- The mirror will fold or unfold when
the door is locked or unlocked by
the remote key. With smart key system
- The mirror will fold or unfold when
the door is locked or unlocked by
the smart key.
- The mirror will fold or unfold when
the door is locked or unlocked by
the button on the outside door
handle.
- The mirror will unfold when you
approach the vehicle (all doors
closed and locked) with a smart
key in possession. (if equipped)
The electric type outside rearview
mirror operates even though the
ignition switch is in the OFF posi-
tion. However, to prevent unnec-
essary battery discharge, do not
adjust the mirrors longer than
necessary while the engine is not
running.
Do not fold the electric type out-
side rearview mirror by hand. It
could cause motor failure.
Reverse Parking Aid Function
(if equipped)
When you move the shift lever to the
R (Reverse) position, the side view
mirror(s) will rotate downwards to aid
with driving in reverse. The position
of the side view mirror switch (1)
determines whether or not the mir-
rors will move:
Left/Right :When either the L (Left) or
R (Right) switch is select-
ed, both side view mirrors
will move.
Neutral : When neither switch is select-
ed, the side view mirrors will
not move.
NOTICE
NOTICE
3
OAE046016
OAEPH049502N
Page 145 of 635
3-53
Convenient features of your vehicle
3
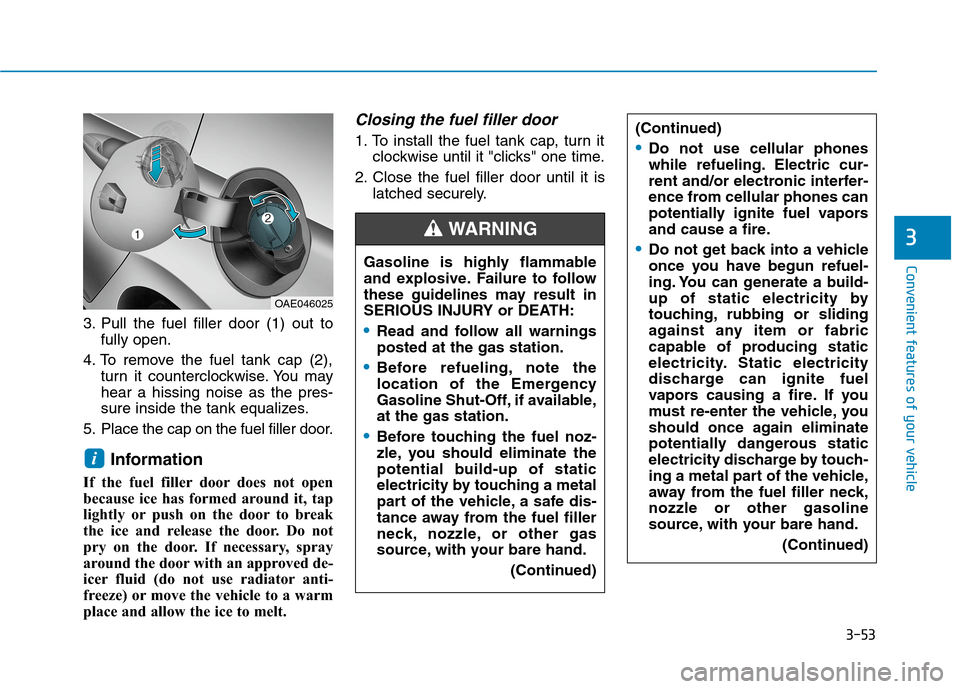
3. Pull the fuel filler door (1) out to
fully open.
4. To remove the fuel tank cap (2),
turn it counterclockwise. You may
hear a hissing noise as the pres-
sure inside the tank equalizes.
5. Place the cap on the fuel filler door.
Information
If the fuel filler door does not open
because ice has formed around it, tap
lightly or push on the door to break
the ice and release the door. Do not
pry on the door. If necessary, spray
around the door with an approved de-
icer fluid (do not use radiator anti-
freeze) or move the vehicle to a warm
place and allow the ice to melt.
Closing the fuel filler door
1. To install the fuel tank cap, turn it
clockwise until it "clicks" one time.
2. Close the fuel filler door until it is
latched securely.
i
Gasoline is highly flammable
and explosive. Failure to follow
these guidelines may result in
SERIOUS INJURY or DEATH:
Read and follow all warnings
posted at the gas station.
Before refueling, note the
location of the Emergency
Gasoline Shut-Off, if available,
at the gas station.
Before touching the fuel noz-
zle, you should eliminate the
potential build-up of static
electricity by touching a metal
part of the vehicle, a safe dis-
tance away from the fuel filler
neck, nozzle, or other gas
source, with your bare hand.
(Continued)
WARNING
(Continued)
Do not use cellular phones
while refueling. Electric cur-
rent and/or electronic interfer-
ence from cellular phones can
potentially ignite fuel vapors
and cause a fire.
Do not get back into a vehicle
once you have begun refuel-
ing. You can generate a build-
up of static electricity by
touching, rubbing or sliding
against any item or fabric
capable of producing static
electricity. Static electricity
discharge can ignite fuel
vapors causing a fire. If you
must re-enter the vehicle, you
should once again eliminate
potentially dangerous static
electricity discharge by touch-
ing a metal part of the vehicle,
away from the fuel filler neck,
nozzle or other gasoline
source, with your bare hand.
(Continued)
OAE046025
Page 146 of 635
3-54
Convenient features of your vehicle
Information
Make sure to refuel your vehicle
according to the "Fuel Requirements"
suggested in the Introduction chapter.
Do not spill fuel on the exterior
surfaces of the vehicle. Any type
of fuel spilled on painted sur-
faces may damage the paint.
If the fuel filler cap requires
replacement, use only a genuine
HYUNDAI cap or the equivalent
specified for your vehicle. An
incorrect fuel filler cap can
result in a serious malfunction
of the fuel system or emission
control system.
NOTICE
i
(Continued)
Do not use matches or a
lighter and do not smoke or
leave a lit cigarette in your
vehicle while at a gas station,
especially during refueling.
Do not over-fill or top-off your
vehicle tank, which can cause
gasoline spillage.
If a fire breaks out during refu-
eling, leave the vicinity of the
vehicle, and immediately con-
tact the manager of the gas
station and then contact the
local fire department. Follow
any safety instructions they
provide.
If pressurized fuel sprays out,
it can cover your clothes or
skin and thus subject you to
the risk of fire and burns.
Always remove the fuel cap
carefully and slowly. If the cap
is venting fuel or if you hear a
hissing sound, wait until the
condition stops before com-
pletely removing the cap.
(Continued)
(Continued)
Always check that the fuel cap
is installed securely to pre-
vent fuel spillage in the event
of an accident.
(Continued)
When using an approved
portable fuel container, be
sure to place the container on
the ground prior to refueling.
Static electricity discharge
from the container can ignite
fuel vapors causing a fire.
Once refueling has begun,
contact between your bare
hand and the vehicle should
be maintained until the filling
is complete.
Use only approved portable
plastic fuel containers designed
to carry and store gasoline.
When refueling, always move
the shift lever to the P (Park)
position, set the parking
brake, and place the Engine
Start/Stop button to the OFF
position. Sparks produced by
electrical components related
to the engine can ignite fuel
vapors causing a fire.
(Continued)