set clock HYUNDAI IX35 2014 Owners Manual
[x] Cancel search | Manufacturer: HYUNDAI, Model Year: 2014, Model line: IX35, Model: HYUNDAI IX35 2014Pages: 1534, PDF Size: 39.76 MB
Page 201 of 1534
4 129
Features of your vehicle
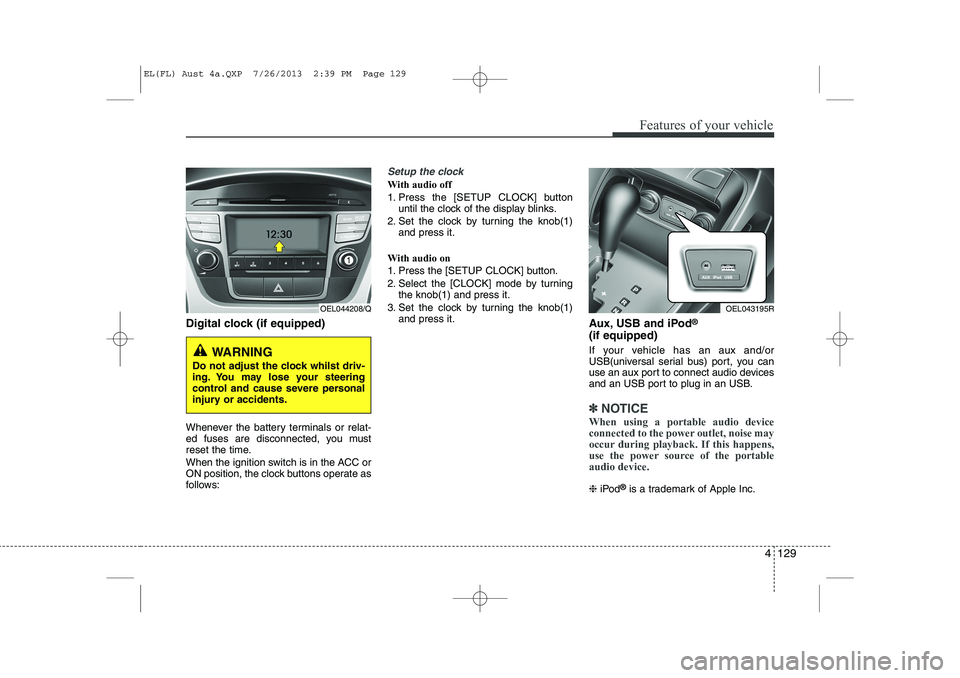
Digital clock (if equipped)
Whenever the battery terminals or relat-
ed fuses are disconnected, you must
reset the time.
When the ignition switch is in the ACC or
ON position, the clock buttons operate as
follows:
Setup the clock
With audio off
1. Press the [SETUP CLOCK] buttonuntil the clock of the display blinks.
2. Set the clock by turning the knob(1) and press it.
With audio on
1. Press the [SETUP CLOCK] button.
2. Select the [CLOCK] mode by turning the knob(1) and press it.
3. Set the clock by turning the knob(1) and press it. Aux, USB and iPod®
(if equipped)
If your vehicle has an aux and/or
USB(universal serial bus) port, you can
use an aux port to connect audio devices
and an USB port to plug in an USB.
✽✽ NOTICE
When using a portable audio device
connected to the power outlet, noise may
occur during playback. If this happens,
use the power source of the portableaudio device.
❈ iPod ®
is a trademark of Apple Inc.
OEL044208/Q
WARNING
Do not adjust the clock whilst driv-
ing. You may lose your steering
control and cause severe personal
injury or accidents.
OEL043195R
EL(FL) Aust 4a.QXP 7/26/2013 2:39 PM Page 129
Page 286 of 1534
What to do in an emergency
10
6
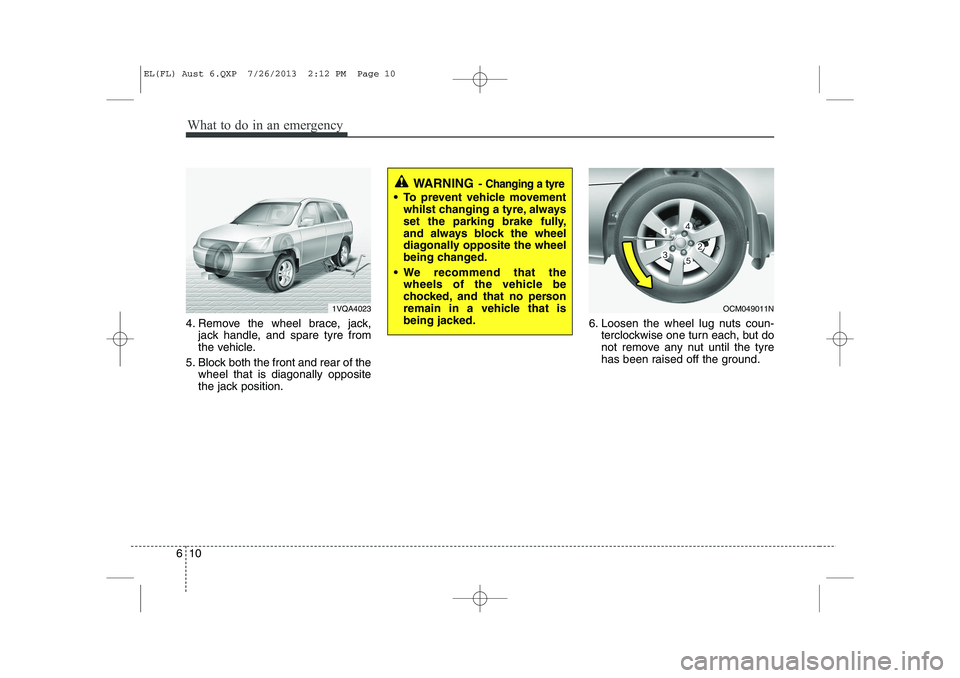
4. Remove the wheel brace, jack,
jack handle, and spare tyre from
the vehicle.
5. Block both the front and rear of the wheel that is diagonally opposite
the jack position. 6. Loosen the wheel lug nuts coun-
terclockwise one turn each, but do
not remove any nut until the tyre
has been raised off the ground.
WARNING - Changing a tyre
To prevent vehicle movement
whilst changing a tyre, always
set the parking brake fully,
and always block the wheel
diagonally opposite the wheel
being changed.
We recommend that the wheels of the vehicle be
chocked, and that no person
remain in a vehicle that is
being jacked.
1VQA4023OCM049011N
EL(FL) Aust 6.QXP 7/26/2013 2:12 PM Page 10
Page 291 of 1534
615
What to do in an emergency
When towing your vehicle in an emer- gency without wheel dollies :
1. Set the ignition switch in the ACC posi-tion.
2. Place the transaxle shift lever in N (Neutral).
3. Release the parking brake.
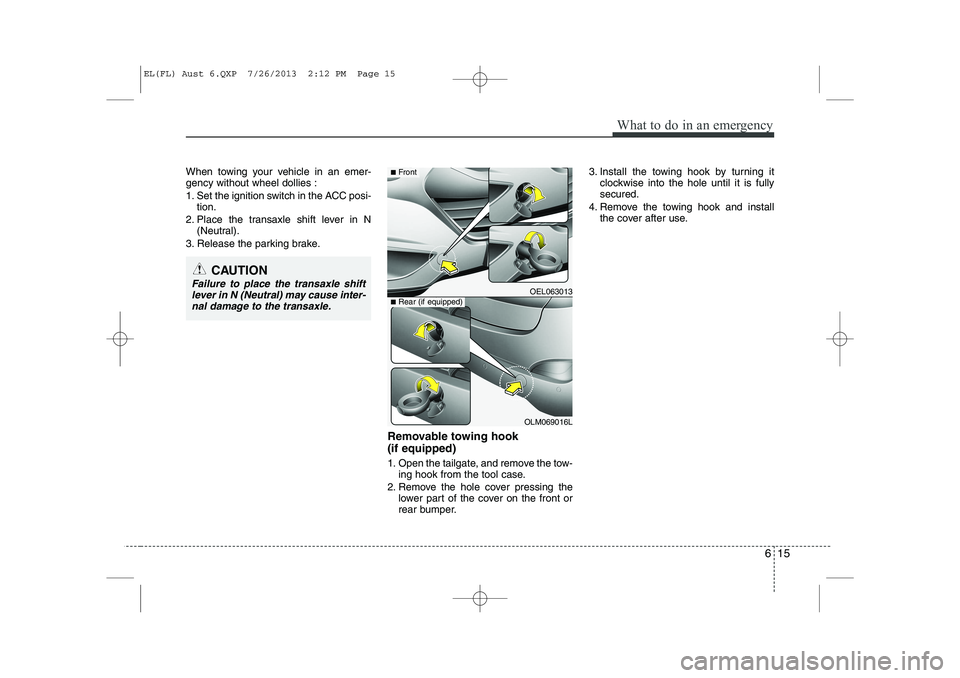
Removable towing hook (if equipped)
1. Open the tailgate, and remove the tow-ing hook from the tool case.
2. Remove the hole cover pressing the lower part of the cover on the front or
rear bumper. 3. Install the towing hook by turning it
clockwise into the hole until it is fullysecured.
4. Remove the towing hook and install the cover after use.
CAUTION
Failure to place the transaxle shift
lever in N (Neutral) may cause inter-
nal damage to the transaxle.OEL063013
OLM069016L
■ Front
■Rear (if equipped)
EL(FL) Aust 6.QXP 7/26/2013 2:12 PM Page 15
Page 333 of 1534
739
Maintenance
Battery recharging
Your vehicle has a maintenance-free,
calcium-based battery.
If the battery becomes discharged in ashort time (because, for example, the
headlights or interior lights were left on
whilst the vehicle was not in use),
recharge it by slow charging (trickle)
for 10 hours.
If the battery gradually discharges because of high electric load whilst the
vehicle is being used, recharge it at 20-
30A for two hours. Reset items
Items should be reset after the battery
has been discharged or the battery hasbeen disconnected.
Auto up/down window (See section 4)
Sunroof (See section 4)
Trip computer (See section 4)
Climate control system
(See section 4)
Clock (See section 4)
Audio (See section 4)(Continued)
Before performing maintenance or recharging the battery, turn off all accessories and stop the
engine.
The negative battery cable must be removed first and installed
last when the battery is discon-nected.WARNING - Recharging
battery
When recharging the battery,
observe the following precautions:
The battery must be removed from the vehicle and placed in an area with good ventilation.
Do not allow cigarettes, sparks, or flame near the battery.
Watch the battery during charg- ing, and stop or reduce the charg-
ing rate if the battery cells begin
gassing (boiling) violently or if
the temperature of the electrolyte
of any cell exceeds 49°C (120°F).
Wear eye protection when check- ing the battery during charging.
Disconnect the battery charger in the following order.
1. Turn off the battery charger main switch.
2. Unhook the negative clamp from the negative battery ter- minal.
3. Unhook the positive clamp from the positive battery termi-nal.
(Continued)
EL(FL) Aust 7.QXP 7/26/2013 2:24 PM Page 39
Page 631 of 1534
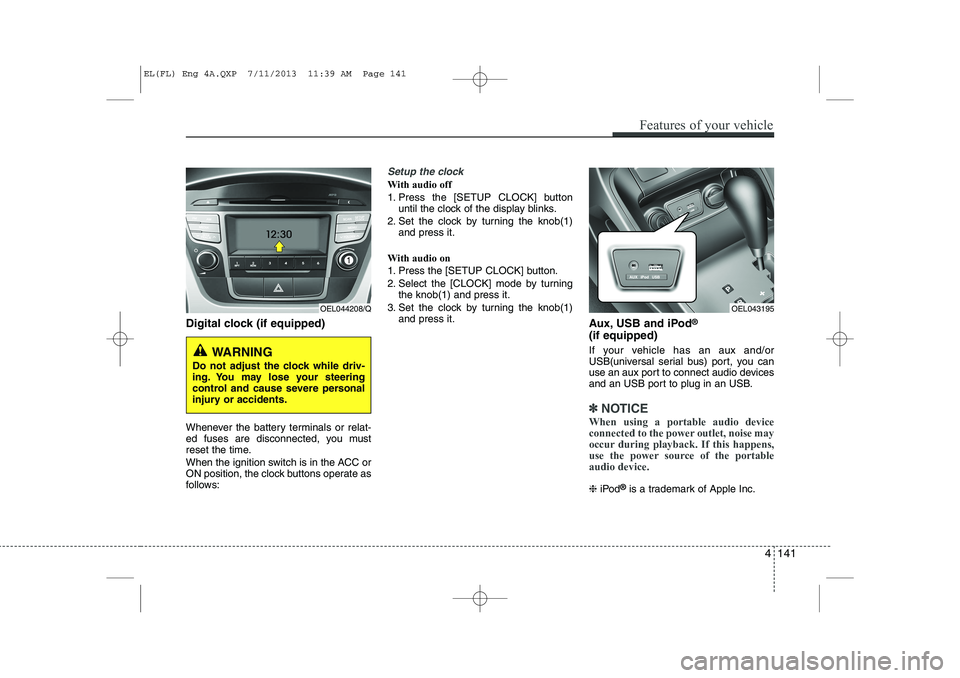
Digital clock (if equipped)
Whenever the battery terminals or relat-
ed fuses are disconnected, you must
reset the time.
When the ignition switch is in the ACC or
ON position, the clock buttons operate as
follows:
Setup the clock
With audio off
1. Press the [SETUP CLOCK] buttonuntil the clock of the display blinks.
2. Set the clock by turning the knob(1) and press it.
With audio on
1. Press the [SETUP CLOCK] button.
2. Select the [CLOCK] mode by turning the knob(1) and press it.
3. Set the clock by turning the knob(1) and press it. Aux, USB and iPod®
(if equipped)
If your vehicle has an aux and/or
USB(universal serial bus) port, you can
use an aux port to connect audio devices
and an USB port to plug in an USB.
✽✽ NOTICE
When using a portable audio device
connected to the power outlet, noise may
occur during playback. If this happens,
use the power source of the portableaudio device.
❈ iPod ®
is a trademark of Apple Inc.
Features of your vehicle
141
4
OEL044208/Q
WARNING
Do not adjust the clock while driv-
ing. You may lose your steering
control and cause severe personal
injury or accidents.
OEL043195
EL(FL) Eng 4A.QXP 7/11/2013 11:39 AM Page 141
Page 648 of 1534
Features of your vehicle
158
4
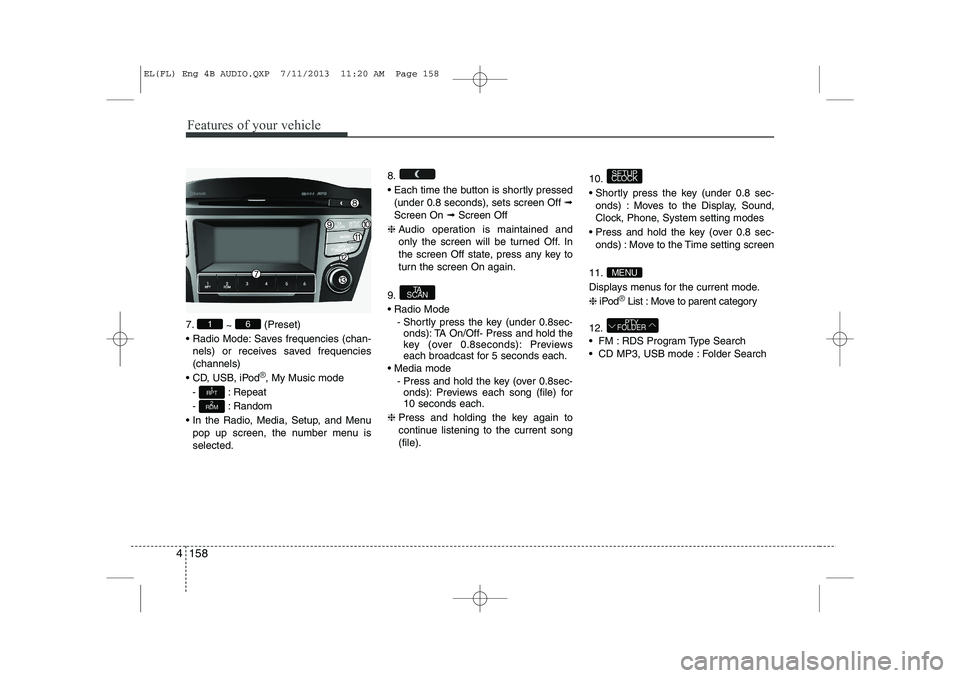
7.
~ (Preset)
Radio Mode: Saves frequencies (chan- nels) or receives saved frequencies (channels)
CD, USB, iPod
®, My Music mode
- : Repeat
- : Random
In the Radio, Media, Setup, and Menu pop up screen, the number menu is selected. 8.
Each time the button is shortly pressed
(under 0.8 seconds), sets screen Off ➟
Screen On ➟Screen Off
❈ Audio operation is maintained and
only the screen will be turned Off. In
the screen Off state, press any key to
turn the screen On again.
9. Radio Mode - Shortly press the key (under 0.8sec-onds): TA On/Off- Press and hold the
key (over 0.8seconds): Previews
each broadcast for 5 seconds each.
Media mode - Press and hold the key (over 0.8sec-onds): Previews each song (file) for10 seconds each.
❈ Press and holding the key again to
continue listening to the current song(file). 10.
Shortly press the key (under 0.8 sec-
onds) : Moves to the Display, Sound,
Clock, Phone, System setting modes
Press and hold the key (over 0.8 sec- onds) : Move to the Time setting screen
11.
Displays menus for the current mode.❈ iPod
®List : Move to parent category
12.
FM : RDS Program Type Search
CD MP3, USB mode : Folder Search
PTY
FOLDER
MENU
SETUP
CLOCK
TA
SCAN
2
RDM
1
RPT
61
EL(FL) Eng 4B AUDIO.QXP 7/11/2013 11:20 AM Page 158
Page 650 of 1534
![HYUNDAI IX35 2014 Owners Manual Features of your vehicle
160
4
SETUP
- AC100ELEE, AC110ELEE
Display Settings
Press the key Select [Display]
through TUNE knob or key
Select menu through TUNE knob Mode Pop up
[Mode Pop up] HYUNDAI IX35 2014 Owners Manual Features of your vehicle
160
4
SETUP
- AC100ELEE, AC110ELEE
Display Settings
Press the key Select [Display]
through TUNE knob or key
Select menu through TUNE knob Mode Pop up
[Mode Pop up]](/img/35/56237/w960_56237-649.png)
Features of your vehicle
160
4
SETUP
- AC100ELEE, AC110ELEE
Display Settings
Press the key Select [Display]
through TUNE knob or key
Select menu through TUNE knob Mode Pop up
[Mode Pop up] Changes . selec- tion mode
During On state, press the or
key to display the mode
change pop up screen.
When the pop up screen is displayed, use the TUNE knob or keys
~ to select the desired mode.
Scroll text
[Scroll text] Set /
: Maintains scroll
: Scrolls only one (1) time.
Song Info
When playing an MP3 file, select the
desired display info from ‘Folder/File’ or
‘Album/Artist/Song’. Sound Settings
Press the key Select [Sound]
through TUNE knob or key
Select menu through TUNE knob
2
RDM
SETUP
CLOCK
Off
On
OffOn
6
1
MEDIA
RADIO
On
1
RPT
SETUP
CLOCK
EL(FL) Eng 4B AUDIO.QXP 7/11/2013 11:20 AM Page 160
Page 652 of 1534
![HYUNDAI IX35 2014 Owners Manual Features of your vehicle
162
4
Clock Settings
Press the key Select [Clock]
through TUNE knob or key
Select menu through TUNE knob Clock Settings
This menu is used to set the time.
Select [Cloc HYUNDAI IX35 2014 Owners Manual Features of your vehicle
162
4
Clock Settings
Press the key Select [Clock]
through TUNE knob or key
Select menu through TUNE knob Clock Settings
This menu is used to set the time.
Select [Cloc](/img/35/56237/w960_56237-651.png)
Features of your vehicle
162
4
Clock Settings
Press the key Select [Clock]
through TUNE knob or key
Select menu through TUNE knob Clock Settings
This menu is used to set the time.
Select [Clock Settings] Set through
TUNE knob Press TUNE knob ❈
Adjust the number currently in focus to set the [hour] and press the tune knob
to set the [minute]. Day Settings
This menu is used to set the date.
Select [Day Settings] Set through
TUNE knob Press TUNE knob
❈ Adjust the number currently in focus to
make the settings and press the tune
knob to move to the next setting. (Set
in order of Year/Month/Day)
3
SETUP
CLOCK
EL(FL) Eng 4B AUDIO.QXP 7/11/2013 11:20 AM Page 162
Page 653 of 1534
![HYUNDAI IX35 2014 Owners Manual 4 163
Features of your vehicle
Time Format This function is used to set the 12/24
hour time format of the audio system.
Select [Time Format] Set 12Hr / 24Hr
through TUNE knob
Clock Display when Po HYUNDAI IX35 2014 Owners Manual 4 163
Features of your vehicle
Time Format This function is used to set the 12/24
hour time format of the audio system.
Select [Time Format] Set 12Hr / 24Hr
through TUNE knob
Clock Display when Po](/img/35/56237/w960_56237-652.png)
4 163
Features of your vehicle
Time Format This function is used to set the 12/24
hour time format of the audio system.
Select [Time Format] Set 12Hr / 24Hr
through TUNE knob
Clock Display when Power is OFF
Select [Clock Disp.(Pwr Off) Set /through TUNE knob
: Displays time/date on screen
: Turn off. Automatic RDS Time This option is used to automatically set
the time by synchronizing with RDS.
Select [Automatic RDS Time] Set
/ through TUNE
knob
: Turn on Automatic Time
: Turn off.
Off
On
Off
On
Off
On
Off
On
EL(FL) Eng 4B AUDIO.QXP 7/11/2013 11:20 AM Page 163
Page 654 of 1534
![HYUNDAI IX35 2014 Owners Manual Features of your vehicle
164
4
Phone Setup (if eqipped)
Press the key Select [Phone] Pair Phone
Select [Pair Phone] Set through TUNE knob ➀
Search for device names as displayed
on your mobil HYUNDAI IX35 2014 Owners Manual Features of your vehicle
164
4
Phone Setup (if eqipped)
Press the key Select [Phone] Pair Phone
Select [Pair Phone] Set through TUNE knob ➀
Search for device names as displayed
on your mobil](/img/35/56237/w960_56237-653.png)
Features of your vehicle
164
4
Phone Setup (if eqipped)
Press the key Select [Phone] Pair Phone
Select [Pair Phone] Set through TUNE knob ➀
Search for device names as displayed
on your mobile phone and connect.
➁ Input the passkey displayed on the
screen. (Passkey : 0000)
❈ The device name and passkey will be
displayed on the screen for up to 3
minutes. If pairing is not completed
within the 3 minutes, the mobile phone
pairing process will automatically becanceled. ➂
Pairing completion is displayed.
❈ In some mobile phones, pairing will
automatically be followed by connec-tion.
❈ It is possible to pair up to five
Bluetooth®Wireless Technology
enabled mobile phones.
SETUP
CLOCKCAUTION
To pair a Bluetooth®Wireless
Technology enabled mobile phone, authentication and connection processes are first required. As aresult, you cannot pair your mobile
phone while driving the vehicle.First park your vehicle before use.
EL(FL) Eng 4B AUDIO.QXP 7/11/2013 11:20 AM Page 164