Hyundai Kona 2018 Owner's Manual
Manufacturer: HYUNDAI, Model Year: 2018, Model line: Kona, Model: Hyundai Kona 2018Pages: 523, PDF Size: 33.6 MB
Page 111 of 523
3-28
Convenient features of your vehicle
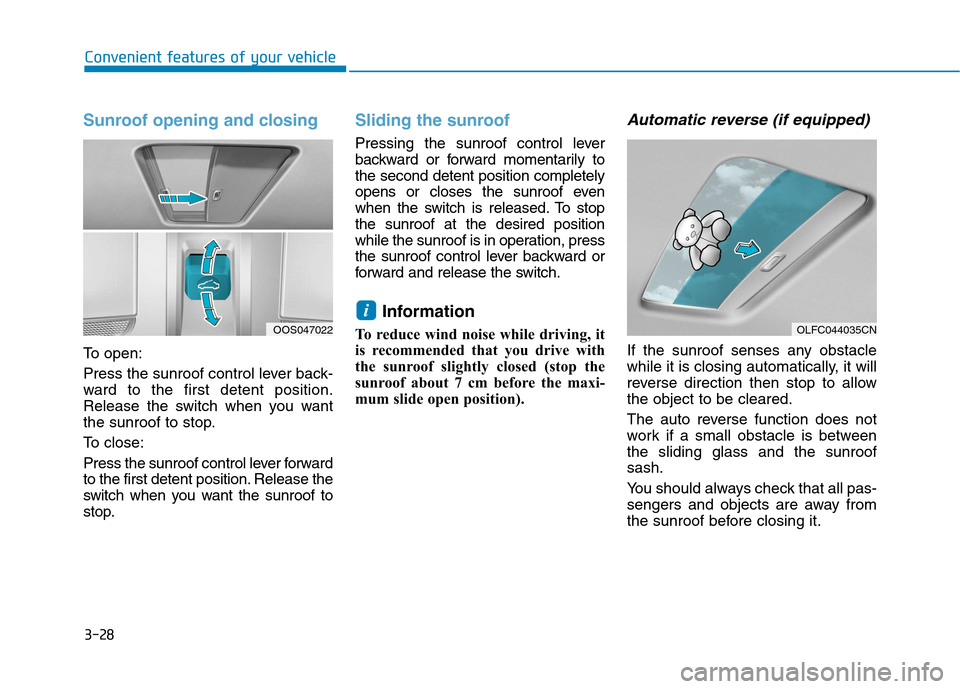
Sunroof opening and closing
To open:
Press the sunroof control lever back-
ward to the first detent position.
Release the switch when you want
the sunroof to stop.
To close:
Press the sunroof control lever forward
to the first detent position. Release the
switch when you want the sunroof to
stop.
Sliding the sunroof
Pressing the sunroof control lever
backward or forward momentarily tothe second detent position completely
opens or closes the sunroof even
when the switch is released. To stopthe sunroof at the desired position
while the sunroof is in operation, press
the sunroof control lever backward or
forward and release the switch.Information
To reduce wind noise while driving, it
is recommended that you drive with
the sunroof slightly closed (stop the
sunroof about 7 cm before the maxi-
mum slide open position).
Automatic reverse (if equipped)
If the sunroof senses any obstacle
while it is closing automatically, it will
reverse direction then stop to allowthe object to be cleared.
The auto reverse function does not
work if a small obstacle is betweenthe sliding glass and the sunroofsash.
You should always check that all pas-
sengers and objects are away from
the sunroof before closing it.
i
OLFC044035CNOOS047022
Page 112 of 523
3-29
Convenient features of your vehicle
3
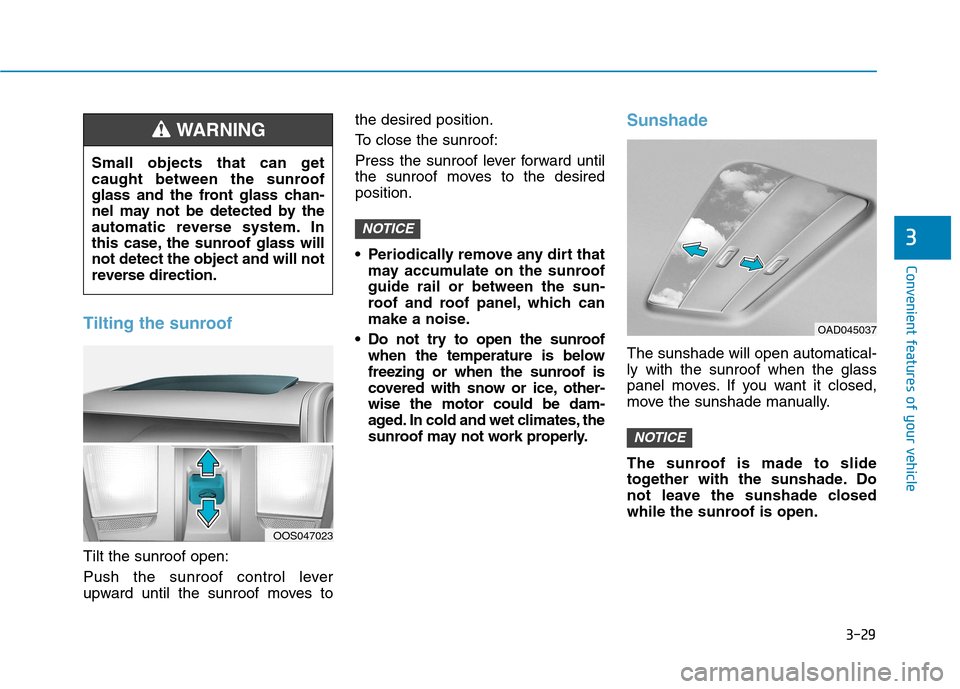
Tilting the sunroof
Tilt the sunroof open:
Push the sunroof control lever
upward until the sunroof moves tothe desired position.
To close the sunroof:
Press the sunroof lever forward until
the sunroof moves to the desiredposition.
Periodically remove any dirt that
may accumulate on the sunroof guide rail or between the sun-
roof and roof panel, which can
make a noise.
Do not try to open the sunroof when the temperature is below
freezing or when the sunroof is
covered with snow or ice, other-wise the motor could be dam-
aged. In cold and wet climates, the
sunroof may not work properly.
Sunshade
The sunshade will open automatical- ly with the sunroof when the glass
panel moves. If you want it closed,
move the sunshade manually.
The sunroof is made to slide
together with the sunshade. Do
not leave the sunshade closed
while the sunroof is open.
NOTICE
NOTICE
OAD045037
OOS047023
Small objects that can get
caught between the sunroof
glass and the front glass chan-
nel may not be detected by the
automatic reverse system. In
this case, the sunroof glass willnot detect the object and will not
reverse direction.
WARNING
Page 113 of 523
3-30
Convenient features of your vehicle
Resetting the sunroof
The sunroof may need to be reset if
the following conditions occur:
- The battery is discharged or dis-connected or the sunroof fuse has been replaced or disconnected
- The sunroof control lever is not operating correctly
To reset the sunroof, perform the fol-
lowing steps:
1. Place the ignition switch to the ON position or start the engine. It is recommended to reset the sunroof
while the engine is running.
2. Push the control lever forward. The sunroof will close completely or tiltdepending on the condition of the
sunroof.
3. Release the control lever until the sunroof does not move.
4. Push the control lever forward about 10 seconds.
- When the sunroof is in the close position :
The glass will tilt and slightly move up and down. - When the sunroof is in the tilt
position:
The glass will slightly move up and down.
Do not release the lever until the
operation is completed.
If you release the lever during opera-
tion, try again from step 2.
5. Within 3 seconds, push the control lever forward until the sunroof
operates as follows:
Tilt down �Slide Open �Slide
Close.
Do not release the lever until the
operation is completed.
If you release the lever during opera-
tion, try again from step 2.
6. Release the sunroof control lever after all operation has completed. (The sunroof system has beenreset.) Information
If the sunroof does not reset when the vehicle battery is disconnected
or discharged, or related fuse is
blown, the sunroof may not operate
normally.
For more detailed information, we recommend that you contact an
authorized HYUNDAI dealer.
Sunroof open warning (if equipped)
If the driver turns off the engine whenthe sunroof is not fully closed, the
warning chime will sound for approx-imately 3 seconds and the open sun-
roof warning appear on the LCD dis-
play.
If the driver turns off the engine and opens the door when the sunroof isnot fully closed, the open sunroof
warning will appear on the LCD dis-
play until the door is closed or thesunroof is fully closed.
Close the sunroof securely when leav-
ing your vehicle.
i
Page 114 of 523
3-31
Convenient features of your vehicle
3
EEXX TTEERR IIOO RR FF EE AA TTUU RREESS
Hood
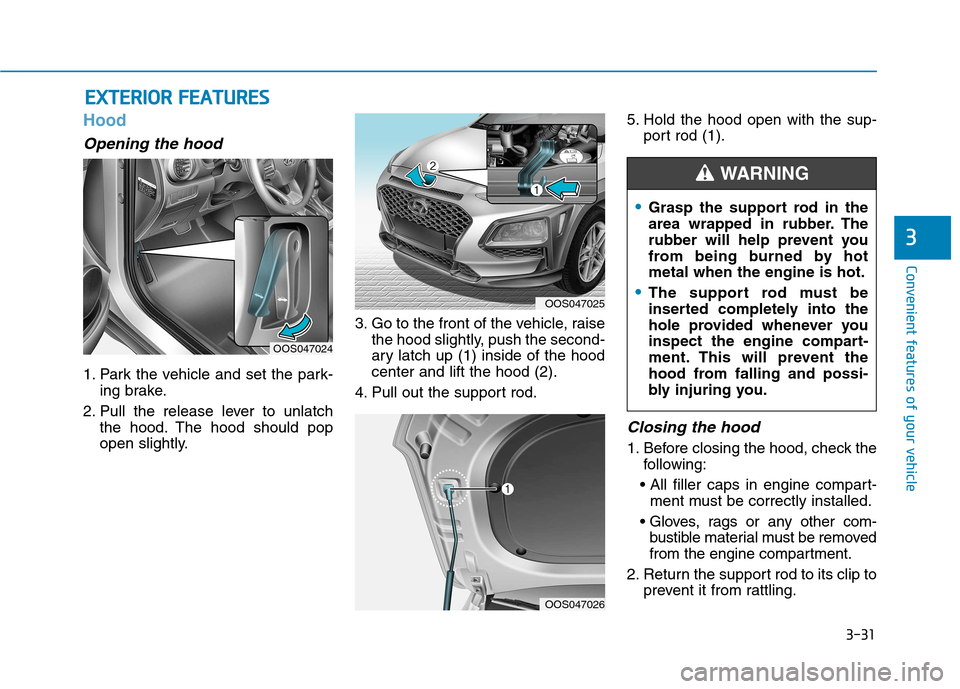
Opening the hood
1. Park the vehicle and set the park-
ing brake.
2. Pull the release lever to unlatch the hood. The hood should pop
open slightly. 3. Go to the front of the vehicle, raise
the hood slightly, push the second-
ary latch up (1) inside of the hoodcenter and lift the hood (2).
4. Pull out the support rod. 5. Hold the hood open with the sup-
port rod (1).
Closing the hood
1. Before closing the hood, check thefollowing:
ment must be correctly installed.
bustible material must be removed
from the engine compartment.
2. Return the support rod to its clip to prevent it from rattling.
OOS047024
OOS047025
Grasp the support rod in the
area wrapped in rubber. The
rubber will help prevent you
from being burned by hotmetal when the engine is hot.
The support rod must be
inserted completely into the
hole provided whenever you
inspect the engine compart-
ment. This will prevent the
hood from falling and possi-
bly injuring you.
WARNING
OOS047026
Page 115 of 523
3-32
Convenient features of your vehicle
3. Lower the hood halfway (liftedapproximately 30cm from the
closed position) and push down to
securely lock in place. Then double
check to be sure the hood is secure.
If the hood can be raised slightly, it is
not securely locked. Open it again
and close it with more force.
Tailgate
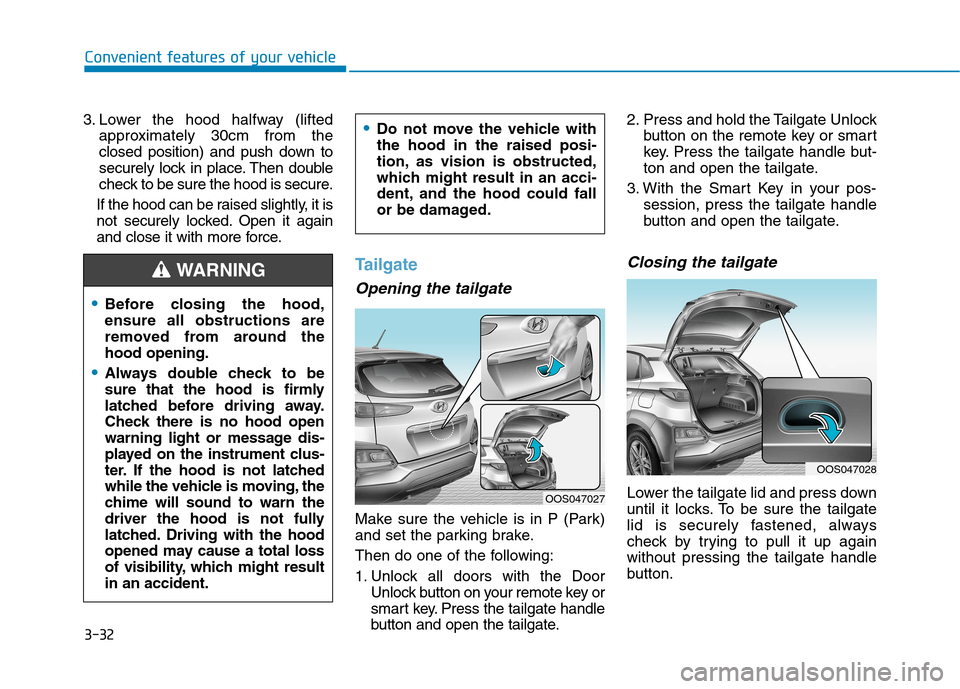
Opening the tailgate
Make sure the vehicle is in P (Park)
and set the parking brake.
Then do one of the following:
1. Unlock all doors with the Door Unlock button on your remote key or
smart key. Press the tailgate handle
button and open the tailgate. 2. Press and hold the Tailgate Unlock
button on the remote key or smart
key. Press the tailgate handle but-
ton and open the tailgate.
3. With the Smart Key in your pos- session, press the tailgate handle
button and open the tailgate.
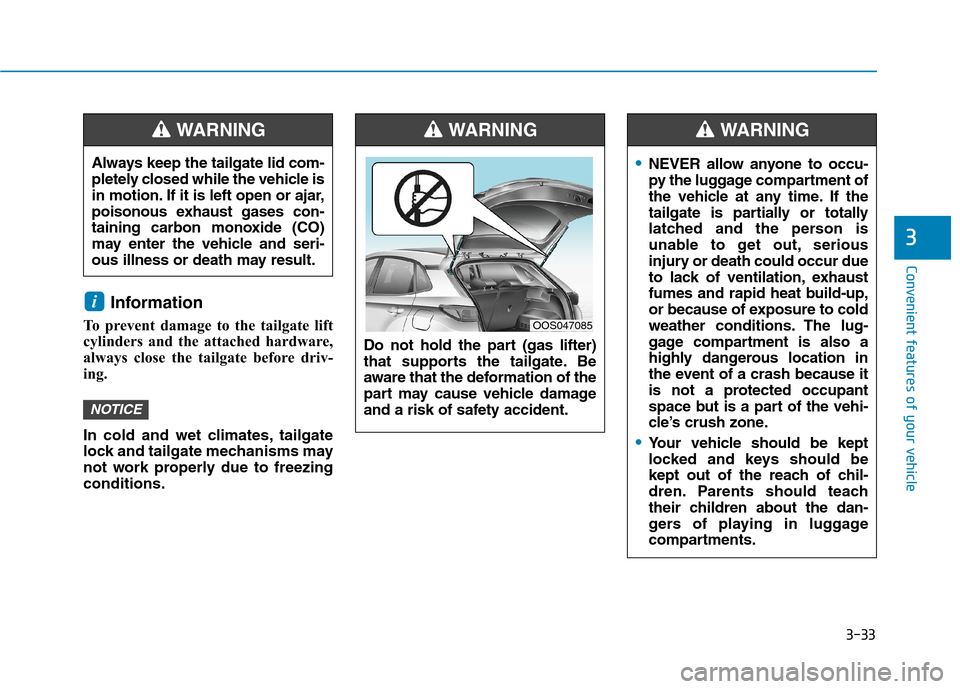
Closing the tailgate
Lower the tailgate lid and press down
until it locks. To be sure the tailgate
lid is securely fastened, always
check by trying to pull it up againwithout pressing the tailgate handle
button.
Before closing the hood, ensure all obstructions are
removed from around thehood opening.
Always double check to be
sure that the hood is firmly
latched before driving away.
Check there is no hood open
warning light or message dis-
played on the instrument clus-
ter. If the hood is not latched
while the vehicle is moving, the
chime will sound to warn the
driver the hood is not fully
latched. Driving with the hood
opened may cause a total loss
of visibility, which might resultin an accident.
Do not move the vehicle with the hood in the raised posi-
tion, as vision is obstructed,
which might result in an acci-
dent, and the hood could fall
or be damaged.
WARNING
OOS047027
OOS047028
Page 116 of 523
3-33
Convenient features of your vehicle
3
Information
To prevent damage to the tailgate lift
cylinders and the attached hardware,
always close the tailgate before driv-
ing.
In cold and wet climates, tailgate
lock and tailgate mechanisms may
not work properly due to freezingconditions.
NOTICE
i
Always keep the tailgate lid com-
pletely closed while the vehicle is
in motion. If it is left open or ajar,
poisonous exhaust gases con-
taining carbon monoxide (CO)
may enter the vehicle and seri-
ous illness or death may result.
WARNING
Do not hold the part (gas lifter)
that supports the tailgate. Be
aware that the deformation of the
part may cause vehicle damage
and a risk of safety accident.
WARNING
OOS047085
NEVER allow anyone to occu-
py the luggage compartment of
the vehicle at any time. If the
tailgate is partially or totally
latched and the person is
unable to get out, serious
injury or death could occur due
to lack of ventilation, exhaust
fumes and rapid heat build-up,
or because of exposure to cold
weather conditions. The lug-
gage compartment is also a
highly dangerous location in
the event of a crash because it
is not a protected occupant
space but is a part of the vehi-
cle’s crush zone.
Your vehicle should be kept
locked and keys should be
kept out of the reach of chil-
dren. Parents should teach
their children about the dan-
gers of playing in luggage
compartments.
WARNING
Page 117 of 523
3-34
Convenient features of your vehicle
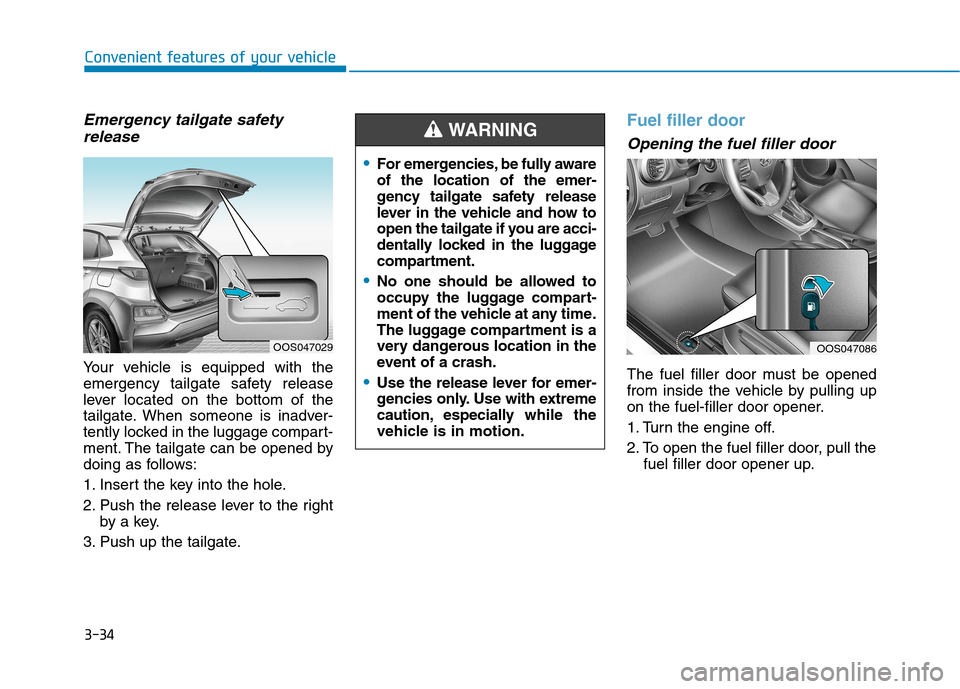
Emergency tailgate safetyrelease
Your vehicle is equipped with the
emergency tailgate safety release
lever located on the bottom of the
tailgate. When someone is inadver-
tently locked in the luggage compart-
ment. The tailgate can be opened by
doing as follows:
1. Insert the key into the hole.
2. Push the release lever to the right by a key.
3. Push up the tailgate.
Fuel filler door
Opening the fuel filler door
The fuel filler door must be opened
from inside the vehicle by pulling up
on the fuel-filler door opener.
1. Turn the engine off.
2. To open the fuel filler door, pull the fuel filler door opener up.
OOS047086OOS047029
For emergencies, be fully aware of the location of the emer-
gency tailgate safety release
lever in the vehicle and how to
open the tailgate if you are acci-
dentally locked in the luggage
compartment.
No one should be allowed to
occupy the luggage compart-
ment of the vehicle at any time.
The luggage compartment is a
very dangerous location in the
event of a crash.
Use the release lever for emer-
gencies only. Use with extreme
caution, especially while the
vehicle is in motion.
WARNING
Page 118 of 523
3-35
Convenient features of your vehicle
3
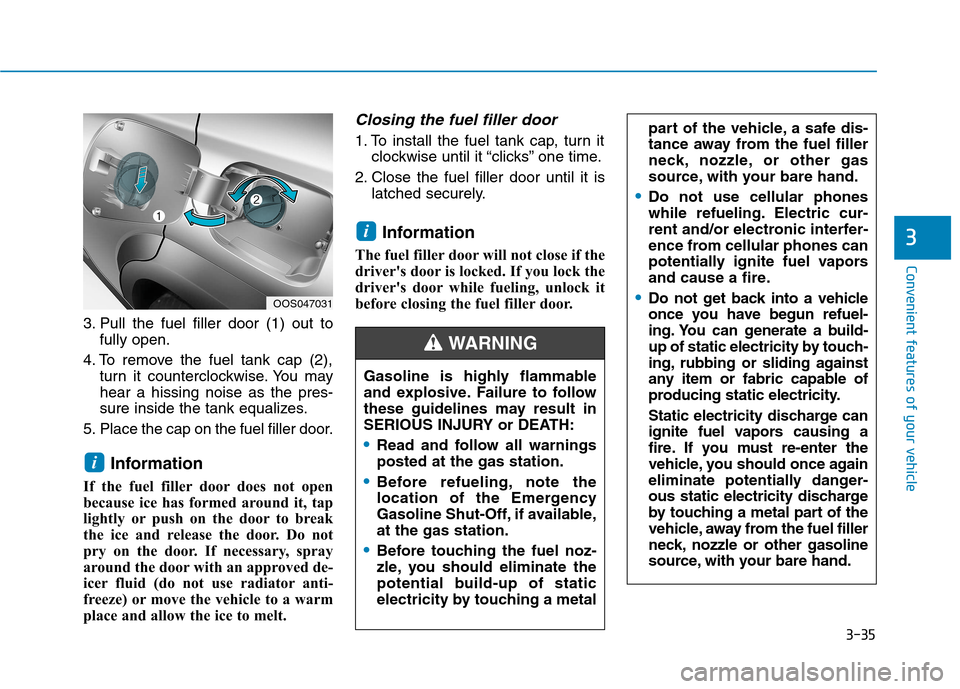
3. Pull the fuel filler door (1) out tofully open.
4. To remove the fuel tank cap (2), turn it counterclockwise. You may hear a hissing noise as the pres-
sure inside the tank equalizes.
5. Place the cap on the fuel filler door.
Information
If the fuel filler door does not open
because ice has formed around it, tap
lightly or push on the door to break
the ice and release the door. Do not
pry on the door. If necessary, spray
around the door with an approved de-
icer fluid (do not use radiator anti-
freeze) or move the vehicle to a warm
place and allow the ice to melt.
Closing the fuel filler door
1. To install the fuel tank cap, turn it clockwise until it “clicks” one time.
2. Close the fuel filler door until it is latched securely.
Information
The fuel filler door will not close if the
driver's door is locked. If you lock the
driver's door while fueling, unlock it
before closing the fuel filler door.
i
i
part of the vehicle, a safe dis-
tance away from the fuel filler
neck, nozzle, or other gas
source, with your bare hand.
Do not use cellular phones
while refueling. Electric cur-
rent and/or electronic interfer-
ence from cellular phones can
potentially ignite fuel vapors
and cause a fire.
Do not get back into a vehicle
once you have begun refuel-
ing. You can generate a build-
up of static electricity by touch-
ing, rubbing or sliding against
any item or fabric capable of
producing static electricity.
Static electricity discharge can
ignite fuel vapors causing a
fire. If you must re-enter the
vehicle, you should once again
eliminate potentially danger-
ous static electricity discharge
by touching a metal part of the
vehicle, away from the fuel filler
neck, nozzle or other gasoline
source, with your bare hand.OOS047031
Gasoline is highly flammable
and explosive. Failure to follow
these guidelines may result in
SERIOUS INJURY or DEATH:
Read and follow all warnings posted at the gas station.
Before refueling, note the
location of the Emergency
Gasoline Shut-Off, if available,at the gas station.
Before touching the fuel noz-
zle, you should eliminate the
potential build-up of static
electricity by touching a metal
WARNING
Page 119 of 523
3-36
Convenient features of your vehicle
Information
Make sure to refuel your vehicle
according to the "Fuel Requirements"
suggested in the Introduction chapter.
Do not spill fuel on the exterior surfaces of the vehicle. Any type of fuel spilled on painted sur-
faces may damage the paint.
If the fuel filler cap requires replacement, use only a genuine
HYUNDAI cap or the equivalent
specified for your vehicle. Anincorrect fuel filler cap canresult in a serious malfunctionof the fuel system or emission
control system.
NOTICE
iDo not use matches or a lighter and do not smoke or
leave a lit cigarette in your
vehicle while at a gas station,
especially during refueling.
Do not over-fill or top-off your
vehicle tank, which can cause
gasoline spillage.
If a fire breaks out during refu-
eling, leave the vicinity of the
vehicle, and immediately con-
tact the manager of the gasstation and then contact the
local fire department. Follow
any safety instructions they
provide.
If pressurized fuel sprays out,
it can cover your clothes or
skin and thus subject you to
the risk of fire and burns.
Always remove the fuel cap
carefully and slowly. If the cap
is venting fuel or if you hear a
hissing sound, wait until the
condition stops before com-
pletely removing the cap.
Always check that the fuel cap
is installed securely to prevent
fuel spillage in the event of anaccident.
When refueling, always move
the shift lever to the P (Park)
position (for dual clutch trans-
mission) or first gear or R
(Reverse, for manual transmis-
sion), set the parking brake, and
place the ignition switch to the
LOCK/OFF position. Sparks pro-
duced by electrical componentsrelated to the engine can ignite
fuel vapors causing a fire.
When using an approved
portable fuel container, be sureto place the container on the
ground prior to refueling. Static
electricity discharge from the
container can ignite fuel vapors
causing a fire. Once refueling
has begun, contact between
your bare hand and the vehicleshould be maintained until the
filling is complete.
Use only approved portable
plastic fuel containers designed
to carry and store gasoline.
Page 120 of 523
3-37
Convenient features of your vehicle
3
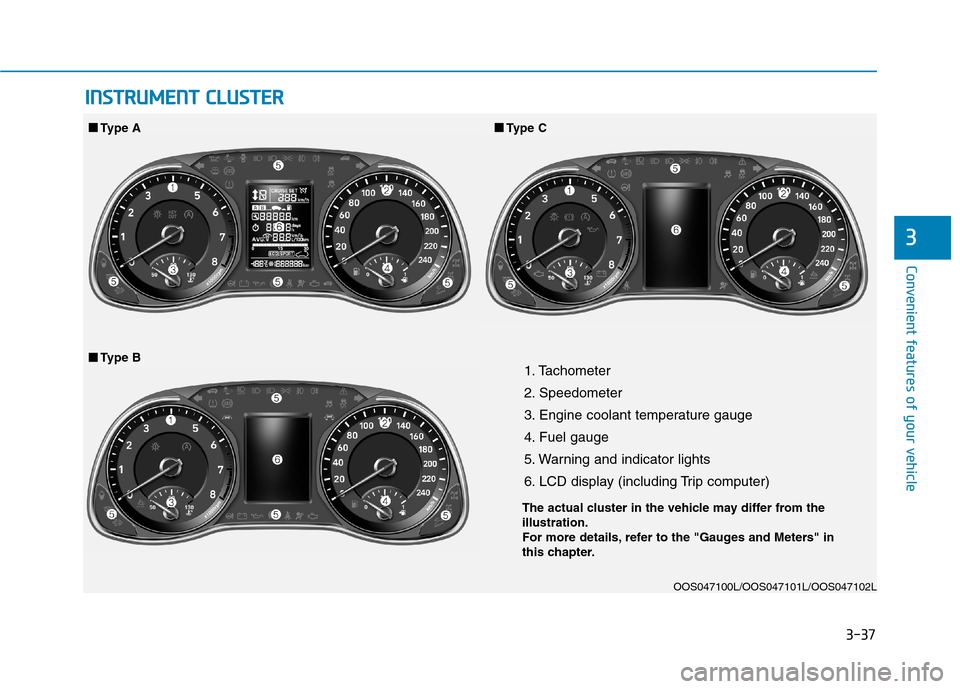
1. Tachometer
2. Speedometer
3. Engine coolant temperature gauge
4. Fuel gauge
5. Warning and indicator lights
6. LCD display (including Trip computer)OOS047100L/OOS047101L/OOS047102L
■■Type A ■■
Type C
■
■ Type B
IINN SSTT RR UU MM EENN TT CC LLUU SSTT EERR
The actual cluster in the vehicle may differ from the illustration.
For more details, refer to the "Gauges and Meters" in
this chapter.