check oil Hyundai Kona 2018 Owner's Guide
[x] Cancel search | Manufacturer: HYUNDAI, Model Year: 2018, Model line: Kona, Model: Hyundai Kona 2018Pages: 523, PDF Size: 33.6 MB
Page 446 of 523
7-34
Maintenance
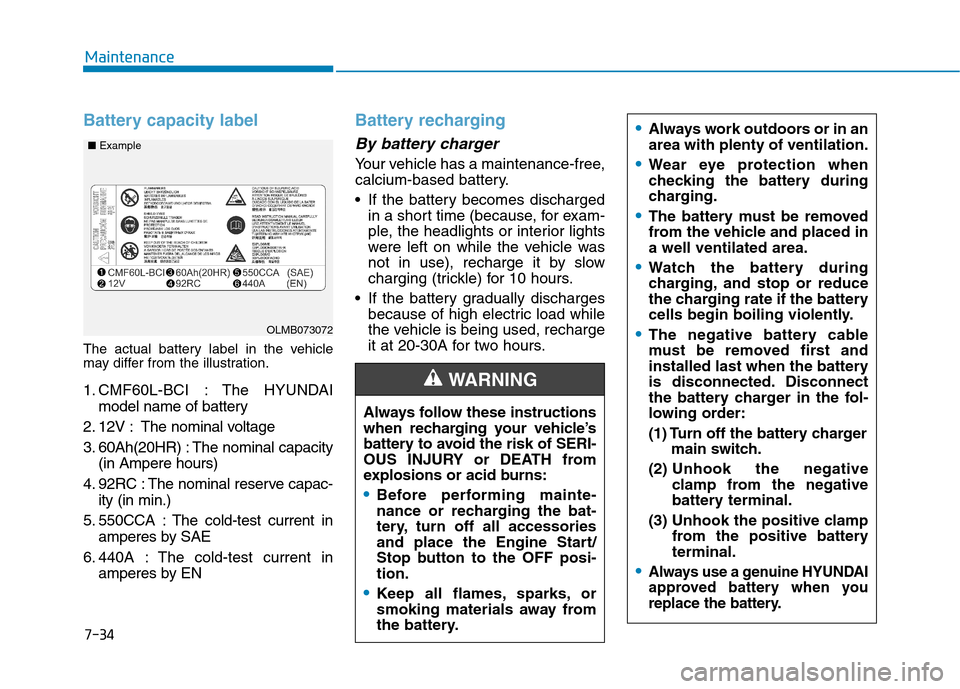
Battery capacity label
The actual battery label in the vehicle
may differ from the illustration.
1. CMF60L-BCI : The HYUNDAImodel name of battery
2. 12V : The nominal voltage
3. 60Ah(20HR) : The nominal capacity (in Ampere hours)
4. 92RC : The nominal reserve capac- ity (in min.)
5. 550CCA : The cold-test current in amperes by SAE
6. 440A : The cold-test current in amperes by EN
Battery recharging
By battery charger
Your vehicle has a maintenance-free,
calcium-based battery.
If the battery becomes dischargedin a short time (because, for exam-
ple, the headlights or interior lights
were left on while the vehicle was
not in use), recharge it by slow
charging (trickle) for 10 hours.
If the battery gradually discharges because of high electric load while
the vehicle is being used, recharge
it at 20-30A for two hours.
OLMB073072
■
Example
Always follow these instructions
when recharging your vehicle’s
battery to avoid the risk of SERI-
OUS INJURY or DEATH from
explosions or acid burns:
Before performing mainte-
nance or recharging the bat-
tery, turn off all accessories
and place the Engine Start/
Stop button to the OFF posi-tion.
Keep all flames, sparks, or
smoking materials away from
the battery.
WARNING
Always work outdoors or in an area with plenty of ventilation.
Wear eye protection when
checking the battery during
charging.
The battery must be removed
from the vehicle and placed ina well ventilated area.
Watch the battery during
charging, and stop or reduce
the charging rate if the battery
cells begin boiling violently.
The negative battery cable
must be removed first and
installed last when the battery
is disconnected. Disconnect
the battery charger in the fol-
lowing order:
(1) Turn off the battery chargermain switch.
(2) Unhook the negative
clamp from the negative
battery terminal.
(3) Unhook the positive clamp from the positive batteryterminal.
Always use a genuine HYUNDAI
approved battery when you
replace the battery.
Page 458 of 523
7-46
MaintenanceF
F UU SSEE SS
A vehicle’s electrical system is pro-
tected from electrical overload dam-
age by fuses.
This vehicle has 2 (or 3) fuse panels,
one located in the driver’s side panel
bolster, the other in the engine com-
partment.
If any of your vehicle’s lights, acces-
sories, or controls do not work, check
the appropriate circuit fuse. If a fuse
has blown, the element inside the
fuse will be melted or broken.
If the electrical system does not
work, first check the driver’s side
fuse panel. Before replacing a blown
fuse, turn the engine and all switches
off, and then disconnect the negative
battery cable. Always replace a
blown fuse with one of the same rat-ing.
If the replacement fuse blows, this indi-
cates an electrical problem. Avoid
using the system involved and immedi-
ately consult an authorized HYUNDAI
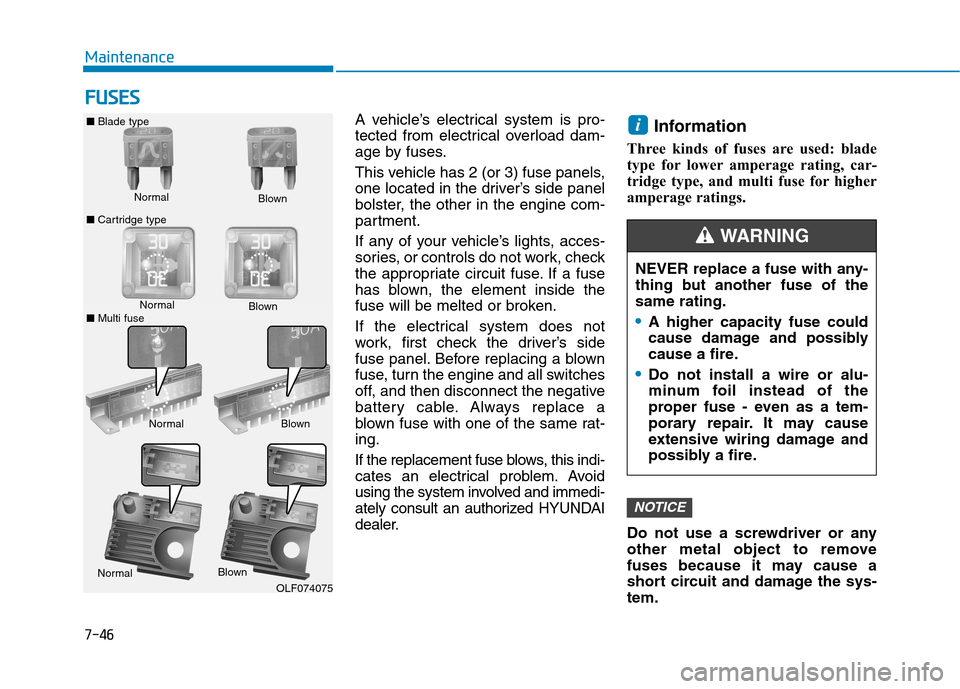
dealer. Information
Three kinds of fuses are used: blade
type for lower amperage rating, car-
tridge type, and multi fuse for higher
amperage ratings.
Do not use a screwdriver or any
other metal object to remove
fuses because it may cause a
short circuit and damage the sys-tem.
NOTICE
i
Normal
■
Blade type
■ Cartridge type Blown
Normal Blown
Normal Blown
OLF074075 NEVER replace a fuse with any-
thing but another fuse of thesame rating.
A higher capacity fuse could
cause damage and possibly
cause a fire.
Do not install a wire or alu-
minum foil instead of the
proper fuse - even as a tem-
porary repair. It may cause
extensive wiring damage and
possibly a fire.
WARNING
Normal
Blown
■ Multi fuse
Page 471 of 523
7-59
7
Maintenance
Fuse NameSymbolFuse RatingCircuit Protected
SENSOR2S210APCB Block (A/CON Relay), E/R Junction Block (RLY.9), Purge Control Solenoid Valve,
RCV Control Solenoid Valve, Oil Control Valve #1~#2
ECU2E210AECM
ECU1E120AECM
INJECTORINJECTOR15A-
SENSOR1S115AOxygen Sensor (Up), Oxygen Sensor (Down)
IGN COILIGN COIL20AIgnition Coil #1~#4
ECU3E315AECM
A/CON10APCB Block (A/CON Relay)
ECU5E510AECM
SENSOR4S415AVacuum Pump
ABS3310AESC Control Module, Multipurpose Check Connector
TCM2T215ATCM, Transaxle Range Switch
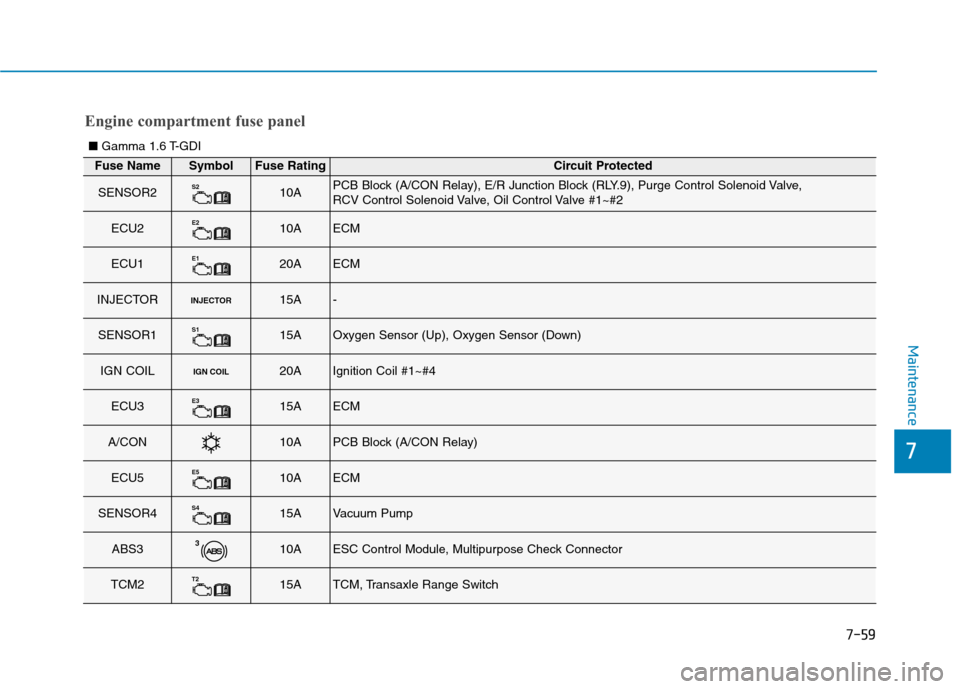
Engine compartment fuse panel
■ Gamma 1.6 T-GDI
Page 473 of 523
7-61
7
Maintenance
Fuse NameSymbolFuse RatingCircuit Protected
IGN COILIGN COIL20AIgnition Coil #1~#3
ECU3E315AECM
A/CON10APCB Block (A/CON Relay)
ECU5E510AECM
SENSOR4S415A-
ABS3310AMultipurpose Check Connector, ESC Control Module
TCM2T215A-
SENSOR3S310AE/R Junction Block (RLY.7)
ECU4E415AECM
H/LAMP10APCB Block (Head Lamp (High) Relay)
HORN15APCB Block (Horn Relay)
Page 478 of 523
7-66
Maintenance
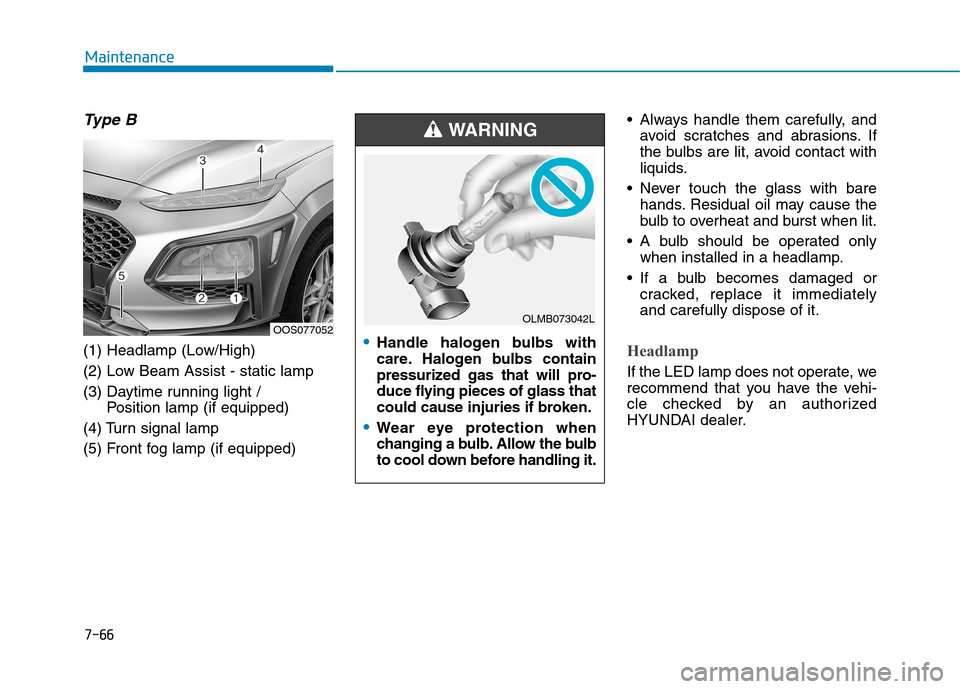
Type B
(1) Headlamp (Low/High)
(2) Low Beam Assist - static lamp
(3) Daytime running light / Position lamp (if equipped)
(4) Turn signal lamp
(5) Front fog lamp (if equipped) Always handle them carefully, and
avoid scratches and abrasions. If
the bulbs are lit, avoid contact with
liquids.
Never touch the glass with bare hands. Residual oil may cause the
bulb to overheat and burst when lit.
A bulb should be operated only when installed in a headlamp.
If a bulb becomes damaged or cracked, replace it immediatelyand carefully dispose of it.Headlamp
If the LED lamp does not operate, we
recommend that you have the vehi-
cle checked by an authorized
HYUNDAI dealer.
OOS077052Handle halogen bulbs with
care. Halogen bulbs contain
pressurized gas that will pro-
duce flying pieces of glass that
could cause injuries if broken.
Wear eye protection when
changing a bulb. Allow the bulb
to cool down before handling it.
WARNING
OLMB073042L
Page 494 of 523
7-82
Maintenance
vehicle, give particular attention to
the components under the fendersand other areas that are hidden
from view. Do a thorough job; just
dampening the accumulated mud
rather than washing it away will
accelerate corrosion rather than
prevent it. Water under high pres-
sure and steam are particularly
effective in removing accumulated
mud and corrosive materials.
When cleaning lower door panels, rocker panels and frame members,
be sure that drain holes are keptopen so that moisture can escape
and not be trapped inside to accel-
erate corrosion.
Keep your garage dry
Don't park your vehicle in a damp,
poorly ventilated garage. This cre-
ates a favorable environment for cor-
rosion. This is particularly true if you
wash your vehicle in the garage or
drive it into the garage when it is still
wet or covered with snow, ice or
mud. Even a heated garage can con-
tribute to corrosion unless it is well
ventilated so moisture is dispersed.
Keep paint and trim in good condition
Scratches or chips in the finish
should be covered with "touch-up"
paint as soon as possible to reduce
the possibility of corrosion. If bare
metal is showing through, the atten-tion of a qualified body and paintshop is recommended.
Bird droppings : Bird droppings are
highly corrosive and may damage
painted surfaces in just a few hours.
Always remove bird droppings as
soon as possible.
Don't neglect the interior
Moisture can collect under the floor
mats and vehicle peting to cause
corrosion. Check under the mats
periodically to be sure the carpeting
is dry. Use particular care if you carry
fertilizers, cleaning materials or
chemicals in the vehicle.
These should be carried only in
proper containers and any spills or
leaks should be cleaned up, flushed
with clean water and thoroughly
dried.
Interior care
Interior general precautions
Prevent chemicals such as perfume, cosmetic oil, sun cream, hand cleanerand air freshener from contacting the
interior parts because they may
cause damage or discoloration. If they
do contact the interior parts, wipe them
off immediately.
See the instructions that follow for
the proper way to clean vinyl.
Never allow water or other liquids to come in contact with electrical/elec-
tronic components inside the vehi-
cle as this may damage them.
When cleaning leather products
(steering wheel, seats etc.), use
neutral detergents or low alcohol
content solutions. If you use highalcohol content solutions or acid/
alkaline detergents, the color of
the leather may fade or the sur-
face may get stripped off.
NOTICE
NOTICE
Page 507 of 523
8-8
Specifications & Consumer information
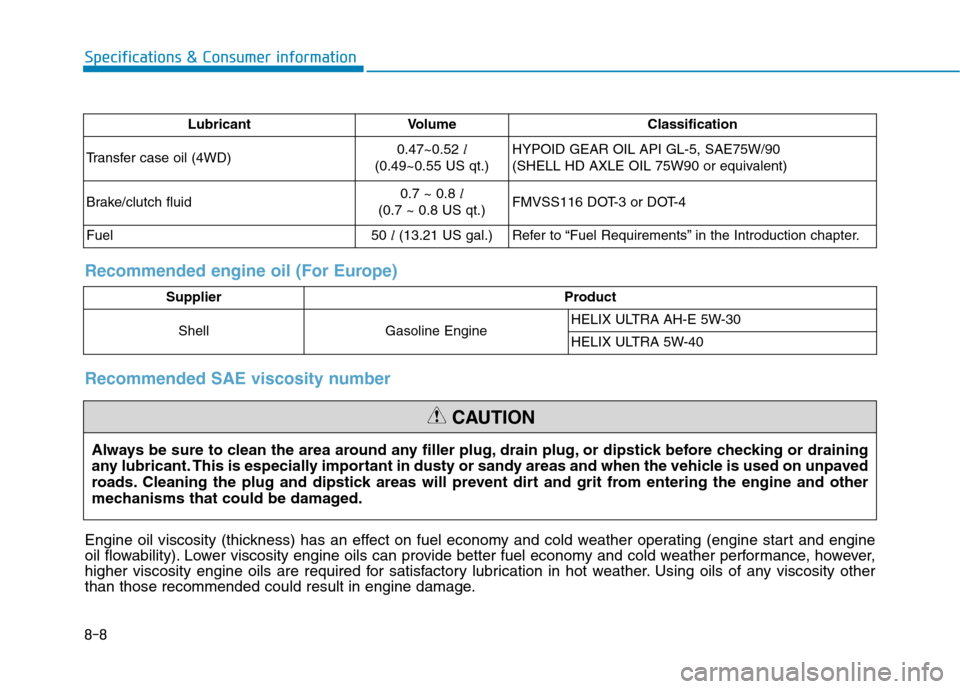
Lubricant Volume Classification
Transfer case oil (4WD) 0.47~0.52
l
(0.49~0.55 US qt.) HYPOID GEAR OIL API GL-5, SAE75W/90
(SHELL HD AXLE OIL 75W90 or equivalent)
Brake/clutch fluid 0.7 ~ 0.8
l
(0.7 ~ 0.8 US qt.) FMVSS116 DOT-3 or DOT-4
Fuel 50
l(13.21 US gal.)
Refer to “Fuel Requirements” in the Introduction chapter.
Recommended engine oil (For Europe)
Supplier Product
Shell Gasoline Engine HELIX ULTRA AH-E 5W-30
HELIX ULTRA 5W-40
Always be sure to clean the area around any filler plug, drain plug, or dipstick before checking or draining
any lubricant. This is especially important in dusty or sandy areas and when the vehicle is used on unpaved
roads. Cleaning the plug and dipstick areas will prevent dirt and grit from entering the engine and other
mechanisms that could be damaged.
CAUTION
Recommended SAE viscosity number
Engine oil viscosity (thickness) has an effect on fuel economy and cold weather operating (engine start and engine
oil flowability). Lower viscosity engine oils can provide better fuel economy and cold weather performance, however,
higher viscosity engine oils are required for satisfactory lubrication in hot weather. Using oils of any viscosity other
than those recommended could result in engine damage.