Tire Pressure Gauge Hyundai Kona 2018 Owner's Manual
[x] Cancel search | Manufacturer: HYUNDAI, Model Year: 2018, Model line: Kona, Model: Hyundai Kona 2018Pages: 523, PDF Size: 33.6 MB
Page 369 of 523
If you have a flat tire (with tire mobility kit)
- Type B ................................................................6-35Introduction ......................................................................6-35
Notes on the safe use of the Tire Mobility Kit.......6-36
Components of the Tire Mobility Kit .........................6-37
Using the Tire Mobility Kit............................................6-38
Distributing the sealant .................................................6-39
Checking the tire inflation pressure ..........................6-40
Towing ...................................................................6-41 Towing service .................................................................6-41
Removable towing hook ................................................6-42
Emergency towing ..........................................................6-43
Emergency commodity ........................................6-45 Fire extinguisher .............................................................6-45
First aid kit ........................................................................6-45
Triangle reflector ............................................................6-45
Tire pressure gauge .......................................................6-45
6
Page 379 of 523
6-12
What to do in an emergency
Changing a tire with TPMS
If you have a flat tire, the Low Tire
Pressure will come on. We recom-
mend that the flat tire be checked by
an authorized HYUNDAI dealer. Each wheel is equipped with a tire pressure sensor mounted inside the
tire behind the valve stem. You must
use TPMS specific wheels. It is rec-
ommended that you have your tires
serviced by an authorized HYUNDAI
dealer.
Even if you replace the low pressure
tire with the spare tire, the Low Tire
Pressure Telltale will blink or remain
on until the low pressure tire is
repaired and placed on the vehicle.After you replace the low pressure
tire with the spare tire, the Low Tire
Pressure Telltale may blink or illumi-
nate after a few minutes because theTPMS sensor mounted on the sparewheel is not initiated.
Once the low pressure tire is reinflat- ed to the recommended pressure
and installed on the vehicle or we
recommend that the TPMS sensormounted on the replaced spare
wheel be initiated by an authorized
HYUNDAI dealer, the TPMS mal-
function indicator and the low tire
pressure telltale will extinguish within
a few minutes of driving.
If the indicator is not extinguished
after a few minutes of driving, We rec-
ommend that the system be checked
by an authorized HYUNDAI dealer.
You may not be able to identify a low
tire by simply looking at it. Alwaysuse a good quality tire pressuregauge to measure the tire's inflation
pressure. Please note that a tire that
is hot (from being driven) will have ahigher pressure measurement than atire that is cold.
A cold tire means the vehicle has
been sitting for 3 hours and driven forless than 1 mile (1.6 km) in that 3
hour period.
Allow the tire to cool before measur-
ing the inflation pressure. Always be
sure the tire is cold before inflating to
the recommended pressure.
We recommend that you use the
sealant approved by HYUNDAI. The sealant on the tire pressure sensor and wheel shall be elem-
inated when you replace the tire
with a new one.
CAUTION
If original mounted tire is
replaced with the spare tire, theTPMS sensor on the replacedspare wheel should be initiatedand we recommend that theTPMS sensor on the original
mounted wheel be deactivated
by a HYUNDAI dealer.
If the TPMS sensor on the origi- nal mounted wheel located inthe spare tire carrier still acti-
vates, the tire pressure monitor-
ing system may not operate
properly. We recommend that
the system be serviced by an
authorized HYUNDAI dealer.
CAUTION
Page 381 of 523
6-14
What to do in an emergency
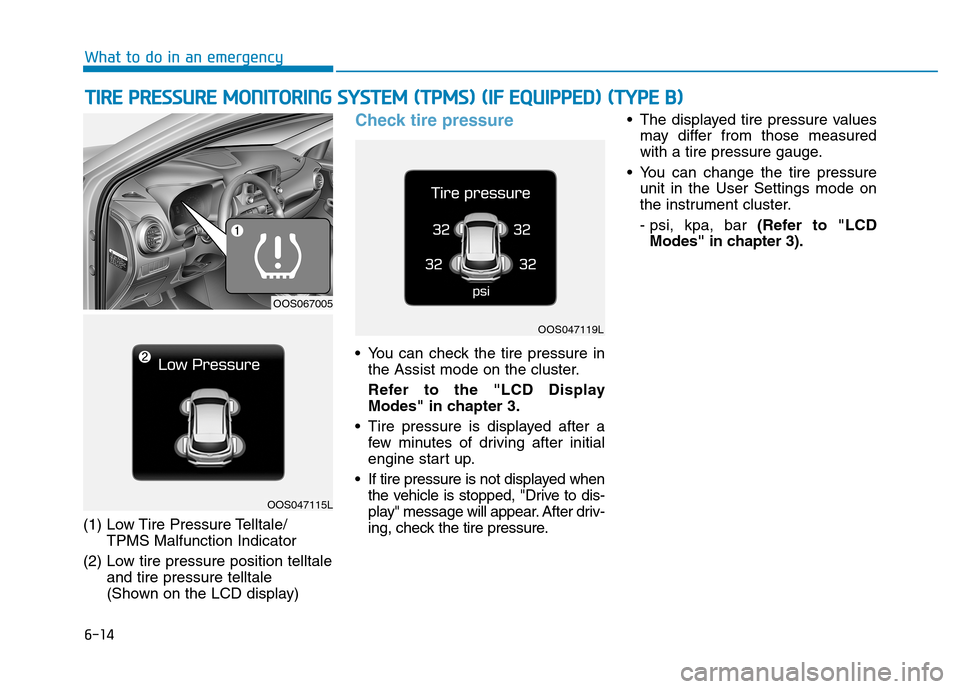
(1) Low Tire Pressure Telltale/TPMS Malfunction Indicator
(2) Low tire pressure position telltale and tire pressure telltale
(Shown on the LCD display)
Check tire pressure
You can check the tire pressure inthe Assist mode on the cluster.
Refer to the "LCD Display
Modes" in chapter 3.
Tire pressure is displayed after a few minutes of driving after initial
engine start up.
If tire pressure is not displayed when the vehicle is stopped, "Drive to dis-
play" message will appear. After driv-
ing, check the tire pressure. The displayed tire pressure values
may differ from those measured
with a tire pressure gauge.
You can change the tire pressure unit in the User Settings mode on
the instrument cluster.
- psi, kpa, bar (Refer to "LCD
Modes" in chapter 3).
TT IIRR EE PP RR EESSSSUU RREE MM OONNIITT OO RRIINN GG SS YY SSTT EEMM (( TT PP MM SS)) (( IIFF EE QQ UUIIPP PPEEDD )) (( TT YY PPEE BB ))
OOS067005
OOS047115L
OOS047119L
Page 385 of 523
6-18
What to do in an emergency
Changing a tire with TPMS
If you have a flat tire, the low Tire
Pressure and Position telltales will
come on. We recommend that the
system be checked by an authorized
HYUNDAI dealer. Each wheel is equipped with a tire pressure sensor mounted inside the
tire behind the valve stem. You must
use TPMS specific wheels. It is rec-
ommended that you have your tires
serviced by an authorized HYUNDAI
dealer.If you drive the vehicle for about 10
minutes at speeds above 25 km/h
after replacing the low pressure tire
with the spare tire, the below willhappen:
The TPMS malfunction indicator
may blink for approximately 1 minute
and then remain continuously illumi-
nated because the TPMS sensor isnot mounted on the spare wheel.
You may not be able identify a tire
with low pressure by simply looking
at it. Always use a good quality tirepressure gauge to measure the tire's
inflation pressure. Please note that a
tire that is hot (from being driven) will
have a higher pressure measure-ment than a tire that is cold (from sit-
ting stationary for at least 3 hour and
driven less than 1.6 km (1 mile) dur-
ing that 3 hour period).
Allow the tire to cool before measur-
ing the inflation pressure. Always be
sure the tire is cold before inflating to
the recommended pressure.
A cold tire means the vehicle has
been sitting for 3 hours and driven forless than 1.6 km (1 mile) in that 3
hour period.
The TPMS malfunction indica-
tor may blink for approximate-
ly 1 minute and then remain
continuously illuminated if
the vehicle is moving around
electric power supply cables
or radios transmitter such as
at police stations, government
and public offices, broadcast-
ing stations, military installa-
tions, airports, or transmitting
towers, etc. This can interferewith normal operation of theTire Pressure MonitoringSystem (TPMS).
The TPMS malfunction indica-
tor may blink for approximate-
ly
1 minute and then remain
continuously illuminated if
snow chains are used or
some separate electronic
devices such as notebook
computer, mobile charger,
remote starter or navigation
etc., are used in the vehicle.
This can interfere with normal
operation of the Tire PressureMonitoring System (TPMS).
CAUTION
NEVER use a puncture-repair-
ing agent to repair and/or inflate
a low pressure tire. The tire
sealant can damage the tire
pressure sensor. If used, you
will have to replace the tire
pressure sensor.
CAUTION
Page 391 of 523
6-24
What to do in an emergency
If you have a tire gauge, check the tire pressure (see "Tires and
Wheels" in chapter 8 for tire pressure
instructions.). If the pressure is lower
or higher than recommended, drive
slowly to the nearest service stationand adjust it to the recommended
pressure. Always reinstall the valve
cap after checking or adjusting tire
pressure. If the cap is not replaced,
air may leak from the tire. If you lose
a valve cap, buy another and install it
as soon as possible. After changing
tires, put the flat tire in its place and
return the jack and tools to their
proper storage locations.
Check the tire pressure as soonas possible after installing a
spare tire. Adjust it to the rec-
ommended pressure.
Check and tighten the wheel lug nuts after driving over 50 km if
tires are replaced. Re-check the
tire wheel lug nuts after driving
over 1,000 km. If any of the equipment such as the
jack, lug nuts, studs, or other equip-ment is damaged or in poor condi-tion, do not attempt to change the
tire and call for assistance.Use of compact spare tires
(if equipped)
Compact spare tires are designed for
emergency use only. Drive carefullyon the compact spare tire and
always follow the safety precautions.
NOTICE
Your vehicle has metric threads
on the studs and lug nuts. Make
certain during tire changing
that the same nuts that were
removed are reinstalled. If you
have to replace your lug nuts
make sure they have metric
threads to avoid damaging thestuds and ensure the wheel is
properly secured to the hub. We
recommend that you consult an
authorized HYUNDAI dealer for
assistance.
CAUTION
To prevent compact spare tire
failure and loss of control pos-
sibly resulting in an accident:
Use the compact spare tire
only in an emergency.
NEVER operate your vehicle
over 80 km/h (50 mph).
Do not exceed the vehicle’s
maximum load rating or the
load carrying capacity shown
on the sidewall of the com-
pact spare tire.
Do not use the compact spare
tire continuously. Repair orreplace the original tire as
soon as possible to avoid fail-
ure of the compact spare tire.
WARNING
Page 397 of 523
6-30
What to do in an emergency
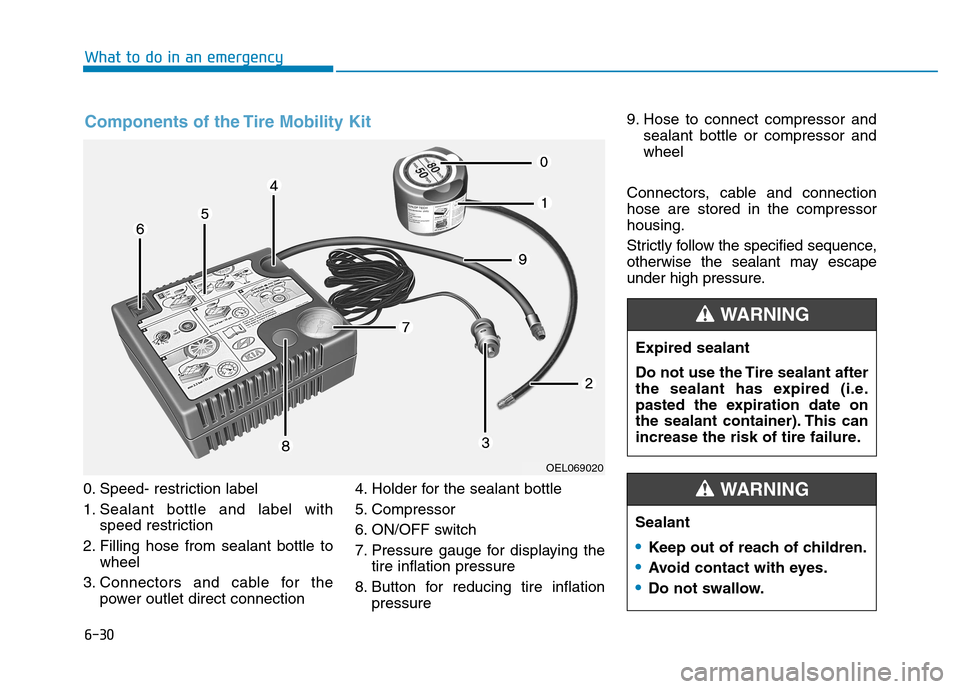
0. Speed- restriction label
1. Sealant bottle and label withspeed restriction
2. Filling hose from sealant bottle to wheel
3. Connectors and cable for the power outlet direct connection 4. Holder for the sealant bottle
5. Compressor
6. ON/OFF switch
7. Pressure gauge for displaying the
tire inflation pressure
8. Button for reducing tire inflation pressure 9. Hose to connect compressor and
sealant bottle or compressor and wheel
Connectors, cable and connectionhose are stored in the compressorhousing.
Strictly follow the specified sequence,
otherwise the sealant may escape
under high pressure.
Components of the Tire Mobility Kit
OEL069020 Expired sealant
Do not use the Tire sealant after
the sealant has expired (i.e.
pasted the expiration date on
the sealant container). This can
increase the risk of tire failure.
WARNING
Sealant
Keep out of reach of children.
Avoid contact with eyes.
Do not swallow.
WARNING
Page 401 of 523
6-34
What to do in an emergency
- To increase the inflation pres-sure : Switch on the compres-
sor, position I. To check the cur- rent inflation pressure setting,
briefly switch off the compressor.
- To reduce the inflation pres- sure: Press the button (8) on the
compressor.
Do not let the compressor run for
more than 10 minutes, otherwise
the device will overheat and may
be damaged. Information
The pressure gauge may show higher
than actual reading when the com-
pressor is running. To get an accurate
tire reading, the compressor needs to
be turned off. Information
When reinstalling the repaired or
replaced tire and wheel on the vehicle,
tighten the wheel lug nut to 11~13
kgf
Page 404 of 523
6-37
What to do in an emergency
6
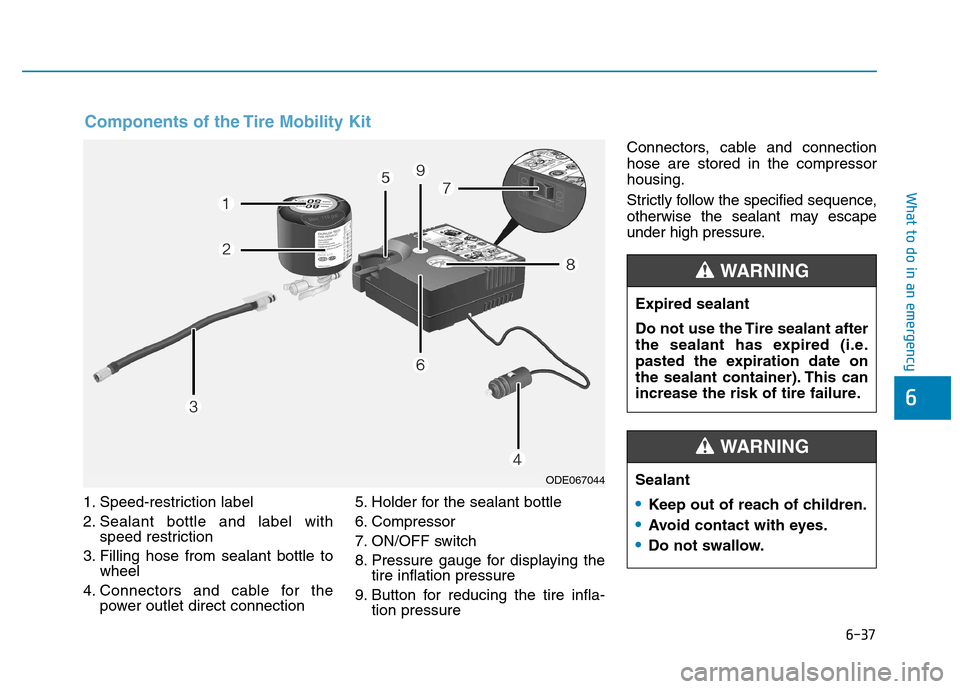
1. Speed-restriction label
2. Sealant bottle and label withspeed restriction
3. Filling hose from sealant bottle to wheel
4. Connectors and cable for the power outlet direct connection 5. Holder for the sealant bottle
6. Compressor
7. ON/OFF switch
8. Pressure gauge for displaying the
tire inflation pressure
9. Button for reducing the tire infla- tion pressure Connectors, cable and connection hose are stored in the compressorhousing.
Strictly follow the specified sequence,
otherwise the sealant may escape
under high pressure.
Components of the Tire Mobility Kit
ODE067044
Expired sealant
Do not use the Tire sealant after
the sealant has expired (i.e.
pasted the expiration date on
the sealant container). This can
increase the risk of tire failure.
WARNING
Sealant
Keep out of reach of children.
Avoid contact with eyes.
Do not swallow.
WARNING
Page 407 of 523
6-40
What to do in an emergency
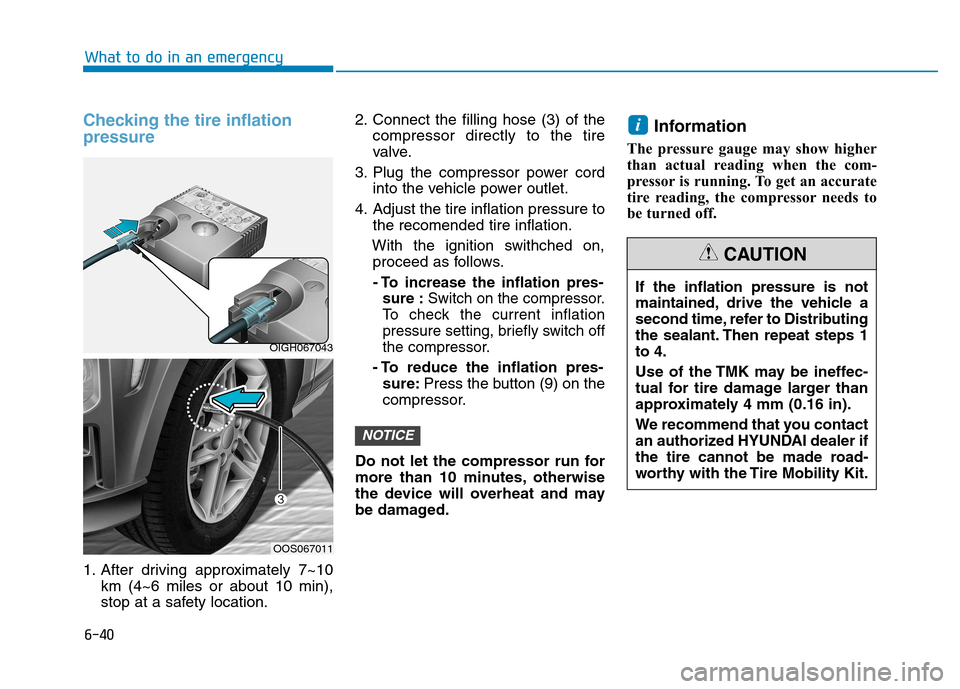
Checking the tire inflation pressure
1. After driving approximately 7~10km (4~6 miles or about 10 min),
stop at a safety location. 2. Connect the filling hose (3) of the
compressor directly to the tire
valve.
3. Plug the compressor power cord into the vehicle power outlet.
4. Adjust the tire inflation pressure to the recomended tire inflation.
With the ignition swithched on, proceed as follows.
- To increase the inflation pres- sure : Switch on the compressor.
To check the current inflation
pressure setting, briefly switch off
the compressor.
- To reduce the inflation pres- sure: Press the button (9) on the
compressor.
Do not let the compressor run for
more than 10 minutes, otherwise
the device will overheat and may
be damaged. Information
The pressure gauge may show higher
than actual reading when the com-
pressor is running. To get an accurate
tire reading, the compressor needs to
be turned off.
i
NOTICE
OIGH067043
OOS067011 If the inflation pressure is not
maintained, drive the vehicle a
second time, refer to Distributing
the sealant. Then repeat steps 1to 4.
Use of the TMK may be ineffec-
tual for tire damage larger than
approximately 4 mm (0.16 in).
We recommend that you contact
an authorized HYUNDAI dealer if
the tire cannot be made road-
worthy with the Tire Mobility Kit.
CAUTION
Page 412 of 523
6-45
What to do in an emergency
6
Your vehicle is equipped with emer-
gency commodities to help yourespond to emergency situation.
Fire extinguisher
If there is small fire and you know
how to use the fire extinguisher, fol-
low these steps carefully.
1. Pull out the safety pin at the top ofthe extinguisher that keeps the handle from being accidentallypressed.
2. Aim the nozzle towards the base of the fire.
3. Stand approximately 2.5 m (8 ft) away from the fire and squeeze
the handle to discharge the extin-
guisher. If you release the handle,
the discharge will stop.
4. Sweep the nozzle back and forth at the base of the fire. After the fire
appears to be out, watch carefully
since it may re-ignite.
First aid kit
Supplies for use in giving first aid
such as scissors, bandage and
adhesive tape, etc. are provided.
Triangle reflector
Place the triangle reflector on the
road to warn oncoming vehicles dur-
ing emergencies, such as when the
vehicle is parked by the roadside due
to problems.
Tire pressure gauge (if equipped)
Tires normally lose some air in day-
to-day use, and you may have to add
a air periodically and usually it is not
a sign of a leaking tire, but of normal
wear. Always check tire pressurewhen the tires are cold because tire
pressure increases with tempera-
ture. To check the tire pressure, take the
following steps:
1. Unscrew the inflation valve cap
that is located on the rim of the
tire.
2. Press and hold the gauge against the tire valve. Some air will leak as
you begin and more will leak if you
don't press the gauge in firmly.
3. A firm non-leaking push will acti- vate the gauge.
4. Read the tire pressure on the gauge to see whether the tire
pressure is low or high.
5. Adjust the tire pressure to the specified pressure. Refer to "Tires
and Wheels" in chapter 8.
6. Reinstall the inflation valve cap.
EE MM EERR GG EENN CCYY CC OO MM MMOODDIITT YY (( IIFF EE QQ UUIIPP PPEEDD ))