remote control Hyundai Kona 2018 Owner's Manual
[x] Cancel search | Manufacturer: HYUNDAI, Model Year: 2018, Model line: Kona, Model: Hyundai Kona 2018Pages: 523, PDF Size: 33.6 MB
Page 84 of 523
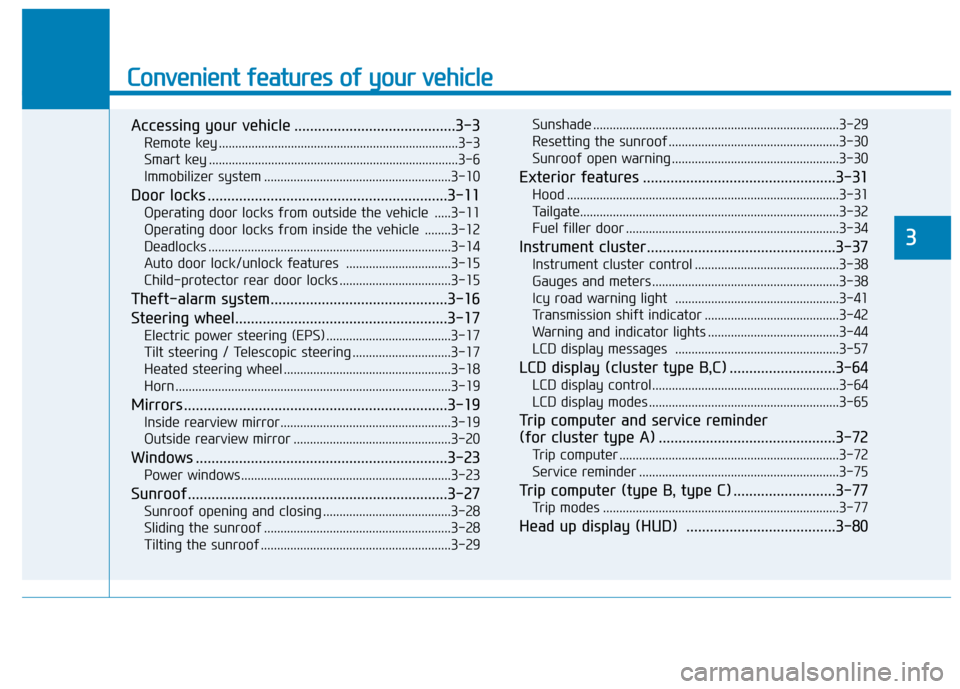
Convenient features of your vehicle
Accessing your vehicle .........................................3-3Remote key .........................................................................3-3
Smart key ............................................................................3-6
Immobilizer system .........................................................3-10
Door locks .............................................................3-11 Operating door locks from outside the vehicle .....3-11
Operating door locks from inside the vehicle ........3-12
Deadlocks ..........................................................................3-14
Auto door lock/unlock features ................................3-15
Child-protector rear door locks ..................................3-15
Theft-alarm system.............................................3-16
Steering wheel......................................................3-17 Electric power steering (EPS) ......................................3-17
Tilt steering / Telescopic steering ..............................3-17
Heated steering wheel ...................................................3-18
Horn ....................................................................................3-19
Mirrors ...................................................................3-19 Inside rearview mirror....................................................3-19
Outside rearview mirror ................................................3-20
Windows ................................................................3-23 Power windows ................................................................3-23
Sunroof..................................................................3-27 Sunroof opening and closing .......................................3-28
Sliding the sunroof .........................................................3-28
Tilting the sunroof ..........................................................3-29 Sunshade ...........................................................................3-29
Resetting the sunroof ....................................................3-30
Sunroof open warning ...................................................3-30
Exterior features .................................................3-31 Hood ...................................................................................3-31
Tailgate...............................................................................3-32
Fuel filler door .................................................................3-34
Instrument cluster................................................3-37 Instrument cluster control ............................................3-38
Gauges and meters .........................................................3-38
Icy road warning light ..................................................3-41
Transmission shift indicator .........................................3-42
Warning and indicator lights ........................................3-44
LCD display messages ..................................................3-57
LCD display (cluster type B,C) ...........................3-64 LCD display control.........................................................3-64
LCD display modes ..........................................................3-65
Trip computer and service reminder
(for cluster type A) .............................................3-72 Trip computer ...................................................................3-72
Service reminder .............................................................3-75
Trip computer (type B, type C) ..........................3-77 Trip modes ........................................................................3-77
Head up display (HUD) ......................................3-80
3
Page 104 of 523
3-21
Convenient features of your vehicle
3
The mirror can be adjusted remotely
with the remote switch.
The mirror heads can be folded to
prevent damage during an automatic
car wash or when passing through a
narrow street. Do not scrape ice off the mirror
face; this may damage the sur-face of the glass.
If the mirror is jammed with ice, do not adjust the mirror by
force. Use an approved spray
de-icer (not radiator antifreeze)
spray, or a sponge or soft cloth
with very warm water, or move
the vehicle to a warm place and
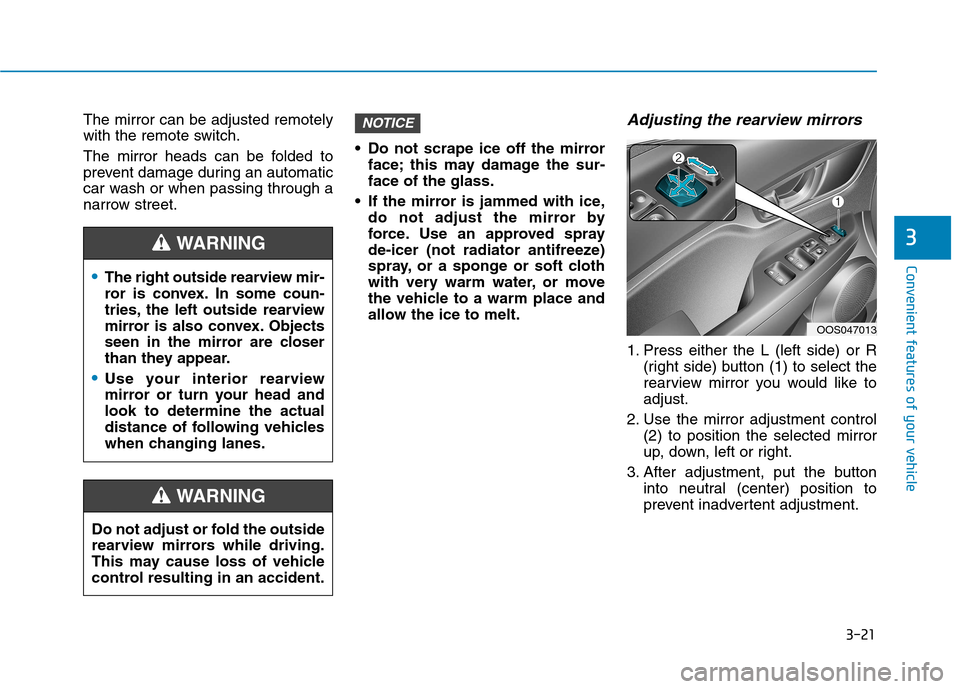
allow the ice to melt.Adjusting the rearview mirrors
1. Press either the L (left side) or R (right side) button (1) to select the
rearview mirror you would like toadjust.
2. Use the mirror adjustment control (2) to position the selected mirror
up, down, left or right.
3. After adjustment, put the button into neutral (center) position to
prevent inadvertent adjustment.
NOTICE
The right outside rearview mir-
ror is convex. In some coun-
tries, the left outside rearview
mirror is also convex. Objects
seen in the mirror are closer
than they appear.
Use your interior rearview
mirror or turn your head andlook to determine the actual
distance of following vehicles
when changing lanes.
WARNING
Do not adjust or fold the outside
rearview mirrors while driving.
This may cause loss of vehicle
control resulting in an accident.
WARNING
OOS047013
Page 224 of 523
4-3
Multimedia System
4
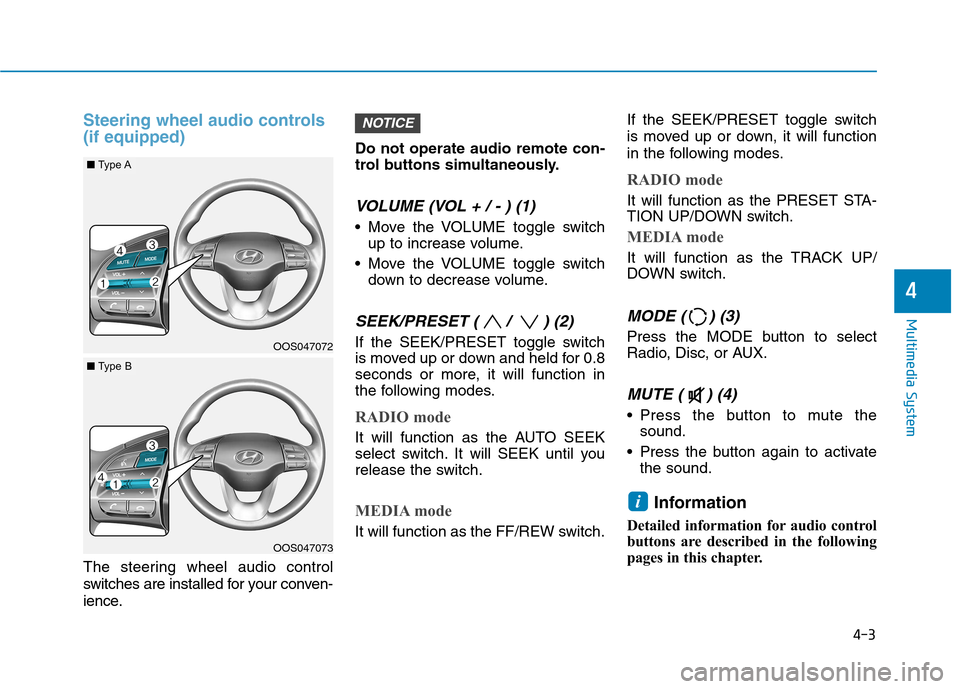
Steering wheel audio controls (if equipped)
The steering wheel audio control
switches are installed for your conven-
ience.Do not operate audio remote con-
trol buttons simultaneously.
VOLUME (VOL + / - ) (1)
Move the VOLUME toggle switch
up to increase volume.
Move the VOLUME toggle switch down to decrease volume.
SEEK/PRESET ( / ) (2)
If the SEEK/PRESET toggle switch
is moved up or down and held for 0.8
seconds or more, it will function in
the following modes.
RADIO mode
It will function as the AUTO SEEK
select switch. It will SEEK until you
release the switch.
MEDIA mode
It will function as the FF/REW switch. If the SEEK/PRESET toggle switch
is moved up or down, it will function
in the following modes.
RADIO mode
It will function as the PRESET STA-
TION UP/DOWN switch.
MEDIA mode
It will function as the TRACK UP/
DOWN switch.
MODE ( ) (3)
Press the MODE button to select
Radio, Disc, or AUX.
MUTE ( ) (4)
Press the button to mute the
sound.
Press the button again to activate the sound.
Information
Detailed information for audio control
buttons are described in the following
pages in this chapter.
i
NOTICE
OOS047072
OOS047073
■ Type A
■Type B
Page 231 of 523
4-10
Multimedia System
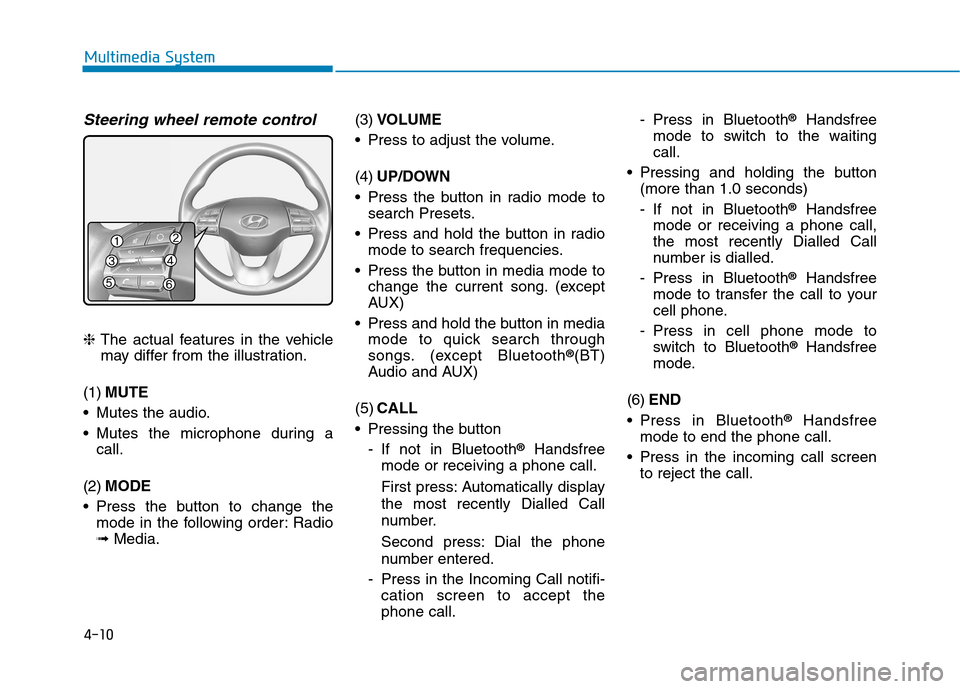
Steering wheel remote control
❈The actual features in the vehicle
may differ from the illustration.
(1) MUTE
Mutes the audio.
Mutes the microphone during a call.
(2) MODE
Press the button to change the mode in the following order: Radio ➟ Media. (3)
VOLUME
Press to adjust the volume. (4) UP/DOWN
Press the button in radio mode to search Presets.
Press and hold the button in radio mode to search frequencies.
Press the button in media mode to change the current song. (except
AUX)
Press and hold the button in media mode to quick search through
songs. (except Bluetooth ®
(BT)
Audio and AUX)
(5) CALL
Pressing the button
- If not in Bluetooth ®
Handsfree
mode or receiving a phone call.
First press: Automatically display
the most recently Dialled Call
number.
Second press: Dial the phone
number entered.
- Press in the Incoming Call notifi- cation screen to accept the phone call. - Press in Bluetooth
®
Handsfree
mode to switch to the waitingcall.
Pressing and holding the button (more than 1.0 seconds)
- If not in Bluetooth ®
Handsfree
mode or receiving a phone call,
the most recently Dialled Call
number is dialled.
- Press in Bluetooth ®
Handsfree
mode to transfer the call to your
cell phone.
- Press in cell phone mode to switch to Bluetooth ®
Handsfree
mode.
(6) END
Press in Bluetooth ®
Handsfree
mode to end the phone call.
Press in the incoming call screen to reject the call.
Page 246 of 523
4-25
Multimedia System
4
Pairing a Bluetooth®device
Information on pairing Bluetooth®
devices
Pairing refers to the process of pairing Bluetooth ®
cell phones or
devices with the system prior to
connection. This is a necessary
procedure for Bluetooth ®
connec-
tion and usage.
Up to five devices can be paired.
Pairing Bluetooth ®
device is not
allowed while vehicle is moving.
Pairing the first Bluetooth ®
device
Press the [PHONE]button on the
audio system or the [CALL]button
on the steering wheel remote control ➟ Search for the vehicle from the
Bluetooth ®
device, and pair ➟Enter
the passkey on the Bluetooth ®
device or approve passkey ➟
Bluetooth ®
pairing completed.
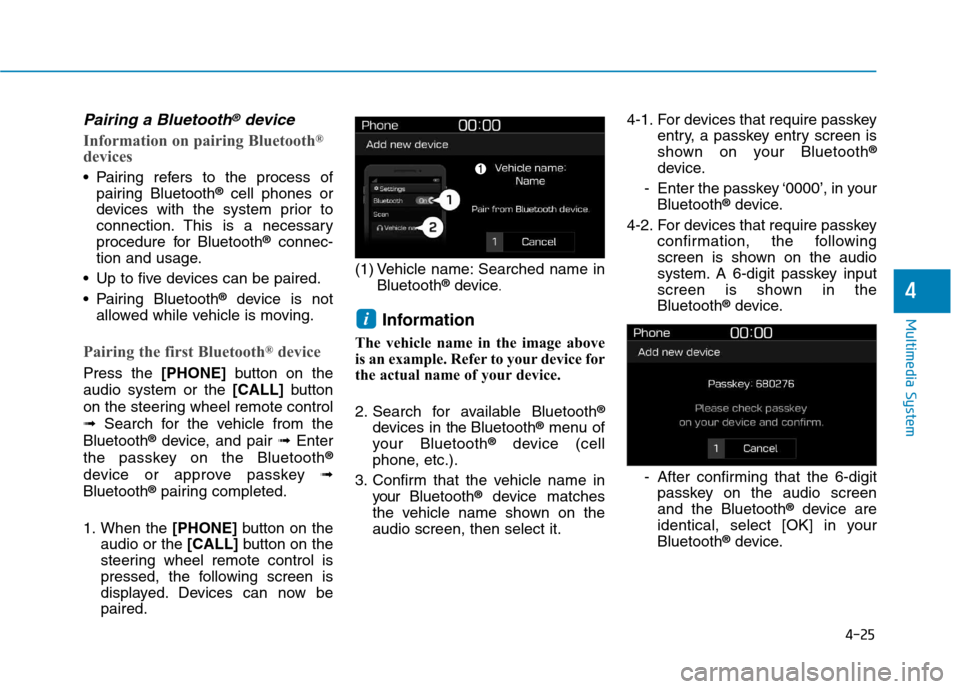
1. When the [PHONE]button on the
audio or the [CALL]button on the
steering wheel remote control is
pressed, the following screen is
displayed. Devices can now bepaired. (1) Vehicle name: Searched name in
Bluetooth ®
device .
Information
The vehicle name in the image above
is an example. Refer to your device for
the actual name of your device.
2. Search for available Bluetooth ®
devices in the Bluetooth ®
menu of
your Bluetooth ®
device (cell
phone, etc.).
3. Confirm that the vehicle name in your Bluetooth ®
device matches
the vehicle name shown on the audio screen, then select it. 4-1. For devices that require passkey
entry, a passkey entry screen is
shown on your Bluetooth ®
device.
- Enter the passkey ‘0000’, in your Bluetooth ®
device.
4-2. For devices that require passkey confirmation, the following
screen is shown on the audio
system. A 6-digit passkey input
screen is shown in theBluetooth ®
device.
- After confirming that the 6-digit passkey on the audio screenand the Bluetooth ®
device are
identical, select [OK] in yourBluetooth ®
device.
i
Page 247 of 523
![Hyundai Kona 2018 Owners Manual 4-26
Multimedia System
Information
The 6-digit passkey in the image
above is an example. Refer to your
vehicle for the actual passkey.
Pairing a second Bluetooth ®
device
Press the [SETUP/CLOCK] bu Hyundai Kona 2018 Owners Manual 4-26
Multimedia System
Information
The 6-digit passkey in the image
above is an example. Refer to your
vehicle for the actual passkey.
Pairing a second Bluetooth ®
device
Press the [SETUP/CLOCK] bu](/img/35/16231/w960_16231-246.png)
4-26
Multimedia System
Information
The 6-digit passkey in the image
above is an example. Refer to your
vehicle for the actual passkey.
Pairing a second Bluetooth ®
device
Press the [SETUP/CLOCK] button
on the audio system ➟Select
[Bluetooth] ➟Select [Connections]
➟ Select [Add new device].
- The pairing procedure from this point is identical to [Pairing the first
Bluetooth device]. Information
Bluetooth ®
standby mode lasts for
three minutes. If a device is not
paired within three minutes, pairing
is canceled. Start over from the
beginning.
For most Bluetooth ®
devices, a con-
nection is established automatically
after pairing. Some devices, howev-
er, require separate confirmation
when connecting after pairing. Be
sure to check your Bluetooth ®
device after pairing to confirm that
it has connected.
Connecting Bluetooth®devices
If there are no connected devices
Press the [PHONE]button on the
audio system or the [CALL]button in
the steering wheel remote control ➟
List of paired Bluetooth ®
devices ➟
Select the desired Bluetooth ®
device
from the list ➟Connect Bluetooth ®
.
ii
Page 378 of 523
6-11
What to do in an emergency
6
TPMS (Tire Pressure Monitoring System)malfunction indicator
The TPMS malfunction indicator will
illuminate after it blinks for approxi-
mately one minute when there is a
problem with the Tire Pressure
Monitoring System. If the system is
able to correctly detect an under
inflation warning at the same time as
system failure then it will illuminate
the TPMS malfunction indicator.
We recommend that the system be
checked by an authorized HYUNDAI
dealer.
In winter or cold weather, the
low tire pressure telltale may beilluminated if the tire pressurewas adjusted to the recom-mended tire inflation pressure
in warm weather. It does not
mean your TPMS is malfunc-tioning because the decreased
temperature leads to a propor-
tional lowering of tire pressure.
When you drive your vehicle
from a warm area to a cold area
or from a cold area to a warm
area, or the outside temperature
is greatly higher or lower, you
should check the tire inflationpressure and adjust the tires tothe recommended tire inflation
pressure.
CAUTION
Low pressure damage
Significantly low tire pressure
makes the vehicle unstable and
can contribute to loss of vehicle
control and increased brakingdistances.
Continued driving on low pres- sure tires can cause the tires to
overheat and fail.
WARNING
The TPMS malfunction indica-
tor may be illuminated if the
vehicle is moving around
electric power supply cables
or radios transmitter such as
at police stations, government
and public offices, broadcast-
ing stations, military installa-
tions, airports, or transmitting
towers, etc. This can interferewith normal operation of theTire Pressure MonitoringSystem (TPMS).
The TPMS malfunction indica-
tor may illuminate if snow
chains or some separately
purchased devices such as
notebook computers, mobile
charger, remote starter, navi-
gation etc. are used in the
vehicle. This can interfere with
normal operation of the TirePressure Monitoring System(TPMS).
CAUTION