navigation Hyundai Kona 2019 Owner's Manual
[x] Cancel search | Manufacturer: HYUNDAI, Model Year: 2019, Model line: Kona, Model: Hyundai Kona 2019Pages: 485, PDF Size: 15.75 MB
Page 16 of 485
I
IN
N S
ST
T R
R U
U M
M E
EN
N T
T
P
P A
A N
N E
EL
L
O
O V
VE
ER
R V
V I
IE
E W
W
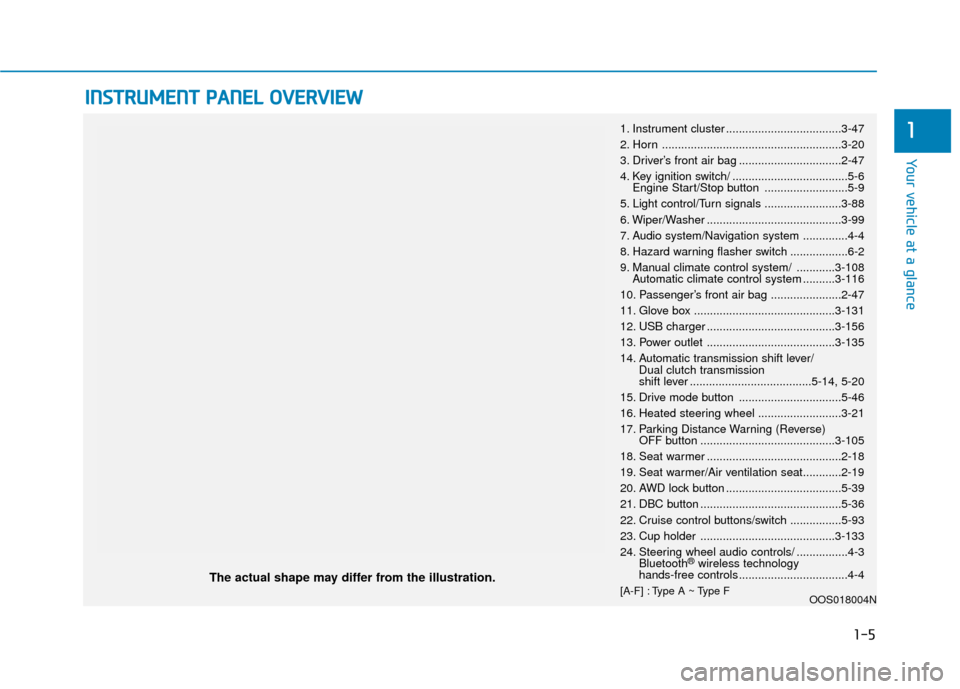
The actual shape may differ from the illustration.
1-5
Your vehicle at a glance
11. Instrument cluster ....................................3-47
2. Horn ........................................................3-20
3. Driver’s front air bag ................................2-47
4. Key ignition switch/ ....................................5-6
Engine Start/Stop button ..........................5-9
5. Light control/Turn signals ........................3-88
6. Wiper/Washer ..........................................3-99
7. Audio system/Navigation system ..............4-4
8. Hazard warning flasher switch ..................6-2
9. Manual climate control system/ ............3-108 Automatic climate control system ..........3-116
10. Passenger’s front air bag ......................2-47
11. Glove box ............................................3-131
12. USB charger ........................................3-156
13. Power outlet ........................................3-135
14. Automatic transmission shift lever/ Dual clutch transmission
shift lever ......................................5-14, 5-20
15. Drive mode button ................................5-46
16. Heated steering wheel ..........................3-21
17. Parking Distance Warning (Reverse) OFF button ..........................................3-105
18. Seat warmer ..........................................2-18
19. Seat warmer/Air ventilation seat............2-19
20. AWD lock button ....................................5-39
21. DBC button ............................................5-36
22. Cruise control buttons/switch ................5-93
23. Cup holder ..........................................3-133
24. Steering wheel audio controls/ ................4-3 Bluetooth
®wireless technology
hands-free controls ..................................4-4
[A-F] : Type A ~ Type F OOS018004N
Page 107 of 485
![Hyundai Kona 2019 Owners Manual 3-23
Convenient features of your vehicle
3
[A] : Indicator
When cleaning the mirror, use a
paper towel or similar material
dampened with glass cleaner. Do
not spray glass cleaner directly on
the mirro Hyundai Kona 2019 Owners Manual 3-23
Convenient features of your vehicle
3
[A] : Indicator
When cleaning the mirror, use a
paper towel or similar material
dampened with glass cleaner. Do
not spray glass cleaner directly on
the mirro](/img/35/16224/w960_16224-106.png)
3-23
Convenient features of your vehicle
3
[A] : Indicator
When cleaning the mirror, use a
paper towel or similar material
dampened with glass cleaner. Do
not spray glass cleaner directly on
the mirror as that may cause the
liquid cleaner to enter the mirror
housing.
Blue Link®center (for Canada)
For details, refer to the Blue Link®
Owner's Guide, Navigation Manual
or Audio Manual.
Electrochromic mirror (ECM) withHomeLink®system, compass and
Blue Link®(if equipped)
NOTICE
OOS047092C
OOS047093N
■ For USAHomeLink Indicator
HomeLink ButtonTelematics buttons
HomeLink Indicator
Telematics buttonsHomeLink Button
OOS047093C
■For Canada
OOS047010L
Page 132 of 485
3-48
Convenient features of your vehicle
Instrument Cluster Control
Adjusting instrument clusterillumination
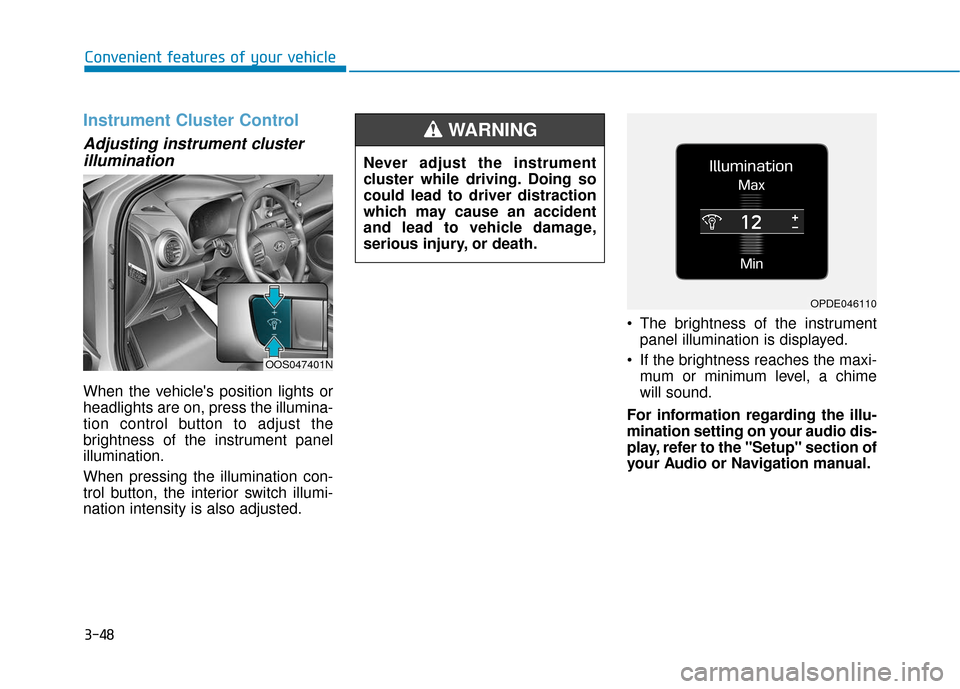
When the vehicle's position lights or
headlights are on, press the illumina-
tion control button to adjust the
brightness of the instrument panel
illumination.
When pressing the illumination con-
trol button, the interior switch illumi-
nation intensity is also adjusted. The brightness of the instrument
panel illumination is displayed.
If the brightness reaches the maxi- mum or minimum level, a chime
will sound.
For information regarding the illu-
mination setting on your audio dis-
play, refer to the "Setup" section of
your Audio or Navigation manual.
Never adjust the instrument
cluster while driving. Doing so
could lead to driver distraction
which may cause an accident
and lead to vehicle damage,
serious injury, or death.
WARNING
OOS047401N
OPDE046110
Page 155 of 485
3-71
Convenient features of your vehicle
3
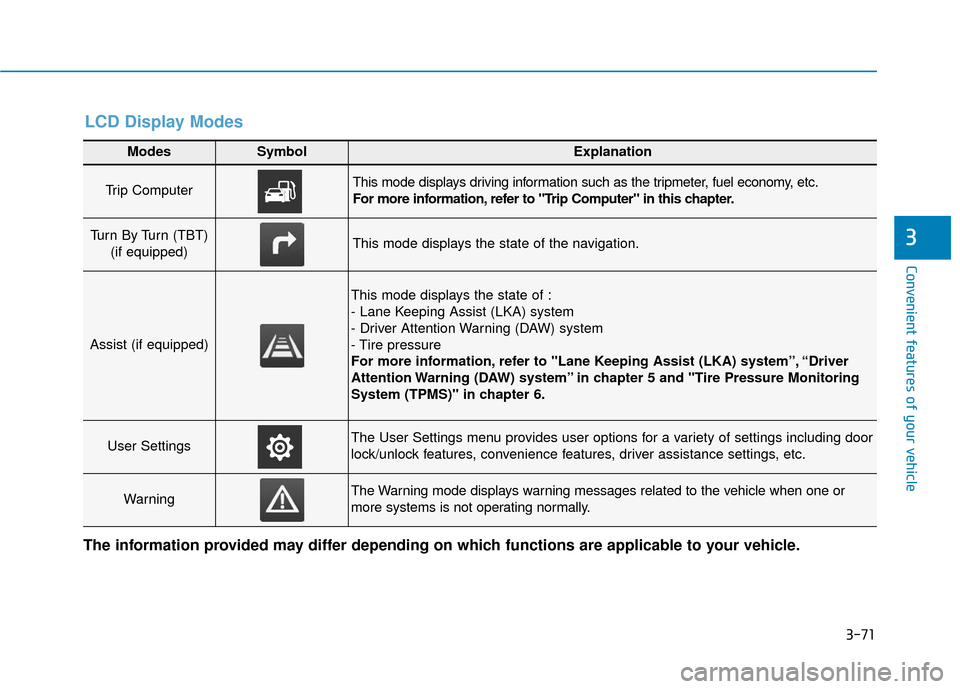
Modes SymbolExplanation
Trip Computer This mode displays driving information such as the tripmeter, fuel economy, etc.
For more information, refer to "Trip Computer" in this chapter.
Turn By Turn (TBT) (if equipped)This mode displays the state of the navigation.
Assist (if equipped)
This mode displays the state of :
- Lane Keeping Assist (LKA) system
- Driver Attention Warning (DAW) system
- Tire pressure
For more information, refer to "Lane Keeping Assist (LKA) system”, “Driver
Attention Warning (DAW) system” in chapter 5 and "Tire Pressure Monitoring
System (TPMS)" in chapter 6.
User SettingsThe User Settings menu provides user options for a variety of settings including door
lock/unlock features, convenience features, driver assistance settings, etc.
WarningThe Warning mode displays warning messages related to the vehicle when one or
more systems is not operating normally.
The information provided may differ depending on which functions are applicable to your vehicle.
LCD Display Modes
Page 156 of 485
3-72
Convenient features of your vehicle
Shift to P to edit settings
This warning message appears if
you try to adjust the User Settings
while driving.
For your safety, change the User
Settings after parking the vehicle,
applying the parking brake and mov-
ing the shift lever to P (Park).
Quick guide help
This mode provides quick guides for
the systems in the User Settings
mode.
Select an item, press and hold the OK
button.
For more information about each
system, refer to this Owner's
Manual.
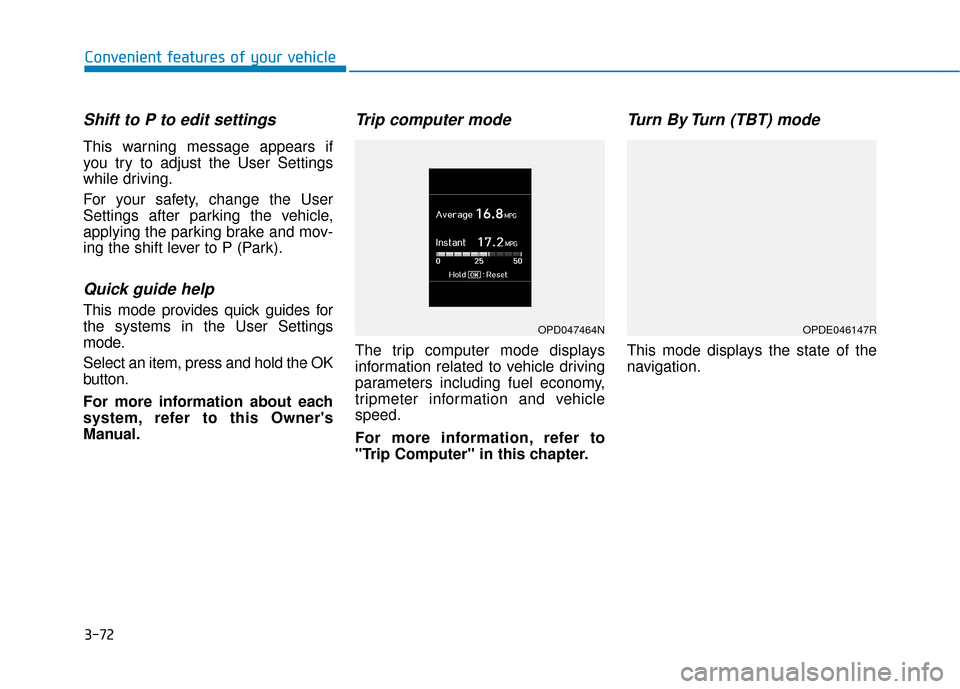
Trip computer mode
The trip computer mode displays
information related to vehicle driving
parameters including fuel economy,
tripmeter information and vehicle
speed.
For more information, refer to
"Trip Computer" in this chapter.
Turn By Turn (TBT) mode
This mode displays the state of the
navigation.
OPD047464NOPDE046147R
Page 171 of 485
3-87
Convenient features of your vehicle
3
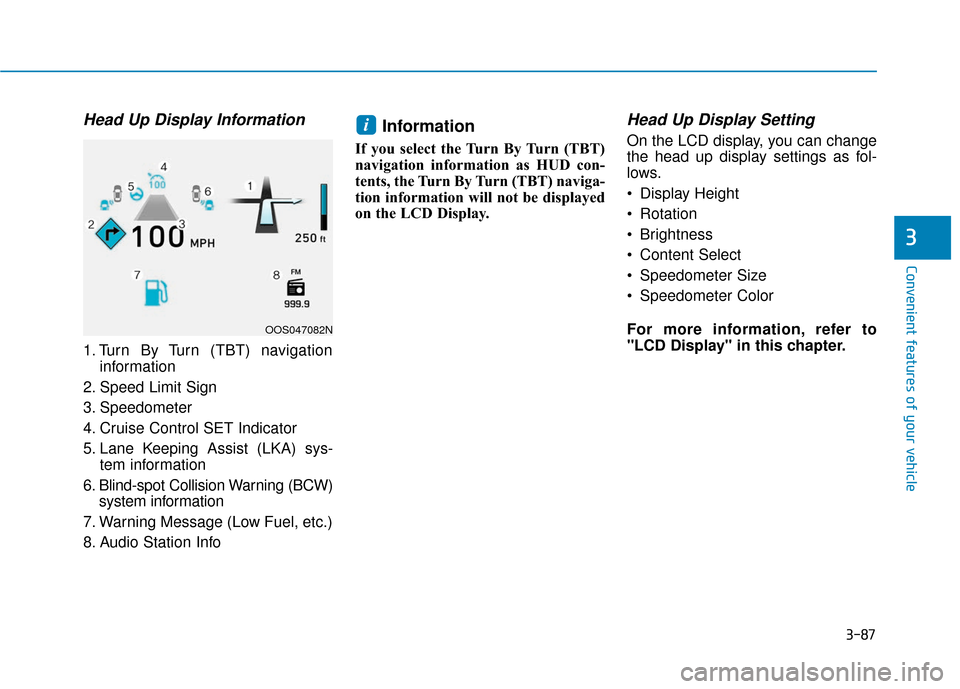
Head Up Display Information
1. Turn By Turn (TBT) navigationinformation
2. Speed Limit Sign
3. Speedometer
4. Cruise Control SET Indicator
5. Lane Keeping Assist (LKA) sys- tem information
6. Blind-spot Collision Warning (BCW) system information
7. Warning Message (Low Fuel, etc.)
8. Audio Station Info
Information
If you select the Turn By Turn (TBT)
navigation information as HUD con-
tents, the Turn By Turn (TBT) naviga-
tion information will not be displayed
on the LCD Display.
Head Up Display Setting
On the LCD display, you can change
the head up display settings as fol-
lows.
Display Height
Rotation
Brightness
Content Select
Speedometer Size
Speedometer Color
For more information, refer to
"LCD Display" in this chapter.i
OOS047082N
Page 222 of 485
3-138
Convenient features of your vehicle
The wireless charging process may temporarily stop, when tem-
perature abnormally increases
inside the wireless cellular
phone charging system. The
wireless charging process
restarts, when temperature falls
to a certain level.
The wireless charging process may temporarily stop when
there is any metallic item, such
as a coin, between the wireless
cellular phone charging system
and cellular phone.
When charging some cell phones with the case still
applied, the wireless charging
speed may decrease and the
wireless charging may stop.
If the cellular phone has a thick cover, the wireless charging may
not be possible.
If the cell phone is not complete- ly contacting the charging pad,
wireless charging may not oper-
ate properly.
Some magnetic items like credit cards, phone cards or rail tickets
may be damaged if left with the
cellular phone during the charg-
ing process. If the cellular phone without the
wireless charging function or
the metallic items are placed on
the charging pad, it may cause
slight noise. This noise does not
affect the cellular phone and the
vehicle, because this noise is an
operating sound during deter-
mining the item on the charging
pad.
Information
If the ignition switch is OFF, the
charging also stops.
Information
This device complies with part 15 of
the FCC Rules.
Operation is subject to the following
two conditions:
1. This device may not cause harmful interference, and
2. This device must accept any inter- ference received, including inter-
ference that may cause undesired
operation.
Clock
Vehicles with Audio system
Select the [SETUP] button on the
audio system ➟ Select [Date/Time].
Set time: Set the time displayed on the audio screen.
Time format: Choose between 12- hour and 24-hour time formats.
Vehicles with Navigation system
Select the Settings menu on the
Navigation system ➟Select
[Date/Time].
GPS time: Displays time according to the received GNSS time.
24-hour: Switches to 12 hour or 24 hour.
i
i
Do not attempt to adjust the
clock while driving. Doing so
may result in distracted driving
which may lead to an accident
involving personal injury or
death.
WARNING
Page 228 of 485
Multimedia System
Multimedia System.................................................4-2
AUX, USB and iPod®Port ...............................................4-2
Antenna ........................................................................\
.......4-2
Steering Wheel Audio Controls ......................................4-3
Bluetooth®Wireless Technology Hands-Free ...........4-4
Audio (Display Audio) / Video /
Navigation System (AVN).................................................4-5
4
Page 232 of 485
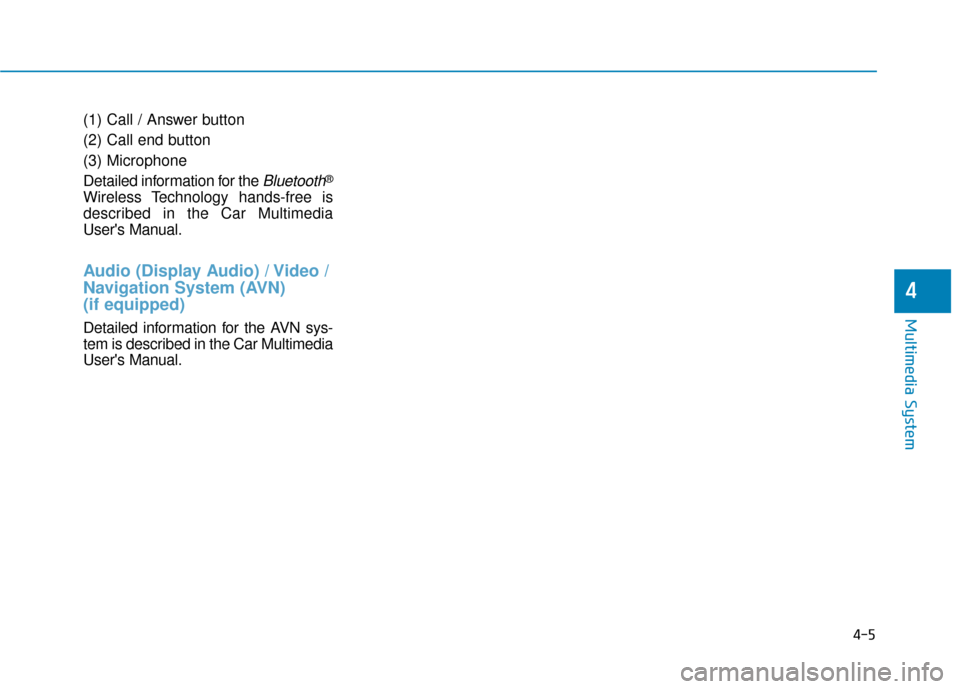
(1) Call / Answer button
(2) Call end button
(3) Microphone
Detailed information for the
Bluetooth®
Wireless Technology hands-free is
described in the Car Multimedia
User's Manual.
Audio (Display Audio) / Video /
Navigation System (AVN)
(if equipped)
Detailed information for the AVN sys-
tem is described in the Car Multimedia
User's Manual.
4-5
Multimedia System
4
Page 354 of 485
6-12
What to do in an emergency
The TPMS Malfunction Indicator
may illuminate after blinking for
one minute if the vehicle is near
electric power supply cables or
radio transmitters such as police
stations, government and public
offices, broadcasting stations,
military installations, airports,
transmitting towers, etc.
Additionally, the TPMS Malfunction
Indicator may illuminate if snow
chains are used or electronic
devices such as computers, charg-
ers, remote starters, navigation,
etc. This may interfere with normal
operation of the TPMS.
Changing a Tire with TPMS
If you have a flat tire, the Low Tire
Pressure and LCD position indicator
will come on. Have the flat tire
repaired by an authorized HYUNDAI
dealer as soon as possible or
replace the flat tire with the spare
tire.
The spare tire does not come with a
tire pressure monitoring sensor.
When the low pressure tire or the flat
tire is replaced with the spare tire,
the Low Tire Pressure LCD position
indicator will remain on. Also, the
TPMS Malfunction Indicator will illu-
minate after blinking for one minute if
the vehicle is driven at speed above
15.5 mph (25 km/h) for approximate-
ly 20 minutes. Once the original tire equipped with
a tire pressure monitoring sensor is
reinflated to the recommended pres-
sure and reinstalled on the vehicle,
the Low Tire Pressure LCD position
indicator and TPMS Malfunction
Indicator will go off within a few min-
utes of driving.
If the indicators do not disappear
after a few minutes, please visit an
authorized HYUNDAI dealer.
Each wheel is equipped with a tire
pressure sensor mounted inside the
tire behind the valve stem (except for
the spare tire). You must use TPMS
specific wheels. It is recommended
that you always have your tires serv-
iced by an authorized HYUNDAI
dealer.
NOTICE
It is recommended that you do
not use a puncture-repairing
agent not approved by HYUNDAI
dealer to repair and/or inflate a
low pressure tire. Tire sealant
not approved by HYUNDAI deal-
er may damage the tire pressure
sensor.
CAUTION