brake HYUNDAI KONA EV 2022 Owners Manual
[x] Cancel search | Manufacturer: HYUNDAI, Model Year: 2022, Model line: KONA EV, Model: HYUNDAI KONA EV 2022Pages: 548, PDF Size: 49.14 MB
Page 444 of 548
![HYUNDAI KONA EV 2022 Owners Manual 07
7-111
•
Pulling into the parking space where
there is a structure
OJX1079115
[A] : Structure, [B] :Wall
Rear Cross-Traffic Collision-
Avoidance Assist may detect vehicles
passing by in fron HYUNDAI KONA EV 2022 Owners Manual 07
7-111
•
Pulling into the parking space where
there is a structure
OJX1079115
[A] : Structure, [B] :Wall
Rear Cross-Traffic Collision-
Avoidance Assist may detect vehicles
passing by in fron](/img/35/56171/w960_56171-443.png)
07
7-111
•
Pulling into the parking space where
there is a structure
OJX1079115
[A] : Structure, [B] :Wall
Rear Cross-Traffic Collision-
Avoidance Assist may detect vehicles
passing by in front of you when
parking in reverse into a parking
space with a wall or structure in the
rear or side area. If this occurs, the
function may unnecessarily warn the
driver and control the brake.
Always check your surroundings while backing up.
• When the vehicle is parked rearward
OJX1079116
Rear Cross-Traffic Collision-
Avoidance Assist may detect vehicles
passing by behind you when parking
in reverse into a parking space.
If this occurs, the function may
unnecessarily warn the driver and
control the brake.
Always check your surroundings while backing up.
warning
• When you are towing a trailer or
another vehicle, we recommend
that Rear Cross-Traffic Collision-
Avoidance Assist is turned off due to
safety reasons.
• Rear Cross-Traffic Collision-
Avoidance Assist may not operate
normally if interfered by strong
electromagnetic waves.
• Rear Cross-Traffic Collision-
Avoidance Assist may not operate
for 15 seconds after the vehicle is
started, or the rear corner radars are
initialized.
Information
This device complies with Industry Canada RSS-210 standard.
Operation is subject to the following three conditions: 1. This device may not cause harmful
interference, and
2. This device must accept any
interference received, including
interference that may cause undesired operation.
3. Changes or modifications not expressly
approved by the party responsible
for compliance could void the user's authority to operate the device.
Information
Radio frequency radiation exposure information: This equipment complies with RSS- 210
radiation exposure limits set forth for an
uncontrolled environment. This equipment should be installed and operated with minimum distance of 20cm
(8 in.) between the radiator (antenna) and
your body.
This transmitter must not be co-located or
operating in conjunction with any other
antenna or transmitter.
Page 458 of 548
08
8-3
If you have a flat tire while driving
If a tire goes flat while you are driving: • Take your foot off the accelerator
pedal and let the vehicle slow down
while driving straight ahead. Do not
apply the brakes immediately or
attempt to pull off the road as this
may cause loss of vehicle control
resulting in an accident. When the
vehicle has slowed to such a speed
that it is safe to do so, brake carefully
and pull off the road. Drive off the
road as far as possible and park on
firm, level ground. If you are on a
divided highway, do not park in the
median area between the two traffic lanes.
• When the vehicle is stopped, press the
hazard warning flasher button, shift to
P (Park), apply the parking brake, and
place the START/STOP button in the OFF position.
• Have all passengers get out of the
vehicle. Be sure they all get out on the
side of the vehicle that is away from
traffic.
• When changing a flat tire, follow the
instructions provided later in this
chapter.
if tHe veHicle will not
s ta rt
Confirm the EV battery is not low
on the charge gauge
• Be sure the gear is in P (Park). The
vehicle starts only when the gear is in
P (Park).
• Check the 12-volt battery connections
to be sure they are clean and tight.
• Turn on the interior light. If the light
dims or goes out when you operate
the starter, the 12V battery is drained.
Do not push or pull the vehicle to start it.
This could cause damage to your vehicle.
See instructions for “Jump Starting”
provided in this chapter.
Page 460 of 548
08
8-5
Jump starting procedure
1. Position the vehicles close enough
that the jumper cables will reach, but
do not allow the vehicles to touch.
2. Avoid fans or any moving parts in the motor compartment at all times, even
when the vehicles are turned off.
3. Turn off all electrical devices such as radios, lights, air conditioning, etc.
Put the vehicles in P (Park) and set
the parking brakes. Turn both vehicles
OFF.
1VQA4001
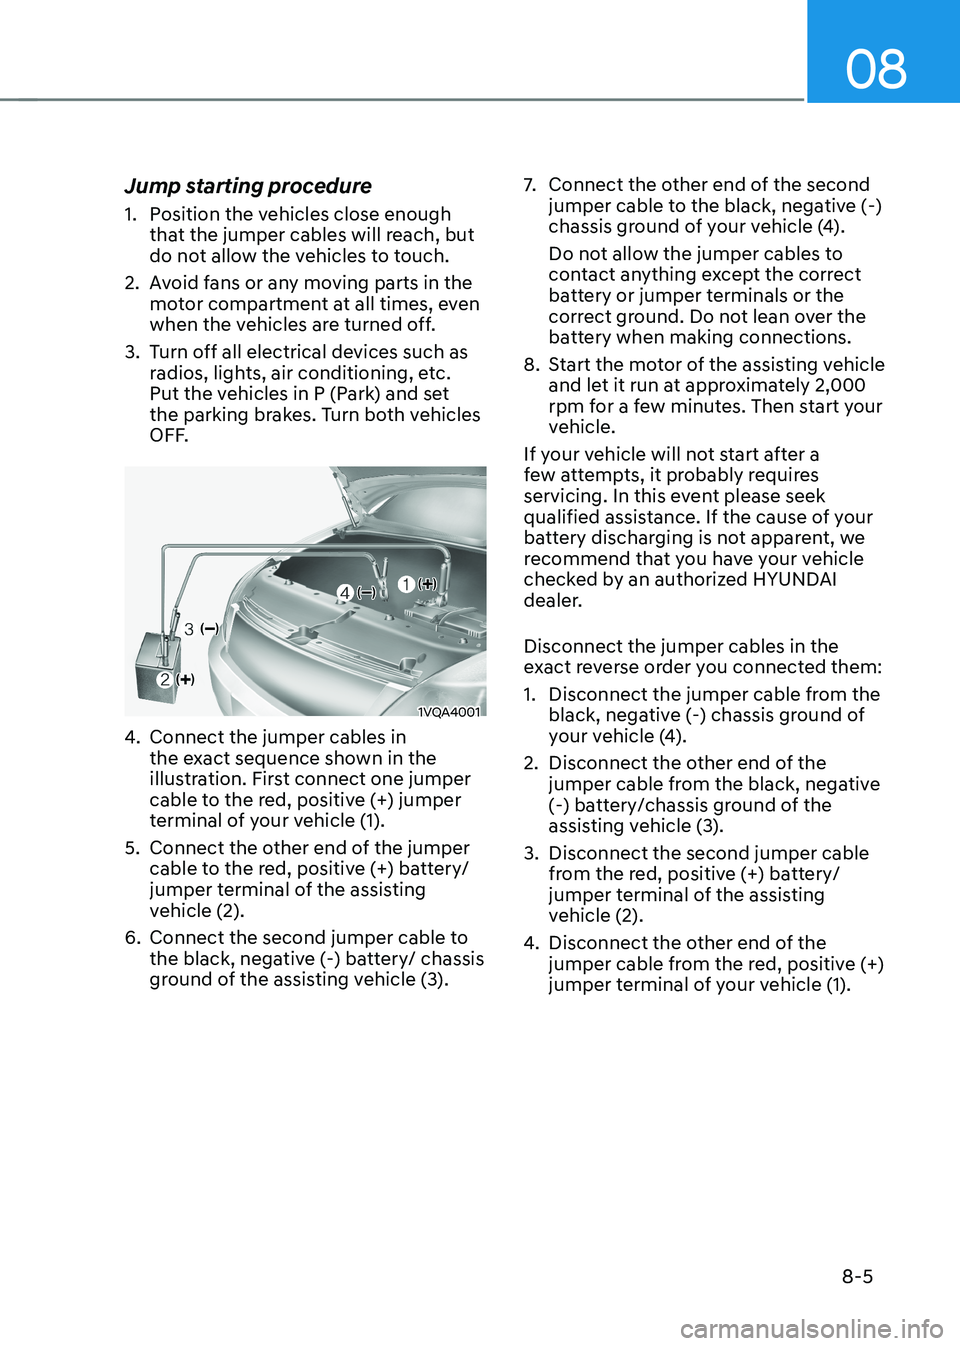
4. Connect the jumper cables in
the exact sequence shown in the
illustration. First connect one jumper
cable to the red, positive (+) jumper
terminal of your vehicle (1).
5. Connect the other end of the jumper cable to the red, positive (+) battery/
jumper terminal of the assisting
vehicle (2).
6. Connect the second jumper cable to the black, negative (-) battery/ chassis
ground of the assisting vehicle (3). 7.
Connect the other end of the second
jumper cable to the black, negative (-)
chassis ground of your vehicle (4).
Do not allow the jumper cables to
contact anything except the correct
battery or jumper terminals or the
correct ground. Do not lean over the
battery when making connections.
8. Start the motor of the assisting vehicle and let it run at approximately 2,000
rpm for a few minutes. Then start your
vehicle.
If your vehicle will not start after a
few attempts, it probably requires
servicing. In this event please seek
qualified assistance. If the cause of your
battery discharging is not apparent, we
recommend that you have your vehicle
checked by an authorized HYUNDAI
dealer. Disconnect the jumper cables in the
exact reverse order you connected them:
1. Disconnect the jumper cable from the black, negative (-) chassis ground of
your vehicle (4).
2. Disconnect the other end of the jumper cable from the black, negative
(-) battery/chassis ground of the
assisting vehicle (3).
3. Disconnect the second jumper cable from the red, positive (+) battery/
jumper terminal of the assisting
vehicle (2).
4. Disconnect the other end of the
jumper cable from the red, positive (+)
jumper terminal of your vehicle (1).
Page 465 of 548
Emergency situations
8-10
WARNING
• The TPMS cannot alert you to severe
and sudden tire damage caused by
external factors such as nails or road debris.
• If you feel any vehicle instability,
immediately take your foot off
the accelerator, apply the brakes
gradually and with light force, and
slowly move to a safe position off the
road.
WARNING
Tampering with, modifying, or disabling
the Tire Pressure Monitoring System
(TPMS) components may interfere
with the system’s ability to warn the
driver of low tire pressure conditions
and/or TPMS malfunctions. Tampering
with, modifying, or disabling the Tire
Pressure Monitoring System (TPMS)
components may void the warranty for
that portion of the vehicle.
WARNING
This device complies with Industry
Canada RSS-210 standard.
Operation is subject to the following
three conditions: 1. This device may not cause harmful
interference.
2. This device must accept any
interference received, including
interference that may cause
undesired operation.
3. Changes or modifications not
expressly approved by the party
responsible for compliance could
void the user’s authority to operate
the equipment.
Page 472 of 548
08
8-17
Notes on the safe use of the Tire
Mobility Kit
• Park your car at the side of the road
so that you can work with the Tire
Mobility Kit away from moving traffic.
• To be sure your vehicle will not move,
even when you’re on fairly level
ground, always set your parking brake.
• Only use the Tire Mobility Kit for
sealing/inflation passenger car tires.
Only punctured areas located within
the tread region of the tire can be
sealed using the tire mobility kit.
• Do not use on motorcycles, bicycles
or any other type of tires.
• When the tire and wheel are
damaged, do not use Tire Mobility Kit
for your safety.
• Use of the Tire Mobility Kit may not be
effective for tire damage larger than
approximately 6 mm (0.24 in).
• If the tire cannot be made roadworthy
with the Tire Mobility Kit, we
recommend that you contact an
authorized HYUNDAI dealer.
• Do not use the Tire Mobility Kit if a tire
is severely damaged by driving run flat
or with insufficient air pressure.
• Do not remove any foreign objects
such as nails or screws that have
penetrated the tire.
• Provided the car is outdoors, leave
the Vehicle is ON (
indicator ON).
Otherwise operating the compressor
may eventually drain the car battery. •
Never leave the Tire Mobility Kit
unattended while it is being used.
• Do not leave the compressor running
for more than 10 min. at a time or it
may overheat.
• Do not use the Tire Mobility Kit if the
ambient temperature is below -30°C
(-22°F).
• In case of skin contact with the
sealant, wash the area thoroughly
with plenty of water. If the irritation
persists, seek medical attention.
• In case of eye contact with the
sealant, flush your eyes for at least 15
minutes. If the irritation persists, seek
medical attention.
• In case of swallowing the sealant,
rinse the mouth and drink plenty of
water. However, never give anything
to an unconscious person and seek
medical attention immediately.
• Long time exposure to the sealant
may cause damage to bodily tissue
such as kidney, etc.
Page 474 of 548
08
8-19
When towing your vehicle in an
emergency without wheel dollies:
1. While depressing the brake pedal
shift to the N (Neutral) position and
turn the vehicle off. The START/STOP
button will be in the ACC position.
2. Release the parking brake.
CAUTION
Failure to place the shift lever in N
(Neutral) may cause internal damage to
the vehicle.
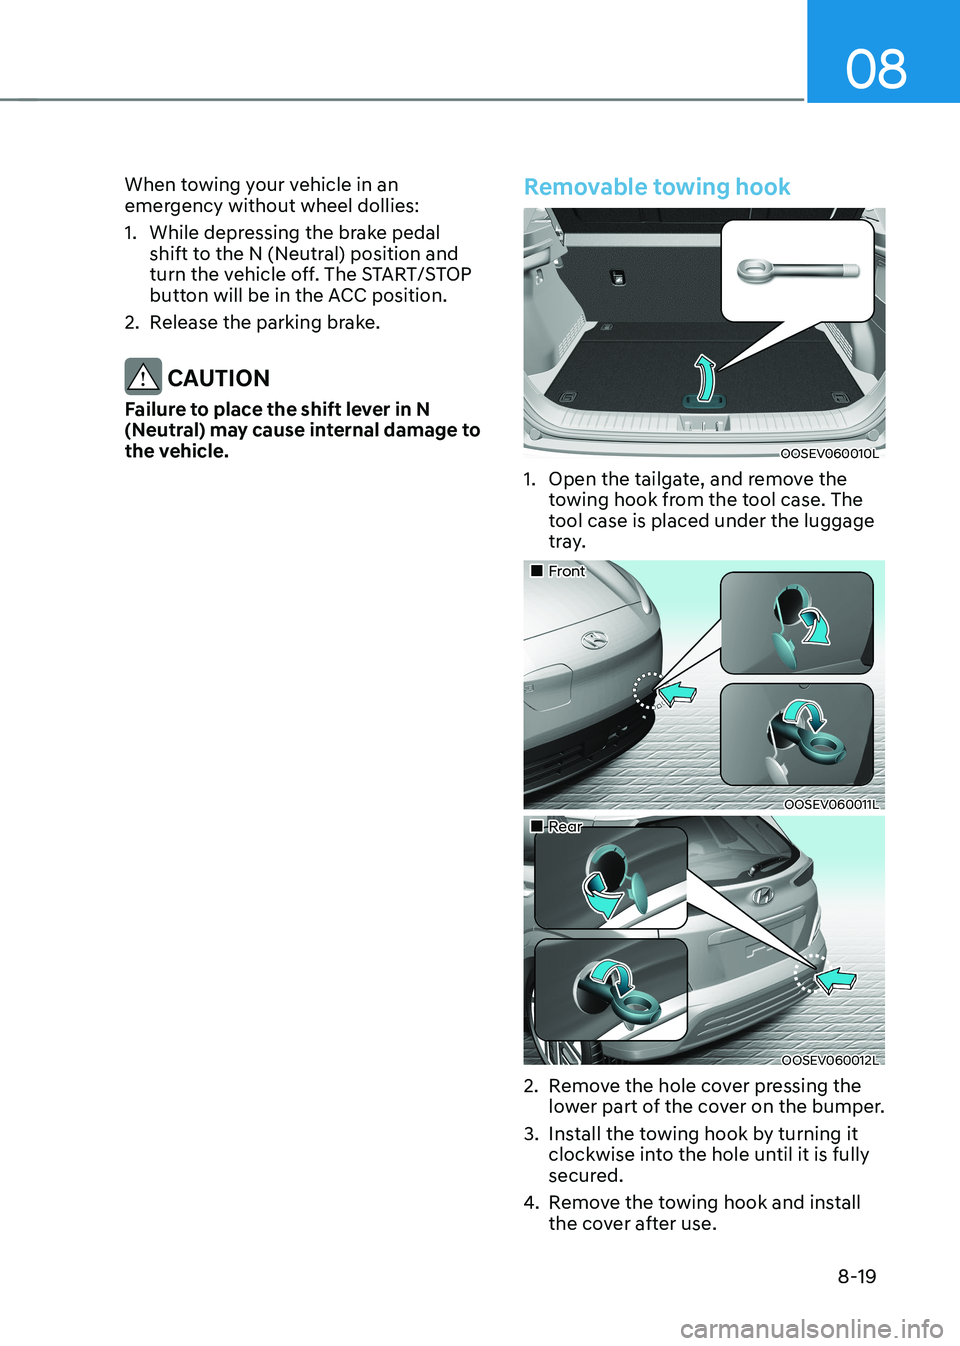
Removable towing hook
OOSEV060010L
1. Open the tailgate, and remove the towing hook from the tool case. The
tool case is placed under the luggage
tray.
„„Front
OOSEV060011L
„„Rear
OOSEV060012L
2. Remove the hole cover pressing the lower part of the cover on the bumper.
3. Install the towing hook by turning it clockwise into the hole until it is fully
secured.
4. Remove the towing hook and install
the cover after use.
Page 475 of 548
Emergency situations
8-20
Emergency towing
If towing is necessary, we recommend
you have it done by an authorized
HYUNDAI dealer or a commercial tow truck service.
If a towing service is not available in
an emergency, your vehicle may be
temporarily towed using a cable or chain
secured to the emergency towing hook
at the front (or rear) of the vehicle.
Use extreme caution when towing the
vehicle with a cable or chain. A driver
must be in the vehicle to steer it and
operate the brakes.
Towing in this manner may be done
only on hard-surfaced roads for a short
distance and at low speeds. Also, the
wheels, axles, power train, steering and
brakes must all be in good condition.
CAUTION
The driver must be in the vehicle for
steering and braking operations when
the vehicle is being towed. Passengers
other than the driver must not be in the
vehicle. Always follow these emergency towing
precautions: •
While depressing the brake pedal
shift to the N (Neutral) position and
turn the vehicle off. The START/STOP
button will be in the ACC position.
• Release the parking brake.
• Depress the brake pedal with more
force than normal as you will have
reduced braking performance.
• More steering effort will be required
because the power steering system will be disabled.
• Use a vehicle heavier than your own to
tow your vehicle.
• The drivers of both vehicles should
communicate with each other
frequently.
• Before emergency towing, check that
the hook is not broken or damaged.
• Fasten the towing cable or chain
securely to the hook.
• Do not jerk the hook. Apply steady
and even force.
Page 477 of 548
9
9. Maintenance
Motor compartment ......................................................................................... 9-3
Maintenance services ....................................................................................... 9-4
Owner’s responsibility ................................................................................................ 9-4
Owner maintenance precautions............................................................................... 9-4
Owner maintenance ......................................................................................... 9-5
Owner maintenance schedule .................................................................................... 9-5
Scheduled maintenance services ..................................................................... 9 -7
Maintenance Schedule ................................................................................................ 9 -7
Explanation of scheduled maintenance items ...............................................9-9
Cooling system ............................................................................................................ 9-9
Coolant ......................................................................................................................... 9-9
Reduction gear fluid.................................................................................................... 9-9
Brake hoses and lines.................................................................................................. 9-9Brake fluid ................................................................................................................... 9-9
Brake pads, calipers and rotors .................................................................................. 9-9
Suspension mounting bolts ........................................................................................ 9-9
Drive shafts and boots ................................................................................................ 9-9
Air conditioning refrigerant/compressor................................................................... 9-9
Coolant ............................................................................................................. 9-10
Brake fluid ......................................................................................................... 9-11
Checking the brake fluid level .................................................................................... 9-11
Washer fluid ..................................................................................................... 9-12
Checking the washer fluid level ................................................................................ 9-12
Climate control air filter................................................................................... 9-13
Filter inspection ............................................................................................... 9-13
Filter replacement ...................................................................................................... 9-13
Wiper blades .................................................................................................... 9-14
Blade inspection ......................................................................................................... 9-14
Blade replacement ................................................................................................... 9-14
Battery (12 Volt) ................................................................................................ 9-17
Battery usage.............................................................................................................. 9-18 Battery capacity label ................................................................................................ 9-18
Battery recharging ..................................................................................................... 9-18
Reset items ................................................................................................................. 9-19
Page 479 of 548
9-3
09
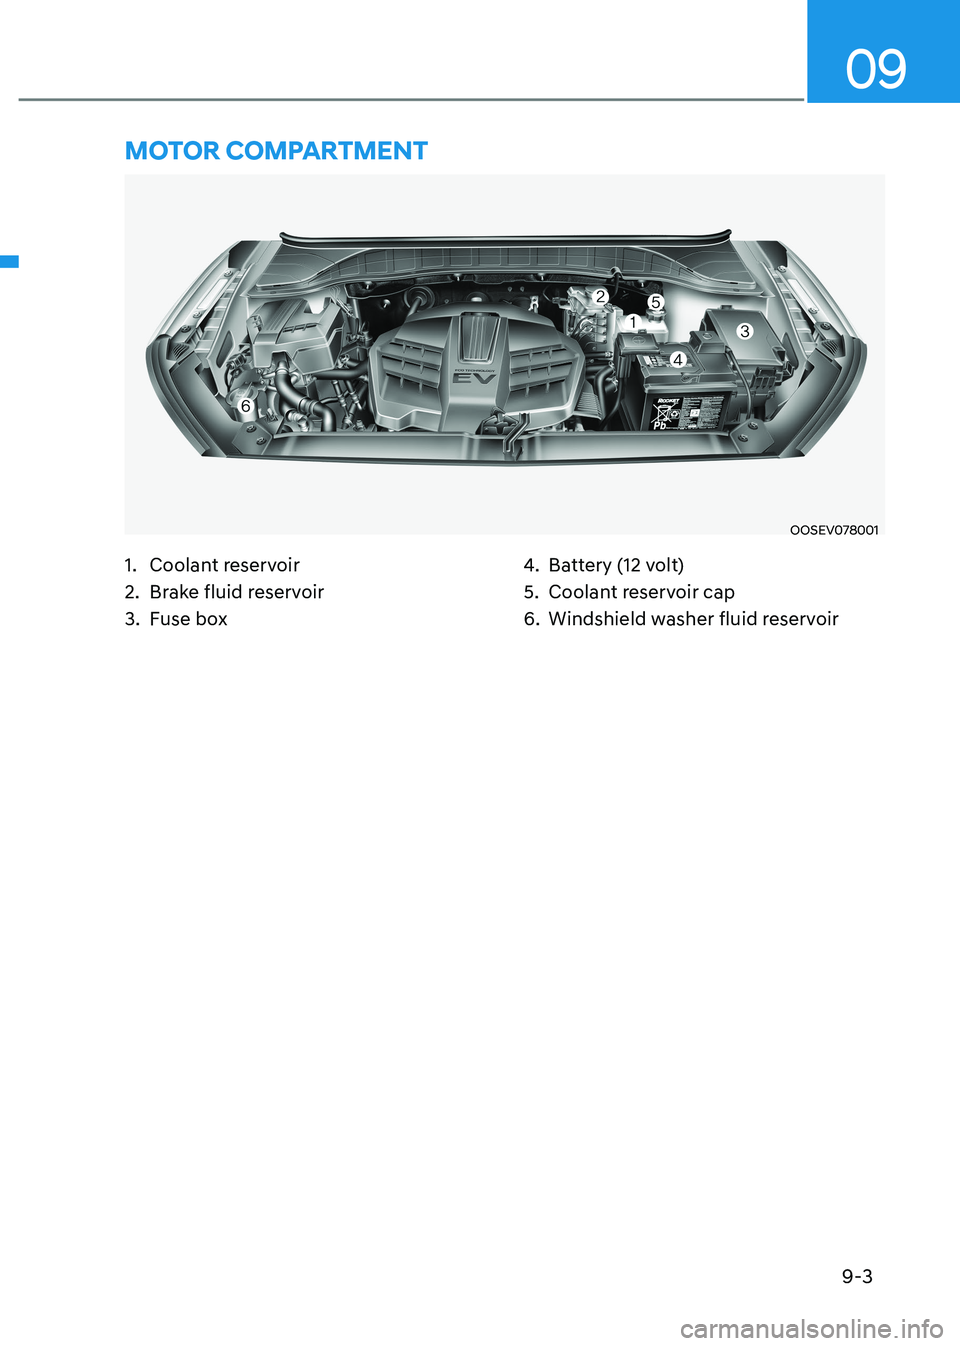
OOSEV078001
1. Coolant reservoir
2. Brake fluid reservoir
3. Fuse box 4.
Battery (12 volt)
5. Coolant reservoir cap
6. Windshield washer fluid reservoir
MOTOR COMPARTMENT
Page 481 of 548
09
9-5
OWNER MAINTENANCE
WARNING
Performing maintenance work on a
vehicle can be dangerous. If you lack
sufficient knowledge and experience
or the proper tools and equipment to
do the work, we recommend that the
system be serviced by an authorized
HYUNDAI dealer. ALWAYS follow
these precautions for performing
maintenance work: • Park your vehicle on level ground,
shift to P (Park) position, apply the
parking brake, place the START/STOP
button in the OFF position.
• Block the tires (front and back) to
prevent the vehicle from moving.
Remove loose clothing or jewelry
that can become entangled in
moving parts.
• Keep flames, sparks, or smoking
materials away from the battery and
motor related parts.
The following lists are vehicle checks and
inspections that should be performed
by the owner or an authorized HYUNDAI
dealer at the frequencies indicated to
help ensure safe, dependable operation
of your vehicle.
Any adverse conditions should be
brought to the attention of your dealer as soon as possible.
These Owner Maintenance vehicle
checks are generally not covered by
warranties and you may be charged for
labor, parts and lubricants used.Owner maintenance schedule
When you stop for charging: • Check the coolant level in the coolant
reservoir.
• Check the windshield washer fluid
level.
• Check for low or under-inflated tires.
WARNING
Be careful when checking your coolant
level when the motor compartment is
hot. This may result in coolant being
blown out of the opening and cause
serious burns and other injuries.