turn signal HYUNDAI KONA EV 2022 User Guide
[x] Cancel search | Manufacturer: HYUNDAI, Model Year: 2022, Model line: KONA EV, Model: HYUNDAI KONA EV 2022Pages: 548, PDF Size: 49.14 MB
Page 366 of 548
07
7-33
warning
Take the following precautions when
using Lane Keeping Assist: • The driver should hold the
responsibility to safely drive and
control the vehicle. Do not solely rely
on Lane Keeping Assist and drive
dangerously.
• The operation of Lane Keeping
Assist can be cancelled or not
work properly depending on road
conditions and surroundings. Always be cautious while driving.
• Refer to “Limitations of Lane Keeping
Assist” if the lane is not detected
properly.
• When you are towing a trailer or
another vehicle, we recommend that
Lane Keeping Assist is turned off due
to safety reasons.
• If the vehicle is driven at high speed,
the steering wheel will not be
controlled. The driver must always
follow the speed limit when using
Lane Keeping Assist.
• If any other system’s warning
message is displayed or audible
warning is generated, Lane Keeping
Assist warning message may not be
displayed and audible warning may
not be generated. •
You may not hear the warning
sound of Lane Keeping Assist if the
surrounding is noisy.
• If you attach objects to the steering
wheel, steering may not be assisted
properly.
• Lane Keeping Assist may not operate
for 15 seconds after the vehicle is
started, or the front view camera is
initialized.
• Lane Keeping Assist will not operate when:
- The turn signal or hazard warning flasher is turned on.
- The vehicle is not driven in the
center of the lane when Lane
Keeping Assist is turned on or right
after changing a lane.
- esC (electronic stability Control)
or vsm (vehicle stability
Management) is activated.
- The vehicle is driven on a sharp
curve.
- vehicle speed is below 55 km/h
(35 mph) or above 210 km/h
(130 mph).
- The vehicle makes sharp lane changes.
- The vehicle brakes suddenly.
Page 372 of 548
07
7-39
Collision Warning
• Collision warning will operate when the turn signal is turned on in the
direction of the detected vehicle.
• If ‘Warning Only’ is selected from the Settings menu, the collision warning
will operate when your vehicle
approaches the lane the blind spot
vehicle is detected.
• To warn the driver of a collision, the
warning light on the outside rearview
mirror and head-up display (if
equipped) will blink. At the same time,
an audible warning will sound and the
steering wheel will vibrate.
• When the turn signal is turned off or
you move away from the lane, the
collision warning will be canceled
and the function will return to vehicle
detection state. warning
• The detecting range of the rear
corner radar is determined by a
standard road width, therefore, on a
narrow road, the function may detect
other vehicles in the next next lane
and warn you. In contrast, on a wide
road, the function may not be able to
detect a vehicle driving in the next
lane and may not warn you.
• When the hazard warning flasher is
on, the collision warning by the turn
signal will not operate.
Information
If the driver's seat is on the left side, the
collision warning may occur when you
turn left. Maintain a proper distance with the vehicles in the left lane. If the driver's seat is on the right side, the collision
warning may occur when you turn right.
Maintain a proper distance with the vehicles in the right lane.
Page 402 of 548
07
7-69
Overtaking Acceleration Assist
Overtaking Acceleration Assist will
operate when the turn signal indicator
is turned on to the left (left-hand drive)
or turned on to the right (right-hand
drive) while Smart Cruise Control is
operating, and the following conditions
are satisfied: • Your vehicle speed is above 60 km/h
(40 mph)
• The hazard warning flasher is off
• A vehicle is detected in front of your
vehicle
• Deceleration is not needed to
maintain distance with the vehicle in
front
warning
• When the turn signal indicator is
turned on to the left (left-hand drive)
or turned on to the right (right-
hand drive) while there is a vehicle
ahead, the vehicle may accelerate
temporarily. Pay attention to the
road conditions at all times.
• Regardless of your countries driving
direction, Overtaking Acceleration
Assist will operate when the
conditions are satisfied. When
using the function in countries with
different driving direction, always
check the road conditions at all times.
Smart Cruise Control display and
control
Basic function
You can see the status of the Smart
Cruise Control operation in the Driving
Assist view on the cluster. Refer to “View
Modes” section in chapter 4.
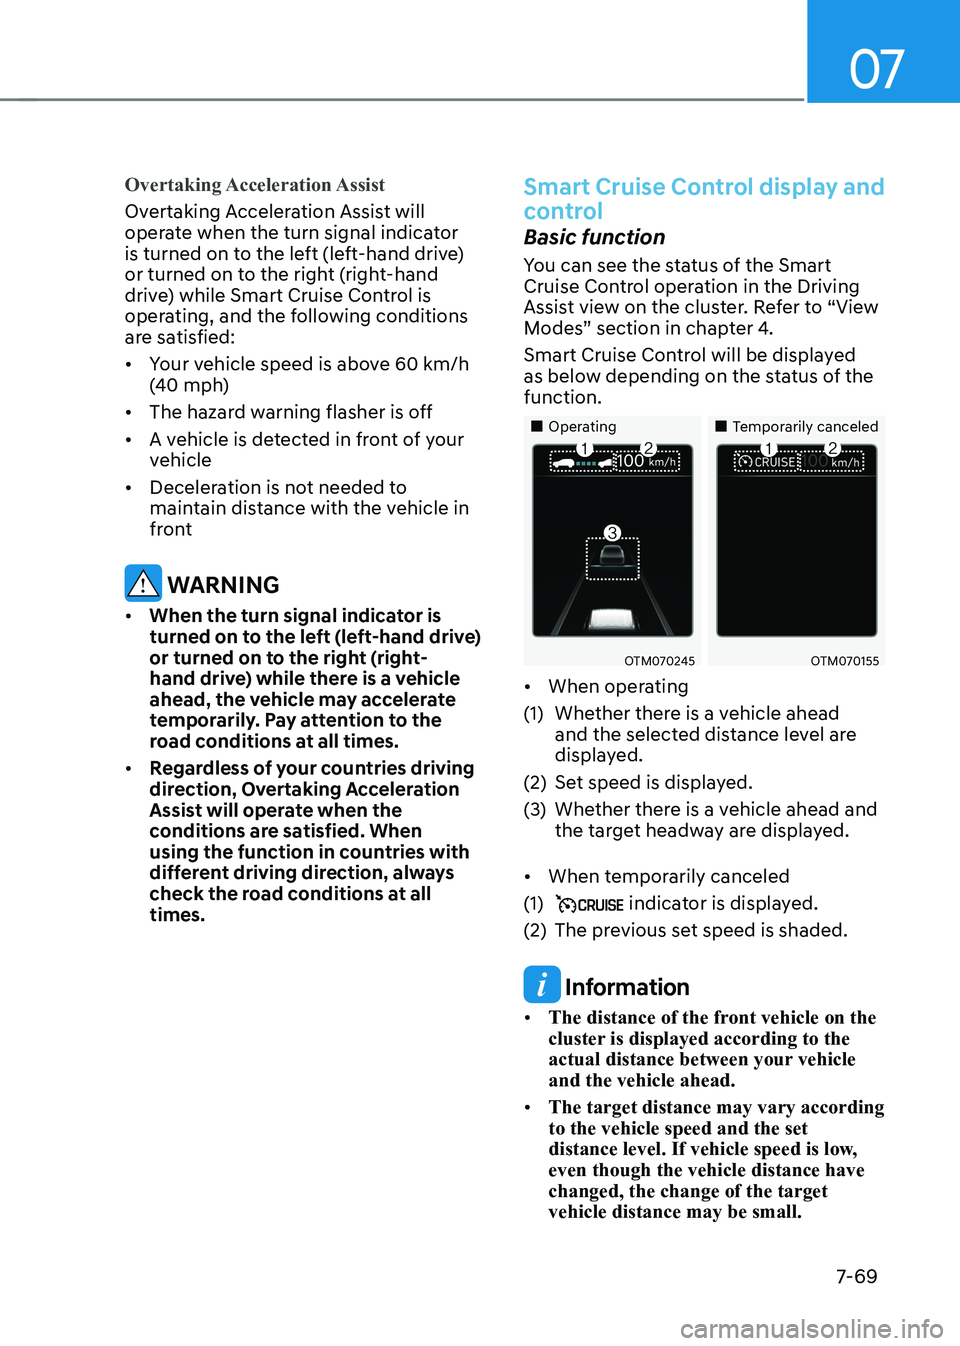
Smart Cruise Control will be displayed
as below depending on the status of the function.
„„Operating „„Temporarily canceled
OTM070245OTM070155
• When operating
(1) Whether there is a vehicle ahead and the selected distance level are
displayed.
(2) Set speed is displayed.
(3) Whether there is a vehicle ahead and the target headway are displayed.
• When temporarily canceled
(1)
indicator is displayed.
(2) The previous set speed is shaded.
Information
• The distance of the front vehicle on the
cluster is displayed according to the
actual distance between your vehicle and the vehicle ahead.
• The target distance may vary according to the vehicle speed and the set
distance level. If vehicle speed is low, even though the vehicle distance have changed, the change of the target vehicle distance may be small.
Page 457 of 548
Emergency situations
8-2
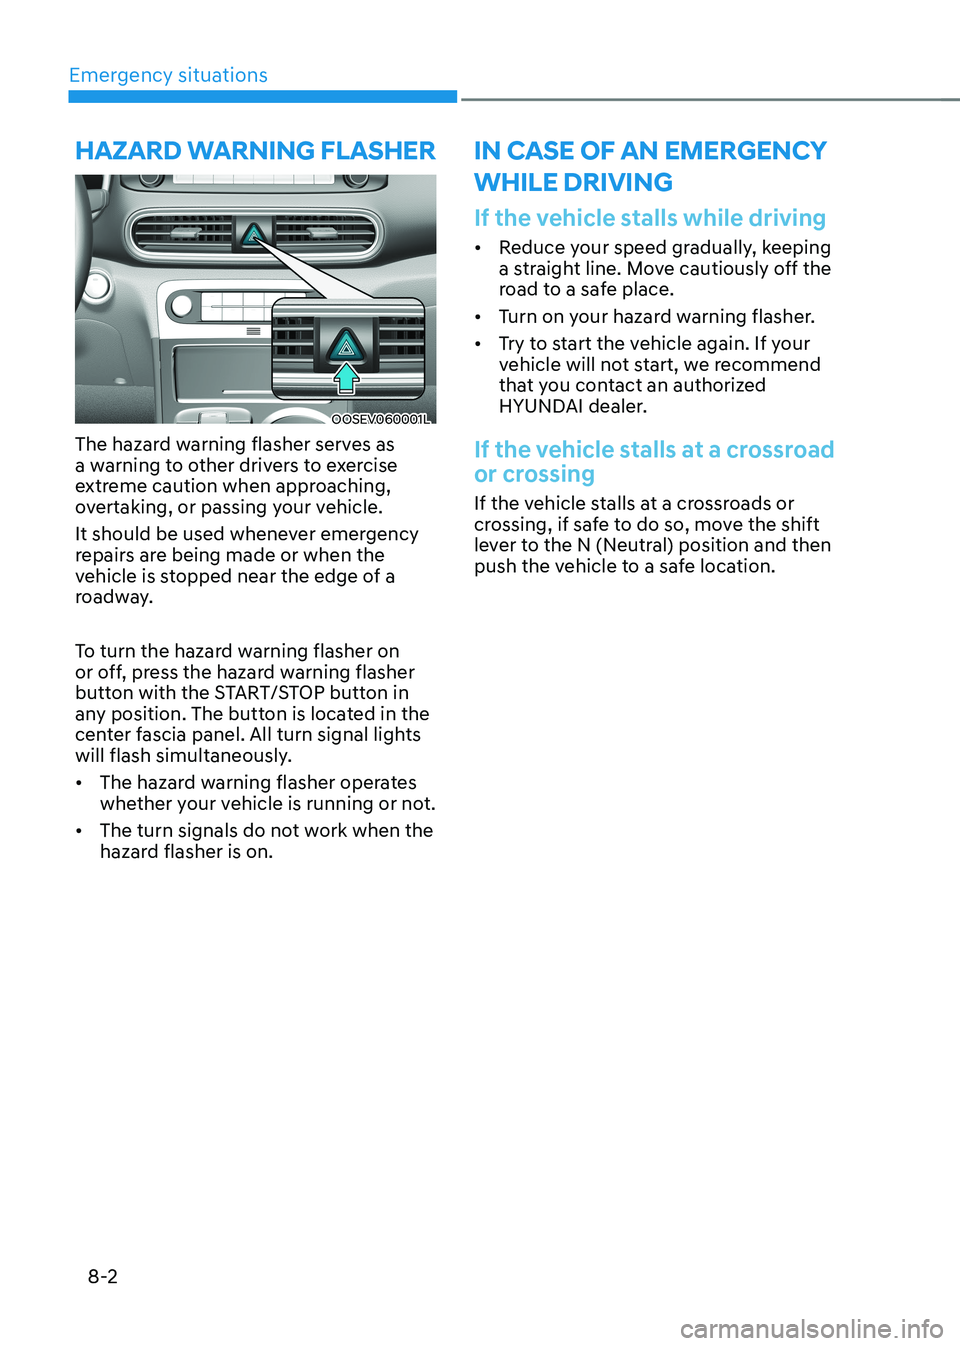
OOSEV060001L
The hazard warning flasher serves as
a warning to other drivers to exercise
extreme caution when approaching,
overtaking, or passing your vehicle.
It should be used whenever emergency
repairs are being made or when the
vehicle is stopped near the edge of a
roadway.
To turn the hazard warning flasher on
or off, press the hazard warning flasher
button with the START/STOP button in
any position. The button is located in the
center fascia panel. All turn signal lights
will flash simultaneously. • The hazard warning flasher operates
whether your vehicle is running or not.
• The turn signals do not work when the
hazard flasher is on.
If the vehicle stalls while driving
• Reduce your speed gradually, keeping
a straight line. Move cautiously off the
road to a safe place.
• Turn on your hazard warning flasher.
• Try to start the vehicle again. If your
vehicle will not start, we recommend
that you contact an authorized
HYUNDAI dealer.
If the vehicle stalls at a crossroad
or crossing
If the vehicle stalls at a crossroads or
crossing, if safe to do so, move the shift
lever to the N (Neutral) position and then
push the vehicle to a safe location.
Hazard warning flasHerin case of an emergency wHile driving
Page 462 of 548
08
8 -7
Tire pressure monitoring system
WARNING
Over-inflation or under-inflation can
reduce tire life, adversely affect vehicle
handling, and lead to sudden tire failure
that may cause loss of vehicle control
resulting in an accident.
Each tire, including the spare (if
provided), should be checked monthly
when cold and inflated to the inflation
pressure recommended by the vehicle
manufacturer on the vehicle placard
or tire inflation pressure label. (If your
vehicle has tires of a different size than
the size indicated on the vehicle placard
or tire inflation pressure label, you should
determine the proper tire inflation
pressure for those tires.)
As an added safety feature, your
vehicle has been equipped with a tire
pressure monitoring system (TPMS)
that illuminates a low tire pressure
telltale when one or more of your tires is
significantly under-inflated. Accordingly,
when the low tire pressure telltale
illuminates, you should stop and check
your tires as soon as possible, and inflate
them to the proper pressure. Driving on
a significantly under-inflated tire causes
the tire to overheat and can lead to tire
failure. Under-inflation also reduces
electric energy efficiency and tire tread
life, and may affect the vehicle’s handling
and stopping ability.
Please note that the TPMS is not a
substitute for proper tire maintenance,
and it is the driver’s responsibility to
maintain correct tire pressure, even if
under-inflation has not reached the level
to trigger illumination of the TPMS low
tire pressure telltale.
Your vehicle has also been equipped
with a TPMS malfunction indicator
to indicate when the system is
not operating properly. The TPMS
malfunction indicator is combined with
the low tire pressure telltale. When
the system detects a malfunction, the
telltale will flash for approximately one
minute and then remain continuously
illuminated. This sequence will continue
upon subsequent vehicle start-ups as
long as the malfunction exists. When
the malfunction indicator is illuminated,
the system may not be able to detect or
signal low tire pressure as intended.
TPMS malfunctions may occur for
a variety of reasons, including the
installation of replacement or alternate
tires or wheels on the vehicle that
prevent the TPMS from functioning
properly. Always check the TPMS
malfunction telltale after replacing one
or more tires or wheels on your vehicle to
ensure that the replacement or alternate
tires and wheels allow the TPMS to
continue to function properly.
NOTICE
If any of the below happens, we
recommend that the system be checked
by an authorized HYUNDAI dealer. 1. The low tire pressure telltale/TPMS
malfunction indicator does not
illuminate for 3 seconds when the
START/STOP button is turned to the
ON position or the Vehicle is ON (
indicator ON).
2. The TPMS malfunction indicator
remains illuminated after blinking for
approximately 1 minute.
3. The Low tire pressure position
telltale remains illuminated.
Page 478 of 548
9
Tire and wheels ............................................................................................... 9-20
Tire care ..................................................................................................................... 9-20
Recommended cold tire inflation pressures ..........................................................9-20
Check tire inflation pressure ..................................................................................... 9-21
Tire rotation ................................................................................................................ 9-22
Wheel alignment and tire balance ............................................................................ 9-22
Tire replacement ........................................................................................................ 9-23
Wheel replacement .................................................................................................... 9-24
Tire traction ................................................................................................................ 9-24
Tire maintenance ....................................................................................................... 9-24
Tire sidewall labeling .................................................................................................. 9-24
Tire Terminology and Definitions .............................................................................. 9-27
All season tires ........................................................................................................... 9-30
Summer tires ............................................................................................................. 9-30
Snow Tires.................................................................................................................. 9-30 Radial-ply Tires .......................................................................................................... 9-30
Low Aspect Ratio Tires ............................................................................................... 9-31
Fuses ................................................................................................................ 9-32
Instrument panel fuse replacement ........................................................................ 9-33
Motor compartment panel fuse replacement ..........................................................9-35
Light bulbs ....................................................................................................... 9-44
Headlamp, position lamp, turn signal lamp and
daytime running light bulb replacement .................................................................9-45
Side repeater lamp replacement .............................................................................. 9-47
Rear combination lamp bulb replacement ..............................................................9-47
High mounted stop lamp replacement ................................................................... 9-49
License plate light bulb replacement ...................................................................... 9-50
Interior light bulb replacement ................................................................................ 9-50
Appearance care ............................................................................................. 9-52
Exterior care ............................................................................................................... 9-52
Interior care ................................................................................................................ 9-57
Page 482 of 548
Maintenance
9-6
While operating your vehicle: •
Check for vibrations in the steering
wheel. Notice if there is any increased
steering effort or looseness in the
steering wheel, or change in its
straight-ahead position.
• Notice if your vehicle constantly turns
slightly or “pulls” to one side when
traveling on smooth, level road.
• When stopping, listen and check for
unusual sounds, pulling to one side,
increased brake pedal travel or “hard-
to-push” brake pedal.
• If any slipping or changes in the
operation of your reduction gear
occurs, check the reduction gear fluid
level.
• Check the reduction gear p (park) function.
• Check the parking brake.
• Check for fluid leaks under your
vehicle (water dripping from the air
conditioning system during or after use is normal).
At least monthly: • Check coolant level in the coolant
reservoir.
• Check the operation of all exterior
lights, including the stoplights, turn
signals and hazard warning flashers.
• Check the inflation pressures of all
tires including the spare for tires that
are worn, show uneven wear, or are damaged.
• Check for loose wheel lug nuts.
• Do not add regular green coolant. •
At least twice a year:
(i.e., every Spring and Autumn)
• Check radiator, heater and air
conditioning hoses for leaks or damage.
• Check windshield washer spray and
wiper operation. Clean wiper blades
with a clean cloth dampened with
washer fluid.
• Check headlamp alignment.
• Check the seat belts for wear and function.
At least once a year: • Clean body and door drain holes.
• Lubricate door hinges and hood hinges.
• Lubricate door and hood locks and
latches.
• Lubricate door rubber weather strips.
• Check the air conditioning system.
• Inspect and lubricate reduction gear
linkage and controls.
• Clean the battery and terminals.
• Check the brake fluid level.
Page 521 of 548
09
9-45
Headlamp, position lamp, turn
signal lamp and daytime running
light bulb replacement
Type A
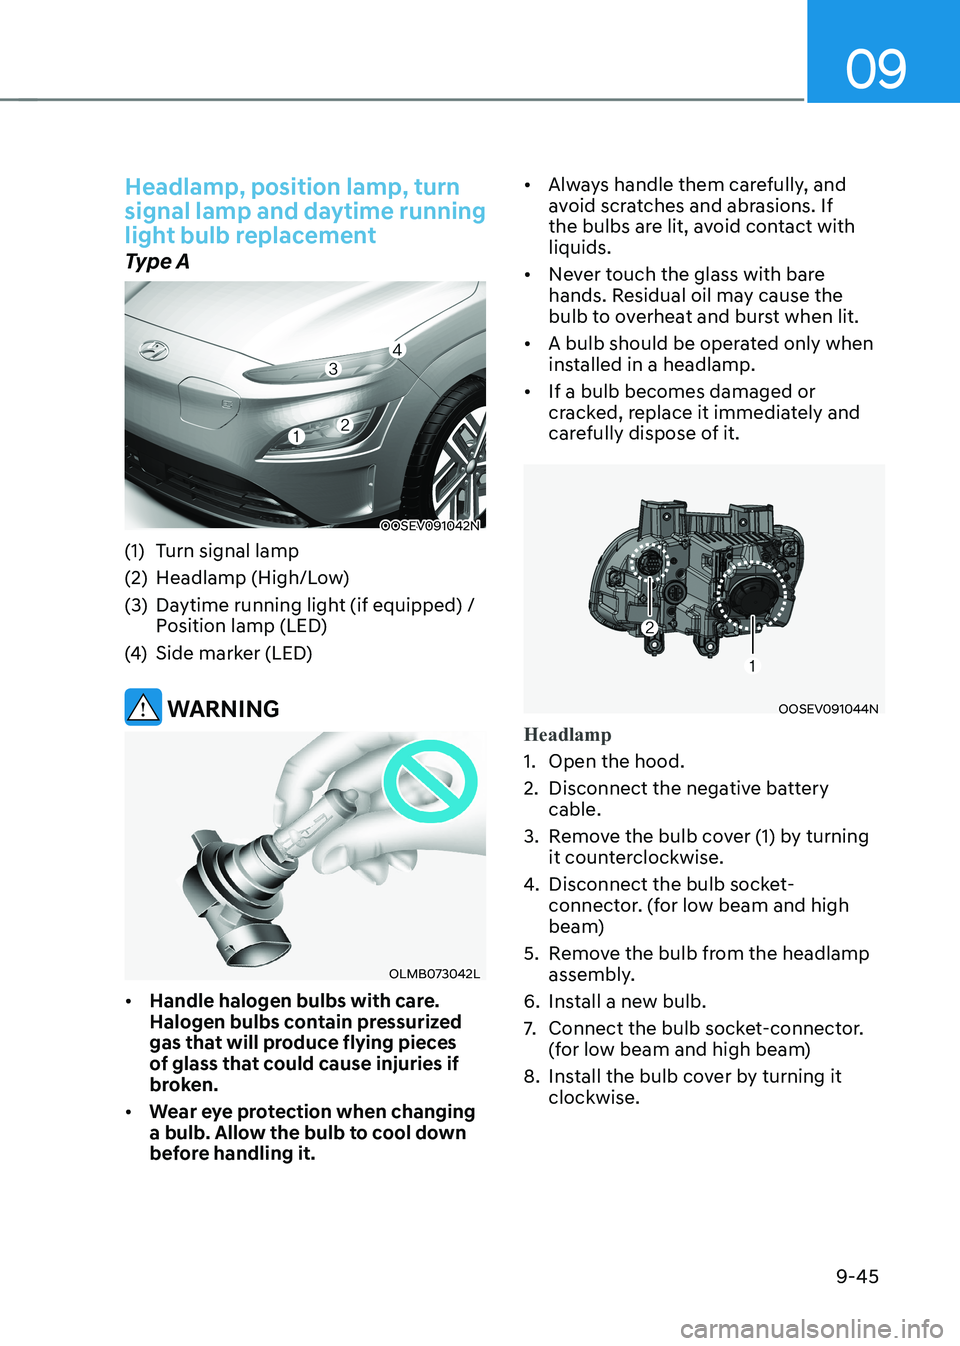
OOSEV091042N
(1) Turn signal lamp
(2) Headlamp (High/Low)
(3) Daytime running light (if equipped) / position lamp (LED)
(4) Side marker (LED)
WARNING
OLMB073042L
• Handle halogen bulbs with care.
Halogen bulbs contain pressurized
gas that will produce flying pieces
of glass that could cause injuries if
broken.
• Wear eye protection when changing
a bulb. Allow the bulb to cool down
before handling it. •
Always handle them carefully, and
avoid scratches and abrasions. If
the bulbs are lit, avoid contact with liquids.
• Never touch the glass with bare
hands. Residual oil may cause the
bulb to overheat and burst when lit.
• A bulb should be operated only when
installed in a headlamp.
• If a bulb becomes damaged or
cracked, replace it immediately and
carefully dispose of it.
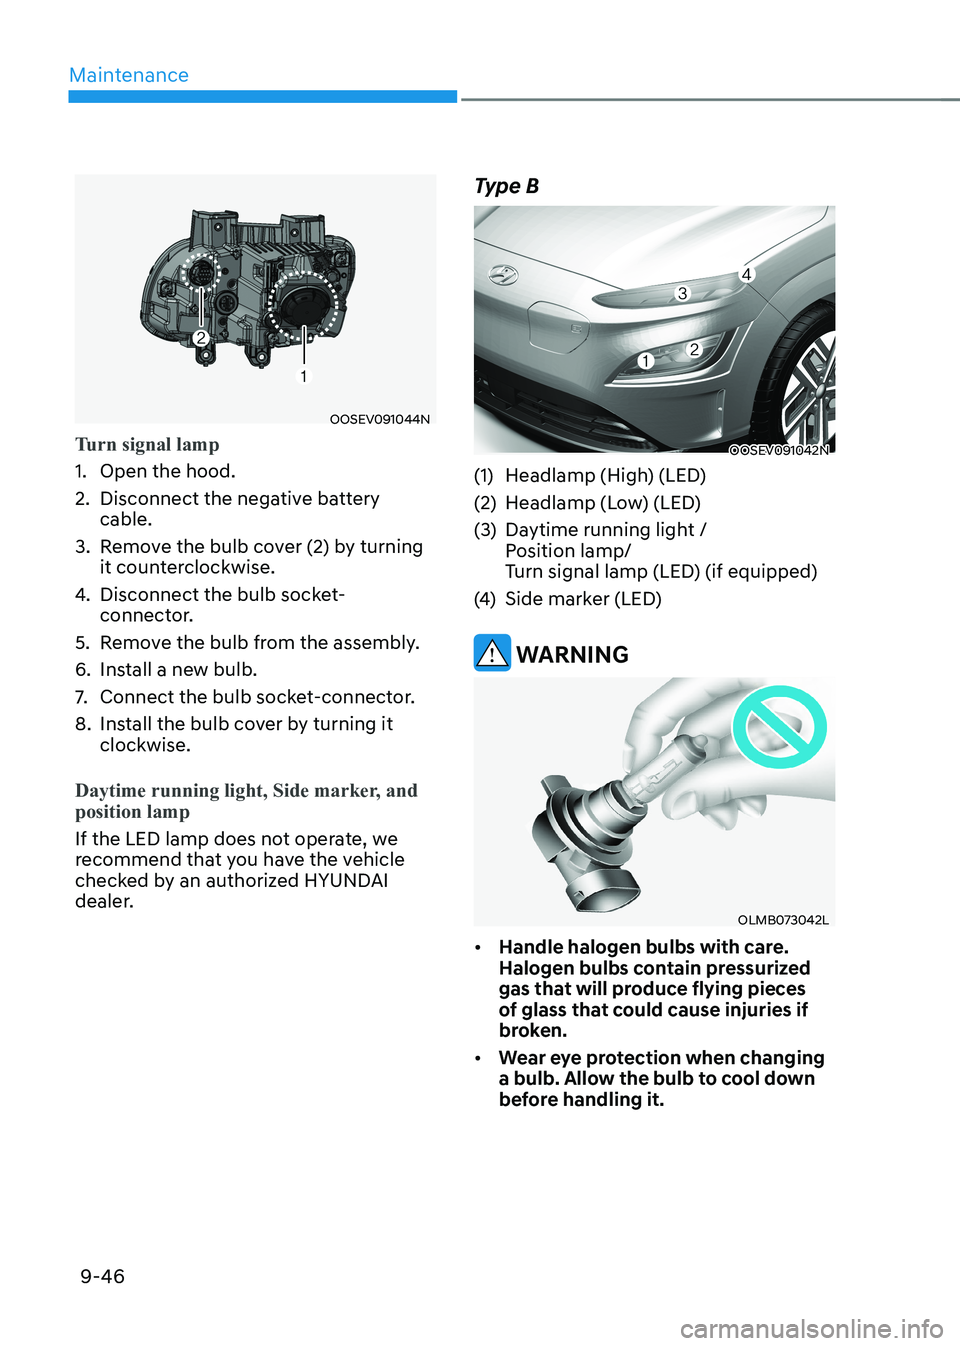
OOSEV091044N
Headlamp
1. Open the hood.
2. Disconnect the negative battery
cable.
3. Remove the bulb cover (1) by turning it counterclockwise.
4. Disconnect the bulb socket-
connector. (for low beam and high
beam)
5. Remove the bulb from the headlamp assembly.
6. Install a new bulb.
7. Connect the bulb socket-connector.
(for low beam and high beam)
8. Install the bulb cover by turning it clockwise.
Page 522 of 548
Maintenance
9-46
OOSEV091044N
Turn signal lamp
1. Open the hood.
2. Disconnect the negative battery cable.
3. Remove the bulb cover (2) by turning it counterclockwise.
4. Disconnect the bulb socket-
connector.
5. Remove the bulb from the assembly.
6. Install a new bulb.
7. Connect the bulb socket-connector.
8. Install the bulb cover by turning it clockwise.
Daytime running light, Side marker, and position lamp
If the LED lamp does not operate, we
recommend that you have the vehicle
checked by an authorized HYUNDAI
dealer. Type B
OOSEV091042N
(1) Headlamp (High) (LED)
(2) Headlamp (Low) (LED)
(3) Daytime running light / position lamp/
Turn signal lamp (LED) (if equipped)
(4) Side marker (LED)
WARNING
OLMB073042L
• Handle halogen bulbs with care.
Halogen bulbs contain pressurized
gas that will produce flying pieces
of glass that could cause injuries if
broken.
• Wear eye protection when changing
a bulb. Allow the bulb to cool down
before handling it.
Page 523 of 548
09
9-47
•
Always handle them carefully, and
avoid scratches and abrasions. If
the bulbs are lit, avoid contact with liquids.
• Never touch the glass with bare
hands. Residual oil may cause the
bulb to overheat and burst when lit.
• A bulb should be operated only when
installed in a headlamp.
• If a bulb becomes damaged or
cracked, replace it immediately and
carefully dispose of it.
Daytime running light, position lamp, turn signal lamp, and head lamp
If the LED lamp does not operate, we
recommend that you have the vehicle
checked by an authorized HYUNDAI
dealer.
Side repeater lamp replacement
OOSEV078024
If the light bulb does not operate, we
recommend that you have the vehicle
checked by an authorized HYUNDAI
dealer.
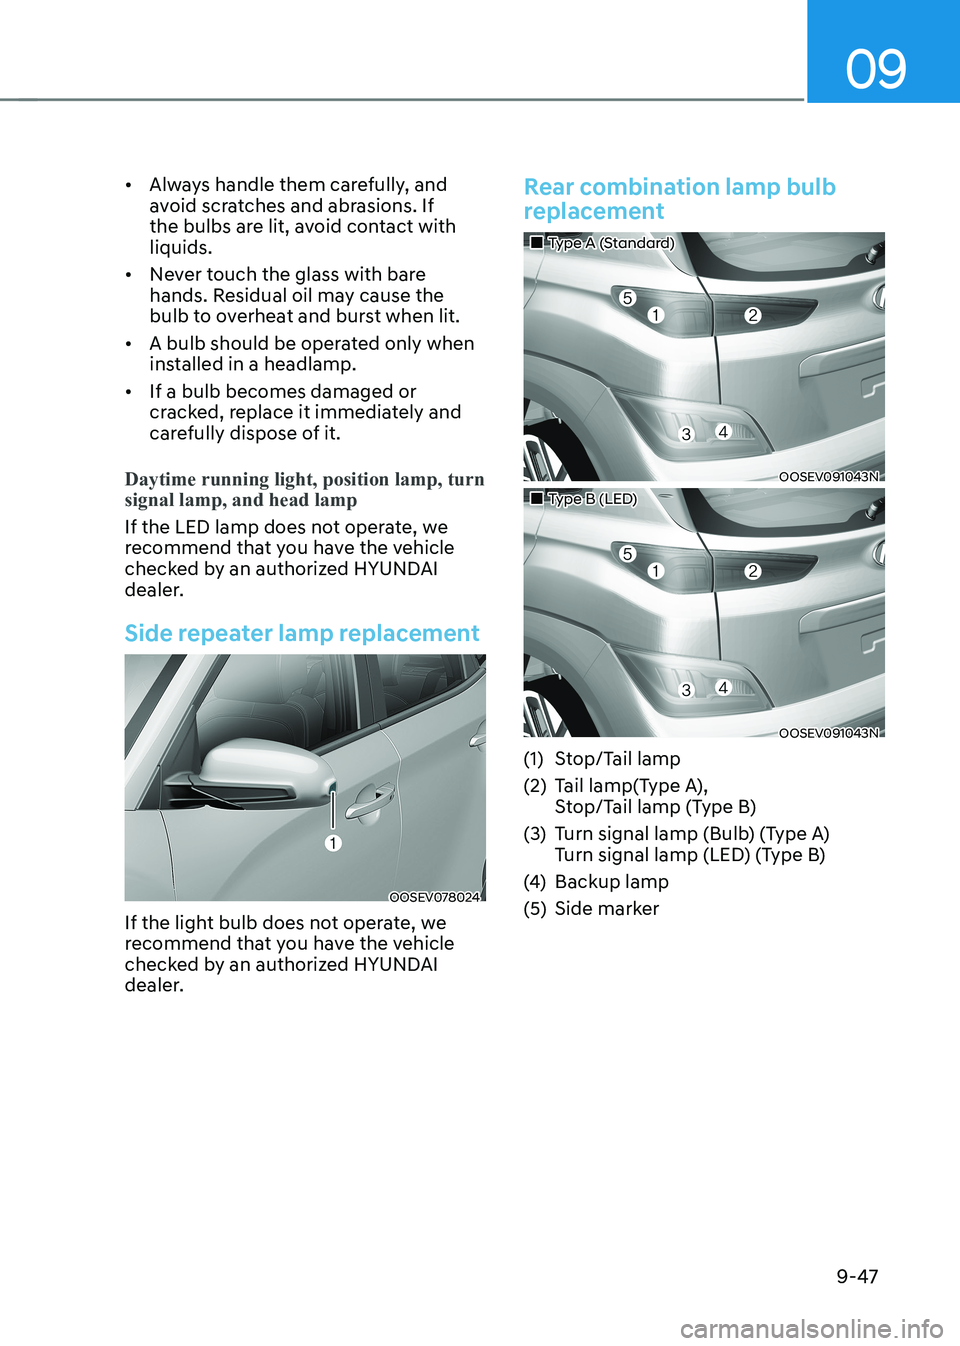
Rear combination lamp bulb
replacement
„„Type A (Standard)
OOSEV091043N
„„Type B (LED)
OOSEV091043N
(1) Stop/Tail lamp
(2) Tail lamp(Type A), Stop/Tail lamp (Type B)
(3) Turn signal lamp (Bulb) (Type A) Turn signal lamp (LED) (Type B)
(4) Backup lamp
(5) Side marker