ECO mode HYUNDAI KONA EV 2023 Owner's Manual
[x] Cancel search | Manufacturer: HYUNDAI, Model Year: 2023, Model line: KONA EV, Model: HYUNDAI KONA EV 2023Pages: 548, PDF Size: 49.14 MB
Page 177 of 548
Instrument cluster
4-34
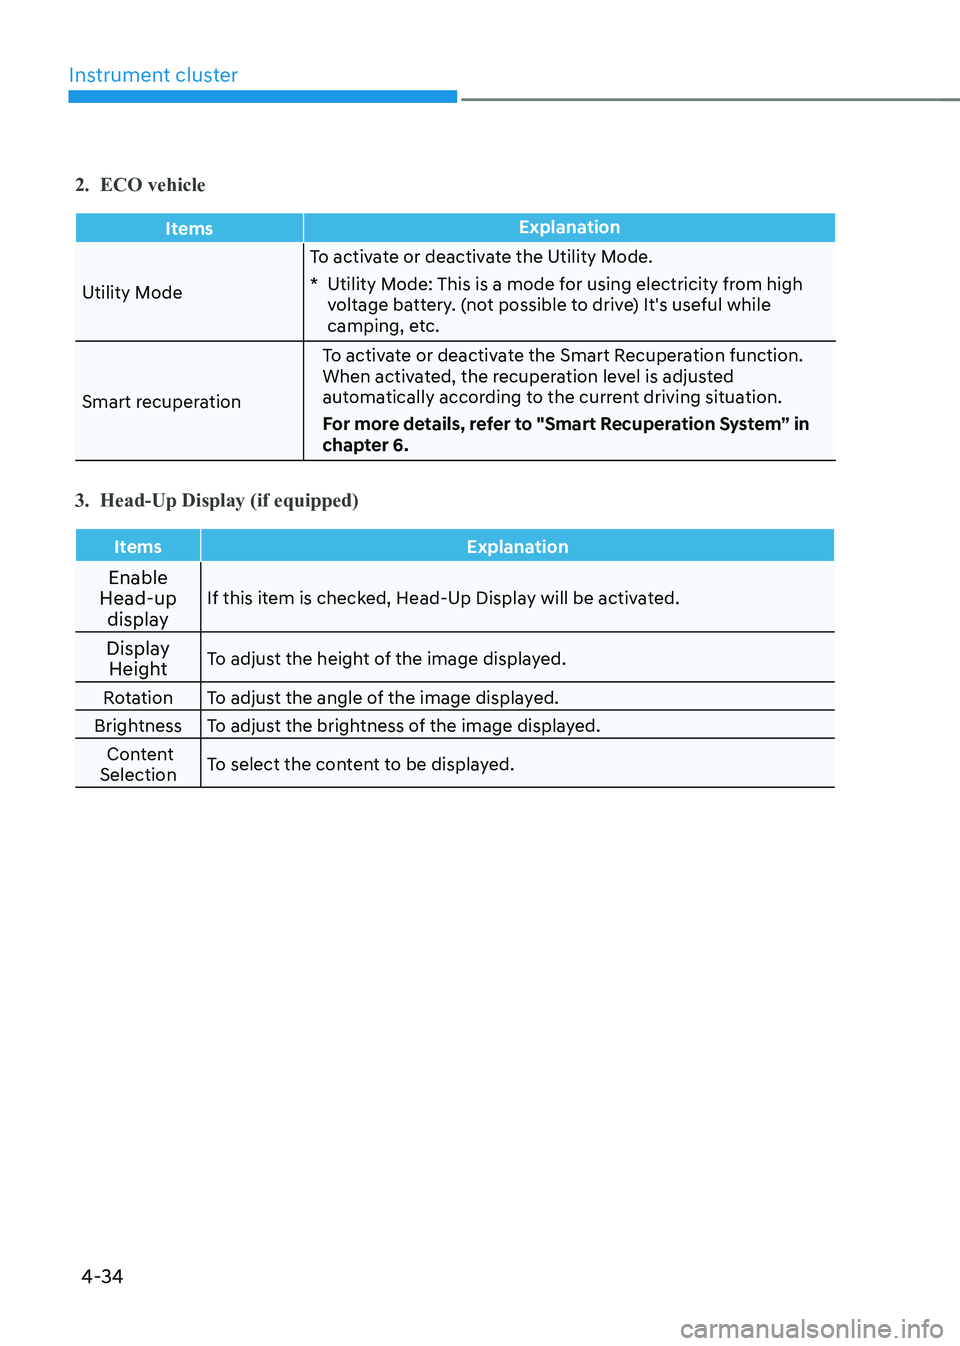
2. ECO vehicle
ItemsExplanation
Utility ModeTo activate or deactivate the Utility Mode.
* Utility Mode: This is a mode for using electricity from high
voltage battery. (not possible to drive) It's useful while
camping, etc.
Smart recuperation To activate or deactivate the Smart Recuperation function.
When activated, the recuperation level is adjusted
automatically according to the current driving situation.
For more details, refer to "Smart Recuperation System” in
chapter 6.
3. Head-Up Display (if equipped)
Items Explanation
Enable
Head-up
display If this item is checked, Head-Up Display will be activated.
Display Height To adjust the height of the image displayed.
Rotation To adjust the angle of the image displayed.
Brightness To adjust the brightness of the image displayed. Content
Selection To select the content to be displayed.
Page 178 of 548
04
4-35
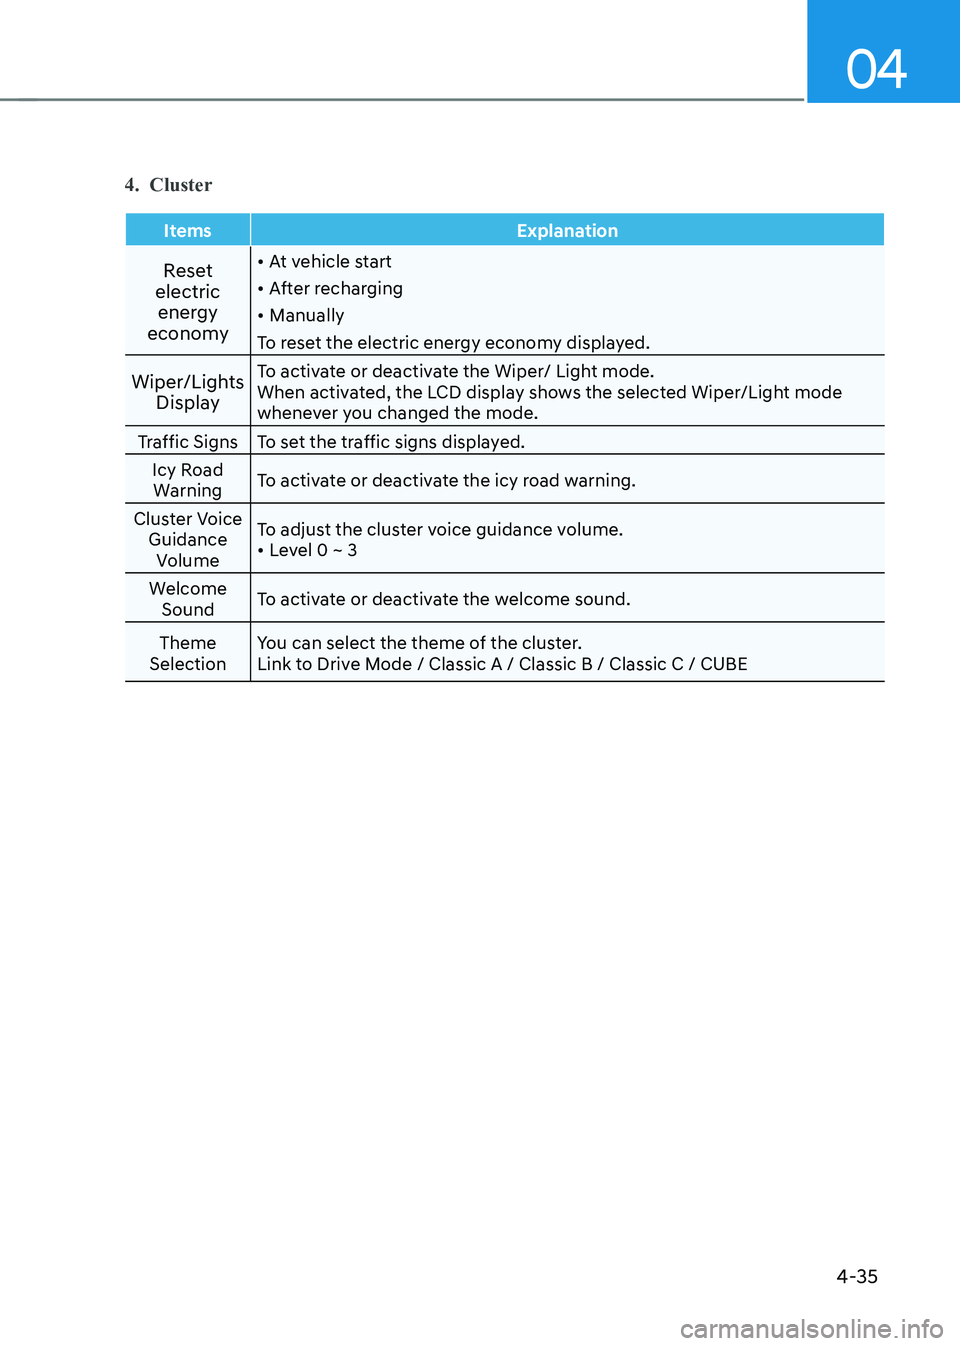
4. Cluster
Items Explanation
Reset
electric energy
economy •
At vehicle start
• After recharging
• Manually
To reset the electric energy economy displayed.
Wiper/Lights Display To activate or deactivate the Wiper/ Light mode.
When activated, the LCD display shows the selected Wiper/Light mode
whenever you changed the mode.
Traffic Signs To set the traffic signs displayed. Icy Road Warning To activate or deactivate the icy road warning.
Cluster Voice Guidance Volume To adjust the cluster voice guidance volume.•
Level 0 ~ 3
Welcome Sound To activate or deactivate the welcome sound.
Theme
Selection You can select the theme of the cluster.
Link to Drive Mode / Classic A / Classic B / Classic C / CUBE
Page 179 of 548
Instrument cluster
4-36
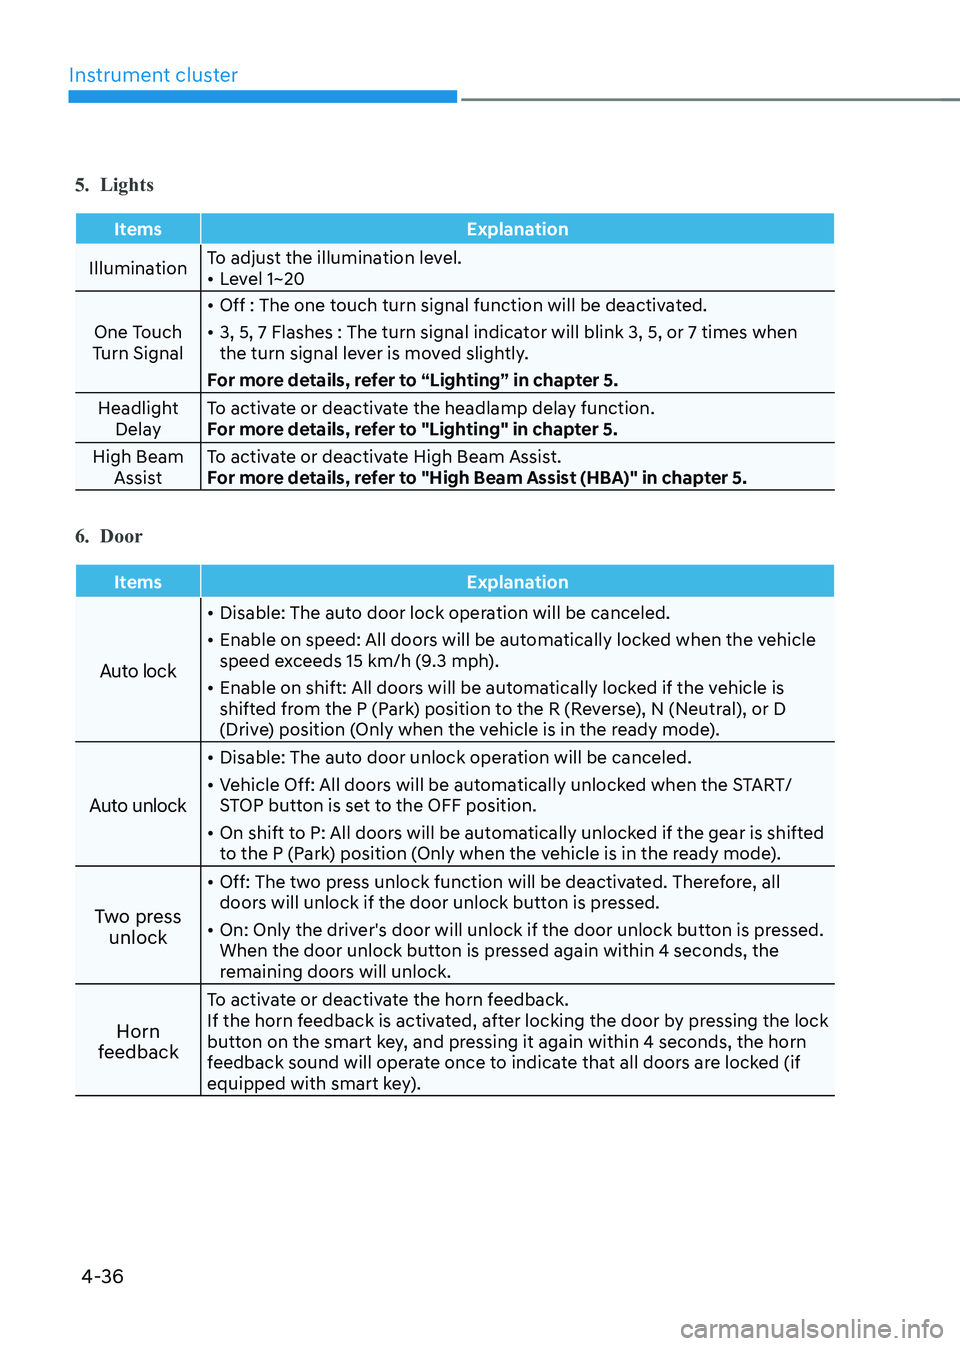
5. Lights
Items Explanation
IlluminationTo adjust the illumination level. •
Level 1~20
One Touch
Turn Signal •
Off : The one touch turn signal function will be deactivated.
• 3, 5, 7 Flashes : The turn signal indicator will blink 3, 5, or 7 times when
the turn signal lever is moved slightly.
For more details, refer to “Lighting” in chapter 5.
Headlight Delay To activate or deactivate the headlamp delay function.
For more details, refer to "Lighting" in chapter 5.
High Beam Assist To activate or deactivate High Beam Assist.
For more details, refer to "High Beam Assist (HBA)" in chapter 5.
6. Door
Items Explanation
Auto lock
•
Disable: The auto door lock operation will be canceled.
• Enable on speed: All doors will be automatically locked when the vehicle
speed exceeds 15 km/h (9.3 mph).
• Enable on shift: All doors will be automatically locked if the vehicle is
shifted from the P (Park) position to the R (Reverse), N (Neutral), or D
(Drive) position (Only when the vehicle is in the ready mode).
Auto unlock
• Disable: The auto door unlock operation will be canceled.
• Vehicle Off: All doors will be automatically unlocked when the START/
STOP button is set to the OFF position.
• On shift to P: All doors will be automatically unlocked if the gear is shifted
to the P (Park) position (Only when the vehicle is in the ready mode).
Two press unlock •
Off: The two press unlock function will be deactivated. Therefore, all
doors will unlock if the door unlock button is pressed.
• On: Only the driver's door will unlock if the door unlock button is pressed.
When the door unlock button is pressed again within 4 seconds, the
remaining doors will unlock.
Horn
feedback To activate or deactivate the horn feedback.
If the horn feedback is activated, after locking the door by pressing the lock
button on the smart key, and pressing it again within 4 seconds, the horn
feedback sound will operate once to indicate that all doors are locked (if
equipped with smart key).
Page 181 of 548
Instrument cluster
4-38
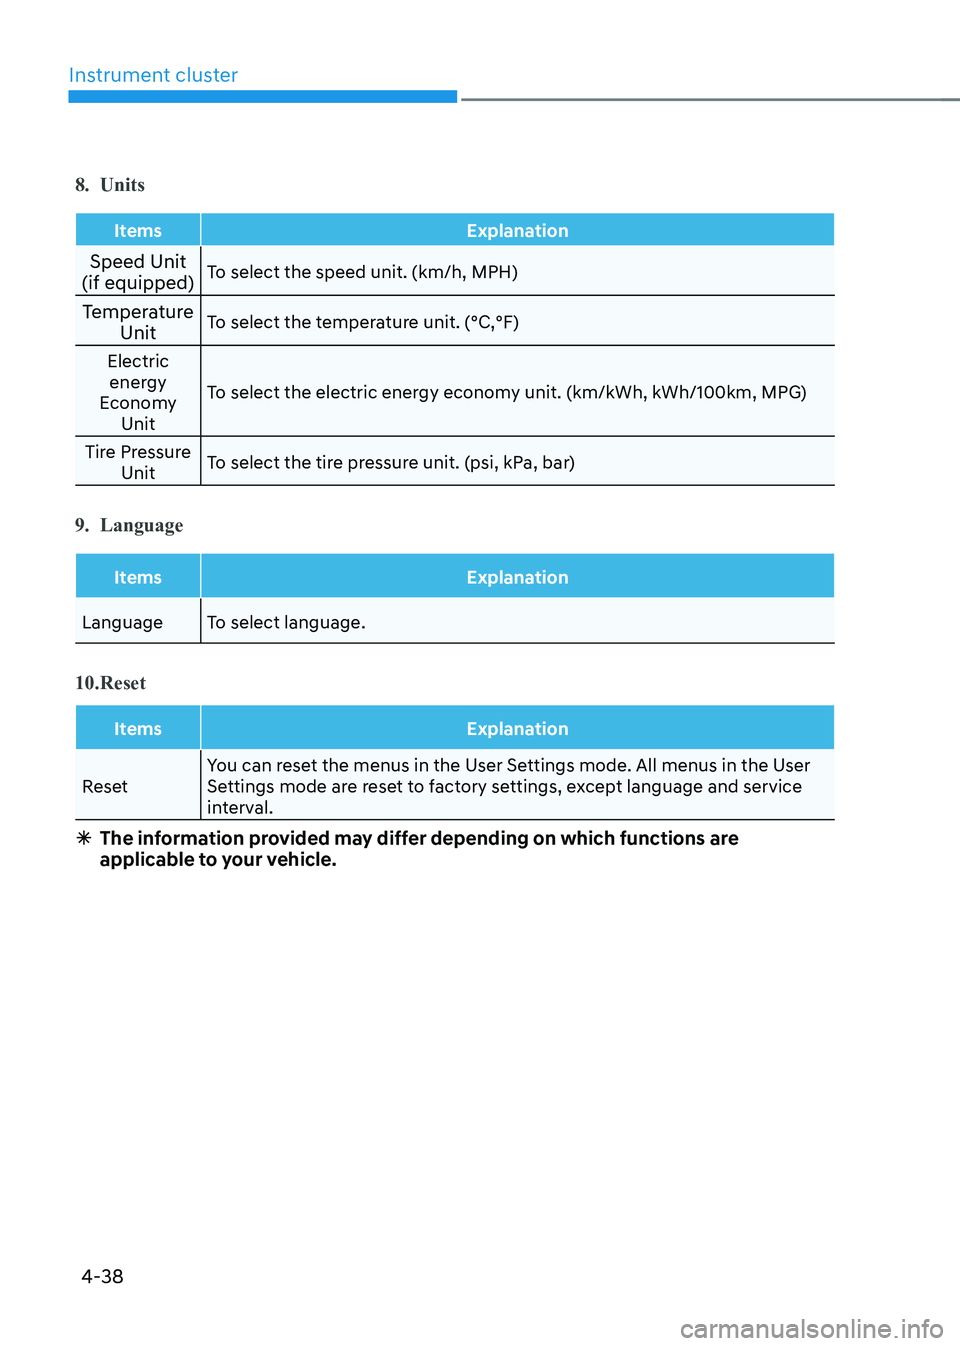
8. Units
Items Explanation
Speed Unit
(if equipped) To select the speed unit. (km/h, MPH)
Temperature Unit To select the temperature unit. (°C,°F)
Electric energy
Economy Unit To select the electric energy economy unit. (km/kWh, kWh/100km, MPG)
Tire Pressure Unit To select the tire pressure unit. (psi, kPa, bar)
9. Language
Items Explanation
Language To select language.
10. Reset
Items Explanation
Reset You can reset the menus in the User Settings mode. All menus in the User
Settings mode are reset to factory settings, except language and service
interval.
à The information provided may differ depending on which functions are
applicable to your vehicle.
Page 183 of 548
Instrument cluster
4-40
Drive Info
OOSEV040515L
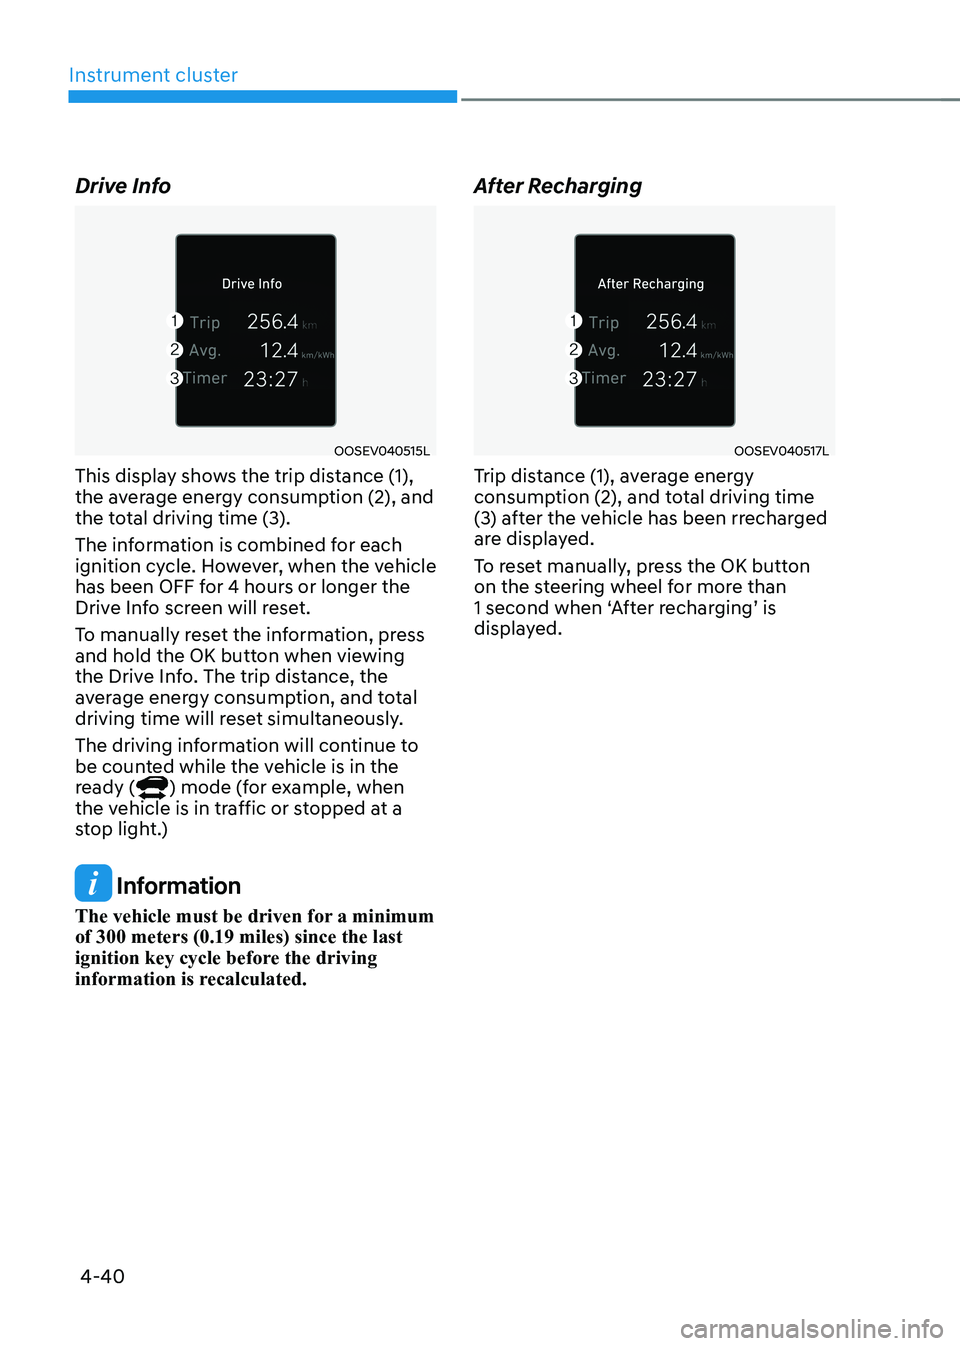
This display shows the trip distance (1),
the average energy consumption (2), and
the total driving time (3).
The information is combined for each
ignition cycle. However, when the vehicle
has been OFF for 4 hours or longer the
Drive Info screen will reset.
To manually reset the information, press
and hold the OK button when viewing
the Drive Info. The trip distance, the
average energy consumption, and total
driving time will reset simultaneously.
The driving information will continue to
be counted while the vehicle is in the
ready (
) mode (for example, when
the vehicle is in traffic or stopped at a
stop light.)
Information
The vehicle must be driven for a minimum of 300 meters (0.19 miles) since the last
ignition key cycle before the driving
information is recalculated. After Recharging
OOSEV040517L
Trip distance (1), average energy
consumption (2), and total driving time
(3) after the vehicle has been rrecharged
are displayed.
To reset manually, press the OK button
on the steering wheel for more than
1 second when ‘After recharging’ is
displayed.
Page 197 of 548
05
5-13
WARNING
Do not leave children or animals
unattended in your vehicle. An enclosed
vehicle can become extremely hot,
causing death or serious injury to
unattended children or animals who
cannot escape the vehicle. Children
might operate features of the vehicle
that could injure them, or they could
encounter other harm, possibly from
someone gaining entry to the vehicle.
WARNING
Leaving your vehicle unlocked increases
the potential risk to you or others from
someone hiding in your vehicle.
To secure your vehicle, while
depressing the brake, move the shift
lever to the P (Park) position, engage
the parking brake, and place the START/
STOP button OFF position, close all
windows, lock all doors, and always
take the key with you.
CAUTION
Opening a door when something is
approaching may cause damage or
injury. Be careful when opening doors
and watch for vehicles, motorcycles,
bicycles or pedestrians approaching the
vehicle in the path of the door.
WARNING
If you stay in the vehicle for a long time
while the weather is very hot or cold,
there are risks of injuries or danger to
life. Do not lock the vehicle from the
outside when someone is in the vehicle.
Auto door lock/unlock features
Impact sensing door unlock system (if equipped)
All doors will be automatically unlocked
when an impact causes the air bags to
deploy.
Speed sensing door lock system (if equipped)
All doors will be automatically locked
when vehicle speed exceeds 15 km/h
(9 mph).
You can activate or deactivate the Auto
Door Lock/Unlock features from the User
Settings mode on the LCD display. For
more details, refer to “LCD Display” in
this chapter.
Page 205 of 548
05
5-21
Automatic-Dimming Night Vision Safety™
(NVS®) Mirror (if equipped)
The NVS® Mirror automatically helps
reduce glare by monitoring light levels in
the front and the rear of the vehicle. Any
object that obstructs either light sensor
will degrade the automatic dimming
control feature.
For more information regarding NVS®
mirrors and other applications, please
refer to the Gentex website:
www.gentex.com
Your mirror will automatically dim
upon detecting glare from the vehicles
traveling behind you.
The mirror defaults to the ON position
each time the vehicle is started.
Integrated HomeLink® Wireless Control System
The HomeLink® Wireless Control System
provides a convenient way to replace
up to three hand held radio-frequency
transmitters used to activate compatible
devices such as gate operators, garage
door openers, entry door locks, security
systems, and home lighting.
NOTICE
HomeLink® operates while the ignition
switch is in the ACC or ON position
for safety reasons. It is to prevent
unintentional security problems from
happening when the vehicle is parked
outside the garage.
WARNING
Before programming HomeLink® to a
garage door opener or gate operator,
make sure people and objects are out
of the way of the device to prevent
potential harm or damage. Do not
use the HomeLink® with any garage
door opener that lacks the safety
stop and reverse features required
by U.S. federal safety standards (this
includes any garage door opener model
manufactured before April 1, 1982).
A garage door that cannot detect an
object - signaling the door to stop and
reverse - does not meet current U.S.
federal safety standards. Using a garage
door opener without these features
increases the risk of serious injury or
death.
For more information, contact
HomeLink® at www.homelink.com, or
call Home-Link customer support at
1-800-355-3515.
It is also recommended that a new
battery be replaced in the handheld
transmitter of the device being trained
to HomeLink® for quicker training and
accurate transmission of the radio
frequency.
1. Programming HomeLink ®
The following steps show how to
program HomeLink. If you have any
questions or are having difficulty
programming your HomeLink buttons,
refer to the HomeLink website or call the
HomeLink customer support toll-free
number. Do this, before going back to
the dealer who sold you the car.
Page 206 of 548
Convenient features
5-22
•
Visit the HomeLink website at: www.
homelink.com. Then at the top of the
page, choose your vehicle make. Then
watch the You Tube video, and/or
access additional website information.
• If you choose to access the website
via your cell phone, scan the QR code.
• Or, call HomeLink customer support
at 1-800-355-3515 (Please have the
vehicle make/model AND the opener
device make/model readily available.)
1) Programming Preparation
OOS040477N
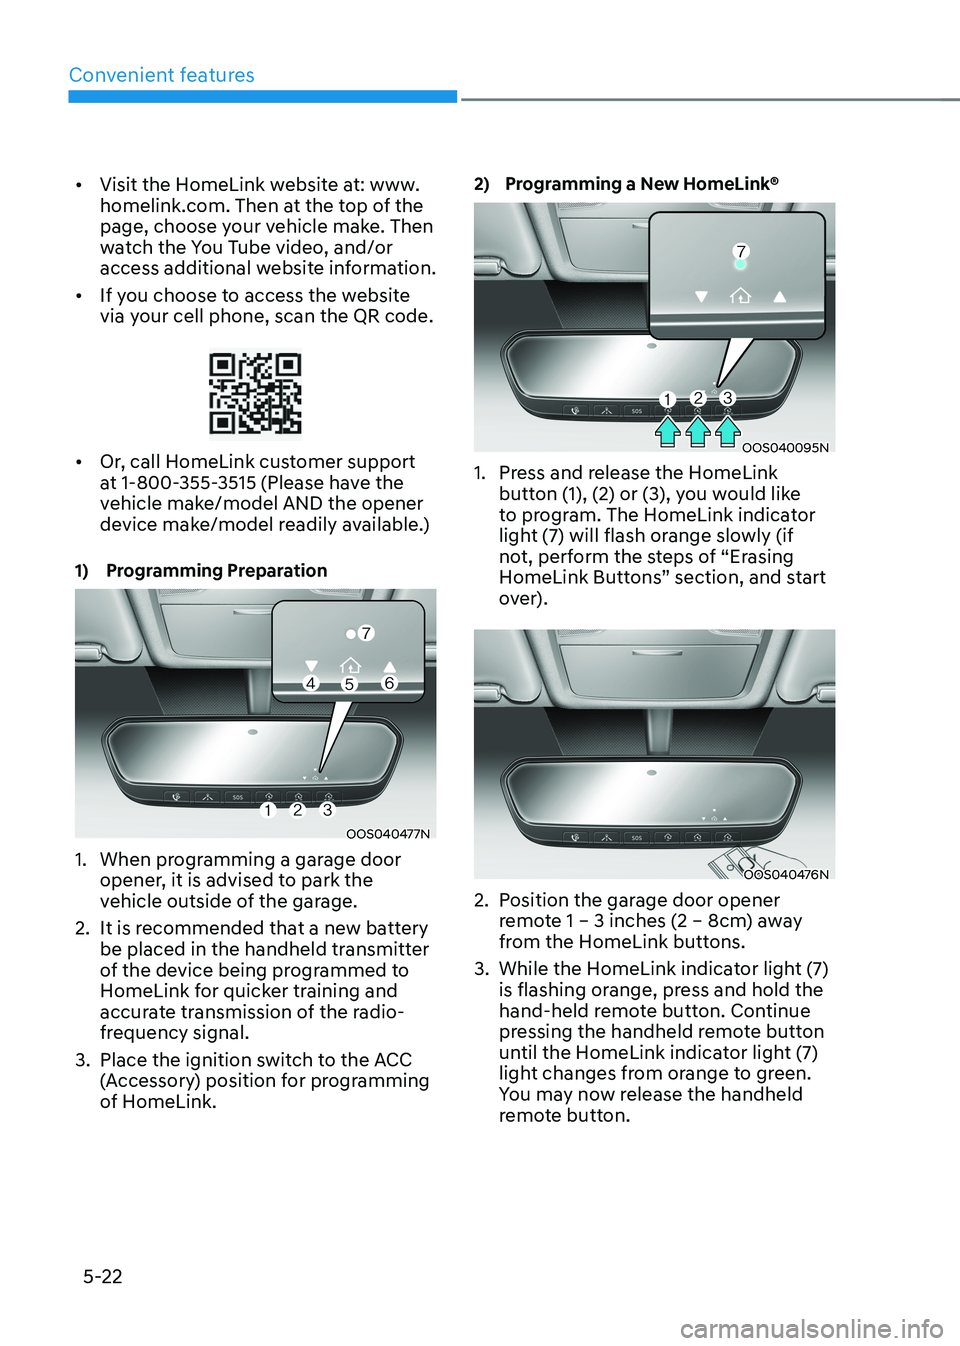
1. When programming a garage door opener, it is advised to park the
vehicle outside of the garage.
2. It is recommended that a new battery be placed in the handheld transmitter
of the device being programmed to
HomeLink for quicker training and
accurate transmission of the radio-
frequency signal.
3. Place the ignition switch to the ACC (Accessory) position for programming
of HomeLink. 2) Programming a New HomeLink®
OOS040095N
1. Press and release the HomeLink button (1), (2) or (3), you would like
to program. The HomeLink indicator
light (7) will flash orange slowly (if
not, perform the steps of “Erasing
HomeLink Buttons” section, and start
over).
OOS040476N
2. Position the garage door opener remote 1 – 3 inches (2 – 8cm) away
from the HomeLink buttons.
3. While the HomeLink indicator light (7) is flashing orange, press and hold the
hand-held remote button. Continue
pressing the handheld remote button
until the HomeLink indicator light (7)
light changes from orange to green.
You may now release the handheld
remote button.
Page 223 of 548
05
5-39
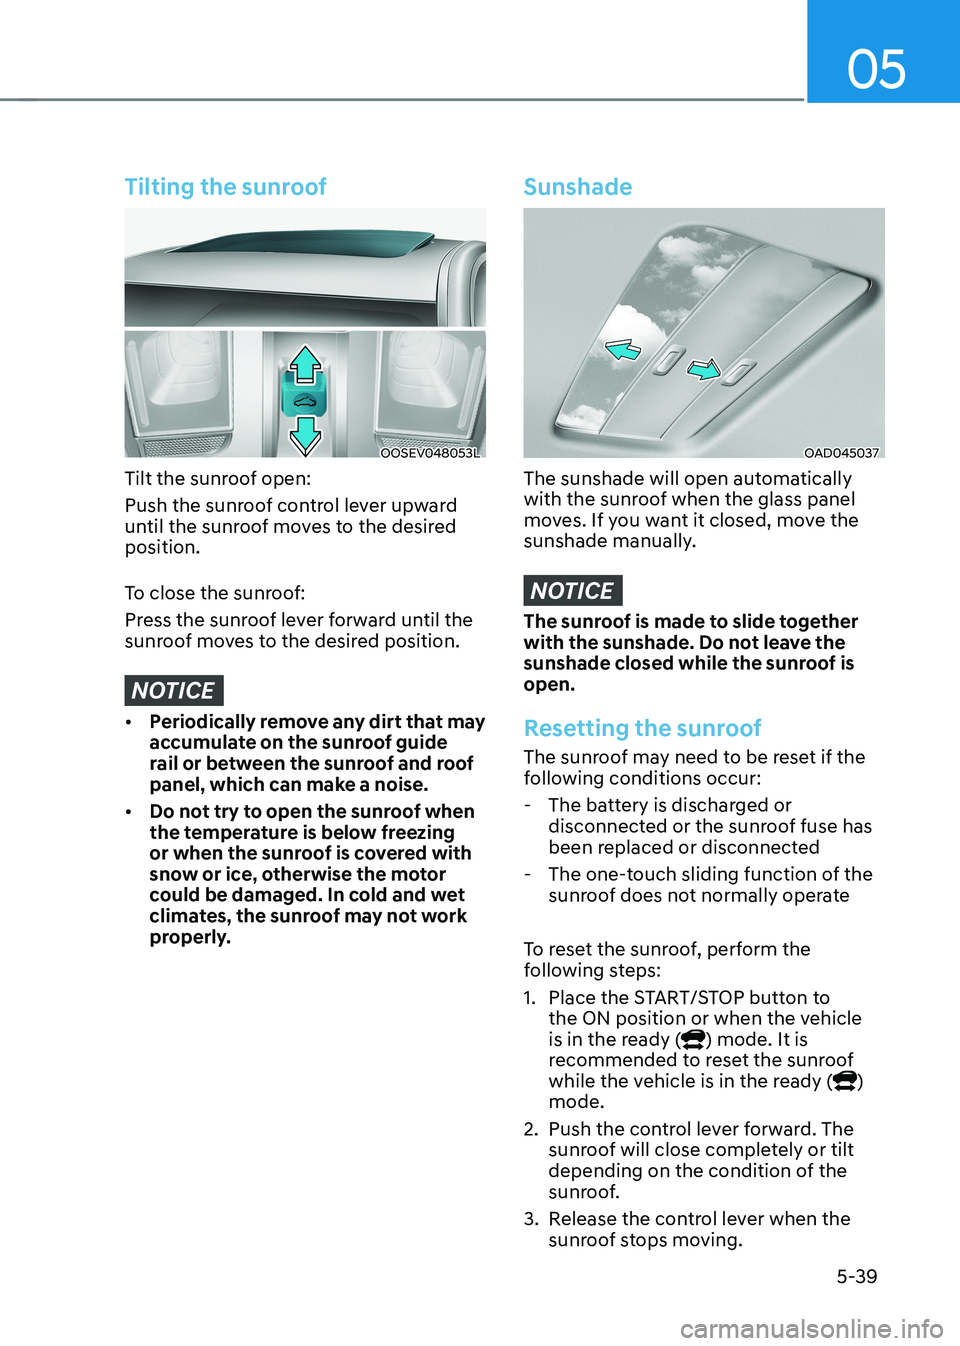
Tilting the sunroof
OOSEV048053L
Tilt the sunroof open:
Push the sunroof control lever upward
until the sunroof moves to the desired position.
To close the sunroof:
Press the sunroof lever forward until the
sunroof moves to the desired position.
NOTICE
• Periodically remove any dirt that may
accumulate on the sunroof guide
rail or between the sunroof and roof
panel, which can make a noise.
• Do not try to open the sunroof when
the temperature is below freezing
or when the sunroof is covered with
snow or ice, otherwise the motor
could be damaged. In cold and wet
climates, the sunroof may not work
properly.
Sunshade
OAD045037
The sunshade will open automatically
with the sunroof when the glass panel
moves. If you want it closed, move the
sunshade manually.
NOTICE
The sunroof is made to slide together
with the sunshade. Do not leave the
sunshade closed while the sunroof is open.
Resetting the sunroof
The sunroof may need to be reset if the
following conditions occur:
- The battery is discharged or disconnected or the sunroof fuse has
been replaced or disconnected
- The one-touch sliding function of the sunroof does not normally operate
To reset the sunroof, perform the
following steps:
1. Place the START/STOP button to the ON position or when the vehicle
is in the ready (
) mode. It is
recommended to reset the sunroof
while the vehicle is in the ready (
)
mode.
2. Push the control lever forward. The sunroof will close completely or tilt
depending on the condition of the
sunroof.
3. Release the control lever when the sunroof stops moving.
Page 235 of 548
05
5-51
Headlamp delay function (if equipped)
If you place the START/STOP button
to the ACC or OFF position with the
headlamps ON, the headlamps (and/or
position lamps) remain on for about 5
minutes. However, with the vehicle off if
the driver’s door is opened and closed,
the headlamps (and/or position lamps)
are turned off after 15 seconds.
The headlamps (and/or position lamps)
can be turned off by pressing the lock
button on the smart key twice or turning
the light switch to the OFF or AUTO
position. However, if you turn the light
switch to the AUTO position when it is
dark outside, the headlamps will not be
turned off.
You can activate or deactivate the
Headlamp Delay function from the User
Settings mode on the LCD display. For
more details, refer to “LCD Display” in
chapter 4.
NOTICE
If the driver gets out of the vehicle
through other doors (except driver’s
door), the battery saver function
does not operate and the headlamp
delay function does not turn off
automatically. Therefore, It causes the
battery to be discharged. In this case,
make sure to turn off the headlamps
before getting out of the vehicle.
Welcome system (if equipped)
Headlamp and position lamp
When the headlamp (lamp switch in the
headlamp or AUTO position) is on and
all doors (and tailgate) are locked and closed, the position lamp and headlamp
will come on for 15 seconds when the
door unlock button is pressed on the
smart key.
At this time, if you press the door lock
or unlock button, the position lamp and
headlamp will turn off immediately
Interior lamp
When the interior lamp switch is in
the DOOR position and all doors (and
tailgate) are closed and locked, the room
lamp will come on for 30 seconds if any
of the below is performed. • When the door unlock button is
pressed on the smart key.
• When the button of the outside door
handle is pressed with the smart key in possession.
At this time, if you press the door lock or
unlock button, the room lamp will turn
off immediately.