glove box Hyundai Matrix 2004 User Guide
[x] Cancel search | Manufacturer: HYUNDAI, Model Year: 2004, Model line: Matrix, Model: Hyundai Matrix 2004Pages: 317, PDF Size: 5.12 MB
Page 205 of 317
1- 23
CONTROLS AND EQUIPMENT
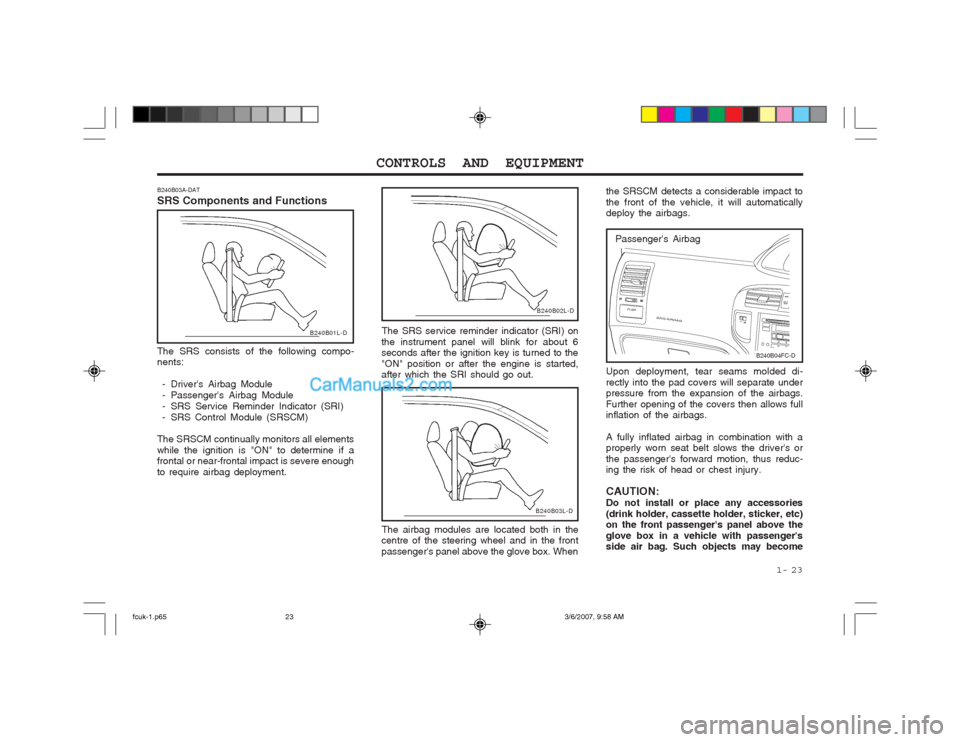
Passenger's Airbag
B240B04FC-D
Upon deployment, tear seams molded di- rectly into the pad covers will separate under pressure from the expansion of the airbags. Further opening of the covers then allows full inflation of the airbags. A fully inflated airbag in combination with a properly worn seat belt slows the driver's or the passenger's forward motion, thus reduc- ing the risk of head or chest injury. CAUTION: Do not install or place any accessories(drink holder, cassette holder, sticker, etc) on the front passenger's panel above the glove box in a vehicle with passenger's side air bag. Such objects may become
the SRSCM detects a considerable impact to the front of the vehicle, it will automatically deploy the airbags.
B240B02L-D
The SRS service reminder indicator (SRI) on
the instrument panel will blink for about 6 seconds after the ignition key is turned to the "ON" position or after the engine is started, after which the SRI should go out.
B240B03L-D
The airbag modules are located both in the
centre of the steering wheel and in the front passenger's panel above the glove box. When
B240B03A-DAT SRS Components and Functions
B240B01L-D
The SRS consists of the following compo- nents:
- Driver's Airbag Module
- Passenger's Airbag Module
- SRS Service Reminder Indicator (SRI)
- SRS Control Module (SRSCM)
The SRSCM continually monitors all elementswhile the ignition is "ON" to determine if a frontal or near-frontal impact is severe enough to require airbag deployment.
fcuk-1.p65 3/6/2007, 9:58 AM
23
Page 208 of 317
CONTROLS AND EQUIPMENT
1- 26
o For cleaning the airbag pad covers,
use only a soft, dry cloth or one which has been moistened with plain water. Solvents or cleaners could adversely affect the airbag covers and proper deployment of the system.
o No objects should be placed over or near the airbag modules on the steeringwheel, instrument panel, and the front passenger's panel above the glove box, because any such object could cause harm if the vehicle is in a crash severe enough to cause the airbags to inflate.
o If the airbags inflate, they must be re-
placed by an authorized Hyundai dealer.
o Do not tamper with or disconnect SRS wiring, or other components of the SRSsystem. Doing so could result in injury, due to accidental firing of the airbags or by rendering the SRS inoperative.
o If components of the airbag system must be discarded, or if the vehicle must bescrapped, certain safety precautions must be observed. Your Hyundai dealer knows these precautions and can give you the necessary information. Failure to follow these precautions and proce- dures could increase the risk of per- sonal injury. o If you sell your vehicle, be sure to
inform the new owner of these impor- tant points and make certain that this manual is transferred to the new owner.
o If your car was flooded and has soaked carpeting or water on flooring, youshouldn't try to start engine; have the car towed to authorized Hyundai dealer.
o Do not replace the bumper or the
bumper guard with the one other than the Hyundai genuine parts. Otherwise, it can adversely affect SRS performance and lead to unexpected injury.
fcuk-1.p65 3/6/2007, 9:58 AM
26
Page 209 of 317
1- 27
CONTROLS AND EQUIPMENT
HFC002-D
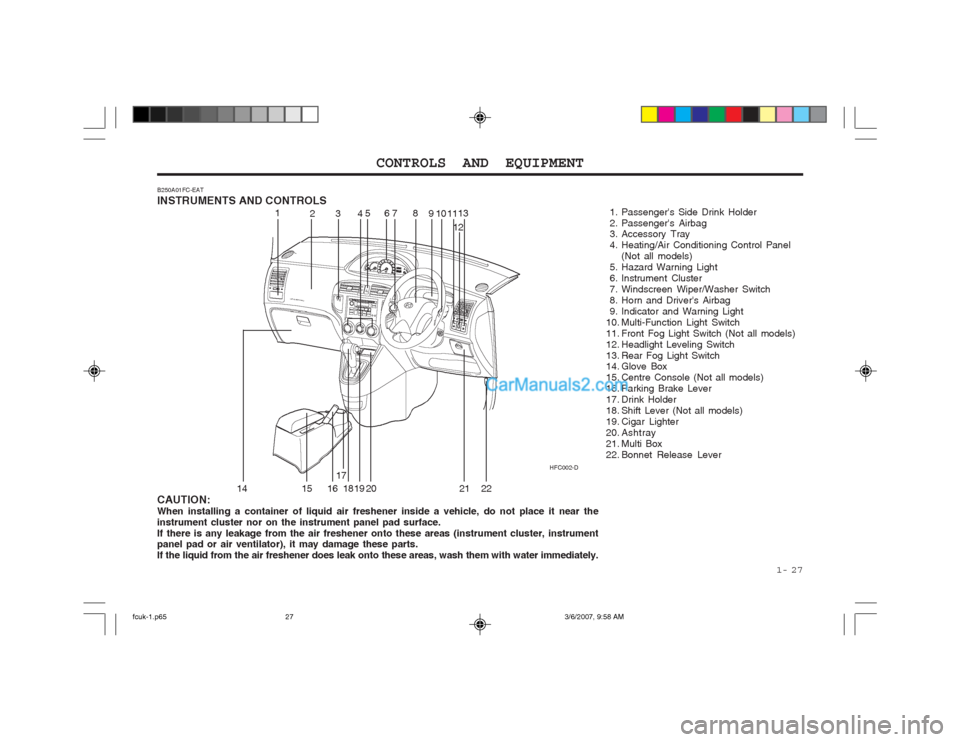
B250A01FC-EAT INSTRUMENTS AND CONTROLS
1. Passenger's Side Drink Holder
2. Passenger's Airbag
3. Accessory Tray
4. Heating/Air Conditioning Control Panel(Not all models)
5. Hazard Warning Light
6. Instrument Cluster
7. Windscreen Wiper/Washer Switch
8. Horn and Driver's Airbag
9. Indicator and Warning Light
10. Multi-Function Light Switch
11. Front Fog Light Switch (Not all models)
12. Headlight Leveling Switch
13. Rear Fog Light Switch
14. Glove Box
15. Centre Console (Not all models)
16. Parking Brake Lever
17. Drink Holder
18. Shift Lever (Not all models)
19. Cigar Lighter
20. Ashtray
21. Multi Box
22. Bonnet Release Lever
CAUTION:When installing a container of liquid air freshener inside a vehicle, do not place it near theinstrument cluster nor on the instrument panel pad surface.If there is any leakage from the air freshener onto these areas (instrument cluster, instrument panel pad or air ventilator), it may damage these parts. If the liquid from the air freshener does leak onto these areas, wash them with water immediately. 1
234
567 8
91011
1213
14 15 16 17
1819
20 2122
fcuk-1.p65 3/6/2007, 9:58 AM
27
Page 225 of 317
1- 43
CONTROLS AND EQUIPMENT
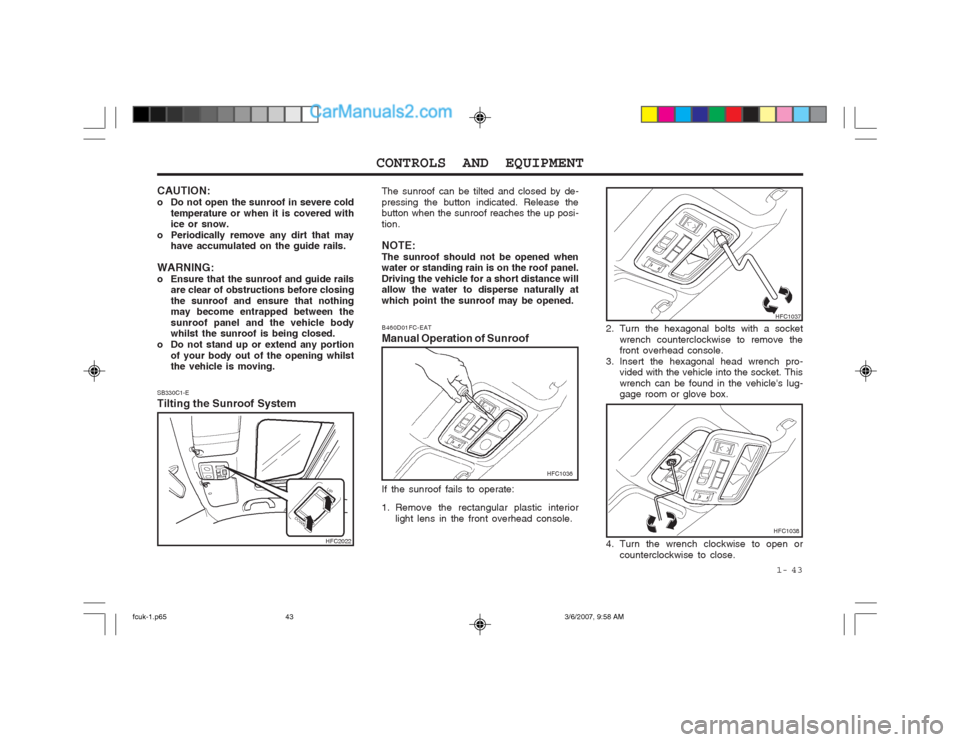
SB330C1-E Tilting the Sunroof System The sunroof can be tilted and closed by de- pressing the button indicated. Release the button when the sunroof reaches the up posi- tion. NOTE: The sunroof should not be opened when water or standing rain is on the roof panel. Driving the vehicle for a short distance will allow the water to disperse naturally at which point the sunroof may be opened.
2. Turn the hexagonal bolts with a socketwrench counterclockwise to remove the front overhead console.
3. Insert the hexagonal head wrench pro- vided with the vehicle into the socket. This wrench can be found in the vehicle's lug- gage room or glove box.
B460D01FC-EAT Manual Operation of Sunroof
HFC1036
If the sunroof fails to operate:
1. Remove the rectangular plastic interior light lens in the front overhead console.
HFC1037
4. Turn the wrench clockwise to open or counterclockwise to close.
CAUTION:
o Do not open the sunroof in severe cold
temperature or when it is covered with ice or snow.
o Periodically remove any dirt that may have accumulated on the guide rails.
WARNING:
o Ensure that the sunroof and guide rails are clear of obstructions before closingthe sunroof and ensure that nothing may become entrapped between the sunroof panel and the vehicle body whilst the sunroof is being closed.
o Do not stand up or extend any portion of your body out of the opening whilstthe vehicle is moving.
HFC2022HFC1038
fcuk-1.p65 3/6/2007, 9:58 AM
43
Page 227 of 317
1- 45
CONTROLS AND EQUIPMENT
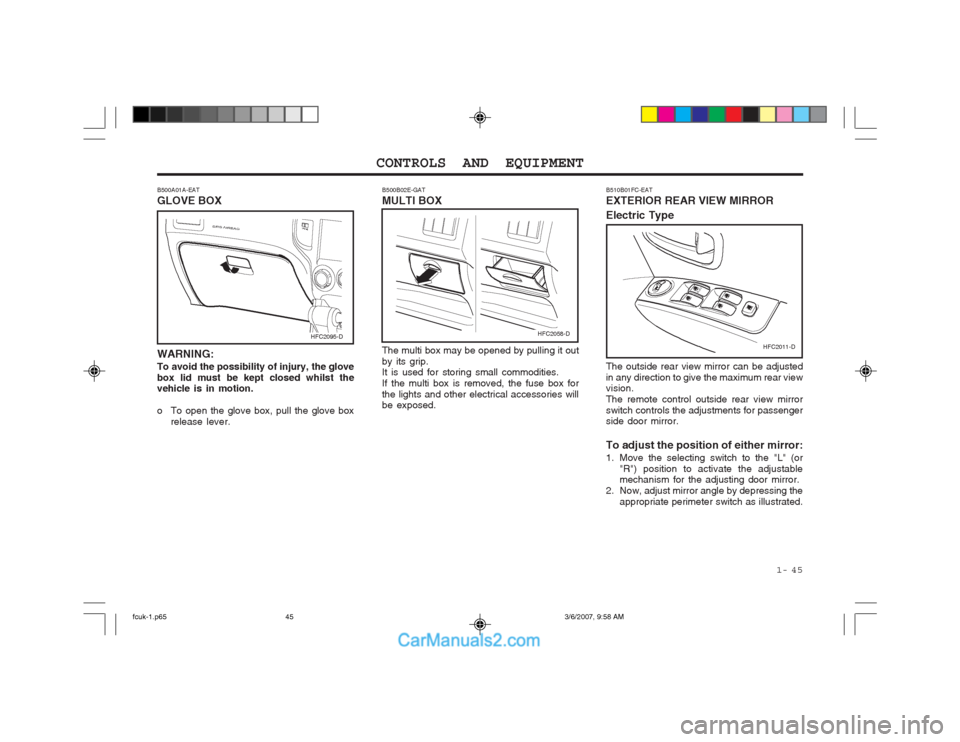
B500A01A-EAT GLOVE BOX WARNING: To avoid the possibility of injury, the glove box lid must be kept closed whilst the vehicle is in motion.
o To open the glove box, pull the glove box release lever. The multi box may be opened by pulling it out by its grip. It is used for storing small commodities. If the multi box is removed, the fuse box forthe lights and other electrical accessories will be exposed.
B500B02E-GAT MULTI BOX
HFC2095-DHFC2058-D
HFC2011-D
B510B01FC-EAT EXTERIOR REAR VIEW MIRROR Electric Type The outside rear view mirror can be adjusted in any direction to give the maximum rear view vision. The remote control outside rear view mirrorswitch controls the adjustments for passenger side door mirror. To adjust the position of either mirror:
1. Move the selecting switch to the "L" (or
"R") position to activate the adjustable mechanism for the adjusting door mirror.
2. Now, adjust mirror angle by depressing the appropriate perimeter switch as illustrated.
fcuk-1.p65 3/6/2007, 9:58 AM
45
Page 241 of 317
1- 59
CONTROLS AND EQUIPMENT
B760A01E
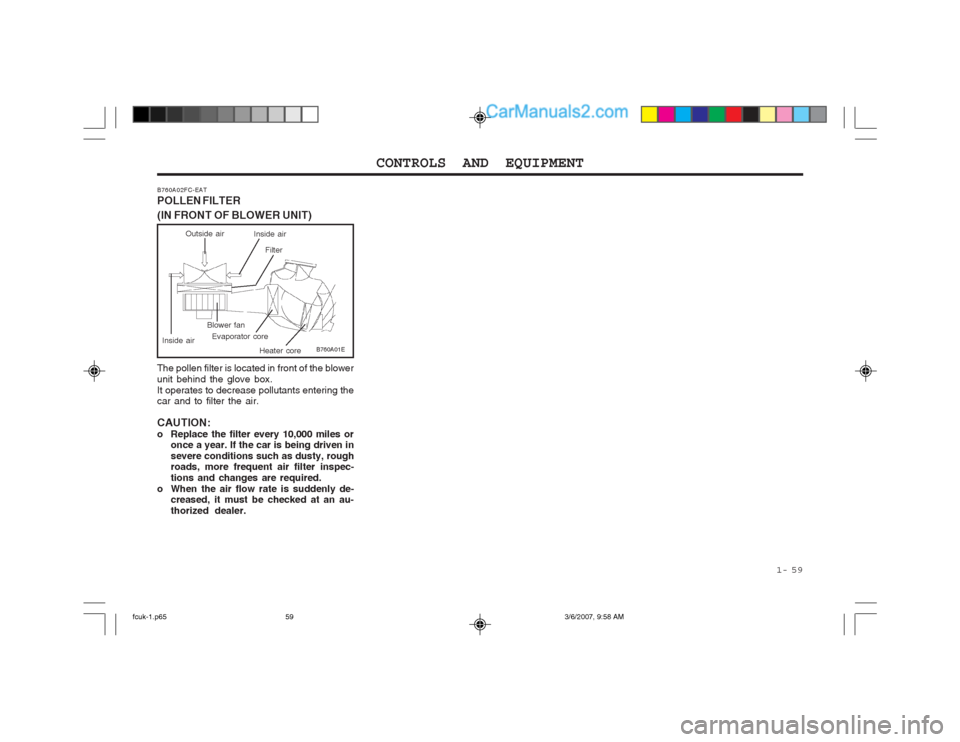
The pollen filter is located in front of the blower unit behind the glove box.It operates to decrease pollutants entering the car and to filter the air. CAUTION:
o Replace the filter every 10,000 miles or
once a year. If the car is being driven insevere conditions such as dusty, rough roads, more frequent air filter inspec- tions and changes are required.
o When the air flow rate is suddenly de- creased, it must be checked at an au-thorized dealer.
Evaporator coreBlower fan
Heater core
B760A02FC-EAT POLLEN FILTER (IN FRONT OF BLOWER UNIT)
Outside air
Filter
Inside air
Inside air
fcuk-1.p65 3/6/2007, 9:58 AM
59
Page 315 of 317
INDEX
10-2 E EFFECTIVE BRAKING
...................................................................... 2-9
ELECTRIC COOLING FANS ........................................................... 6-20
EMISSION CONTROL SYSTEM ...................................................... 7-1
ENGINE COMPARTMENT ...................................................... 6-1 ~ 6-3
ENGINE COOLANT CHECKING AND REPLACING ....................... 6-7
ENGINE OIL AND FILTER REPLACEMENT ................................... 6-6
ENGINE OIL CONSUMPTION .......................................................... 6-6
ENGINE OIL REPLENISHMENT ...................................................... 6-5
ENGINE OIL ....................................................................................... 6-4
EXTERIOR REAR VIEW MIRROR ................................................. 1-45
FFOLDING REAR SEATBACK AND SEAT CUSHION ....... 1-11 ~ 1-12
FOLD-UP TRAY ............................................................................... 1-48
FRONT AS HTRAY........................................................................... 1-40
FRONT FOG LIGHT SWITCH ........................................................ 1-39
FUEL ECONOMY .............................................................................. 2-4
FUEL GAUGE .................................................................................. 1-33
FUEL RECOMMENDATIONS ........................................................... 1-1
FUSE PANEL DESCRIPTION ......................................................... 6-25
FUSIBLE LINKS ............................................................................... 6-18
G
GLOVE BOX .................................................................................... 1-45 HHAZARD WARNING SYSTEM
........................................................ 1-38
HEADLIGHT AIMING ADJUSTEMENT .......................................... 6-21
HEADLIGHT BULB .............................................................. 6-20 ~ 6-21
HEADLIGHT LEVELING DEVICE SYSTEM .................................. 1-42
HEAD RESTRAINT ADJUSTMENT ........................................ 1-9, 1-11
HEATED REAR WINDOW .............................................................. 1-39
HEATING CON TROL ....................................................................... 1-56
HEIGHT ADJUSTABLE FRONT SEAT SHOULDER BELT .......... 1-14
HORN ............................................................................................... 1-52 I IF THE ENGINE CANNOT BE CRANKED ...................................... 3-1
IF THE ENGINE WILL NOT START ................................................ 3-1
IF THE EVENT OF A PUNCTURE ................................................... 3-4
IMMOBILISER SYSTEM ......................................................... 1-2 ~ 1-3
INDIVIDUAL CIRCUIT FUSES ........................................................ 6-18
INSTRUMENT CLUSTER AND INDICATORS ................... 1-28 ~ 1-29
INSTRUMENTS AND CONTROLS ................................................. 1-27
INTERIOR LIGHT ............................................................................ 1-44
INTERIOR REAR VIEW MIRROR .................................................. 1-47
JJUMP STARTING .............................................................................. 3-1
fcuk-10.p65 3/6/2007, 10:03 AM
2