oil pressure Hyundai Matrix 2005 User Guide
[x] Cancel search | Manufacturer: HYUNDAI, Model Year: 2005, Model line: Matrix, Model: Hyundai Matrix 2005Pages: 407, PDF Size: 10.31 MB
Page 164 of 407
YOUR VEHICLE AT A GLANCE
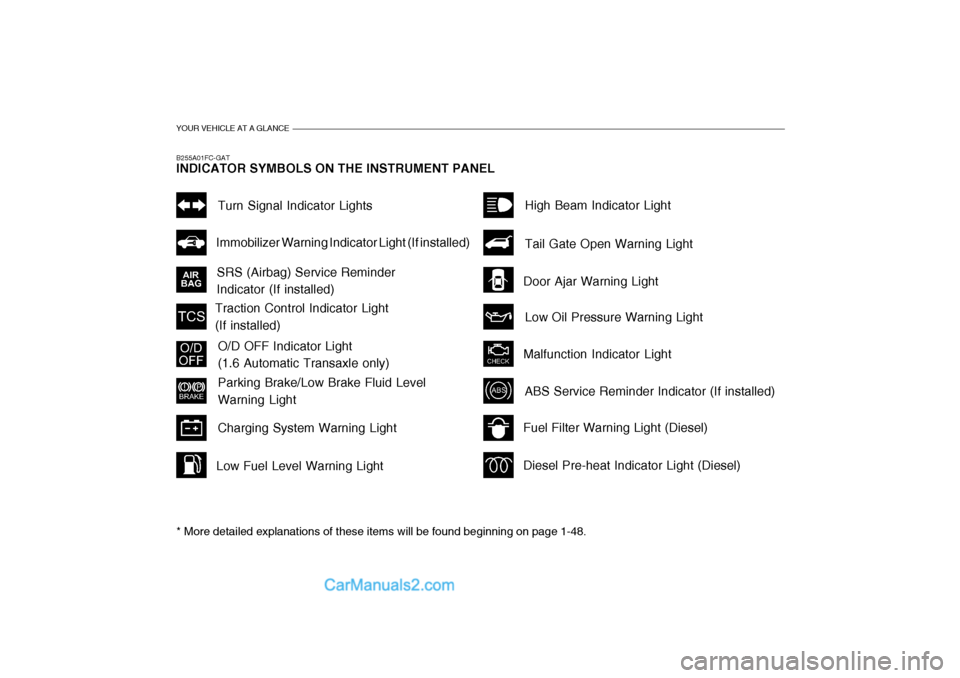
B255A01FC-GAT INDICATOR SYMBOLS ON THE INSTRUMENT PANEL * More detailed explanations of these items will be found beginning on page 1-48.
SRS (Airbag) Service Reminder Indicator (If installed)Turn Signal Indicator Lights
Malfunction Indicator Light
Traction Control Indicator Light(If installed)
O/D OFF Indicator Light (1.6 Automatic Transaxle only)
Parking Brake/Low Brake Fluid Level Warning Light
Charging System Warning Light
Fuel Filter Warning Light (Diesel) Diesel Pre-heat Indicator Light (Diesel)
Immobilizer Warning Indicator Light (If installed)
ABS Service Reminder Indicator (If installed) High Beam Indicator Light Low Oil Pressure Warning Light
Tail Gate Open Warning Light
Door Ajar Warning Light
Low Fuel Level Warning Light
Page 209 of 407
1
FEATURES OF YOUR HYUNDAI
45
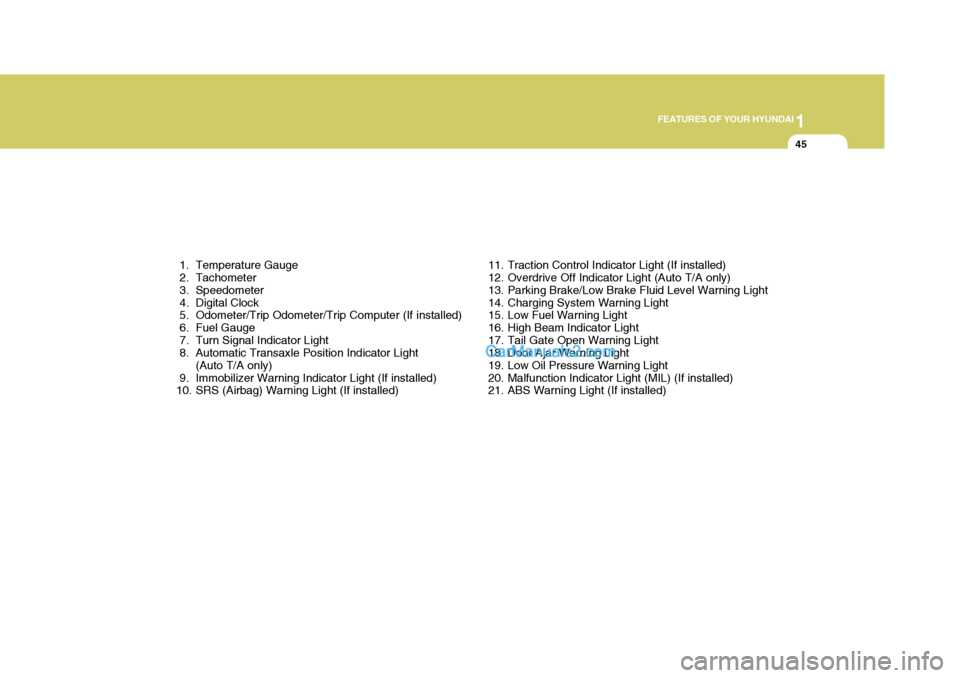
1. Temperature Gauge
2. Tachometer
3. Speedometer
4. Digital Clock
5. Odometer/Trip Odometer/Trip Computer (If installed)
6. Fuel Gauge
7. Turn Signal Indicator Light
8. Automatic Transaxle Position Indicator Light (Auto T/A only)
9. Immobilizer Warning Indicator Light (If installed)
10. SRS (Airbag) Warning Light (If installed) 11. Traction Control Indicator Light (If installed)
12. Overdrive Off Indicator Light (Auto T/A only)
13. Parking Brake/Low Brake Fluid Level Warning Light
14. Charging System Warning Light
15. Low Fuel Warning Light
16. High Beam Indicator Light
17. Tail Gate Open Warning Light
18. Door Ajar Warning Light
19. Low Oil Pressure Warning Light
20. Malfunction Indicator Light (MIL) (If installed)
21. ABS Warning Light (If installed)
Page 211 of 407
1
FEATURES OF YOUR HYUNDAI
47
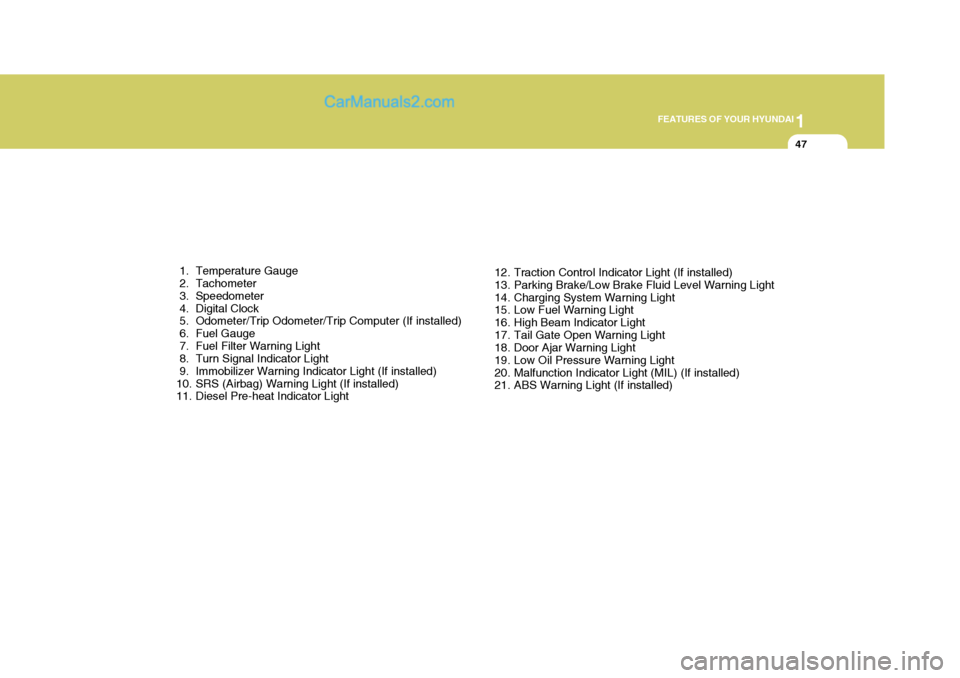
1. Temperature Gauge
2. Tachometer
3. Speedometer
4. Digital Clock
5. Odometer/Trip Odometer/Trip Computer (If installed)
6. Fuel Gauge
7. Fuel Filter Warning Light
8. Turn Signal Indicator Light
9. Immobilizer Warning Indicator Light (If installed)
10. SRS (Airbag) Warning Light (If installed)
11. Diesel Pre-heat Indicator Light 12. Traction Control Indicator Light (If installed)
13. Parking Brake/Low Brake Fluid Level Warning Light
14. Charging System Warning Light
15. Low Fuel Warning Light
16. High Beam Indicator Light
17. Tail Gate Open Warning Light
18. Door Ajar Warning Light
19. Low Oil Pressure Warning Light
20. Malfunction Indicator Light (MIL) (If installed)
21. ABS Warning Light (If installed)
Page 214 of 407
1FEATURES OF YOUR HYUNDAI
50
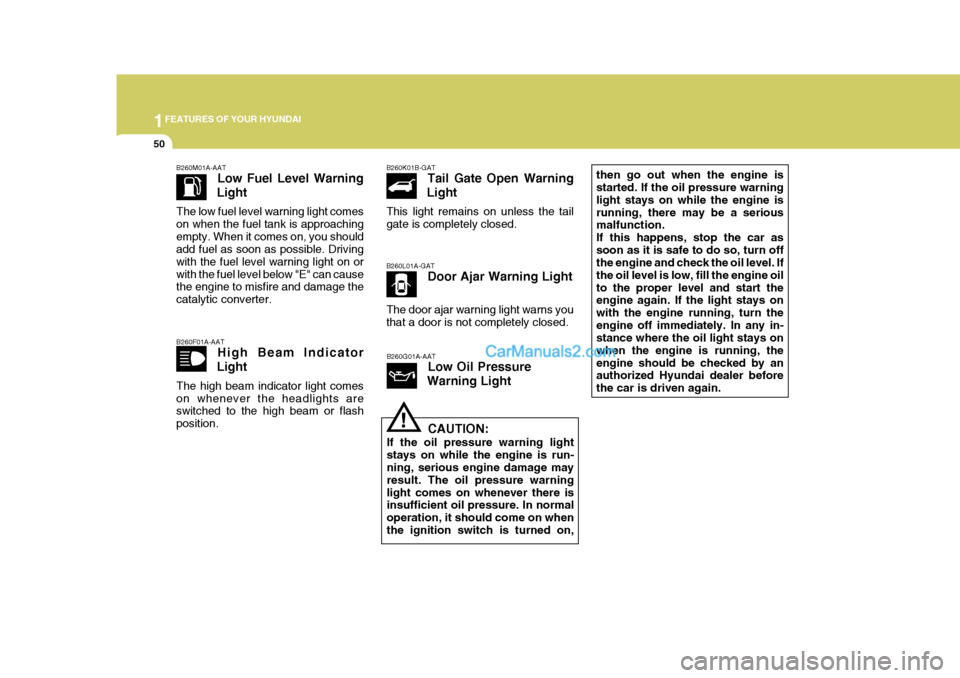
B260M01A-AAT
Low Fuel Level Warning
Light
The low fuel level warning light comes on when the fuel tank is approachingempty. When it comes on, you should add fuel as soon as possible. Driving with the fuel level warning light on orwith the fuel level below "E" can cause the engine to misfire and damage the catalytic converter. B260F01A-AAT High Beam Indicator
Light
The high beam indicator light comes on whenever the headlights are switched to the high beam or flash position.B260K01B-GAT Tail Gate Open Warning
Light
This light remains on unless the tail gate is completely closed. B260L01A-GAT Door Ajar Warning Light
The door ajar warning light warns you that a door is not completely closed.
B260G01A-AAT Low Oil Pressure
Warning Light
CAUTION:
If the oil pressure warning light stays on while the engine is run- ning, serious engine damage may result. The oil pressure warninglight comes on whenever there is insufficient oil pressure. In normal operation, it should come on whenthe ignition switch is turned on, then go out when the engine is started. If the oil pressure warning light stays on while the engine isrunning, there may be a serious malfunction. If this happens, stop the car assoon as it is safe to do so, turn off the engine and check the oil level. If the oil level is low, fill the engine oilto the proper level and start the engine again. If the light stays on with the engine running, turn theengine off immediately. In any in- stance where the oil light stays on when the engine is running, theengine should be checked by an authorized Hyundai dealer before the car is driven again.
!
Page 309 of 407

2 DRIVING YOUR HYUNDAI
20
C180A01A-AAT USE OF LIGHTS Check your lights regularly for correct operation and always keep them clean.When driving during the day in condi- tions of poor visibility, it is helpful to drive with headlights on low beam.This enables you to be seen as well as to see.
C160J01A-AAT Don't Let Ice and Snow Accumulate Underneath Under some conditions, snow and ice can build up under the fenders andinterfere with the steering. When driv- ing in severe winter conditions where this may happen, you should periodi-cally check underneath the car to be sure the movement of the front wheels and the steering components is notobstructed. C160K01A-AAT Carry Emergency Equipment Depending on the severity of the weather where you drive your car, you should carry appropriate emergency equipment. Some of the items youmay want to carry include tire chains, tow straps or chains, flashlight, emer- gency flares, sand, a shovel, jumpercables, a window scraper, gloves, ground cloth, coveralls, a blanket, etc. C170A01A-AAT HIGHER SPEED MOTORING Pre-Trip Inspections 1. Tires: Adjust the tire inflation pressures to specification. Low tire inflation pres- sures will result in overheating andpossible failure of the tires. Avoid using worn or damaged tires which may result in reduced traction ortire failure. NOTE: Never exceed the maximum tire infla- tion pressure shown on the tires. 2. Fuel, engine coolant and en- gine oil: High speed travel consumes more fuel than urban motoring. Do not forget tocheck both engine coolant and engine oil. 3. Drive belt: A loose or damaged drive belt may result in overheating of the engine.
Page 342 of 407

5VEHICLE MAINTENANCE REQUIREMENTS
8EXPLANATION OF SCHEDULED MAINTENANCE ITEMS
!
F060M01A-AAT o Engine Oil and Filter The engine oil and filter should be changed at the intervals specified in the maintenance schedule. If the car is being driven in severe conditions,more frequent oil and filter changes are required. F060B01A-AAT
o Drive Belts Inspect all drive belts for evidence of cuts, cracks, excessive wear or oil saturation and replace if necessary. Drive belts should be checked periodi-cally for proper tension and adjusted as necessary. F060C01A-AAT
o Fuel Filter
A clogged filter can limit the speed at
which the vehicle may be driven, dam-age the emission system and cause hard starting. If an excessive amountof foreign matter accumulates in the fuel tank, the filter may require re- placement more frequently. After installing a new filter, run the
engine for several minutes, and checkfor leaks at the connections. Fuel fil- ters should be installed by trained technicians. WARNING (Diesel only):
Never work on injection system with engine running or within 30 sec- onds after shutting off engine. Highpressure pump, rail, injectors and high pressure pipes are subject to high pressure even after the enginestopped. The fuel jet produced by fuel leaks may cause serious injury, if it touch the body. People usingpacemakers should not move than 30cm closer to the ECU or wiring harness within the engine roomwhile engine is running, since the high currents in the Common Rail system produce considerable mag-netic fields.
F060D01TB-AAT
o Fuel Lines, Fuel Hoses and Connections
Check the fuel lines, fuel hoses and
connections for leakage and damage.Replace any damaged or leaking partsimmediately.
Page 350 of 407
6
DO-IT-YOURSELF MAINTENANCE
5GENERAL CHECKS
G020A01A-AAT
Engine Compartment
The following should be checked regu- larly:
o Engine oil level and condition
o Transaxle fluid level and condition
o Brake fluid level
o Clutch fluid level
o Engine coolant level
o Windshield washer fluid level
o Accessory drive belt condition
o Engine coolant hose condition
o Fluid leaks (on or below components)
o Power steering fluid level
o Battery condition
o Air filter condition o Defroster, heating system opera-
tion (and air conditioning, if in- stalled)
o Steering operation and condition
o Mirror condition and operation
o Turn signal operation
o Accelerator pedal operation
o Brake operation, including parking brake
o Manual transaxle operation, includ-
ing clutch operation
o Automatic transaxle operation, in- cluding "PARK" mechanism opera-tion
o Seat control condition and opera-
tion
o Seat belt condition and operation
o Sunvisor operation If you notice anything that does not operate correctly or appears to be functioning incorrectly, inspect it care- fully and seek assistance from yourHyundai dealer if service is needed.
G020B01A-AAT
Vehicle Exterior
The following should be checked
monthly:
o Overall appearance and condition
o Wheel condition and wheel nut
torque
o Exhaust system condition
o Light condition and operation
o Windshield glass condition
o Wiper blade condition
o Paint condition and body corrosion
o Fluid leaks
o Door and hood lock condition
o Tire pressure and condition (including spare tire)
G020C01A-AAT
Vehicle Interior
The following should be checked each
time when the vehicle is driven:
o Lights operation
o Windshield wiper operation
o Horn operation
Page 353 of 407

6 DO-IT-YOURSELF MAINTENANCE
8
G350A01A-GAT
ENGINE OIL CONSUMPTION Function of Engine Oil
Engine oil has the primary function of
lubricating and cooling the inside of the engine. Engine oil consumption
It is normal that an engine should
consume some engine oil while nor- mal driving. The cause of oil con- sumption in a normal engine are asfollows;
o Engine oil is used to lubricate pis- tons, piston rings and cylinders. A thin film of oil is left on the cylinder wall when a piston moves downwards in the cylinder. High negative pressure generated dur-ing engine operation sucks some of the oil into the combustion cham- ber.This oil with some oil of the cylin-der wall is burned by the high tem-perature combustion gases during the combustion process. o The engine oil consumption is
strongly effected by the viscosity and quality of oil, engine rpm and driving condition etc. The engine oil is more consumed under severedriving conditions such as high speeds and frequent acceleration and deceleration than normal driv-ing condition.
1. Remove the oil filler cap by turning
it counter-clockwise.
2. Add oil, then check the level again. Do not overfill.
3. Replace the cap by turning it clock- wise.
The distance between the "F" and "L"marks is equal to about 1 liter(GasolineEngine)/1.2 liter(Diesel Engine) of oil.
Page 357 of 407

6 DO-IT-YOURSELF MAINTENANCE
12
!
!
CHECKING AND CHANGING THE ENGINE COOLANT
G050B01A-AAT
Recommended Engine Coolant
G050B01FC
G050A01A-AAT
WARNING:
Do not remove the radiator cap
when the engine is hot. When the engine is hot, the engine coolant is under pressure and may eruptthrough the opening if the cap is removed. You could be seriously burned if you do not observe thisprecaution. Do not remove the radiator cap until the radiator is cool to the touch.
G050B02FC
Gasoline engine
Diesel engine
Use a high quality ethylene-glycol
coolant in a 50/50 mix with water.
10.Start the engine and check to be
sure no oil is leaking from thedrain plug or oil filter.
11.Shut off the engine and recheck
the oil level.
NOTE:
o It is recommended that the en- gine oil and filter should be changed by an authorized Hyundai dealer.
o Always dispose of used engine oil in an environmentally accept-able manner. It is suggested that it be placed in a sealed container and taken to a service station formaybe reclaimation. Do not pour the oil on the ground or put it into the household trash.
WARNING:
Used motor oil may cause irrita- tion or cancer of the skin if left in contact with the skin for prolongedperiods of time. Wash your hands thoroughly with soap and warm water as soon as possible afterhandling used oil.
Page 380 of 407

6
DO-IT-YOURSELF MAINTENANCE
35
!WARNING:
o Do not smoke or have any other open flame near the vehicle while bleeding the fuel system.
o Be sure to carefully wipe away any water drained out in thismanner, because the fuel mixed in the water might be ignited and result in a fire.
HEADLIGHT AIMING ADJUSTMENT
G290A01FC-GAT Before performing aiming adjustment, make sure of the following.
1. Keep all tires inflated to the correct
pressure.
2. Place the vehicle on level ground and press the front bumper and rear bumper down several times.Place the vehicle at a distance of 3,000 mm (118 in.) from the test wall.
3. See that the vehicle is unloaded
(except for full levels of coolant,engine oil and fuel, and spare tire, jack, and tools).
4. Clean the head lights lens and turn on the headlight (low beam). G290A01FC
5. Open the hood.
6. Draw the vertical line (through the center of each headlight beam pat- tern) and the horizontal line (throughthe center of each headlight beam pattern) on the aiming screen. And then, draw a horizontal paral- lel line at 30 mm (1.18 in.) under the horizontal line.
7. Adjust each cut-off line of the low beam to the parallel line with aphillips screwdriver - VERTICALAIMING.
8. Adjust each cut-off line of the low beam to each vertical line with a phillips screwdriver - HORIZON- TAL AIMING.
Horizontal Aiming
Vertical Aiming