stop start Hyundai Matrix 2005 User Guide
[x] Cancel search | Manufacturer: HYUNDAI, Model Year: 2005, Model line: Matrix, Model: Hyundai Matrix 2005Pages: 407, PDF Size: 10.31 MB
Page 115 of 407

OWNER MAINTENANCE
6-8 CAUTION: Slowly loosen the oil filter upper cap not to overflow the oil.
4. Remove the engine oil filler cap.
5. Slide underneath the car and loosen the oil pan drain plug by turning it counterclock- wise oil pan with a wrench of the propersize. Be sure that a drain pan is in positionto catch the oil as it drains out, then removethe drain plug.
WARNING: Be very careful when draining the engine oil as it may be hot enough to burn you!
6. When the oil has stopped draining, replace the drain plug using a new gasket andretighten by turning it clockwise. Oil pan drain plug tightening torque : 3.5 ~ 4.5 kgf.m
7. Pull out the oil filter upper cap with element from the oil filter housing.Using a clean cloth, remove any dirt or oil accumulated around the oil filter housing.
8. After mounting a new centrepipe O-ring, new oil filter element and new O-ring toupper cap, install the upper cap to oil filterhousing and retighten by turning it clock-wise. Do not over-tighten. Tightening torque : 2.5 kgf.m CAUTION: Don't use old oil filter upper cap O-ring
and centrepipe O-ring.
9. Refill the crankcase with the recommended engine oil. Refer to the specification in chapter 9 for engine oil capacity.
CAUTION: Slowly pour the recommended oil by us-
ing a funnel. Do not overfill not to damage the engine.
10.Start the engine and check to be sure no oil is leaking from the drain plug or oil filter.
11.Shut off the engine and recheck the oil level.
NOTE:
o It is recommended that the engine oil and filter should be changed by an Hyundai authorised repairer.
o Always dispose of used engine oil in an environmentally acceptable man-ner. It is suggested that it be placed ina sealed container and taken to a ser-vice station for maybe reclaimation.Do not pour the oil on the ground orput it into the household trash.
WARNING: Used motor oil may cause irritation or
cancer of the skin if left in contact with the skin for prolonged periods of time.Wash your hands thoroughly with soapand warm water as soon as possible afterhandling used oil.
Centrepipe O-ring
G040B02FC
O-ring
Oil filter housing
2. Open the bonnet and remove the engine oil level dipstick.
3. Loosen the oil filter upper cap with a proper tool from the oil filter housing until an O-ring is seen. Then, drain the oil completely.
Oil filter element
Upper cap
If the car is being driven in severe conditions,
more frequent oil and filter changes are re-quired.
The procedure for changing the oil and filter
is as follows:
1. Park the car on level ground and set the parking brake. Start the engine and let it warm up until the needle on the coolanttemperature gauge moves above the low-est mark. Turn the engine off and place thegear selector lever in "P" (automatic) orreverse gear (manual transaxle).
Page 130 of 407
OWNER MAINTENANCE 6-23
To check the power steering fluid level, be
sure the ignition is "OFF", then check to make certain that the power steering fluid level isbetween the "MAX" and "MIN" level markingson the fluid reservoir.
NOTE: Grinding noise from power steering pump
may be heard immediately after the engine is started in extremely cold condition(below -4°F). If the noise stops during warmup, there is no abnormal function in thesystem. This is due to a power steeringfluid characteristic in extremely cold con-ditions. FLUID RECOMMENDATION
Only automatic transmission fluid meeting the
specification of PSF-3 or Dexron 2 should be used in the power steering system. SG230B1-E POWER STEERING HOSES Power steering hoses should be checked for damage, deterioration and leakage at each ser-vice.
G350B01FC-GAT
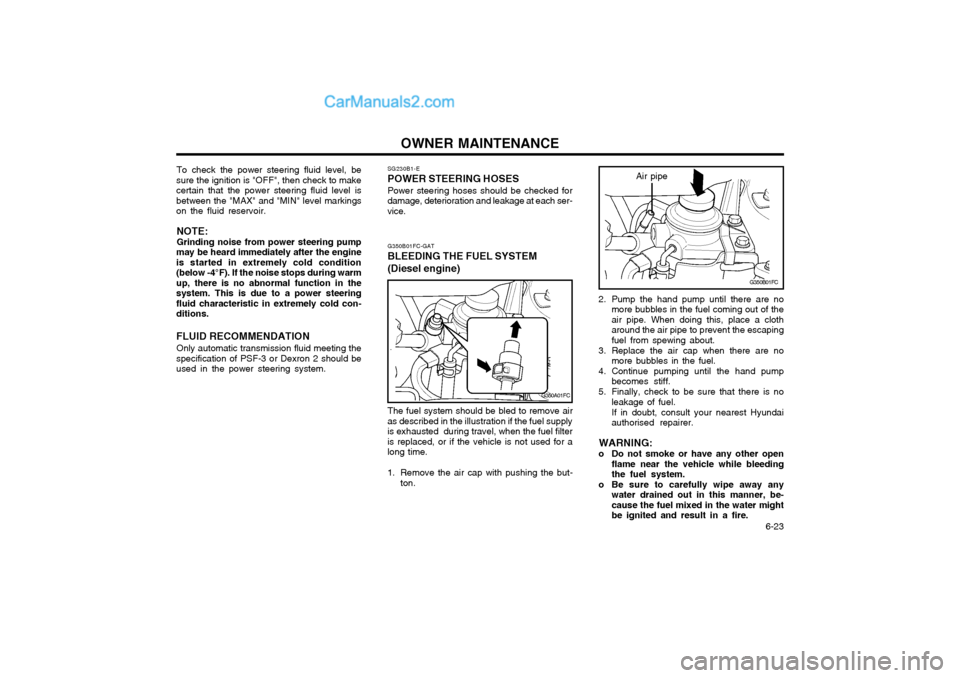
BLEEDING THE FUEL SYSTEM (Diesel engine)
The fuel system should be bled to remove air
as described in the illustration if the fuel supply is exhausted during travel, when the fuel filteris replaced, or if the vehicle is not used for along time.
1. Remove the air cap with pushing the but- ton.
G350A01FC
G350B01FC
2. Pump the hand pump until there are no more bubbles in the fuel coming out of the air pipe. When doing this, place a clotharound the air pipe to prevent the escapingfuel from spewing about.
3. Replace the air cap when there are no more bubbles in the fuel.
4. Continue pumping until the hand pump becomes stiff.
5. Finally, check to be sure that there is no leakage of fuel. If in doubt, consult your nearest Hyundai authorised repairer.
WARNING:
o Do not smoke or have any other open flame near the vehicle while bleedingthe fuel system.
o Be sure to carefully wipe away any water drained out in this manner, be-cause the fuel mixed in the water mightbe ignited and result in a fire.
Air pipe
Page 135 of 407
OWNER MAINTENANCE
6-28
G200C01FC-EAT
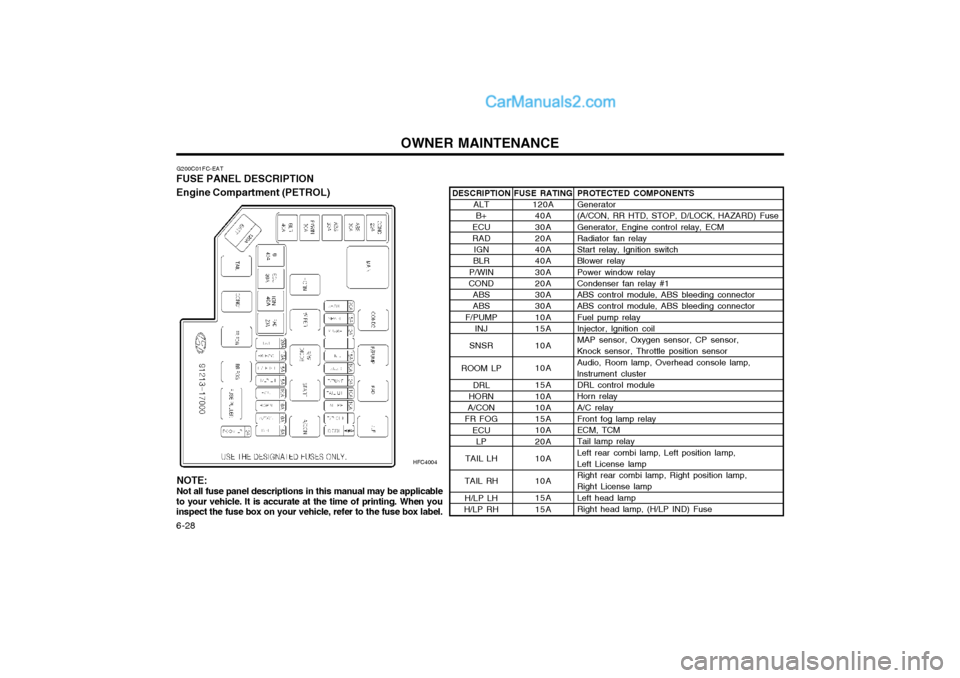
FUSE PANEL DESCRIPTION Engine Compartment (PETROL)
HFC4004PROTECTED COMPONENTS Generator (A/CON, RR HTD, STOP, D/LOCK, HAZARD) Fuse Generator, Engine control relay, ECM Radiator fan relay Start relay, Ignition switch Blower relay Power window relay Condenser fan relay #1 ABS control module, ABS bleeding connector ABS control module, ABS bleeding connector Fuel pump relay Injector, lgnition coil MAP sensor, Oxygen sensor, CP sensor, Knock sensor, Throttle position sensor Audio, Room lamp, Overhead console lamp, lnstrument cluster DRL control module Horn relay A/C relay Front fog lamp relay ECM, TCM Tail lamp relay Left rear combi lamp, Left position lamp, Left License lamp Right rear combi lamp, Right position lamp, Right License lamp Left head lamp Right head lamp, (H/LP IND) Fuse
FUSE RATING
120A40A 30A 20A 40A 40A 30A 20A 30A 30A 10A 15A 10A 10A 15A 10A 10A 15A 10A 20A 10A 10A 15A 15A
DESCRIPTION
ALTB+
ECU RAD IGN
BLR
P/WIN
COND
ABSABS
F/PUMP INJ
SNSR
ROOM LP DRL
HORN
A/CON
FR FOG
ECULP
TAIL LH
TAIL RH H/LP LH
H/LP RH
NOTE: Not all fuse panel descriptions in this manual may be applicable
to your vehicle. It is accurate at the time of printing. When you inspect the fuse box on your vehicle, refer to the fuse box label.
Page 137 of 407
OWNER MAINTENANCE
6-30
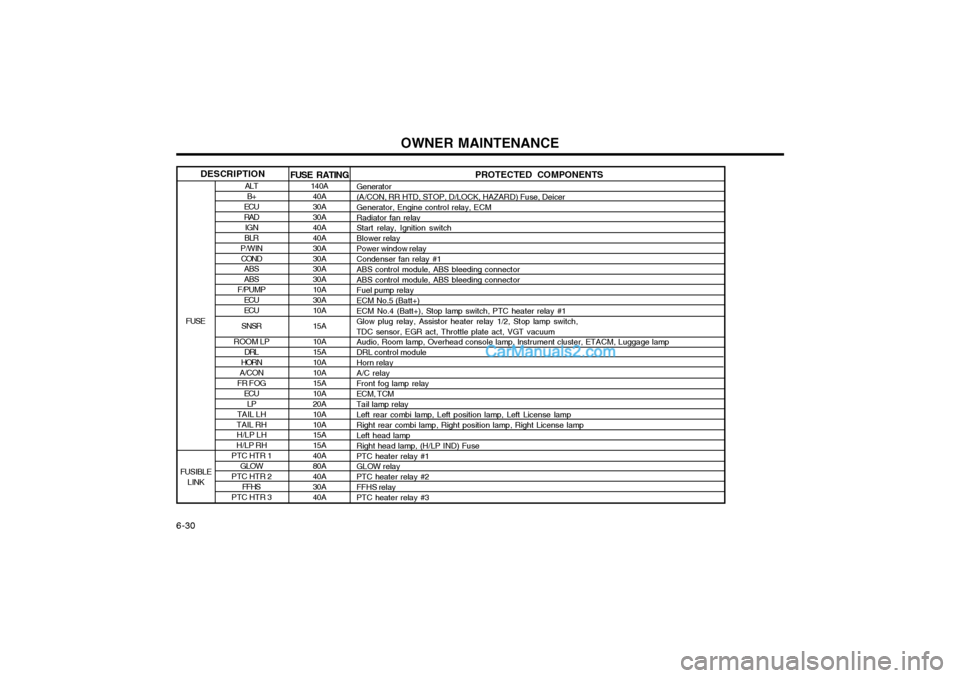
PROTECTED COMPONENTS
Generator (A/CON, RR HTD, STOP, D/LOCK, HAZARD) Fuse, DeicerGenerator, Engine control relay, ECMRadiator fan relay Start relay, Ignition switch Blower relayPower window relayCondenser fan relay #1ABS control module, ABS bleeding connectorABS control module, ABS bleeding connector Fuel pump relay ECM No.5 (Batt+)ECM No.4 (Batt+), Stop lamp switch, PTC heater relay #1Glow plug relay, Assistor heater relay 1/2, Stop lamp switch,TDC sensor, EGR act, Throttle plate act, VGT vacuum Audio, Room lamp, Overhead console lamp, lnstrument cluster, ETACM, Luggage lamp DRL control moduleHorn relayA/C relayFront fog lamp relayECM, TCM Tail lamp relay Left rear combi lamp, Left position lamp, Left License lampRight rear combi lamp, Right position lamp, Right License lampLeft head lampRight head lamp, (H/LP IND) FusePTC heater relay #1 GLOW relay PTC heater relay #2FFHS relayPTC heater relay #3
FUSE RATING
140A40A 30A 30A40A40A30A30A 30A 30A10A30A10A 15A10A 15A10A 10A 15A10A20A10A10A 15A 15A40A80A40A30A 40A
ALT
B+
ECU RAD
IGN
BLR
P/WIN COND ABSABS
F/PUMP ECUECU
SNSR
ROOM LP DRL
HORN
A/CON
FR FOG ECULP
TAIL LH
TAIL RH H/LP LH
H/LP RH
PTC HTR 1 GLOW
PTC HTR 2 FFHS
PTC HTR 3
FUSE
FUSIBLE LINK DESCRIPTION
Page 138 of 407
OWNER MAINTENANCE 6-31
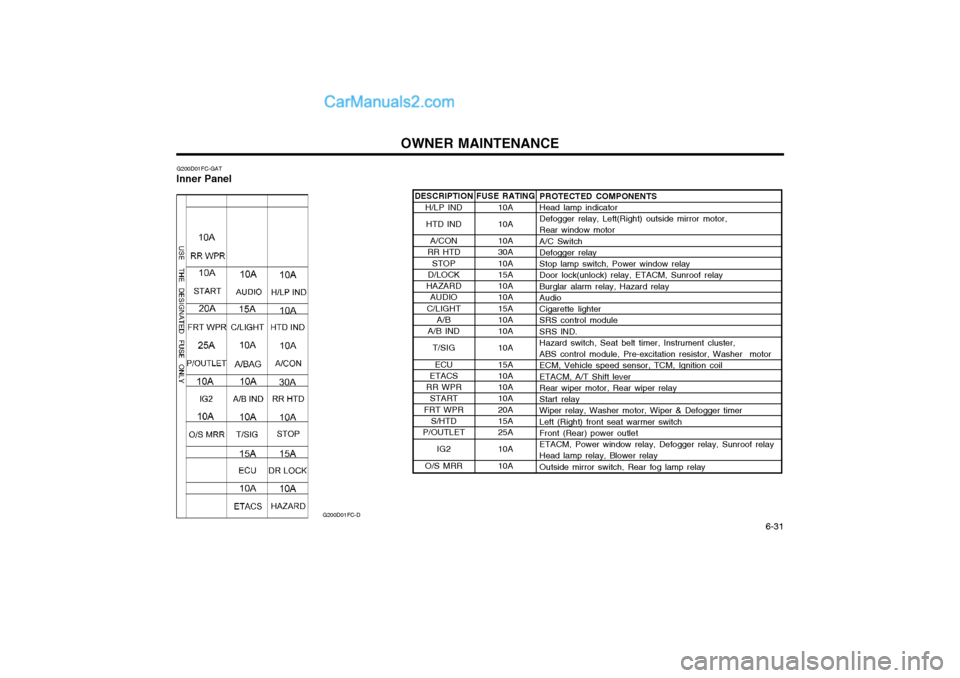
DESCRIPTION
H/LP IND
HTD IND
A/CON
RR HTD
STOP
D/LOCK
HAZARD AUDIO
C/LIGHT A/B
A/B IND
T/SIG
ECU
ETACS
RR WPR START
FRT WPR S/HTD
P/OUTLET
IG2
O/S MRR
G200D01FC-GAT
Inner Panel
G200D01FC-D
PROTECTED COMPONENTS Head lamp indicator Defogger relay, Left(Right) outside mirror motor, Rear window motor A/C Switch Defogger relay Stop lamp switch, Power window relay Door lock(unlock) relay, ETACM, Sunroof relay Burglar alarm relay, Hazard relay Audio Cigarette lighter SRS control module SRS IND. Hazard switch, Seat belt timer, Instrument cluster, ABS control module, Pre-excitation resistor, Washer motor ECM, Vehicle speed sensor, TCM, Ignition coil ETACM, A/T Shift lever Rear wiper motor, Rear wiper relay Start relay Wiper relay, Washer motor, Wiper & Defogger timer Left (Right) front seat warmer switch Front (Rear) power outlet ETACM, Power window relay, Defogger relay, Sunroof relay Head lamp relay, Blower relay Outside mirror switch, Rear fog lamp relay
FUSE RATING
10A 10A 10A 30A 10A 15A 10A 10A 15A 10A 10A 10A 15A 10A 10A 10A 20A 15A 25A 10A 10A
Page 166 of 407
1FEATURES OF YOUR HYUNDAI
2
B010B01A-AAT What About Gasohol? Gasohol (a mixture of 90% unleaded gasoline and 10% ethanol or grain alcohol) may be used in your Hyundai.However, if your engine develops driveability problems, the use of 100% unleaded gasoline is recommended.Fuels with unspecified quantities of alcohol, or alcohols other than ethanol, should not be used.
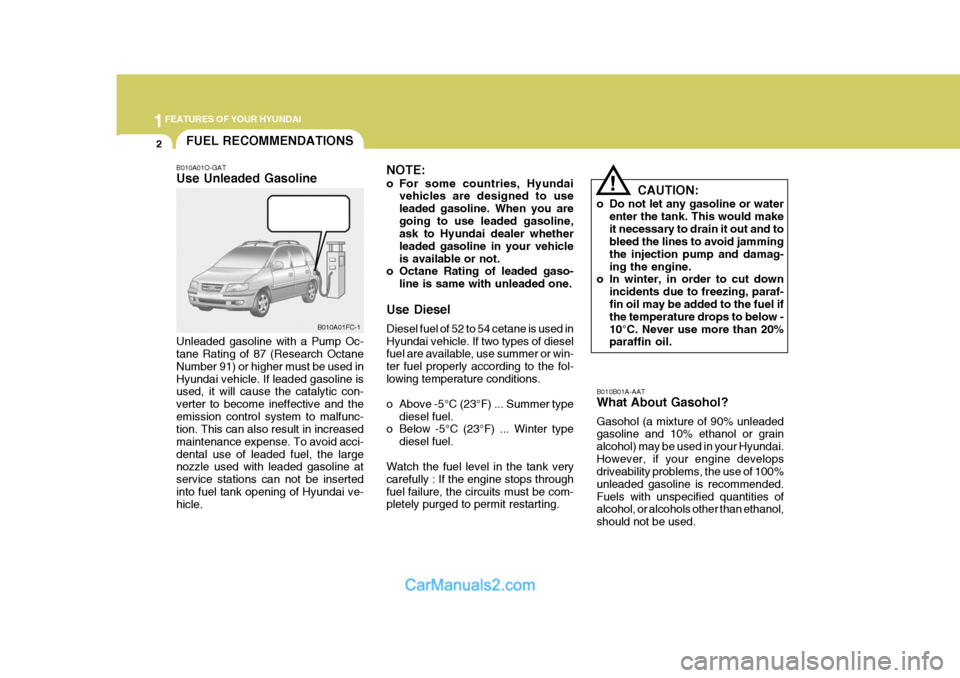
B010A01O-GAT Use Unleaded Gasoline Unleaded gasoline with a Pump Oc- tane Rating of 87 (Research Octane Number 91) or higher must be used inHyundai vehicle. If leaded gasoline is used, it will cause the catalytic con- verter to become ineffective and theemission control system to malfunc- tion. This can also result in increased maintenance expense. To avoid acci-dental use of leaded fuel, the large nozzle used with leaded gasoline at service stations can not be insertedinto fuel tank opening of Hyundai ve- hicle.
NOTE:
o For some countries, Hyundai
vehicles are designed to use leaded gasoline. When you aregoing to use leaded gasoline, ask to Hyundai dealer whether leaded gasoline in your vehicleis available or not.
o Octane Rating of leaded gaso-
line is same with unleaded one.
Use Diesel Diesel fuel of 52 to 54 cetane is used in Hyundai vehicle. If two types of diesel fuel are available, use summer or win- ter fuel properly according to the fol-lowing temperature conditions.
o Above -5°C (23°F) ... Summer type diesel fuel.
o Below -5°C (23°F) ... Winter type
diesel fuel.
Watch the fuel level in the tank very carefully : If the engine stops throughfuel failure, the circuits must be com- pletely purged to permit restarting. CAUTION:
o Do not let any gasoline or water enter the tank. This would make it necessary to drain it out and to bleed the lines to avoid jamming the injection pump and damag-ing the engine.
o In winter, in order to cut down
incidents due to freezing, paraf-fin oil may be added to the fuel if the temperature drops to below - 10°C. Never use more than 20% paraffin oil.
!
B010A01FC-1
FUEL RECOMMENDATIONS
Page 167 of 407

1
FEATURES OF YOUR HYUNDAI
3
B010D01S-AAT Do not Use Methanol Fuels containing methanol (wood al- cohol) should not be used in yourHyundai. This type of fuel can reduce vehicle performance and damage com- ponents of the fuel system. B010E01A-AAT Gasolines for Cleaner Air To help contribute to cleaner air, Hyundai recommends that you usegasolines treated with detergent addi- tives, which help prevent deposit for- mation in the engine. These gasolineswill help the engine run cleaner and enhance performance of the Emission Control System.
!
CAUTION:
Your Hyundai's New Vehicle Lim- ited Warranty may not cover dam-age to the fuel system and perfor- mance problems that are caused by the use of methanol or fuels con-taining methanol. B020A01S-GAT During the First 2,000 Km (1,200 Miles) (Gasoline Engine) No formal "break-in" procedure is re- quired with your new Hyundai. How-ever, you can contribute to the eco- nomical operation and durability of your Hyundai by observing the followingrecommendations during the first 2,000 km (1,200 miles).
o Don't drive faster than 88 km/h (55
mph).
o While driving, keep your engine speed (rpm, or revolutions per minute) between 2,000 rpm and 4,000 rpm.
o Use moderate acceleration. Don't start, depress the accelerator pedalfully.
o For the first 300 km (200 miles), try to avoid hard stops.
o Don't lug the engine (in other words, don't drive so slowly in toohigh a gear that the engine "bucks": shift to a lower gear).
B010F01A-AAT Operation in Foreign Countries If you are going to drive your Hyundai in another country, be sure to:
o Observe all regulations regarding
registration and insurance.
o Determine that acceptable fuel is available. BREAKING IN YOUR NEW HYUNDAI
Page 168 of 407

1FEATURES OF YOUR HYUNDAI
4
B030A01A-AAT
B030A01B
o Use moderate acceleration. Don't
start, depress the accelerator pedal fully.
o For the first 300 km (200 miles), try
to avoid hard stops.
o Don't lug the engine (in other words, don't drive so slowly in too-high agear that the engine "bucks": shift toa lower gear).
o Whether going fast or slow, vary
your speed from time to time.
o Don't let the engine idle longer than 3 minutes at one time.
o Don't tow a trailer during the first 1,000 km (600 miles) of operation. For greater convenience, the same key operates all the locks in your Hyundai. However, because the doorscan be locked without a key, carrying a spare key is recommended in case you accidentally lock one key insidethe car.
o Whether going fast or slow, vary
your speed from time to time.
o Don't let the engine idle longer than 3 minutes at one time.
o Don't tow a trailer during the first 2,000 km (1,200 miles) of opera- tion. KEYS
B020B01FC-GAT During the First 1,000 Km (600 Miles) (Diesel Engine) No formal "break-in" procedure is re- quired with your new Hyundai. How- ever, you can contribute to the eco- nomical operation and durability of yourHyundai by observing the following recommendations during the first 1,000 km (600 miles).
o While driving, keep your engine speed (rpm, or revolutions per minute) within 3,000 rpm.
o While driving, keep under three quar-
ters of maximum speed.
Page 213 of 407

1
FEATURES OF YOUR HYUNDAI
49
!
B260H03A-AAT
Parking Brake/Low Brake
Fluid Level Warning Light other time, you should slow the vehicle and bring it to a complete stop in a safelocation off the roadway. The brake warning light indicates that the brake fluid level in the brake mas-ter cylinder is low and hydraulic brake fluid conforming to DOT 3 or DOT 4 specifications should be added. Afteradding fluid, if no other trouble is found, the car should be immediately and carefully driven to a Hyundai dealer forinspection. If further trouble is experi- enced, the vehicle should not be driven at all but taken to a dealer by aprofessional towing service or some other safe method. Your Hyundai is equipped with dual-diagonal braking systems. This means you still have braking on two wheels even if one of the dual systems shouldfail. With only one of the dual systems working, more than normal pedal travel and greater pedal pressure are re-quired to stop the car. Also, the car will not stop in as short a distance with only half of the brake system working. If thebrakes fail while you are driving, shift to a lower gear for additional engine braking and stop the car as soon as itis safe to do so.
WARNING:
If you suspect brake trouble, have your brakes checked by a Hyundaidealer as soon as possible. Driving your car with a problem in either the brake electrical system or brakehydraulic system is dangerous, and could result in a serious injury or death. Warning Light Operation The parking brake/brake fluid level warning light should come on when the parking brake is applied and the igni-tion switch is turned to "ON" or "START". After the engine is started, the light should go out when the park-ing brake is released. If the parking brake is not applied, the warning light should come on when theignition switch is turned to "ON" or "START", then go out when the engine starts. If the light comes on at any
B260J01S-GAT Charging System
Warning Light
The charging system warning light should come on when the ignition isturned on, then go out when the engine is running. If the light stays on while the engine is running, there is a malfunc-tion in the electrical charging system. If the light comes on while you are driv- ing, stop, turn off the engine and checkunder the hood. First, make certain the generator drive belt is in place. If it is, check the tension of the belt.And then, have the system checked by your Hyundai dealer.
CAUTION:
If the drive belt (generator belt) is loosen, broken, or mission while the vehicle is driving, there may be a serious malfunction, engine couldoverheat because this belt also drives the water pump.
!
Page 214 of 407
1FEATURES OF YOUR HYUNDAI
50
B260M01A-AAT
Low Fuel Level Warning
Light
The low fuel level warning light comes on when the fuel tank is approachingempty. When it comes on, you should add fuel as soon as possible. Driving with the fuel level warning light on orwith the fuel level below "E" can cause the engine to misfire and damage the catalytic converter. B260F01A-AAT High Beam Indicator
Light
The high beam indicator light comes on whenever the headlights are switched to the high beam or flash position.B260K01B-GAT Tail Gate Open Warning
Light
This light remains on unless the tail gate is completely closed. B260L01A-GAT Door Ajar Warning Light
The door ajar warning light warns you that a door is not completely closed.
B260G01A-AAT Low Oil Pressure
Warning Light
CAUTION:
If the oil pressure warning light stays on while the engine is run- ning, serious engine damage may result. The oil pressure warninglight comes on whenever there is insufficient oil pressure. In normal operation, it should come on whenthe ignition switch is turned on, then go out when the engine is started. If the oil pressure warning light stays on while the engine isrunning, there may be a serious malfunction. If this happens, stop the car assoon as it is safe to do so, turn off the engine and check the oil level. If the oil level is low, fill the engine oilto the proper level and start the engine again. If the light stays on with the engine running, turn theengine off immediately. In any in- stance where the oil light stays on when the engine is running, theengine should be checked by an authorized Hyundai dealer before the car is driven again.
!