clock Hyundai Matrix 2006 User Guide
[x] Cancel search | Manufacturer: HYUNDAI, Model Year: 2006, Model line: Matrix, Model: Hyundai Matrix 2006Pages: 490, PDF Size: 11.58 MB
Page 134 of 490

1FEATURES OF YOUR HYUNDAI
120
4. TUNE (Manual) Select Button Press the ( ) side or ( ) side to increase or to decrease the frequency. Presseither button and hold down to continu- ously scroll. Release button once the desired station is reached. SEEK Operation (Automatic Channel Selection) Press the TUNE select button for 0.5 sec or more. Releasing it will automati-cally tune to the next available station with a beep sound. When the ( ) side is pressed longerthan 0.5 second and releasing will auto- matically tune to the next higher fre- quency and when the ( ) side ispressed longer than 0.5 second, releas- ing will automatically tune to the next lower frequency.
5. PRESET STATION SelectButtons
Six (6) stations for AM, FM1 and FM2 respectively can be preset in the elec-tronic memory circuit.
BALANCE Control knob Pull the Bass control knob out further. Rotate the knob clockwise to empha-size right speaker sound (left speaker sound will be attenuated). When the control knob is turned counterclock-wise, left speaker sound will be empha- sized (right speaker sound will be at- tenuated).
3. TREBLE/FAD Knob TREBLE Control Knob Press to pop the knob out and turn to the left or right for the desired treble tone. FAD (Fader Control) Knob Pull the Treble control knob out further. Turn the control knob counterclockwiseto emphasize front speaker sound (rear speaker sound will be attenuated). When the control knob is turned clockwise,rear speaker sound will be emphasized (front speaker sound will be attenu- ated).
H290B03E-GAT
1. POWER ON-OFF Control
Knob
The radio unit may be operated when the ignition key is in the "ACC" or "ON"position. Press the button to switch the power on. The display shows the radio frequency in the radio mode, the tapedirection indicator in the tape mode or CD track in either the CD mode or CD AUTO CHANGER mode. To switch thepower off, press the button again. VOLUME Control Rotate the knob clockwise to increase the volume and turn the knob counter- clockwise to reduce the volume.
2. BASS/BALANCE Control Knob
BASS Control Knob Press to pop the knob out. To increase the bass, rotate the knob clockwise,while to decrease the bass, rotate the knob counterclockwise.
Page 148 of 490

1FEATURES OF YOUR HYUNDAI
134
CAUTION:
o Be sure to remove the antenna before washing the car in an auto- matic car wash or it may be dam- aged.
o Before entering a place with a low
height clearance, be sure to adjustthe roof antenna low.
o When reinstalling your antenna, it
is important that it is fully tight-ened to ensure proper reception.
!
This antenna is a removable type. To remove the antenna, turn the antennacounterclockwise. To install the an- tenna, turn the antenna clockwise.
Page 152 of 490

2 DRIVING YOUR HYUNDAI
4
!
KEY POSITIONS
C070C01E
C070C01A-AAT To remove the ignition key
1. Turn the ignition key to the "ACC"
position.
2. Simultaneously push and turn the
ignition key counterclockwise from the "ACC" position to the "LOCK" position.
3. The key can be removed in the "LOCK" position.LOCK
ACC
ON
o "ON" When the key is in the "ON position, the ignition is on and all accessories may be turned on. If the engine is notrunning, the key should not be left in the "ON" position. This will discharge the battery and may also damage theignition system.
o "ACC" With the key in the "ACC" position, the some electrical accessories (radio, etc.) may be operated.
o "LOCK" The key can be removed or inserted in this position. To protect against theft, the steering wheel locks by removing the key. NOTE: To unlocking the steering wheel, insert the key, and then turn thesteering wheel and key simulta- neously.
C040A01A-AAT
C040A01E
LOCK
ACC
ON
START
WARNING:
The engine should not be turned off or the key removed from the ignition key cylinder while the ve- hicle is in motion. The steeringwheel is locked by removing the key.
o "START" The engine is started in this position. It will crank until you release the key. NOTE: Do not hold the key in the "START" position for more than 15 seconds. START
Page 183 of 490

3
WHAT TO DO IN AN EMERGENCY
9
D060C01A-AAT 2. Block the Wheel Block the wheel that is diagonally op- posite from the flat to keep the vehiclefrom rolling when the vehicle is raised on the jack. D060C02FC
Flat tire
D060E01A-AAT 4. Put the Jack in Place The base of the jack should be placed on firm, level ground. The jack shouldbe positioned as shown in the drawing.D060E02FC
D060D01A-AAT 3. Loosen Wheel Nuts
D060D02FC
The wheel nuts should be loosened slightly before raising the car. To loosenthe nuts, turn the wheel nut wrench handle counterclockwise. When doing this, be sure that the socket is seatedcompletely over the nut so it cannot slip off. For maximum leverage, posi- tion the wrench so the handle is to theright as shown in the drawing. Then, while holding the wrench near the end of the handle, pull up on it with steadypressure. Do not remove the nuts at this time. Just loosen them about one- half turn.
Page 184 of 490
3 WHAT TO DO IN AN EMERGENCY
10
!
D060G01Y-AAT 6. Changing Wheels
Loosen the wheel nuts and remove them with your fingers. Slide the wheeloff the studs and lay it flat so it cannot roll away. To put the wheel on the hub, pick up the spare tire, line up the holeswith the studs and slide the wheel onto them. If this is difficult, tip the wheel slightly and get the top hole in thewheel lined up with the top stud. Then jiggle the wheel back and forth until the wheel can be slid over the other studs. D060G02FC
WARNING:
Do not get under the car when it is supported by the jack! This is very dangerous as the vehicle could falland cause serious injury or death. No one should stay in the car while the jack is being used.
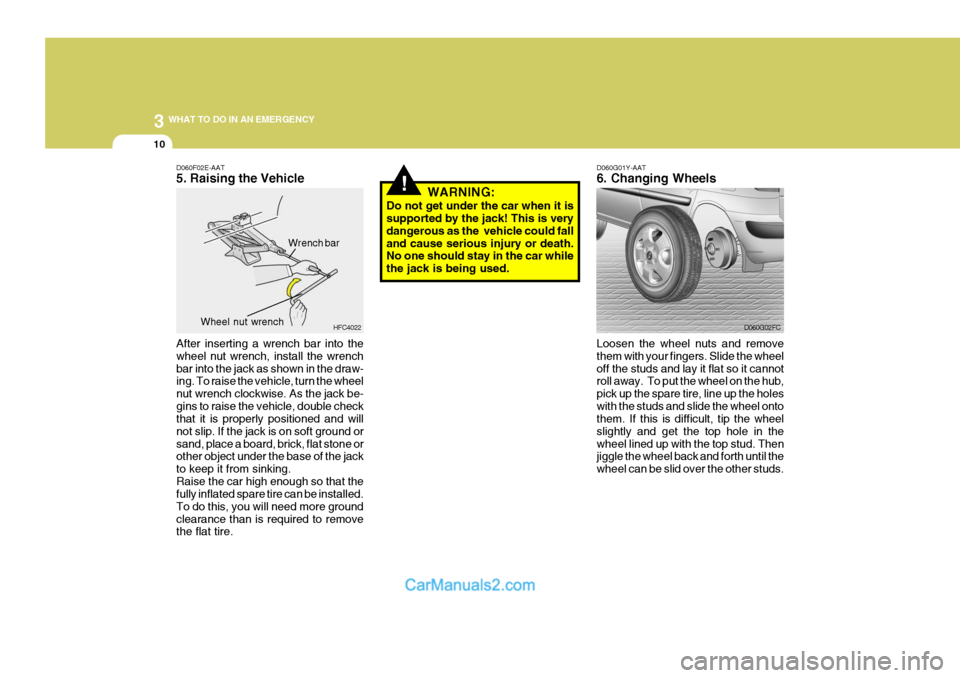
D060F02E-AAT 5. Raising the Vehicle After inserting a wrench bar into the wheel nut wrench, install the wrenchbar into the jack as shown in the draw- ing. To raise the vehicle, turn the wheel nut wrench clockwise. As the jack be-gins to raise the vehicle, double check that it is properly positioned and will not slip. If the jack is on soft ground orsand, place a board, brick, flat stone or other object under the base of the jack to keep it from sinking.Raise the car high enough so that the fully inflated spare tire can be installed. To do this, you will need more groundclearance than is required to remove the flat tire. HFC4022
Wrench bar
Wheel nut wrench
Page 185 of 490

3
WHAT TO DO IN AN EMERGENCY
11
!
D060G02E
WARNING:
Wheel and wheel covers may have sharp edges. Handle them carefully to avoid possible severe injury. Before putting the wheel into place, be sure that there is nothing on the hub or wheel (such as mud, tar, gravel, etc.) that interferes with thewheel from fitting solidly against the hub. If there is, remove it. If there is not good contact on themounting surface between the wheel and hub, the wheel nuts could loosen and cause the loss of a wheel. Loss of a wheel may result in loss of control of the vehicle. This may cause serious injury or death. D060H02A-AAT 7. Re-install Wheel Nuts To reinstall the wheel cover, hold it on the studs, put the wheel nuts on the studs and tighten them finger tight. The nuts should be installed with theirsmall diameter ends directed inward. Jiggle the tire to be sure it is completely seated, then tighten the nuts as muchas possible with your fingers again.
D060H02FC
Lower the car to the ground by turning the wheel nut wrench counterclock- wise. Then position the wrench asshown in the drawing and tighten the wheel nuts. Be sure the socket is seated completely over the nut. Do notstand on the wrench handle or use an extension pipe over the wrench handle. Go around the wheel tightening everyother nut until they are all tight. Then double-check each nut for tightness. After changing wheels, have a techni-cian tighten the wheel nuts to their proper torque as soon as possible.
D060I01E-GAT
8. Lower Vehicle and Tighten
Nuts
D060I02FC
Page 214 of 490
6 DO-IT-YOURSELF MAINTENANCE
8
G350A01A-GAT
ENGINE OIL CONSUMPTION Function of Engine Oil
Engine oil has the primary function of
lubricating and cooling the inside of the engine. Engine oil consumption
It is normal that an engine should
consume some engine oil while nor- mal driving. The cause of oil con- sumption in a normal engine are asfollows;
o Engine oil is used to lubricate pis- tons, piston rings and cylinders. A thin film of oil is left on the cylinder wall when a piston moves downwards in the cylinder. High negative pressure generated dur-ing engine operation sucks some of the oil into the combustion cham- ber.This oil with some oil of the cylin-der wall is burned by the high tem-perature combustion gases during the combustion process.
1. Remove the oil filler cap by turning
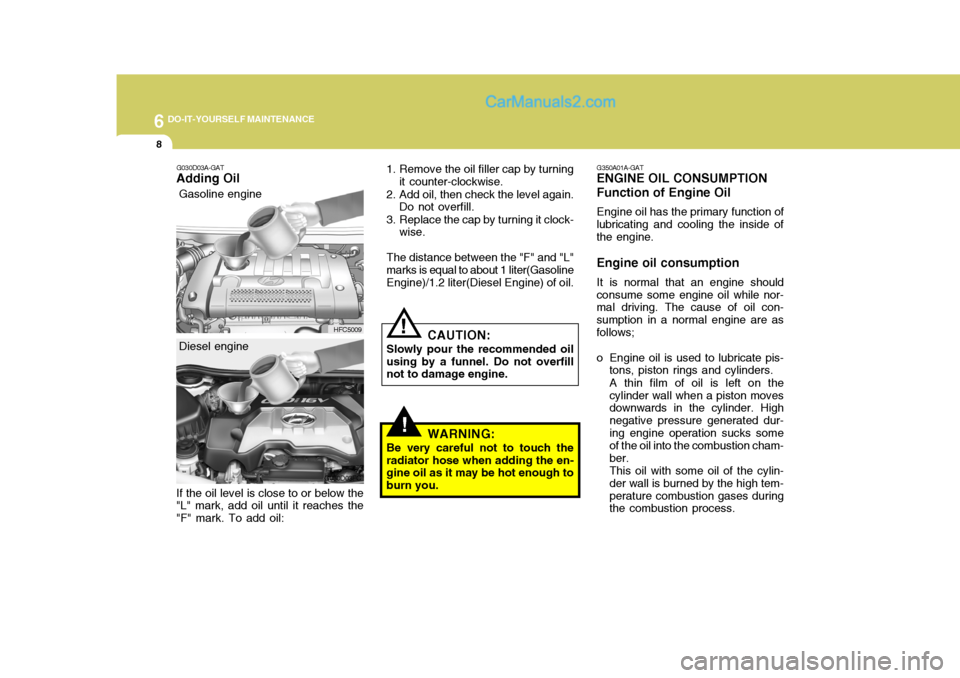
it counter-clockwise.
2. Add oil, then check the level again. Do not overfill.
3. Replace the cap by turning it clock- wise.
The distance between the "F" and "L" marks is equal to about 1 liter(GasolineEngine)/1.2 liter(Diesel Engine) of oil.
!
! CAUTION:
Slowly pour the recommended oil using by a funnel. Do not overfill not to damage engine.
WARNING:
Be very careful not to touch the radiator hose when adding the en- gine oil as it may be hot enough to burn you.
G030D03A-GAT
Adding Oil
HFC5009
G030D03FC
Gasoline engine
Diesel engine
If the oil level is close to or below the "L" mark, add oil until it reaches the "F" mark. To add oil:
Page 215 of 490
6
DO-IT-YOURSELF MAINTENANCE
9
o The engine oil consumption is strongly effected by the viscosity and quality of oil, engine rpm and driving condition etc. The engine oil is more consumed under severedriving conditions such as high speeds and frequent acceleration and deceleration than normal driv-ing condition.CHANGING THE OIL AND FILTER
!
G040A04FC-GAT
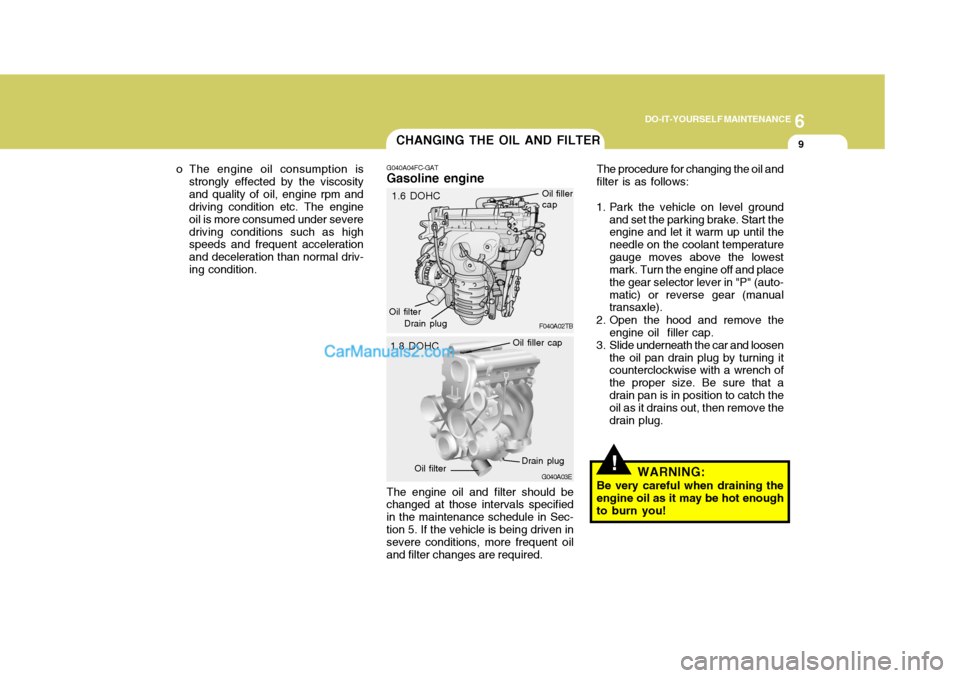
Gasoline engine
The engine oil and filter should be
changed at those intervals specified in the maintenance schedule in Sec-tion 5. If the vehicle is being driven in severe conditions, more frequent oil and filter changes are required. G040A03EThe procedure for changing the oil andfilter is as follows:
1. Park the vehicle on level ground and set the parking brake. Start the engine and let it warm up until the needle on the coolant temperaturegauge moves above the lowest mark. Turn the engine off and place the gear selector lever in "P" (auto-matic) or reverse gear (manual transaxle).
2. Open the hood and remove the engine oil filler cap.
3. Slide underneath the car and loosen the oil pan drain plug by turning itcounterclockwise with a wrench of the proper size. Be sure that adrain pan is in position to catch the oil as it drains out, then remove the drain plug.
WARNING:
Be very careful when draining theengine oil as it may be hot enough to burn you!
Oil filler cap
Drain plug
Oil filter F040A02TB
1.6 DOHC
1.8 DOHC
Oil filler cap
Drain plug
Oil filter
Page 216 of 490
6 DO-IT-YOURSELF MAINTENANCE
10
CAUTION:
Slowly pour the recommended oil into a funnel. Do not overfill not todamage engine.
!
NOTE: Always dispose of used engine oil in an environmentally acceptablemanner. It is suggested that it be placed in a sealed container and taken to a service station for maybereclaimation. Do not pour the oil on the ground or put it in with the household trash.
Be sure that the mounting surfaceon the engine is clean and that theold gasket is removed completely. Lubricate the new gasket on the filter with clean engine oil beforeinstallation.
7. Remove the engine oil level dip- stick.
8. Refill the crankcase with the rec-
ommended engine oil. Refer tothe specification in chapter 9 for engine oil capacity.
!
9. Start the engine and check to be sure no oil is leaking from the drain plug or oil filter.
10.Shut off the engine and recheck the oil level. WARNING:
Used motor oil may cause irrita-
tion or cancer of the skin if left in contact with the skin for prolongedperiods of time. Wash your hands thoroughly with soap and warm water as soon as possible afterhandling used oil.
4. When the oil has stopped draining,
replace the drain plug using a newgasket and retighten by turning it clockwise. Oil pan drain plug tightening torque :
1.6 DOHC 1.8 DOHC 4.0 ~ 4.5 3.5 ~ 4.5
E.CExcept E.C
4.0 ~ 4.5 kgf.m
5. Remove the oil filter by turning it counterclockwise with a oil filter wrench of the proper size. A cer-tain amount of oil will come out when you remove the filter. So be sure to have your drain pan inplace underneath it.
6. Install a new oil filter in accordance with the instructions on the cartonor on the filter itself. Do not over- tighten. Oil filter tightening torque: 1.2~1.6kgf.m
Page 217 of 490
6
DO-IT-YOURSELF MAINTENANCE
11
G040B04FC-GAT
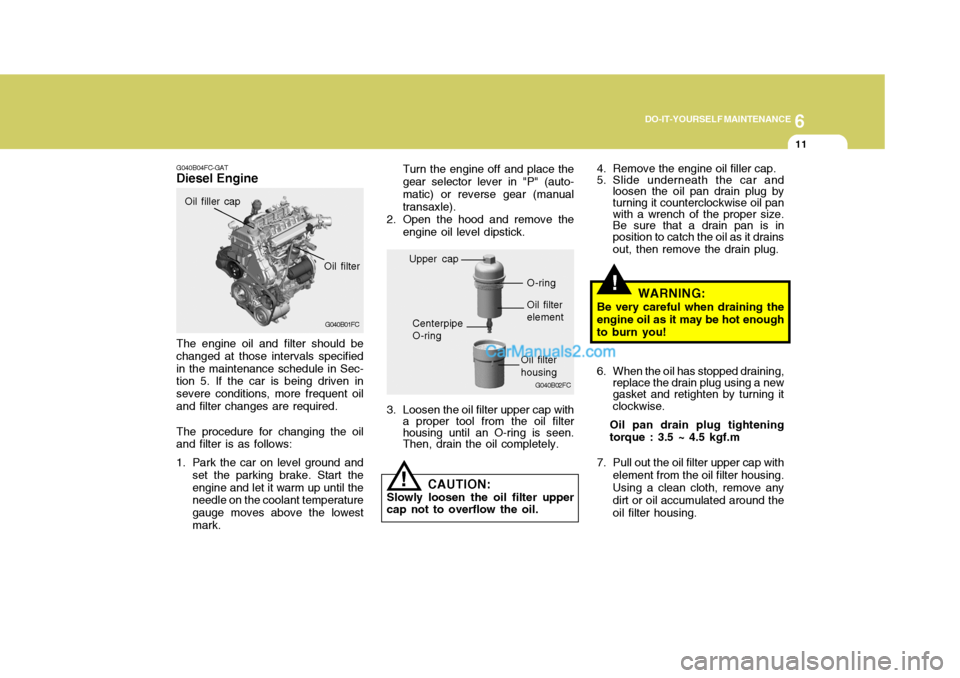
Diesel Engine
Oil filter
G040B01FC
Oil filler cap
The engine oil and filter should be changed at those intervals specifiedin the maintenance schedule in Sec- tion 5. If the car is being driven in severe conditions, more frequent oiland filter changes are required. The procedure for changing the oil and filter is as follows:
1. Park the car on level ground and set the parking brake. Start the engine and let it warm up until the needle on the coolant temperature gauge moves above the lowestmark.
!
Centerpipe O-ring
G040B02FC
Upper capO-ring
Oil filter element
Oil filter housing
Turn the engine off and place the gear selector lever in "P" (auto-matic) or reverse gear (manual transaxle).
2. Open the hood and remove the engine oil level dipstick.
3. Loosen the oil filter upper cap with a proper tool from the oil filter housing until an O-ring is seen.Then, drain the oil completely. 4. Remove the engine oil filler cap.
5. Slide underneath the car and
loosen the oil pan drain plug by turning it counterclockwise oil pan with a wrench of the proper size. Be sure that a drain pan is inposition to catch the oil as it drains out, then remove the drain plug.
WARNING:
Be very careful when draining the engine oil as it may be hot enoughto burn you!
6. When the oil has stopped draining, replace the drain plug using a new gasket and retighten by turning it clockwise.
Oil pan drain plug tightening torque : 3.5 ~ 4.5 kgf.m
7. Pull out the oil filter upper cap with element from the oil filter housing. Using a clean cloth, remove any dirt or oil accumulated around the oil filter housing.
! CAUTION:
Slowly loosen the oil filter upper cap not to overflow the oil.