remove Hyundai Matrix 2006 Owner's Guide
[x] Cancel search | Manufacturer: HYUNDAI, Model Year: 2006, Model line: Matrix, Model: Hyundai Matrix 2006Pages: 490, PDF Size: 11.58 MB
Page 183 of 490

3
WHAT TO DO IN AN EMERGENCY
9
D060C01A-AAT 2. Block the Wheel Block the wheel that is diagonally op- posite from the flat to keep the vehiclefrom rolling when the vehicle is raised on the jack. D060C02FC
Flat tire
D060E01A-AAT 4. Put the Jack in Place The base of the jack should be placed on firm, level ground. The jack shouldbe positioned as shown in the drawing.D060E02FC
D060D01A-AAT 3. Loosen Wheel Nuts
D060D02FC
The wheel nuts should be loosened slightly before raising the car. To loosenthe nuts, turn the wheel nut wrench handle counterclockwise. When doing this, be sure that the socket is seatedcompletely over the nut so it cannot slip off. For maximum leverage, posi- tion the wrench so the handle is to theright as shown in the drawing. Then, while holding the wrench near the end of the handle, pull up on it with steadypressure. Do not remove the nuts at this time. Just loosen them about one- half turn.
Page 184 of 490
3 WHAT TO DO IN AN EMERGENCY
10
!
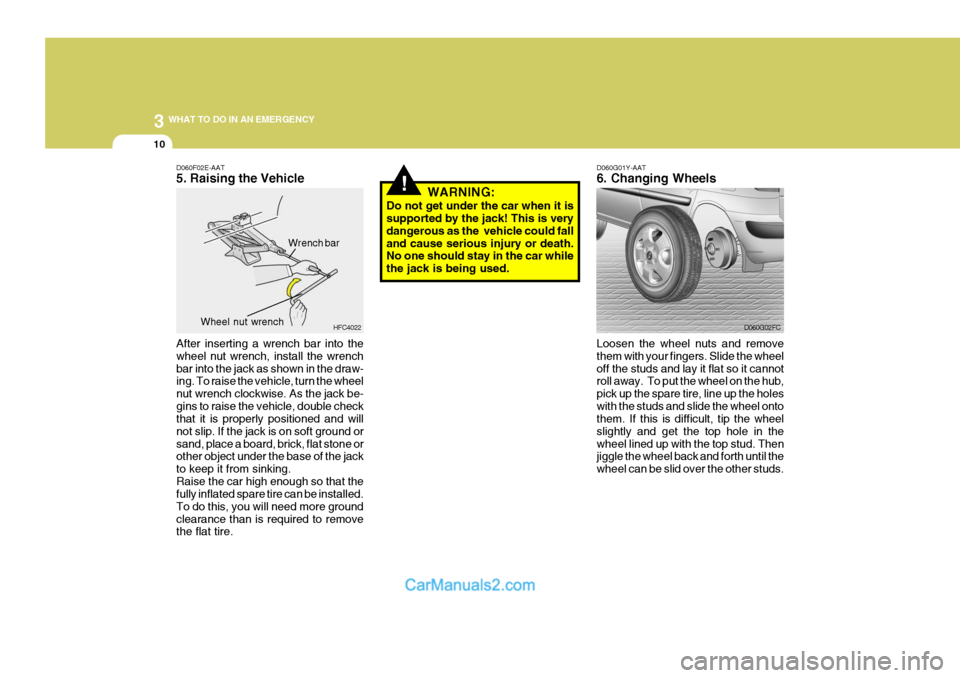
D060G01Y-AAT 6. Changing Wheels
Loosen the wheel nuts and remove them with your fingers. Slide the wheeloff the studs and lay it flat so it cannot roll away. To put the wheel on the hub, pick up the spare tire, line up the holeswith the studs and slide the wheel onto them. If this is difficult, tip the wheel slightly and get the top hole in thewheel lined up with the top stud. Then jiggle the wheel back and forth until the wheel can be slid over the other studs. D060G02FC
WARNING:
Do not get under the car when it is supported by the jack! This is very dangerous as the vehicle could falland cause serious injury or death. No one should stay in the car while the jack is being used.
D060F02E-AAT 5. Raising the Vehicle After inserting a wrench bar into the wheel nut wrench, install the wrenchbar into the jack as shown in the draw- ing. To raise the vehicle, turn the wheel nut wrench clockwise. As the jack be-gins to raise the vehicle, double check that it is properly positioned and will not slip. If the jack is on soft ground orsand, place a board, brick, flat stone or other object under the base of the jack to keep it from sinking.Raise the car high enough so that the fully inflated spare tire can be installed. To do this, you will need more groundclearance than is required to remove the flat tire. HFC4022
Wrench bar
Wheel nut wrench
Page 185 of 490

3
WHAT TO DO IN AN EMERGENCY
11
!
D060G02E
WARNING:
Wheel and wheel covers may have sharp edges. Handle them carefully to avoid possible severe injury. Before putting the wheel into place, be sure that there is nothing on the hub or wheel (such as mud, tar, gravel, etc.) that interferes with thewheel from fitting solidly against the hub. If there is, remove it. If there is not good contact on themounting surface between the wheel and hub, the wheel nuts could loosen and cause the loss of a wheel. Loss of a wheel may result in loss of control of the vehicle. This may cause serious injury or death. D060H02A-AAT 7. Re-install Wheel Nuts To reinstall the wheel cover, hold it on the studs, put the wheel nuts on the studs and tighten them finger tight. The nuts should be installed with theirsmall diameter ends directed inward. Jiggle the tire to be sure it is completely seated, then tighten the nuts as muchas possible with your fingers again.
D060H02FC
Lower the car to the ground by turning the wheel nut wrench counterclock- wise. Then position the wrench asshown in the drawing and tighten the wheel nuts. Be sure the socket is seated completely over the nut. Do notstand on the wrench handle or use an extension pipe over the wrench handle. Go around the wheel tightening everyother nut until they are all tight. Then double-check each nut for tightness. After changing wheels, have a techni-cian tighten the wheel nuts to their proper torque as soon as possible.
D060I01E-GAT
8. Lower Vehicle and Tighten
Nuts
D060I02FC
Page 186 of 490

3 WHAT TO DO IN AN EMERGENCY
12
air may leak from the tire. If you lose a valve cap, buy another and install it assoon as possible. After you have changed wheels, al- ways secure the flat tire in its place inthe luggage room and return the jack and tools to their proper storage loca- tions.
Wheel nut tightening torque: Steel wheel & aluminium alloy wheel: 900-1,100 kg.cm (65-80 lb.ft)
D060J01FC-GAT After Changing Wheels If you have a tire gauge, remove the valve cap and check the air pressure. If the pressure is lower than recom-mended, drive slowly to the nearest service station and inflate to the cor- rect pressure. If it is too high, adjust ituntil it is correct. Always reinstall the valve cap after checking or adjusting tire pressure. If the cap is not replaced, HFC502
IF YOUR VEHICLE MUST BE TOWED
D080A01O-GAT If your vehicle has to be towed, it should be done by your Hyundai dealeror a commercial tow truck service. This will help assure that your vehicle is not damaged in towing. Also, profes-sionals are generally aware of local laws governing towing. In any case, rather than risk damage to your car, itis suggested that you show this infor- mation to the tow truck operator. Be sure that a safety chain system is usedand that all local laws are observed. It is recommended that your vehicle be towed with a wheel lift and dollies orflatbed equipment with all the wheels off the ground.
! CAUTION:
o Your vehicle can be damaged if towed incorrectly!
o Be sure the transaxle is in neu-
tral.
o When the engine will not start, be
sure the steering is unlocked by placing the key in the "ACC" po- sition.
Page 187 of 490
3
WHAT TO DO IN AN EMERGENCY
13
CAUTION:
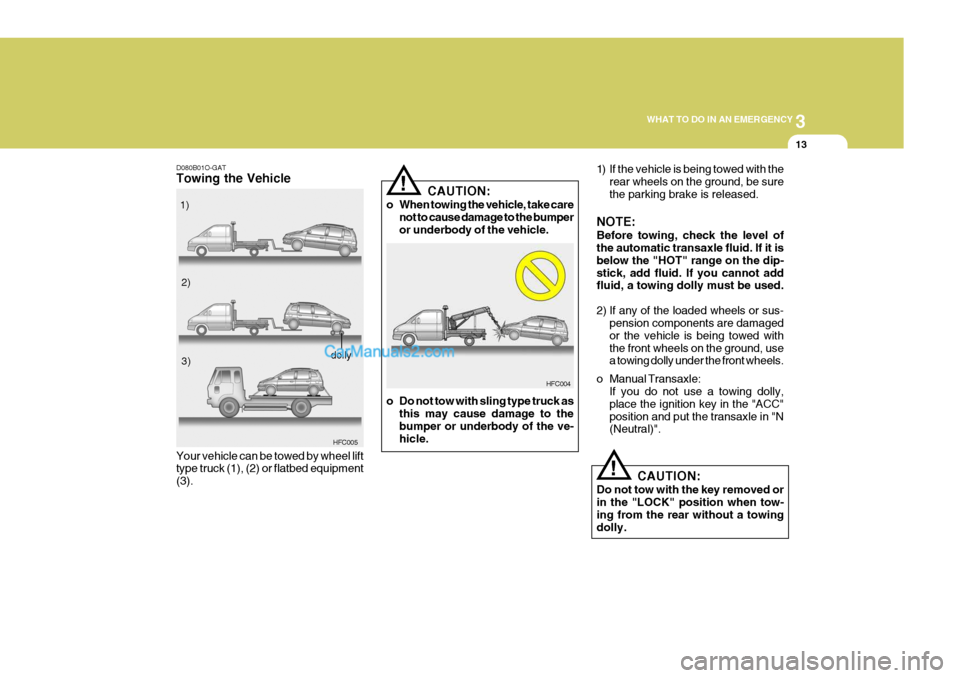
o When towing the vehicle, take care not to cause damage to the bumper or underbody of the vehicle.
o Do not tow with sling type truck as this may cause damage to thebumper or underbody of the ve-hicle. HFC004
D080B01O-GAT Towing the Vehicle
HFC005
Your vehicle can be towed by wheel lift type truck (1), (2) or flatbed equipment (3).
!
1) If the vehicle is being towed with the
rear wheels on the ground, be sure the parking brake is released.
NOTE: Before towing, check the level of the automatic transaxle fluid. If it is below the "HOT" range on the dip-stick, add fluid. If you cannot add fluid, a towing dolly must be used.
2) If any of the loaded wheels or sus- pension components are damaged or the vehicle is being towed withthe front wheels on the ground, use a towing dolly under the front wheels.
o Manual Transaxle: If you do not use a towing dolly, place the ignition key in the "ACC"position and put the transaxle in "N (Neutral)".
1)
2)
3)
dolly
CAUTION:
Do not tow with the key removed or in the "LOCK" position when tow- ing from the rear without a towingdolly.
!
Page 193 of 490

44CORROSION PREVENTION AND APPEARANCE CARE
4WASHING AND WAXING
E030A01A-AAT Washing Your Hyundai Never wash your car when the surface is hot from being in the sun. Alwayswash your car in the shade. Wash your car frequently. Dirt is abra- sive and can scratch the paint if it is not removed. Air pollution or acid rain may damage the paint and trim throughchemical action if pollutants are al- lowed to remain in contact with the surface. If you live near the ocean or inan area where road salts or dust con- trol chemicals are used, you should pay particular attention to the under-side of the car. Start by rinsing the car to remove dust and loose dirt. In win- ter, or if you have driven through mudor muddy water, be sure to thoroughly clean the underside as well. Use a hard direct stream of water to removeaccumulated mud or corrosive materi- als. Use a good quality car-washing solution and follow the manufacturer'sdirections on the package. These are available at your Hyundai dealer or auto parts outlet. Don't use strong house-hold detergents, gasoline, strong sol- vents or abrasive cleaning powders asthese may damage the finish.Use a clean sponge or cloth, rinse it frequently and don't damage the finish by rubbing too hard. For stubborn spots,dampen them frequently and remove them a little at a time. To clean whitewall tires, use a stiffbrush or soapy steel-wool scouring pad. To clean plastic wheel covers, use aclean sponge or soft cloth and water. To clean cast aluminum alloy wheels, use a mild soap or neutral detergent. Do not use abrasive cleaners. Protect the bare-metal surfaces by cleaning,polishing and waxing. Because alumi- num is subject to corrosion, be sure to give aluminum alloy wheels specialattention in winter. If you drive on salted roads, clean the wheels thor- oughly afterwards. After washing, be sure to rinse thor- oughly. If soapy water dries on thefinish, streaking will result. When the weather is warm and the
humidity low, you may find it necessary to rinse each section immediately afterwashing to avoid streaking. After rinsing, dry the car using a damp chamois or soft, absorbent cloth. The reason for drying the car is to remove water from the car so it will dry withoutwater spots. Don't rub, this can dam- age the finish. If you find any nicks or scratches in the paint, use touch-up paint to cover them to prevent corrosion. To protectthe paintwork of the car against corro- sion, you must clean your Hyundai (at least once a month). Give special at-tention to the removal of salt, mud and other substances on the underside of the splashboards of the car. Makesure that the outlets and the underside of the doors are open. Paint damage can be caused by small accumulationof tar, industrial precipitation, tree resin, insects and bird droppings, when not removed immediately. If water alone isnot strong enough to remove the accu- mulated dirt, use a mild car washing solution.
Page 194 of 490

4
CORROSION PREVENTION AND APPEARANCE CARE
5
4
CORROSION PREVENTION AND APPEARANCE CARE
5CLEANING THE INTERIOR
E030D01A-AAT When to Wax Again You should polish and wax the car again when water no longer beads ona clean surface but spreads out over a larger area. E030E01A-AAT Maintaining Bumpers Special precautions must be observed to preserve the appearance of the bumpers on your Hyundai. They are:
o Be careful not to spill battery elec- trolyte or hydraulic brake fluid on the bumpers. If you do, wash it off immediately with clear water.
o Be gentle when cleaning the bumper surfaces. They are made of softplastic and the surface can be dam-aged if mistreated. Do not use abra- sive cleaners. Use warm water and mild soap or car-washing solution.
o Do not expose the bumpers to high temperatures. For example, if youhave your car repainted, do notleave the bumpers on the car if the car is going to be placed in a high- temperature paint booth. E040A01A-AAT To Clean the Vinyl Upholstery To clean the vinyl upholstery, first re- move loose dirt and dust with a vacuumcleaner. Then apply a solution of mild soap or detergent and water using a clean sponge or soft cloth. Allow this tostay on the surface to loosen the dirt, then wipe with a clean damp sponge or cloth. If all the dirt stains are not re-moved, repeat this procedure until the upholstery is clean. Do not use gaso- line, solvent, paint thinner or otherstrong cleaners.
E030B01A-AAT Spot Cleaning Don't use gasoline, strong solvents or corrosive cleaning agents. These can damage the finish of the car. To re-move road tar, use turpentine on a clean, soft cloth or commercially avail- able bug and tar remover. Be gentle.To remove dead insects or tree sap, use warm water and mild soap or car- washing solution. Soak the spot andrub gently. If the paint has lost its luster, use a commercial car-cleaning polish. E030C01A-AAT Polishing and Waxing Always wash and dry the car before polishing or waxing or using a combi- nation cleaner and wax. Use a good quality commercial product and followthe manufacturer's directions on the container. Polish and wax the bright trim pieces as well as the paint.
Be sure to rinse the surface after wash-ing to remove the solution. Never allowthe solution to dry on the painted sur- faces.
Page 195 of 490

44CORROSION PREVENTION AND APPEARANCE CARE
6
E040E01A-AAT Cleaning the Windows You may use any household window cleaner on the windows. However, when cleaning the inside of the rear window be careful not to damage therear window defroster wiring. E050A01A-AAT Any Questions? If you have any questions about the care of your car, consult your Hyundaidealer.
E040C01A-AAT Cleaning the Carpets Use a foam-type carpet cleaner. Clean- ers of this type are available in aerosol cans in liquid form or powder. Read theinstructions and follow them exactly. Using a vacuum cleaner with the ap- propriate attachment, remove as muchdirt from the carpets as possible. Apply the foam following the manufacturer's directions, then rub in overlappingcircles. Do not add water. These clean- ers work best when the carpet is kept as dry as possible.
E040B01A-AAT To Clean the Leather Upholstery (If Installed) In the normal course of use, leather upholstered surfaces will, like anymaterial, pick-up dust and dirt. This dust and dirt must be cleaned off or it may work into the surface of the leather,causing damage. Fine leather needs care, and should be cleaned when necessary. Washing leather thoroughly with soap and water will keep your leather lustrous, beauti-ful and ensure you have many years of wear. Take a piece of cheese cloth and usingany mild soap and lukewarm water, work up a good lather. Thoroughly wash the leather. Wipe clean with aslightly damp cloth and dry with soft cloth. Do this as often as the leather becomes soiled. During tanning operations, sufficient oils are incorporated through process-ing that none need be applied during the life of the leather. Oil applied to the finished surface will in no way help the leather and may do more harm thangood. Varnishes and furniture polishesshould never be used under any con- ditions.
E040D01A-AAT Cleaning the Seat Belts To clean the seat belts, use a cloth or sponge with mild soap or detergentand warm water. Do not use strong detergents, dye, bleach or abrasive materials on the seat belts as this mayweaken the fabric. While cleaning the belts, inspect them for excessive wear, cuts, fraying orother signs of damage and replace them if necessary.
Page 213 of 490
6
DO-IT-YOURSELF MAINTENANCE
7
NOTE: SAE 0W-30 oil is for extra cold zone and to be restricted by driving con-dition and dealing area. (Especially, not recommended for sustained high loaded and high speed operation.)
G030C02JM-GAT
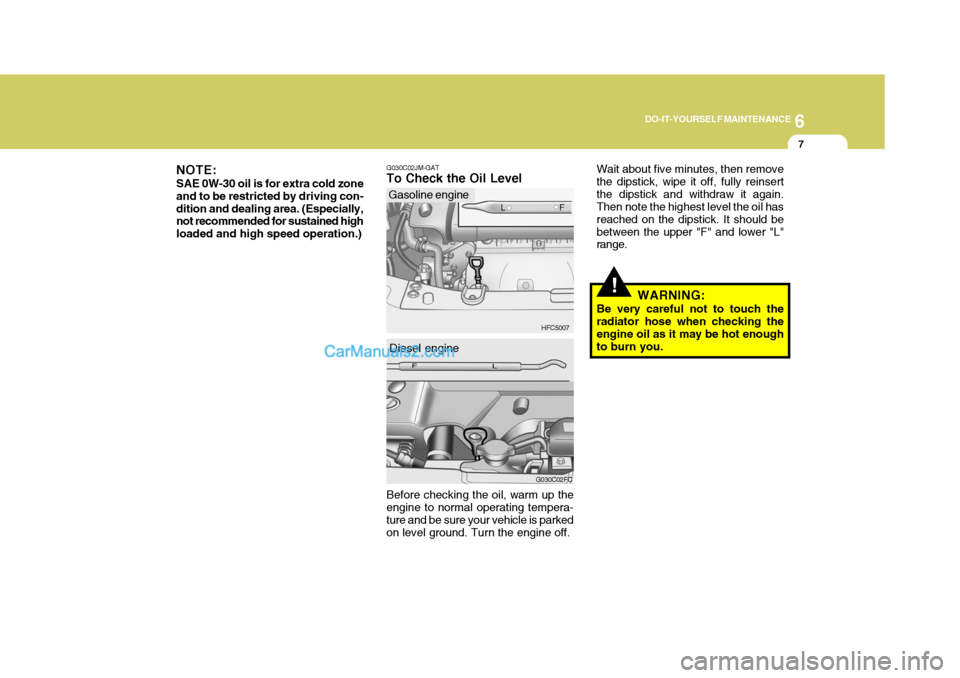
To Check the Oil Level
HFC5007
Gasoline engine
Before checking the oil, warm up the
engine to normal operating tempera- ture and be sure your vehicle is parkedon level ground. Turn the engine off. G030C02FC
Diesel engine
!WARNING:
Be very careful not to touch the radiator hose when checking the engine oil as it may be hot enough to burn you.
Wait about five minutes, then removethe dipstick, wipe it off, fully reinsertthe dipstick and withdraw it again. Then note the highest level the oil has reached on the dipstick. It should bebetween the upper "F" and lower "L" range.
Page 214 of 490
6 DO-IT-YOURSELF MAINTENANCE
8
G350A01A-GAT
ENGINE OIL CONSUMPTION Function of Engine Oil
Engine oil has the primary function of
lubricating and cooling the inside of the engine. Engine oil consumption
It is normal that an engine should
consume some engine oil while nor- mal driving. The cause of oil con- sumption in a normal engine are asfollows;
o Engine oil is used to lubricate pis- tons, piston rings and cylinders. A thin film of oil is left on the cylinder wall when a piston moves downwards in the cylinder. High negative pressure generated dur-ing engine operation sucks some of the oil into the combustion cham- ber.This oil with some oil of the cylin-der wall is burned by the high tem-perature combustion gases during the combustion process.
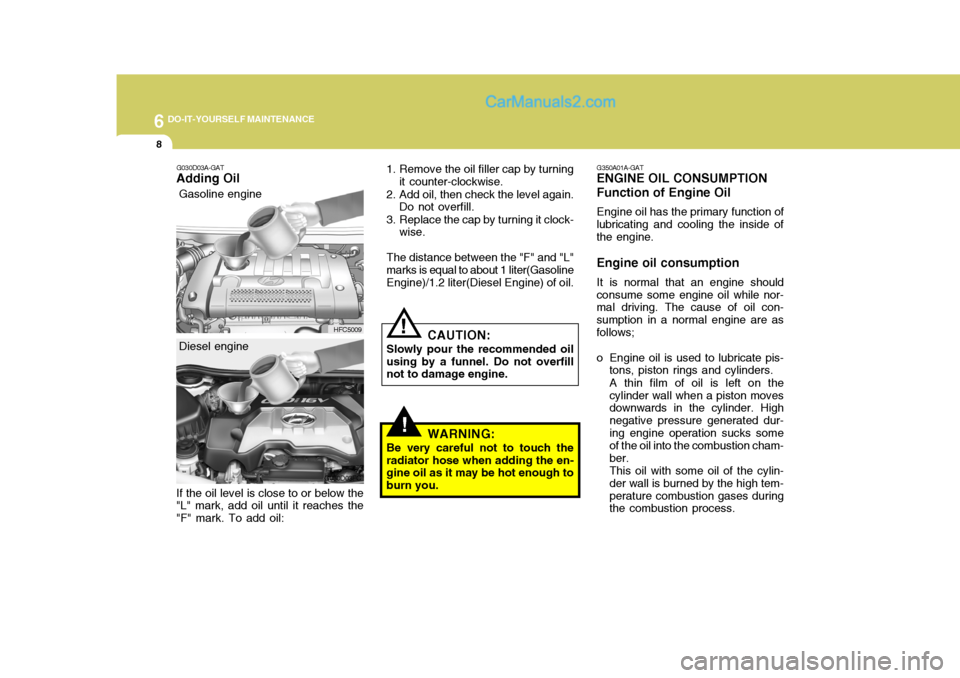
1. Remove the oil filler cap by turning
it counter-clockwise.
2. Add oil, then check the level again. Do not overfill.
3. Replace the cap by turning it clock- wise.
The distance between the "F" and "L" marks is equal to about 1 liter(GasolineEngine)/1.2 liter(Diesel Engine) of oil.
!
! CAUTION:
Slowly pour the recommended oil using by a funnel. Do not overfill not to damage engine.
WARNING:
Be very careful not to touch the radiator hose when adding the en- gine oil as it may be hot enough to burn you.
G030D03A-GAT
Adding Oil
HFC5009
G030D03FC
Gasoline engine
Diesel engine
If the oil level is close to or below the "L" mark, add oil until it reaches the "F" mark. To add oil: