oil Hyundai Matrix 2006 Workshop Manual
[x] Cancel search | Manufacturer: HYUNDAI, Model Year: 2006, Model line: Matrix, Model: Hyundai Matrix 2006Pages: 490, PDF Size: 11.58 MB
Page 269 of 490

10INDEX
6
TowingA trailer (or vehicle) ................................................ 2-23
Emergency ............................................................. 3-14
If your car must be towed ...................................... 3-12
Transaxle
Automa tic ................................................................. 2-9
Automatic transaxle fluid checking ......................... 6-21
Manual ...................................................................... 2-7
Manual transaxle oil checking ................................ 6-20
Trip Computer ............................................................ 1-57
Trip Odometer ............................................................ 1-56
U Under T ray ................................................................ 1-17
V Vehicle Identification Number (VIN) ........................... 8-2
Vehicle Specifi cation................................................... 9-2
Ventilation
Center ventilator ..................................................... 1-83
Side ventilator ......................................................... 1-83
W Warning and Indicator Light ...................................... 1-48
Windows
Manual ................................................................... 1-13
Power ..................................................................... 1-13
Windshield Wiper and Washer Sw itch .......................1-61
Windshield Wiper Blades .... .......................................6-18
Page 280 of 490

YOUR VEHICLE AT A GLANCE
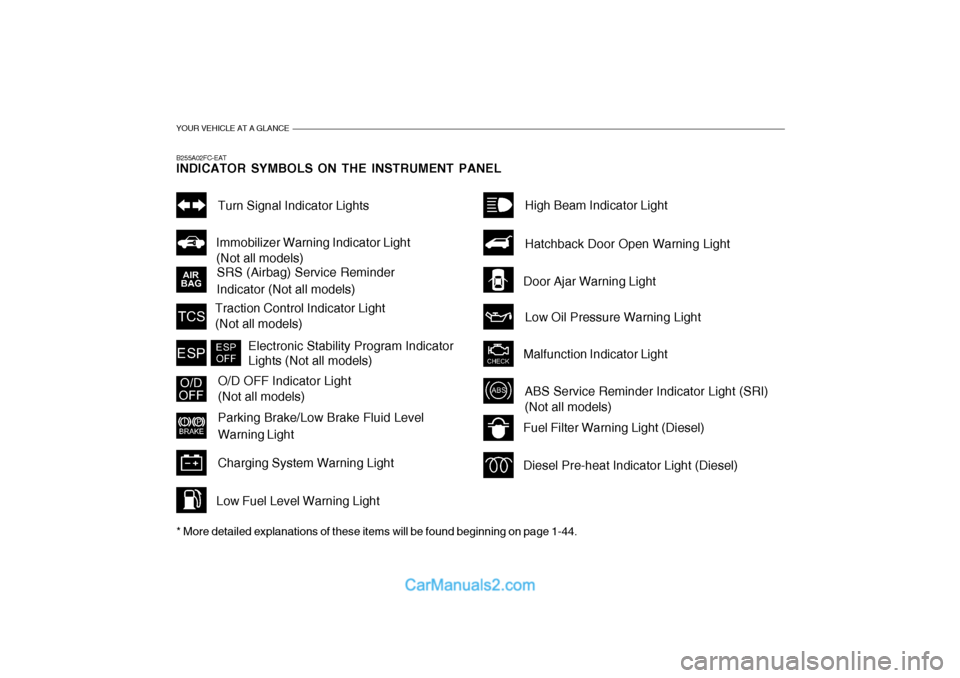
B255A02FC-EAT INDICATOR SYMBOLS ON THE INSTRUMENT PANEL * More detailed explanations of these items will be found beginning on page 1-44.
SRS (Airbag) Service Reminder
Indicator (Not all models)Turn Signal Indicator Lights
Malfunction Indicator Light
Traction Control Indicator Light (Not all models)
O/D OFF Indicator Light (Not all models)
Parking Brake/Low Brake Fluid Level Warning Light
Charging System Warning LightFuel Filter Warning Light (Diesel) Diesel Pre-heat Indicator Light (Diesel)
Immobilizer Warning Indicator Light (Not all models)
ABS Service Reminder Indicator Light (SRI) (Not all models) High Beam Indicator Light Low Oil Pressure Warning Light
Hatchback Door Open Warning Light
Door Ajar Warning Light
Low Fuel Level Warning Light
Electronic Stability Program Indicator Lights (Not all models)
Page 321 of 490

1
CONTROLS AND EQUIPMENT
41
1. Temperature Gauge
2. Tachometer
3. Speedometer
4. Digital Clock
5. Odometer/Trip Odometer/Trip Computer (Not all models)
6. Fuel Gauge
7. Turn Signal Indicator Light
8. Automatic Transaxle Position Indicator Light (Auto T/A only)
9. Immobiliser Warning Indicator Light
10. SRS (Airbag) Warning Light
11. Electronic Stability Program (ESP) Indicator Light (Not all models)/Traction Control Indicator Light (Not all models) 12. Overdrive off Indicator Light (Not all models)
13. Parking Brake/Low Brake Fluid Level Warning Light
14. Charging System Warning Light
15. Low Fuel Warning Light
16. High Beam Indicator Light
17. Tail Gate Open Warning Light
18. Door Ajar Warning Light
19. Oil Pressure Warning Light
20. Malfunction Indicator Light (MIL)
21. ABS Warning Light (Not all models)
Page 323 of 490

1
CONTROLS AND EQUIPMENT
43
1. Temperature Gauge
2. Tachometer
3. Speedometer
4. Digital Clock
5. Odometer/Trip Odometer/Trip Computer (Not all models)
6. Fuel Gauge
7. Fuel Filter Warning Light
8. Turn Signal Indicator Light
9. Immobiliser Warning Indicator Light
10. SRS (Airbag) Warning Light
11. Diesel Pre-heat Indicator Light
12. Electronic Stability Program (ESP) Indicator Light (Not all models)/Traction Control Indicator Light (Not all models) 13. Parking Brake/Low Brake Fluid Level Warning Light
14. Charging System Warning Light
15. Low Fuel Warning Light
16. High Beam Indicator Light
17. Tail Gate Open Warning Light
18. Door Ajar Warning Light
19. Oil Pressure Warning Light
20. Malfunction Indicator Light (MIL)
21. ABS Warning Light (Not all models)
Page 326 of 490

1CONTROLS AND EQUIPMENT
46
SB2100I-EDoor Ajar Warning Light
The door ajar warning light indicates that a door is not correctly closed.Ensure that the light is extinguished prior to driving the vehicle.
CAUTION:
If the drive belt (generator belt) is loose, broken, or missing whilst thevehicle is driving, there may be a serious malfunction, engine could overheat because this belt also drivesthe water pump.! SB210P1-E
Low Fuel Level Warning Light
The low fuel warning light serves to warn the driver that the remaining fuelquantity is approximately 9 litres and that the vehicle should be refuelled. If the vehicle is driven for an extendedperiod with the low fuel warning light illuminated there exists a possibility that misfiring due to fuel shortage mayoccur. This situation must be avoided to prevent damage to the catalyst oc- curring.
SB210M1-E Charging System Warning Light
The charging system warning light should illuminate when the ignitionswitch is turned to the "ON" position and should be extinguished when the engine is started. If the light fails toilluminate when the ignition is turned "ON" or fails to extinguish after starting the engine, the nearest Hyundaiauthorised repairer should be contacted. If the light illuminates whilst the vehicle is being driven, stop the vehicle assoon as it is safe to do so and check the condition of the generator drive belt. If the belt is in place and the tension issatisfactory, the advice of a Hyundai authorised repairer should be sought.
SB210J1-E High Beam Indicator Light
The high beam indicator light will illumi- nate whenever the headlights are switched to high beam of flash position.
B260B01FC-EAT
Hatchback Door Open Warning
Light
The hatchback door open warning light indicates when hatchback door open isopen or is not fully closed. Ensure that the light has extinguished prior to driv- ing the vehicle.
SB210K1-E Oil Pressure Warning Light CAUTION:
If the oil pressure light illuminates when the engine is running, an in- sufficient oil pressure level for con- tinued safe operation of the engine exists. Continued operation of the engine in this condition may result in serious engine damage.
!
Page 327 of 490

1
CONTROLS AND EQUIPMENT
47
Under normal circumstances, the light will illuminate when the ignition is turned"on" and will be extinguished when the engine is started. If the oil pressure warning light illumi-nates whilst the engine is running, stop the engine immediately and check the engine oil level. If the level is insuffi-cient, add the required amount of oil as indicated by the engine oil dipstick. If the light fails to extinguish when theengine is restarted, do not continue to operate the vehicle. If the oil pressure light illuminates dur-ing normal operation and the cause is not an insufficient oil level, or the light fails to illuminate when the ignition isturned "on", contact the nearest Hyundai authorised repairer before further oper- ating the vehicle. B260N02FC-EAT
Malfunction Indicator
Light
This light illuminates when there is amalfunction of an exhaust gas relatedcomponent, and the system is not func- tioning properly so that the exhaust gas regulation values are not satisfied. Thislight will illuminate when the ignition key is tuned to the "ON" position, and then it will go out after the engine start. If itilluminates whilst driving, or does not illuminate when the ignition key is turned to the "ON" position, take your car toyour nearest Hyundai authorised re- pairer and have the system checked.
!
B260P02Y-EAT ABS Service Reminder Indicator (SRI)(Not all models)
When the key is turned to the "ON" position, the Anti-Lock Brake System SRI will come on and then go off in a few seconds. If the ABS SRI remains on, comes on whilst driving, or does not come on when the key is turned to the "ON" position, this indicates that there may be a problem with the ABS. If this occurs, have your vehicle checked by your Hyundai authorised repairer as soon as possible. The nor- mal braking system will still be opera- tional, but without the assistance of the anti-lock brake system.
CAUTION:
If the both ABS SRI and Parking Brake/ Brake fluid level warning lights re- main "ON" or come on whilst driving, there may be a problem with E.B.D.
(Electronic Brake Force Distribution). If this occurs, avoid sudden stops and have your vehicle checked byyour Hyundai authorised repairer as soon as possible.
Page 334 of 490

1CONTROLS AND EQUIPMENT
54
B340C02FC-EAT Lighting Switch The vehicle sidelights and headlights are operated by rotating the end of the turn signal switch barrel. To operate the parking lights, rotating the switch to thefirst detent with ignition switch at the"OFF" position will cause the lights toilluminate. To operate the headlights,the turn signal switch barrel should be rotated to the second detent. The head- lights will only operate when the ignitionswitch is at the "ON" position. If theignition switch is turned to the "OFF" position, only the parking lights will function. NOTE: The ignition must be in the "ON" position to turn on the headlights.MULTI-FUNCTION SWITCH
SB220A1-E Turn Signal Operation To signal an intention to turn right, the switch lever should be pressed down.To signal an intention to turn left, the switch lever should be pushed upwards. In both instances, the turn signal lightson one side of the car will flash and the warning light located in the instrument cluster will flash in sympathy. Uponcompletion of the manoeuvre, the lever will, under normal circumstances, re-
turn to the "OFF" position. However, ifthe manoeuvre involved only a small movement of the steering wheel, the signal may need to be cancelled manu-ally. If either turn signal indicator flashes more rapidly than normal or refuses to flash at all, a malfunction of the turnsignal system may exist. SB220B1-E Lane Change Signal To indicate an intention to change lanes, moving the lever slightly towards the direction of the relevant turn signal will cause the turn signal lights to flash.When the lever is released, it will return to the "OFF" position.
B340B01FC-DB340C01FC-D
Page 350 of 490

1CONTROLS AND EQUIPMENT
70FOLD-UP TRAY
B570A01FC-EAT Pull the release lever inside the vehicle to unlatch the bonnet. At the front of the vehicle, push the safety catch lever sidewards as shown and raise the bon-net by hand. Support the bonnet by means of the bonnet prop. Before closing the bonnet, ensure thatthe prop is correctly stowed. Lower the bonnet by hand to a position of approxi- mately 30cm from the closed positionand allow the bonnet to drop. Do not attempt to close the bonnet by lowering the panel to the closed position andpressing upon the panel work since this may result in damage to the panel.BONNET RELEASE
HIGH-MOUNTED REAR STOP LIGHT
B550A01S-EAT In addition to the lower-mounted rear stoplights on either side of the car, the high mounted rear stoplight in the cen- tre of the rear window or inserted in therear spoiler also lights when the brakes are applied. B550A02FC
B810A01FC-GAT
For your convenience, it may be used as a table holding a book, cup or can.
!WARNING:
To avoid the possibility of injury in case of an accident or a sudden stop,the fold-up tray should be place its original position whilst the vehicle is moving. HFC2070
HFC2018-D
Page 353 of 490

1
CONTROLS AND EQUIPMENT
73
!
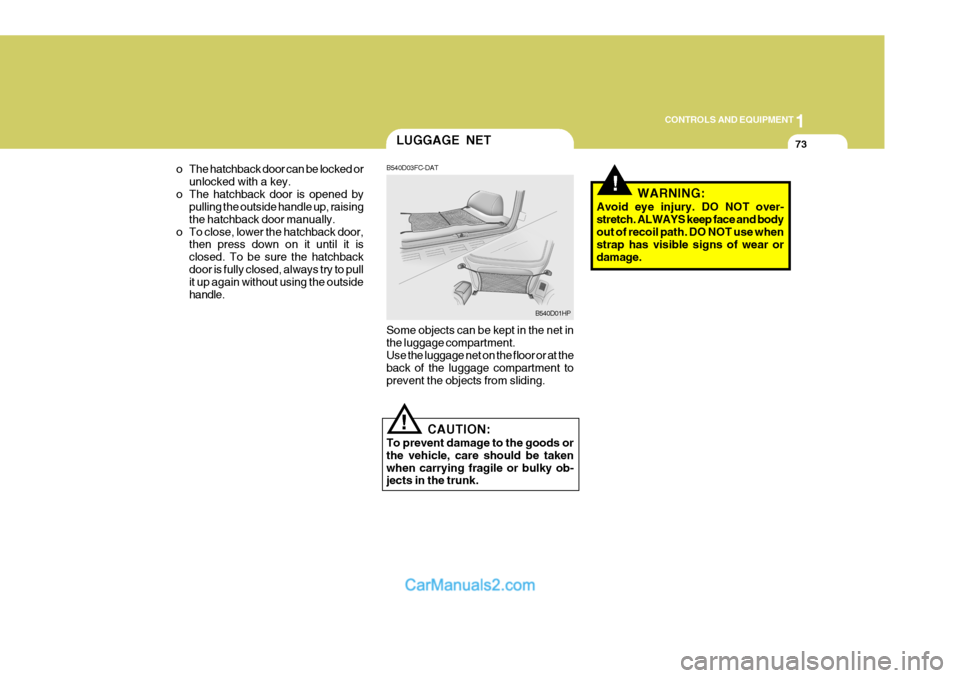
B540D03FC-DAT Some objects can be kept in the net in the luggage compartment. Use the luggage net on the floor or at the back of the luggage compartment toprevent the objects from sliding.
B540D01HP
LUGGAGE NET
CAUTION:
To prevent damage to the goods or the vehicle, care should be takenwhen carrying fragile or bulky ob- jects in the trunk. WARNING:
Avoid eye injury. DO NOT over- stretch. ALWAYS keep face and body out of recoil path. DO NOT use when strap has visible signs of wear ordamage.
o The hatchback door can be locked or
unlocked with a key.
o The hatchback door is opened by pulling the outside handle up, raisingthe hatchback door manually.
o To close, lower the hatchback door, then press down on it until it isclosed. To be sure the hatchbackdoor is fully closed, always try to pull it up again without using the outside handle.
!
Page 378 of 490

2
DRIVING YOUR HYUNDAI
3
!
TO START THE ENGINEBEFORE STARTING THE ENGINE
C020A01O-EAT Before you start the engine, you should always:
1. Look around the vehicle to be sure
there are no flat tyres, puddles of oil or water or other indications of pos- sible trouble.
2. After entering the car check to be
sure the parking brake is engaged.
3. Check that all windows, and lights
are clean.
4. Check that the interior and exterior mirrors are clean and in position.
5. Check your seat, seatback and headrestraint to be sure they are intheir proper positions.
6. Close all doors.
7. Fasten your seat belt and be sure that all other occupants have fas-tened theirs.
8. Turn off all lights and accessories that are not needed. SC040A1-F COMBINATION IGNITION SWITCH AND STEERING LOCK
o If your Hyundai is equipped with a
manual transaxle, place the shift lever in neutral and depress the clutch pedal fully.
o If your Hyundai has an automatic
transaxle, place the shift lever in "P"(park).
o To start the engine, insert the ignition key and turn it to the "START" posi-tion. Release it as soon as the en- gine starts. Do not hold the key in the"START" position for more that 15 seconds.
NOTE: For safety, the engine will not start if the shift lever is not in "P" or "N" Position (automatic transaxle).
9. When you turn the ignition switch to
"ON" check that all appropriate warn- ing lights are operating and that you have sufficient fuel.
10.Check the operation of warning lights
and all bulbs when key is in the "ON"position.
WARNING (DIESEL ENGINE):
To ensure that sufficient vacuum ex- ists within the brake system during cold weather start-up conditions, it is necessary to run the engine at idle for several seconds after starting theengine.