battery Hyundai Santa Fe 2003 Owner's Manual
[x] Cancel search | Manufacturer: HYUNDAI, Model Year: 2003, Model line: Santa Fe, Model: Hyundai Santa Fe 2003Pages: 221, PDF Size: 15.98 MB
Page 21 of 221
FEATURES OF YOUR HYUNDAI 1- 9
B070F01O-AATKeyless Entry System (If installed)
Locking doors
1. Close all doors.
2. Push the "LOCK" button on the transmitter.
3. At the same time all doors lock, the turn signal
lights will blink once to indicate that the
system is armed.
Unlocking doors
1. Push the "UNLOCK" button on the transmit-
ter.
2. At the same time the driver's door unlocks,
the turn signal lights will blink twice to indicate
that the system is disarmed.
NOTE:If you wish to unlock all doors, press the
"UNLOCK" button on the transmitter again
within 4 seconds.
B070E02HP-GATReplacing the battery
When the transmitter's battery begins to get
weak, it may take several pushes on the button
to lock or unlock the doors, and the LED will not
light. Replace the battery as soon as possible.
Battery type : CR2032
Replacement instructions:
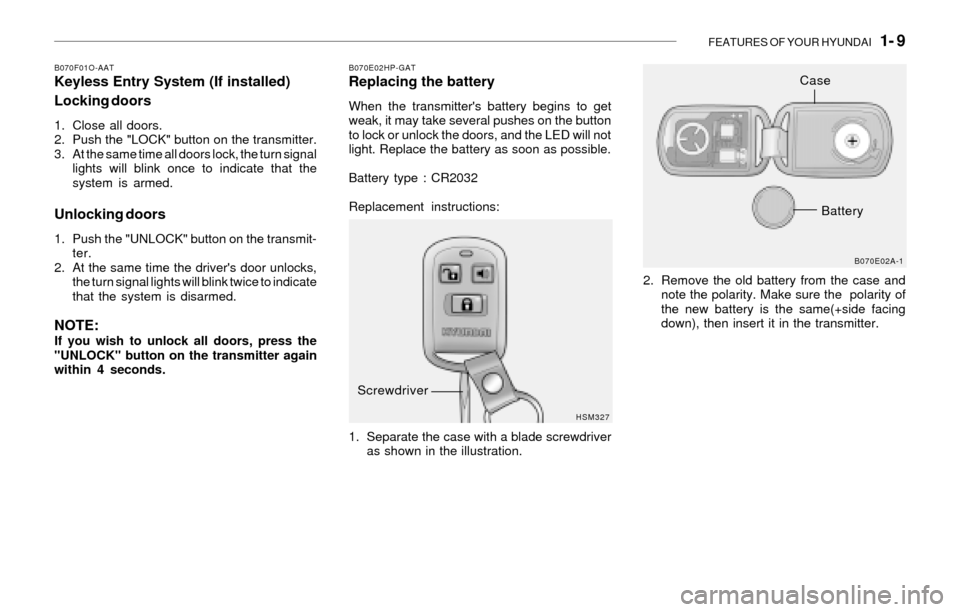
1. Separate the case with a blade screwdriver
as shown in the illustration.2. Remove the old battery from the case and
note the polarity. Make sure the polarity of
the new battery is the same(+side facing
down), then insert it in the transmitter.
HSM327B070E02A-1
Screwdriver
Case
Battery
Page 45 of 221
FEATURES OF YOUR HYUNDAI 1- 33
!
!WARNING:o The SRS can function only when the
ignition key is in the "ON" position. If the
SRS SRI does not come on, or continu-
ously remains on, after flashing for about
6 seconds when the ignition key is
turned to the "ON" position, or after the
engine is started, comes on while driv-
ing, the SRS is not working properly. If
this occurs, have your vehicle immedi-
ately inspected by your Hyundai dealer.
o Before you replace a fuse or disconnect
a battery terminal, turn the ignition key
to the "LOCK" position or remove the
ignition key. Never remove or replace the
air bag related fuse(s) when the ignition
key is in the "ON" position. Failure to
heed this warning will cause the SRS SRI
to illuminate.
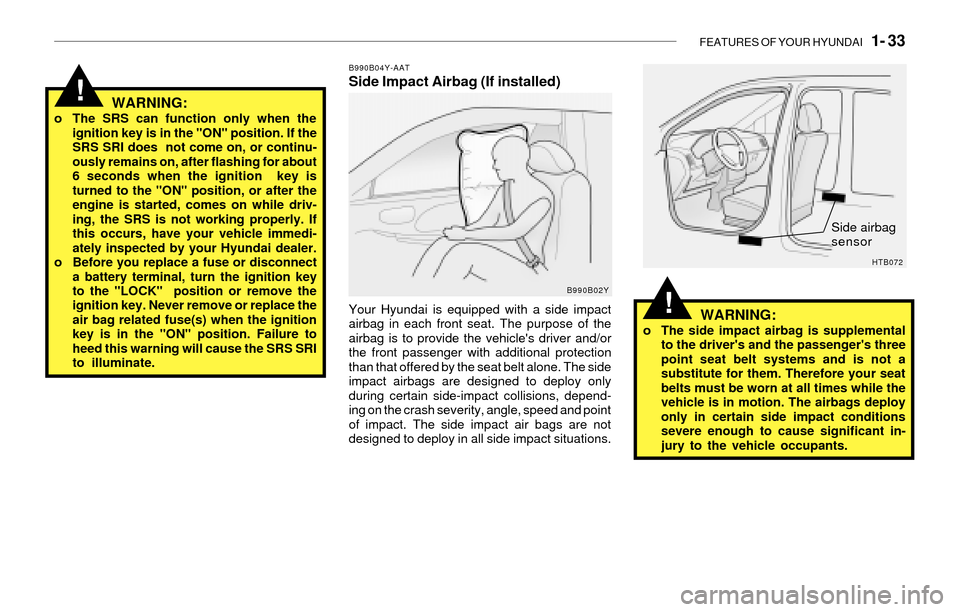
B990B04Y-AATSide Impact Airbag (If installed)
WARNING:
o The side impact airbag is supplemental
to the driver's and the passenger's three
point seat belt systems and is not a
substitute for them. Therefore your seat
belts must be worn at all times while the
vehicle is in motion. The airbags deploy
only in certain side impact conditions
severe enough to cause significant in-
jury to the vehicle occupants. Your Hyundai is equipped with a side impact
airbag in each front seat. The purpose of the
airbag is to provide the vehicle's driver and/or
the front passenger with additional protection
than that offered by the seat belt alone. The side
impact airbags are designed to deploy only
during certain side-impact collisions, depend-
ing on the crash severity, angle, speed and point
of impact. The side impact air bags are not
designed to deploy in all side impact situations.
B990B02Y
HTB072
Side airbag
sensor
Page 60 of 221
1- 48 FEATURES OF YOUR HYUNDAI
B420A01A-AATCIGARETTE LIGHTER
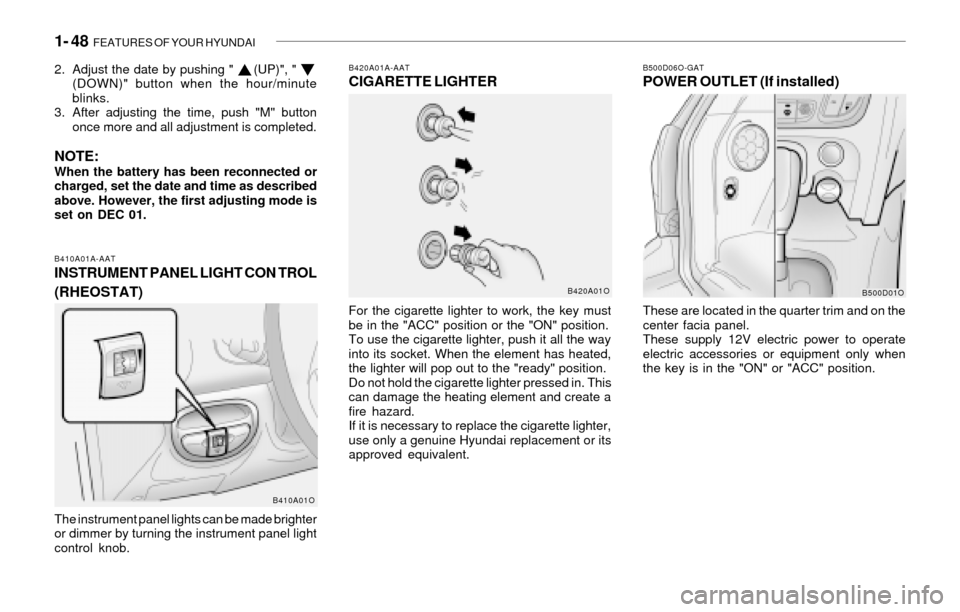
For the cigarette lighter to work, the key must
be in the "ACC" position or the "ON" position.
To use the cigarette lighter, push it all the way
into its socket. When the element has heated,
the lighter will pop out to the "ready" position.
Do not hold the cigarette lighter pressed in. This
can damage the heating element and create a
fire hazard.
If it is necessary to replace the cigarette lighter,
use only a genuine Hyundai replacement or its
approved equivalent.
B500D06O-GATPOWER OUTLET (If installed)
These are located in the quarter trim and on the
center facia panel.
These supply 12V electric power to operate
electric accessories or equipment only when
the key is in the "ON" or "ACC" position.
B420A01OB500D01O
2. Adjust the date by pushing " (UP)", "
(DOWN)" button when the hour/minute
blinks.
3. After adjusting the time, push "M" button
once more and all adjustment is completed.
NOTE:When the battery has been reconnected or
charged, set the date and time as described
above. However, the first adjusting mode is
set on DEC 01.
B410A01A-AATINSTRUMENT PANEL LIGHT CON TROL
(RHEOSTAT)
The instrument panel lights can be made brighter
or dimmer by turning the instrument panel light
control knob.
B410A01O
Page 69 of 221
FEATURES OF YOUR HYUNDAI 1- 57
Flashing
Programming
Your vehicle may require that the ignition switch
to be turned to the "ACC" position to program
and/or operate HomeLink system. It is also
recommended that a new battery be placed in
the handheld transmitter of the device being
programmed to HomeLink for quicker program-
ming and accurate transmission of the radio-
frequency.
Follow these steps to program your HomeLink
mirror:
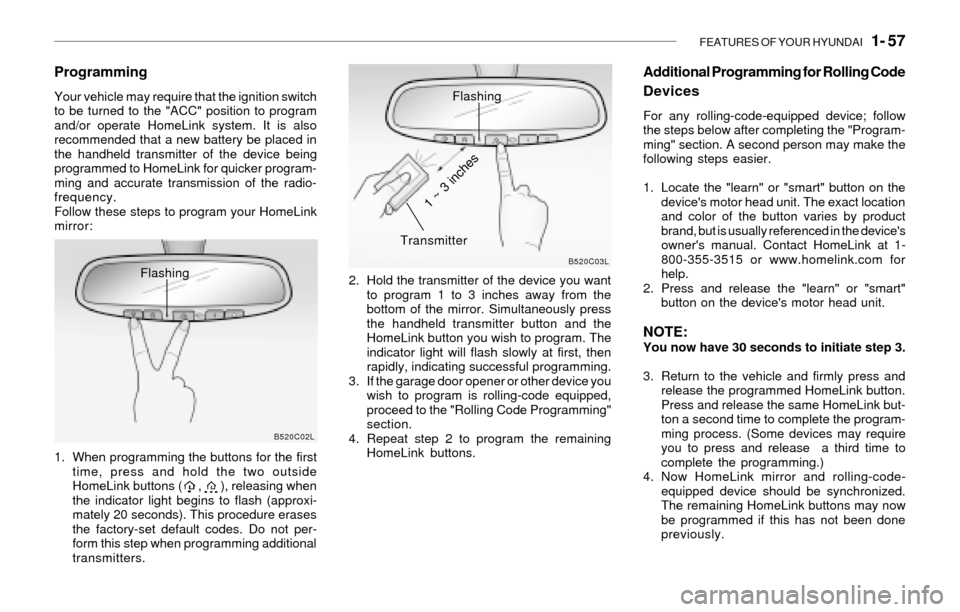
1. When programming the buttons for the first
time, press and hold the two outside
HomeLink buttons ( , ), releasing when
the indicator light begins to flash (approxi-
mately 20 seconds). This procedure erases
the factory-set default codes. Do not per-
form this step when programming additional
transmitters.2. Hold the transmitter of the device you want
to program 1 to 3 inches away from the
bottom of the mirror. Simultaneously press
the handheld transmitter button and the
HomeLink button you wish to program. The
indicator light will flash slowly at first, then
rapidly, indicating successful programming.
3. If the garage door opener or other device you
wish to program is rolling-code equipped,
proceed to the "Rolling Code Programming"
section.
4. Repeat step 2 to program the remaining
HomeLink buttons.
B520C02LB520C03L
Flashing
Transmitter
1 ~ 3 inches
Additional Programming for Rolling Code
Devices
For any rolling-code-equipped device; follow
the steps below after completing the "Program-
ming" section. A second person may make the
following steps easier.
1. Locate the "learn" or "smart" button on the
device's motor head unit. The exact location
and color of the button varies by product
brand, but is usually referenced in the device's
owner's manual. Contact HomeLink at 1-
800-355-3515 or www.homelink.com for
help.
2. Press and release the "learn" or "smart"
button on the device's motor head unit.
NOTE:You now have 30 seconds to initiate step 3.
3. Return to the vehicle and firmly press and
release the programmed HomeLink button.
Press and release the same HomeLink but-
ton a second time to complete the program-
ming process. (Some devices may require
you to press and release a third time to
complete the programming.)
4. Now HomeLink mirror and rolling-code-
equipped device should be synchronized.
The remaining HomeLink buttons may now
be programmed if this has not been done
previously.
Page 91 of 221
FEATURES OF YOUR HYUNDAI 1- 79
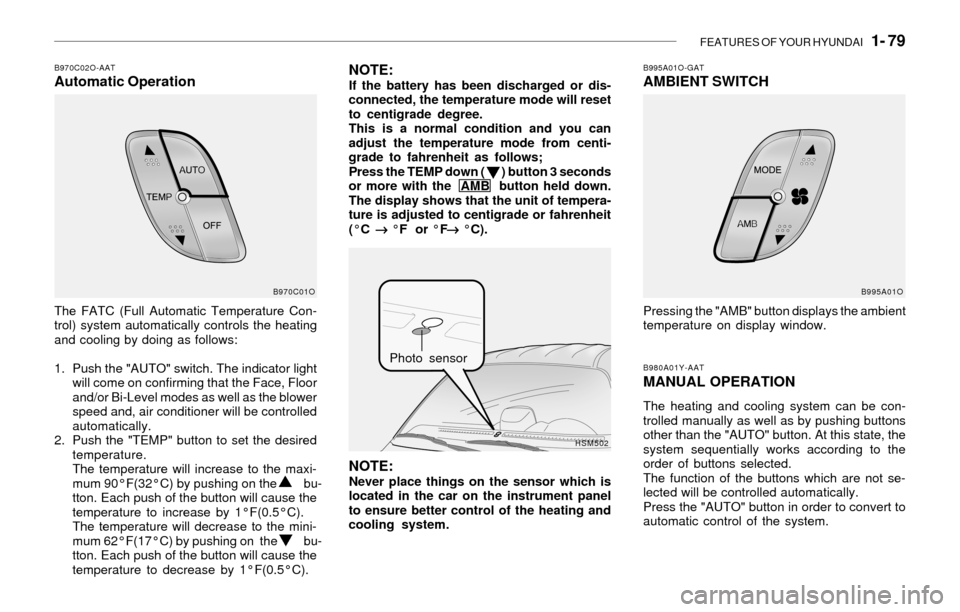
B970C02O-AATAutomatic OperationNOTE:If the battery has been discharged or dis-
connected, the temperature mode will reset
to centigrade degree.
This is a normal condition and you can
adjust the temperature mode from centi-
grade to fahrenheit as follows;
Press the TEMP down ( ) button 3 seconds
or more with the AMB button held down.
The display shows that the unit of tempera-
ture is adjusted to centigrade or fahrenheit
(°C
® ®® ®
® °F or °F
® ®® ®
® °C).
The FATC (Full Automatic Temperature Con-
trol) system automatically controls the heating
and cooling by doing as follows:
1. Push the "AUTO" switch. The indicator light
will come on confirming that the Face, Floor
and/or Bi-Level modes as well as the blower
speed and, air conditioner will be controlled
automatically.
2. Push the "TEMP" button to set the desired
temperature.
The temperature will increase to the maxi-
mum 90°F(32°C) by pushing on the bu-
tton. Each push of the button will cause the
temperature to increase by 1°F(0.5°C).
The temperature will decrease to the mini-
mum 62°F(17°C) by pushing on the bu-
tton. Each push of the button will cause the
temperature to decrease by 1°F(0.5°C).
NOTE:Never place things on the sensor which is
located in the car on the instrument panel
to ensure better control of the heating and
cooling system.
B995A01O-GATAMBIENT SWITCH
Pressing the "AMB" button displays the ambient
temperature on display window.
B980A01Y-AATMANUAL OPERATION
The heating and cooling system can be con-
trolled manually as well as by pushing buttons
other than the "AUTO" button. At this state, the
system sequentially works according to the
order of buttons selected.
The function of the buttons which are not se-
lected will be controlled automatically.
Press the "AUTO" button in order to convert to
automatic control of the system.
B970C01O
HSM502B995A01O
Photo sensor
Page 102 of 221
1- 90 FEATURES OF YOUR HYUNDAI
B260D02O-AAT1. Playing CD
o Insert the CD with the label facing upward.
o Insert the CD to start CD playback, during
radio operation.
o When a disc is in the CD deck, if you press
the CD button, the CD player will begin
playing even if the radio is being used.
o The CD player can be used when the ignition
switch is in either the "ON" or "ACC" position.
2. FF/REW ( / )
If you want to fast forward or reverse through
the compact disc track, push and hold the FF
( ) or REW ( ) button.
When you release the button, the compact disc
player will resume playing.
3. TRACK UP/DOWN
o The desired track on the disc currently being
played can be selected using the track
number.
o Press once to skip forward to the beg-
inning of the next track. Press once to
skip back to the beginning of the track.
4. SCAN Button
o Press the SCAN button to playback the first
10 seconds of each track.
o Press the SCAN button again within 10 sec.
when you have reached the desired track.
5. REPEAT Button
o To repeat the track you are currently listen-
ing to, press the RPT button. To cancel ,
press again.
o If you do not release RPT operation when the
track ends, it will automatically be replayed.
This process will be continued until you push
the button again.
6. EJECT Button
When the EJECT button is pressed with a
CD loaded, the CD will eject.
NOTE:o If the CD does not operate properly or if
the ER2 fault code is displayed, use one
of two methods to reset the CD deck
function.
- Remove the audio fuse for 5 minutes.
Then, reinstall the audio fuse.
- Diconnect the negative terminal of the
battery and wait 5 minutes. Then re-
connect the negative battery terminal.
o To assure proper operation of the unit,
keep the vehicle interior temperature
within a normal range by using the
vehicle's air conditioning or heating
system.
o When replacing the fuse, replace it with
a fuse having the correct capacity.o The preset station frequencies are all
erased when the car battery is discon-
nected. Therefore, all data will have to be
set again if this should occur.
o Do not add any oil to the rotating parts.
Keep magnets, screwdrivers and other
metallic objects away from the tape
mechanism and head.
o This equipment is designed to be used
only in a 12 volt DC battery system with
negative ground.
o This unit is made of precision parts. Do
not attempt to disassemble or adjust
any parts.
o When driving your vehicle, be sure to
keep the volume of the unit set low
enough to allow you to hear sounds
coming from the outside.
o Do not expose this equipment (includ-
ing the speakers) to water or excessive
moisture.
Page 125 of 221
DRIVING YOUR HYUNDAI 2- 3
!!WARNING:o The 2WD Santa Fe is not designed for
off-road use. The 4WD Santa Fe is de-
signed primarily for use on paved roads.
However, occasional use in off-highway
conditions such as established unpaved
roads and non-challenging off-road
trails is allowed. The 4WD Santa Fe is not
designed for blazing new trails, chal-
lenging off-road conditions, or unpaved
hill climbing. Exceeding the conditions
that were intended for the vehicle's pri-
mary design may result in injury or death.
o Utility vehicle has a significantly higher
collision rate than other type of vehicles.
o Utility vehicle have higher ground clear-
ance and a narrower track to make them
capable of performing in a wide variety
of off-road applications. Specific design
characteristics give them a higher center
of gravitiy than ordinary cars. An advan-
tage of the higher ground clearance is a
better view of the road allowing you to
anticipate problem. They are not de-
signed for cornering at the same speeds
as conventional 2-wheel drive vehicles
any more than low-slung sports cars are
designed to perform satisfactorily un-
der off-road conditions. If at all possible,
avoid sharp turns or abrupt maneuvers.
As with other vehicles of this type, fail-
ure to operate this vehicle correctly may
result in loss of control or vehicle rollover.
C020A01A-AATBEFORE STARTING THE ENGINE
Before you start the engine, you should always:
1. Look around the vehicle to be sure there are
no flat tires, puddles of oil, water or other
indications of possible trouble.
2. After entering the car, check to be sure the
parking brake is engaged.
3. Check that all windows, and lights are clean.
4. Check that the interior and exterior mirrors
are clean and in position.
5. Check your seat, seatback and headrest to
be sure they are in their proper positions.
6. Lock all the doors.
7. Fasten your seat belt and be sure that all
other occupants have fastened theirs.
8. Turn off all lights and accessories that are
not needed.
9. When you turn the ignition switch to "ON",
check that all appropriate warning lights are
operating and that you have sufficient fuel.
10.Check the operation of warning lights and all
bulbs when key is in the "ON" position.
C030A01E-AATCOMBINATION IGNITION SWITCH
To Start the Engine
o If your Hyundai is equipped with a manual
transaxle, place the shift lever in neutral and
depress the clutch pedal fully.
o If your Hyundai has an automatic transaxle,
place the shift lever in "P" (park).
o To start the engine, insert the ignition key and
turn it to the "START" position. Release it as
soon as the engine starts. Do not hold the
key in the "START" position for more that 15
seconds.
NOTE:o For safety, the engine will not start if the
clutch pedal is not depressed fully
(Manual Transaxle) or the shift lever is
not in "P" or "N" Position (Automatic
Transaxle).
o The ignition key cannot be turned from
"ACC" position to "LOCK" position un-
less the shift lever is in the "P" (Park)
position or the negative battery terminal
is disconnected from the battery. To
remove the key, always confirm that the
shift lever is securely positioned in "P"
(Park) (For Automatic Transaxle)
o For additional information about start-
ing, see page 2-5.
WARNING:o In a collision crash, an unbelted person
is significantly more likely to die than a
person wearing a seatbelt.
Page 126 of 221
2- 4 DRIVING YOUR HYUNDAI
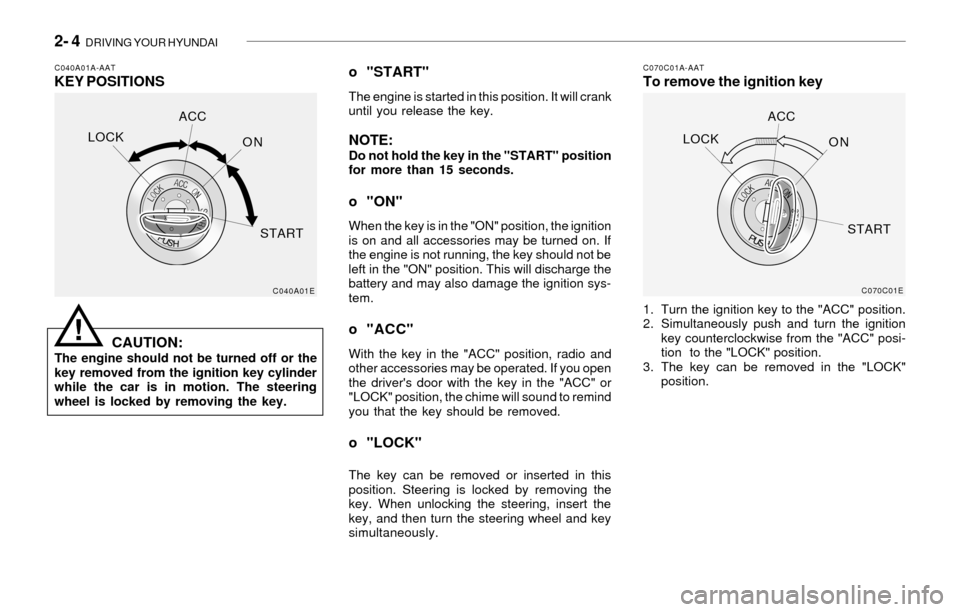
C040A01A-AATKEY POSITIONSC070C01A-AATTo remove the ignition key
CAUTION:
The engine should not be turned off or the
key removed from the ignition key cylinder
while the car is in motion. The steering
wheel is locked by removing the key.
o "START"
The engine is started in this position. It will crank
until you release the key.
NOTE:Do not hold the key in the "START" position
for more than 15 seconds.
o "ON"
When the key is in the "ON" position, the ignition
is on and all accessories may be turned on. If
the engine is not running, the key should not be
left in the "ON" position. This will discharge the
battery and may also damage the ignition sys-
tem.
o "ACC"
With the key in the "ACC" position, radio and
other accessories may be operated. If you open
the driver's door with the key in the "ACC" or
"LOCK" position, the chime will sound to remind
you that the key should be removed.
o "LOCK"
The key can be removed or inserted in this
position. Steering is locked by removing the
key. When unlocking the steering, insert the
key, and then turn the steering wheel and key
simultaneously.1. Turn the ignition key to the "ACC" position.
2. Simultaneously push and turn the ignition
key counterclockwise from the "ACC" posi-
tion to the "LOCK" position.
3. The key can be removed in the "LOCK"
position.
C040A01EC070C01E
LOCKACC
ON
STARTLOCKACC
ON
START
!
Page 129 of 221
DRIVING YOUR HYUNDAI 2- 7
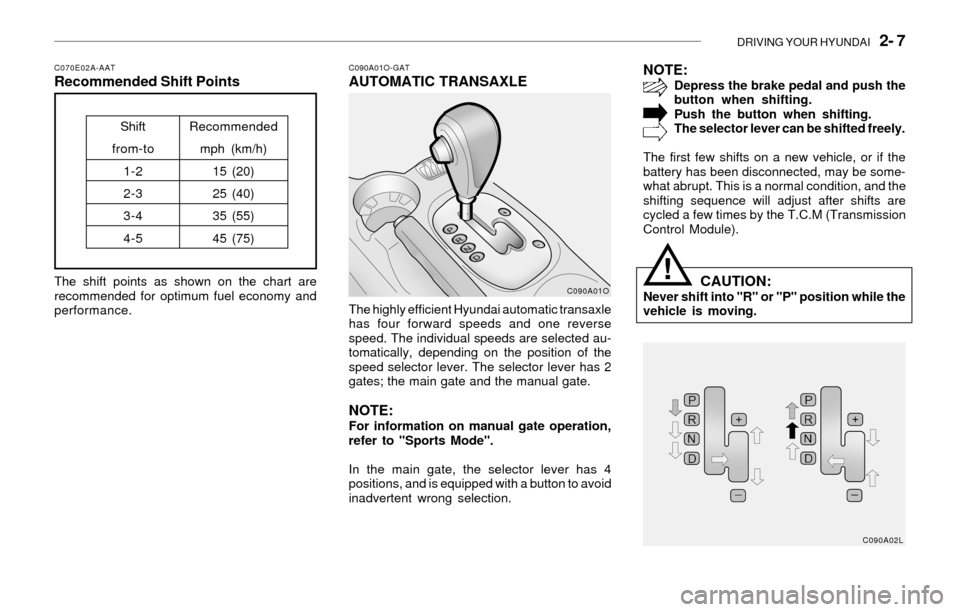
C070E02A-AATRecommended Shift Points
The shift points as shown on the chart are
recommended for optimum fuel economy and
performance.
Shift
from-to
1-2
2-3
3-4
4-5Recommended
mph (km/h)
15 (20)
25 (40)
35 (55)
45 (75)
C090A01O-GATAUTOMATIC TRANSAXLE
The highly efficient Hyundai automatic transaxle
has four forward speeds and one reverse
speed. The individual speeds are selected au-
tomatically, depending on the position of the
speed selector lever. The selector lever has 2
gates; the main gate and the manual gate.
NOTE:For information on manual gate operation,
refer to "Sports Mode".
In the main gate, the selector lever has 4
positions, and is equipped with a button to avoid
inadvertent wrong selection.
NOTE:Depress the brake pedal and push the
button when shifting.
Push the button when shifting.
The selector lever can be shifted freely.
The first few shifts on a new vehicle, or if the
battery has been disconnected, may be some-
what abrupt. This is a normal condition, and the
shifting sequence will adjust after shifts are
cycled a few times by the T.C.M (Transmission
Control Module).
CAUTION:Never shift into "R" or "P" position while the
vehicle is moving.C090A01O
C090A02L!
Page 140 of 221
2- 18 DRIVING YOUR HYUNDAI
C160J01A-AATDon't Let Ice and Snow Accumulate
Underneath
Under some conditions, snow and ice can build
up under the fenders and interfere with the
steering. When driving in severe winter condi-
tions where this may happen, you should peri-
odically check underneath the car to be sure the
movement of the front wheels and the steering
components is not obstructed.
C160I01A-AATDon't Let Your Parking Brake Freeze
Under some conditions your parking brake can
freeze in the engaged position. This is most
likely to happen when there is an accumulation
of snow or ice around or near the rear brakes
or if the brakes are wet. If there is a risk the
parking brake may freeze, apply it only tempo-
rarily while you put the gear selector lever in "P"
(automatic) or in first or reverse gear (manual
transaxle) and block the rear wheels so the car
cannot roll. Then release the parking brake.
C160H01A-AATUse Approved Anti-Freeze in Window
Washer System
To keep the water in the window washer system
from freezing, add an approved anti-freeze
solution in accordance with instructions on the
container. Window washer anti-freeze is avail-
able from Hyundai dealers and most auto parts
outlets. Do not use engine coolant or other types
of anti-freeze as these may damage the finish.
C160G01A-AATTo Keep Locks from Freezing
To keep the locks from freezing, squirt an
approved de-icer fluid or glycerine into the key
opening. If a lock is covered with ice, squirt it with
an approved de-icing fluid to remove the ice. If
the lock is frozen internally, you may be able to
thaw it out by using a heated key. Handle the
heated key with care to avoid burning the
fingers.
C160F01A-AAT
Check Spark Plugs and Ignition
System
Inspect your spark plugs as described in Sec-
tion 6 and replace them if necessary. Also
check all ignition wiring and components to be
sure they are not cracked, worn or damaged in
any way.
C160D01A-AATCheck Battery and Cables
Winter puts additional burdens on the battery
system. Visually inspect the battery and cables
as described in Section 6. The level of charge
in your battery can be checked by your Hyundai
dealer or a service station.
C160E01A-AAT
Change to "Winter Weight" Oil if
Necessary
In some climates it is recommended that a lower
viscosity "winter weight" oil be used during cold
weather. See Section 9 for recommendations.
If you aren't sure what weight oil you should use,
consult your Hyundai dealer.
C160C01A-AATUse High Quality Ethylene Glycol
Coolant
Your Hyundai is delivered with high quality
ethylene glycol coolant in the cooling system. It
is the only type of coolant that should be used
because it helps prevent corrosion in the cool-
ing system, lubricates the water pump and
prevents freezing. Be sure to replace or replen-
ish your coolant in accordance with the main-
tenance schedule in Section 5. Before winter,
have your coolant tested to assure that its
freezing point is sufficient for the temperatures
anticipated during the winter.