oil change Hyundai Santa Fe 2003 Owner's Manual
[x] Cancel search | Manufacturer: HYUNDAI, Model Year: 2003, Model line: Santa Fe, Model: Hyundai Santa Fe 2003Pages: 221, PDF Size: 15.98 MB
Page 124 of 221
2- 2 DRIVING YOUR HYUNDAI
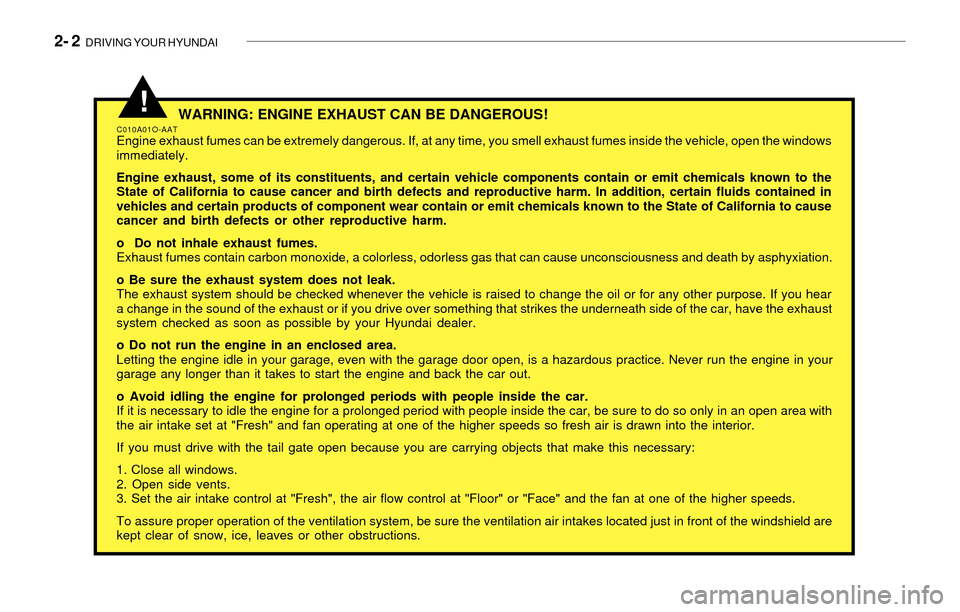
WARNING: ENGINE EXHAUST CAN BE DANGEROUS!C010A01O-AATEngine exhaust fumes can be extremely dangerous. If, at any time, you smell exhaust fumes inside the vehicle, open the windows
immediately.
Engine exhaust, some of its constituents, and certain vehicle components contain or emit chemicals known to the
State of California to cause cancer and birth defects and reproductive harm. In addition, certain fluids contained in
vehicles and certain products of component wear contain or emit chemicals known to the State of California to cause
cancer and birth defects or other reproductive harm.
o Do not inhale exhaust fumes.
Exhaust fumes contain carbon monoxide, a colorless, odorless gas that can cause unconsciousness and death by asphyxiation.
o Be sure the exhaust system does not leak.
The exhaust system should be checked whenever the vehicle is raised to change the oil or for any other purpose. If you hear
a change in the sound of the exhaust or if you drive over something that strikes the underneath side of the car, have the exhaust
system checked as soon as possible by your Hyundai dealer.
o Do not run the engine in an enclosed area.
Letting the engine idle in your garage, even with the garage door open, is a hazardous practice. Never run the engine in your
garage any longer than it takes to start the engine and back the car out.
o Avoid idling the engine for prolonged periods with people inside the car.
If it is necessary to idle the engine for a prolonged period with people inside the car, be sure to do so only in an open area with
the air intake set at "Fresh" and fan operating at one of the higher speeds so fresh air is drawn into the interior.
If you must drive with the tail gate open because you are carrying objects that make this necessary:
1. Close all windows.
2. Open side vents.
3. Set the air intake control at "Fresh", the air flow control at "Floor" or "Face" and the fan at one of the higher speeds.
To assure proper operation of the ventilation system, be sure the ventilation air intakes located just in front of the windshield are
kept clear of snow, ice, leaves or other obstructions.
!
Page 140 of 221
2- 18 DRIVING YOUR HYUNDAI
C160J01A-AATDon't Let Ice and Snow Accumulate
Underneath
Under some conditions, snow and ice can build
up under the fenders and interfere with the
steering. When driving in severe winter condi-
tions where this may happen, you should peri-
odically check underneath the car to be sure the
movement of the front wheels and the steering
components is not obstructed.
C160I01A-AATDon't Let Your Parking Brake Freeze
Under some conditions your parking brake can
freeze in the engaged position. This is most
likely to happen when there is an accumulation
of snow or ice around or near the rear brakes
or if the brakes are wet. If there is a risk the
parking brake may freeze, apply it only tempo-
rarily while you put the gear selector lever in "P"
(automatic) or in first or reverse gear (manual
transaxle) and block the rear wheels so the car
cannot roll. Then release the parking brake.
C160H01A-AATUse Approved Anti-Freeze in Window
Washer System
To keep the water in the window washer system
from freezing, add an approved anti-freeze
solution in accordance with instructions on the
container. Window washer anti-freeze is avail-
able from Hyundai dealers and most auto parts
outlets. Do not use engine coolant or other types
of anti-freeze as these may damage the finish.
C160G01A-AATTo Keep Locks from Freezing
To keep the locks from freezing, squirt an
approved de-icer fluid or glycerine into the key
opening. If a lock is covered with ice, squirt it with
an approved de-icing fluid to remove the ice. If
the lock is frozen internally, you may be able to
thaw it out by using a heated key. Handle the
heated key with care to avoid burning the
fingers.
C160F01A-AAT
Check Spark Plugs and Ignition
System
Inspect your spark plugs as described in Sec-
tion 6 and replace them if necessary. Also
check all ignition wiring and components to be
sure they are not cracked, worn or damaged in
any way.
C160D01A-AATCheck Battery and Cables
Winter puts additional burdens on the battery
system. Visually inspect the battery and cables
as described in Section 6. The level of charge
in your battery can be checked by your Hyundai
dealer or a service station.
C160E01A-AAT
Change to "Winter Weight" Oil if
Necessary
In some climates it is recommended that a lower
viscosity "winter weight" oil be used during cold
weather. See Section 9 for recommendations.
If you aren't sure what weight oil you should use,
consult your Hyundai dealer.
C160C01A-AATUse High Quality Ethylene Glycol
Coolant
Your Hyundai is delivered with high quality
ethylene glycol coolant in the cooling system. It
is the only type of coolant that should be used
because it helps prevent corrosion in the cool-
ing system, lubricates the water pump and
prevents freezing. Be sure to replace or replen-
ish your coolant in accordance with the main-
tenance schedule in Section 5. Before winter,
have your coolant tested to assure that its
freezing point is sufficient for the temperatures
anticipated during the winter.
Page 167 of 221
5- 6 VEHICLE MAINTENANCE REQUIREMENTS
SEVERE DRIVING CONDITIONSA - Repeated short distance driving
B - Extensive idling
C - Driving in dusty, rough roads
D - Driving in areas using salt or other corrosive materials or in
very cold weather
E - Driving in sandy areas
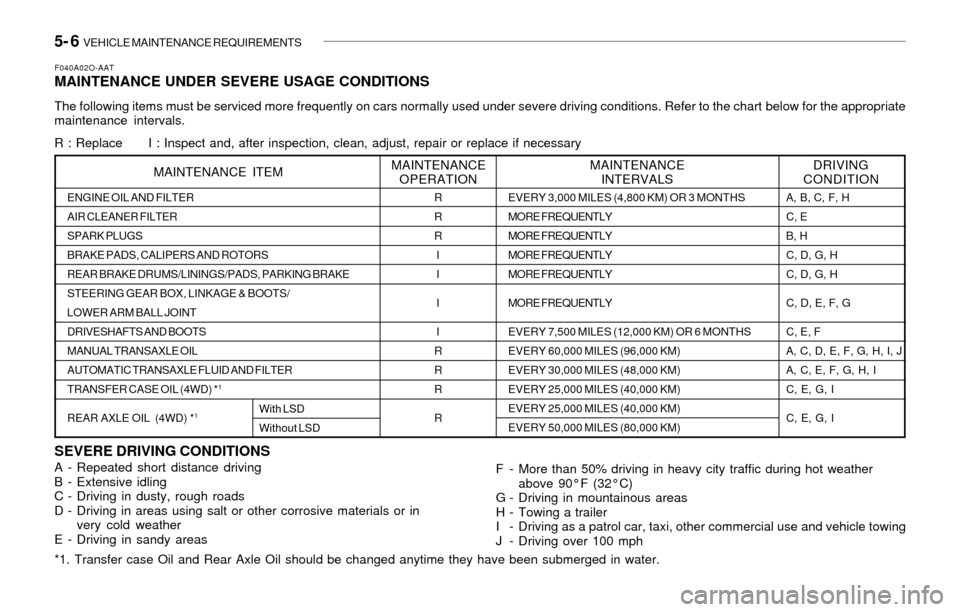
F040A02O-AATMAINTENANCE UNDER SEVERE USAGE CONDITIONS
The following items must be serviced more frequently on cars normally used under severe driving conditions. Refer to the chart below for the appropriate
maintenance intervals.
R : Replace I : Inspect and, after inspection, clean, adjust, repair or replace if necessary
*1. Transfer case Oil and Rear Axle Oil should be changed anytime they have been submerged in water.F - More than 50% driving in heavy city traffic during hot weather
above 90°F (32°C)
G - Driving in mountainous areas
H - Towing a trailer
I - Driving as a patrol car, taxi, other commercial use and vehicle towing
J - Driving over 100 mph
ENGINE OIL AND FILTER
AIR CLEANER FILTER
SPARK PLUGS
BRAKE PADS, CALIPERS AND ROTORS
REAR BRAKE DRUMS/LININGS/PADS, PARKING BRAKE
STEERING GEAR BOX, LINKAGE & BOOTS/
LOWER ARM BALL JOINT
DRIVESHAFTS AND BOOTS
MANUAL TRANSAXLE OIL
AUTOMATIC TRANSAXLE FLUID AND FILTER
TRANSFER CASE OIL (4WD) *
1
REAR AXLE OIL (4WD) *1
MAINTENANCE ITEM
R
R
R
I
I
I
I
R
R
R
REVERY 3,000 MILES (4,800 KM) OR 3 MONTHS
MORE FREQUENTLY
MORE FREQUENTLY
MORE FREQUENTLY
MORE FREQUENTLY
MORE FREQUENTLY
EVERY 7,500 MILES (12,000 KM) OR 6 MONTHS
EVERY 60,000 MILES (96,000 KM)
EVERY 30,000 MILES (48,000 KM)
EVERY 25,000 MILES (40,000 KM)
EVERY 25,000 MILES (40,000 KM)
EVERY 50,000 MILES (80,000 KM)
With LSD
Without LSD
DRIVING
CONDITION MAINTENANCE
INTERVALS MAINTENANCE
OPERATION
A, B, C, F, H
C, E
B, H
C, D, G, H
C, D, G, H
C, D, E, F, G
C, E, F
A, C, D, E, F, G, H, I, J
A, C, E, F, G, H, I
C, E, G, I
C, E, G, I
Page 168 of 221
VEHICLE MAINTENANCE REQUIREMENTS 5- 7
F060G01A-AATo Vapor Hose and Fuel Filler Cap
The vapor hose and fuel filler cap should be
inspected at those intervals specified in the
maintenance schedule. Make sure that a new
vapor hose or fuel filler cap is correctly re-
placed.
F060D01A-AATo Fuel Lines, Fuel Hoses and Connec-
tions
Check the fuel lines, fuel hoses and connec-
tions for leakage and damage. Have a trained
technician replace any damaged or leaking
parts immediately.
F060A01A-AATEXPLANATION OF SCHEDULED MAIN-
TENANCE ITEMS
F060B01A-AATo Drive Belts
Inspect all drive belts for evidence of cuts,
cracks, excessive wear or oil saturation and
replace if necessary. Drive belts should be
checked periodically for proper tension and
adjusted as necessary.
F060M01A-AATo Engine Oil and Filter
The engine oil and filter should be changed at the
intervals specified in the maintenance sched-
ule. If the car is being driven in severe condi-
tions, more frequent oil and filter changes are
required.
F060C01A-AATo Fuel Filter
A clogged filter can limit the speed at which the
vehicle may be driven, damage the emission
system and cause hard starting. If an exces-
sive amount of foreign matter accumulates in
the fuel tank, the filter may require replacement
more frequently.
After installing a new filter, run the engine for
several minutes, and check for leaks at the
connections. Fuel filters should be installed by
trained technicians.
F060F01A-AATo Vacuum, Crankcase
Ventilation Hoses
Inspect the surface of hoses for evidence of
heat and/or mechanical damage. Hard and
brittle rubber, cracking, tears, cuts, abrasions,
and excessive swelling indicate deterioration.
Particular attention should be paid to examine
those hose surfaces nearest to high heat
sources, such as the exhaust manifold.
Inspect the hose routing to assure that the
hoses do not come in contact with any heat
source, sharp edges or moving component
which might cause heat damage or mechanical
wear. Inspect all hose connections, such as
clamps and couplings, to make sure they are
secure, and that no leaks are present. Hoses
should be replaced immediately if there is any
evidence of deterioration or damage.
F070C01A-AATo Coolant
The coolant should be changed at the intervals
specified in the maintenance schedule.
F060E01A-AATo Timing belt
Inspect all parts related to the timing belt for
damage and deformation. Replace any dam-
aged parts immediately.
F060J01A-AAT
o Spark plugs
Make sure to install new spark plugs of the
correct heat range.
F060H01A-AATo Air cleaner filter
A Genuine Hyundai air cleaner filter is recom-
mended when the filter is replaced.
Page 177 of 221
DO-IT-YOURSELF MAINTENANCE 6- 7
!
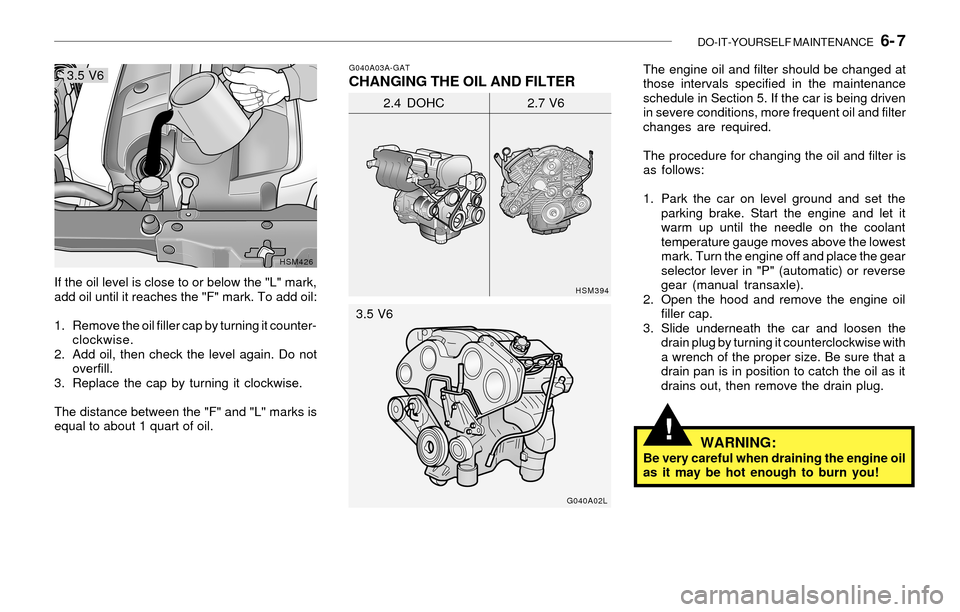
If the oil level is close to or below the "L" mark,
add oil until it reaches the "F" mark. To add oil:
1. Remove the oil filler cap by turning it counter-
clockwise.
2. Add oil, then check the level again. Do not
overfill.
3. Replace the cap by turning it clockwise.
The distance between the "F" and "L" marks is
equal to about 1 quart of oil.
HSM426G040A03A-GAT
CHANGING THE OIL AND FILTERThe engine oil and filter should be changed at
those intervals specified in the maintenance
schedule in Section 5. If the car is being driven
in severe conditions, more frequent oil and filter
changes are required.
The procedure for changing the oil and filter is
as follows:
1. Park the car on level ground and set the
parking brake. Start the engine and let it
warm up until the needle on the coolant
temperature gauge moves above the lowest
mark. Turn the engine off and place the gear
selector lever in "P" (automatic) or reverse
gear (manual transaxle).
2. Open the hood and remove the engine oil
filler cap.
3. Slide underneath the car and loosen the
drain plug by turning it counterclockwise with
a wrench of the proper size. Be sure that a
drain pan is in position to catch the oil as it
drains out, then remove the drain plug.
HSM394
2.4 DOHC 2.7 V6
G040A02L
WARNING:Be very careful when draining the engine oil
as it may be hot enough to burn you! 3.5 V6
3.5 V6
Page 194 of 221
6- 24 DO-IT-YOURSELF MAINTENANCE
!
G260A01L-AATREPLACEMENT OF LIGHT BULBS
Before attempting to replace a light bulb, be sure
the switch is turned to the "OFF" position.
The next paragraph shows how to reach the
light bulbs so they may be changed. Be sure to
replace the burned-out bulb with one of the
same number and wattage rating.
See page 6-30 for the wattage description.
CAUTION:Keep the lamps out of contact with petro-
leum products, such as oil, gasoline, etc.
G270A01O-AATHeadlight and Front Turn Signal Light
1. Allow the bulb to cool. Wear eye protection.
2. Open the engine hood.
3. Always grasp the bulb by its plastic base,
avoid touching the glass.
4. Using a socket wrench of the correct size,
remove the headlight assembly mounting
bolts.
HSM353
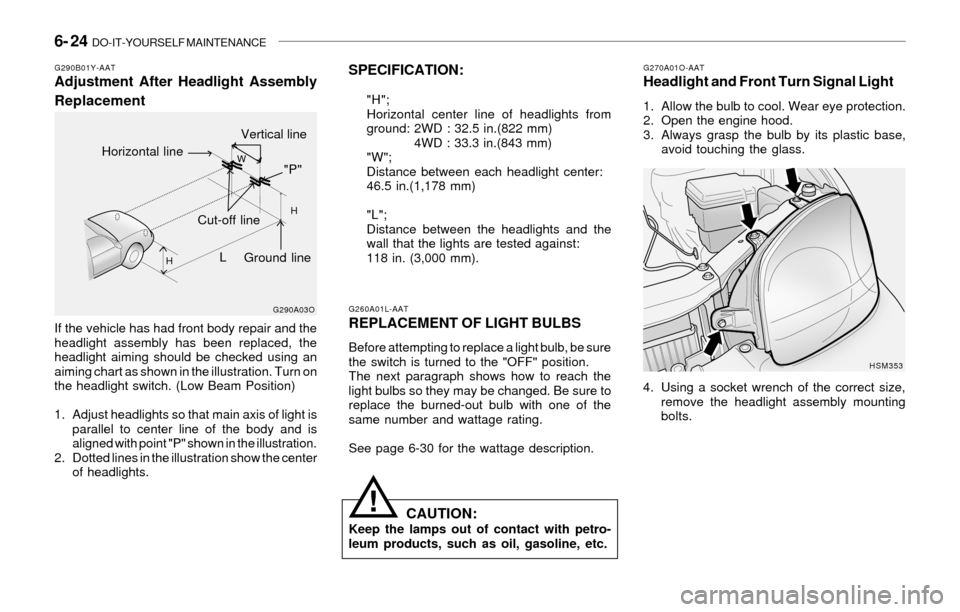
SPECIFICATION:
"H";
Horizontal center line of headlights from
ground: 2WD : 32.5 in.(822 mm)
4WD : 33.3 in.(843 mm)
"W";
Distance between each headlight center:
46.5 in.(1,178 mm)
"L";
Distance between the headlights and the
wall that the lights are tested against:
118 in. (3,000 mm).
G290B01Y-AATAdjustment After Headlight Assembly
Replacement
If the vehicle has had front body repair and the
headlight assembly has been replaced, the
headlight aiming should be checked using an
aiming chart as shown in the illustration. Turn on
the headlight switch. (Low Beam Position)
1. Adjust headlights so that main axis of light is
parallel to center line of the body and is
aligned with point "P" shown in the illustration.
2. Dotted lines in the illustration show the center
of headlights.
G290A03O
L
W
H
H
Cut-off line
Ground line
"P"
Horizontal line
Vertical line