oil temperature Hyundai Santa Fe 2003 Owner's Manual
[x] Cancel search | Manufacturer: HYUNDAI, Model Year: 2003, Model line: Santa Fe, Model: Hyundai Santa Fe 2003Pages: 221, PDF Size: 15.98 MB
Page 48 of 221
1- 36 FEATURES OF YOUR HYUNDAI
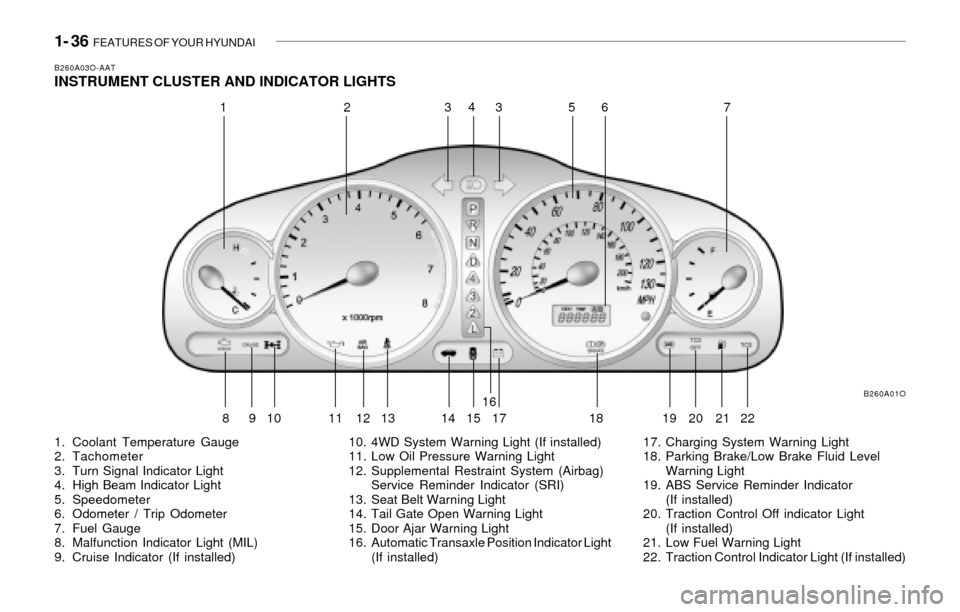
B260A03O-AATINSTRUMENT CLUSTER AND INDICATOR LIGHTS
1. Coolant Temperature Gauge
2. Tachometer
3. Turn Signal Indicator Light
4. High Beam Indicator Light
5. Speedometer
6. Odometer / Trip Odometer
7. Fuel Gauge
8. Malfunction Indicator Light (MIL)
9. Cruise Indicator (If installed)10. 4WD System Warning Light (If installed)
11. Low Oil Pressure Warning Light
12. Supplemental Restraint System (Airbag)
Service Reminder Indicator (SRI)
13. Seat Belt Warning Light
14. Tail Gate Open Warning Light
15. Door Ajar Warning Light
16. Automatic Transaxle Position Indicator Light
(If installed)17. Charging System Warning Light
18. Parking Brake/Low Brake Fluid Level
Warning Light
19. ABS Service Reminder Indicator
(If installed)
20. Traction Control Off indicator Light
(If installed)
21. Low Fuel Warning Light
22. Traction Control Indicator Light (If installed)
B260A01O
12334
567
8910
11 12 13 1416
17 18 19 20
152122
Page 102 of 221
1- 90 FEATURES OF YOUR HYUNDAI
B260D02O-AAT1. Playing CD
o Insert the CD with the label facing upward.
o Insert the CD to start CD playback, during
radio operation.
o When a disc is in the CD deck, if you press
the CD button, the CD player will begin
playing even if the radio is being used.
o The CD player can be used when the ignition
switch is in either the "ON" or "ACC" position.
2. FF/REW ( / )
If you want to fast forward or reverse through
the compact disc track, push and hold the FF
( ) or REW ( ) button.
When you release the button, the compact disc
player will resume playing.
3. TRACK UP/DOWN
o The desired track on the disc currently being
played can be selected using the track
number.
o Press once to skip forward to the beg-
inning of the next track. Press once to
skip back to the beginning of the track.
4. SCAN Button
o Press the SCAN button to playback the first
10 seconds of each track.
o Press the SCAN button again within 10 sec.
when you have reached the desired track.
5. REPEAT Button
o To repeat the track you are currently listen-
ing to, press the RPT button. To cancel ,
press again.
o If you do not release RPT operation when the
track ends, it will automatically be replayed.
This process will be continued until you push
the button again.
6. EJECT Button
When the EJECT button is pressed with a
CD loaded, the CD will eject.
NOTE:o If the CD does not operate properly or if
the ER2 fault code is displayed, use one
of two methods to reset the CD deck
function.
- Remove the audio fuse for 5 minutes.
Then, reinstall the audio fuse.
- Diconnect the negative terminal of the
battery and wait 5 minutes. Then re-
connect the negative battery terminal.
o To assure proper operation of the unit,
keep the vehicle interior temperature
within a normal range by using the
vehicle's air conditioning or heating
system.
o When replacing the fuse, replace it with
a fuse having the correct capacity.o The preset station frequencies are all
erased when the car battery is discon-
nected. Therefore, all data will have to be
set again if this should occur.
o Do not add any oil to the rotating parts.
Keep magnets, screwdrivers and other
metallic objects away from the tape
mechanism and head.
o This equipment is designed to be used
only in a 12 volt DC battery system with
negative ground.
o This unit is made of precision parts. Do
not attempt to disassemble or adjust
any parts.
o When driving your vehicle, be sure to
keep the volume of the unit set low
enough to allow you to hear sounds
coming from the outside.
o Do not expose this equipment (includ-
ing the speakers) to water or excessive
moisture.
Page 121 of 221
FEATURES OF YOUR HYUNDAI 1- 109
B850A02L B850A02F-AAT
CARE OF DISC
Proper HandlingStorageWhen not in use, place your discs in their
individual case and store them in a cool place
away from the sun, heat, and dust.
Do not grip or pull out the disc with your hand
while the disc is being pulled into the unit by the
self loading mechanism.
Keep Your Discs Clean
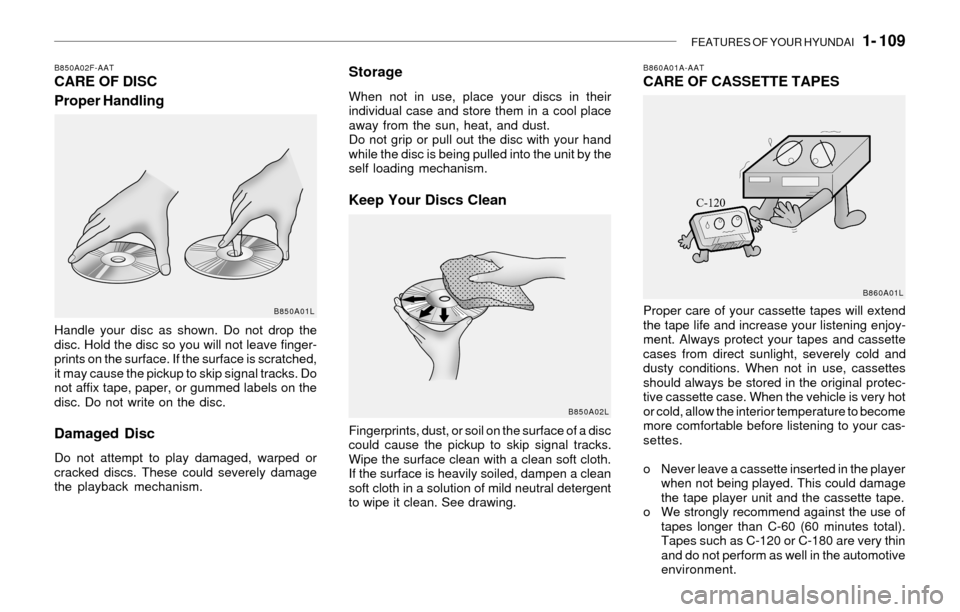
Handle your disc as shown. Do not drop the
disc. Hold the disc so you will not leave finger-
prints on the surface. If the surface is scratched,
it may cause the pickup to skip signal tracks. Do
not affix tape, paper, or gummed labels on the
disc. Do not write on the disc.
Damaged Disc
Do not attempt to play damaged, warped or
cracked discs. These could severely damage
the playback mechanism.Fingerprints, dust, or soil on the surface of a disc
could cause the pickup to skip signal tracks.
Wipe the surface clean with a clean soft cloth.
If the surface is heavily soiled, dampen a clean
soft cloth in a solution of mild neutral detergent
to wipe it clean. See drawing.
B860A01A-AATCARE OF CASSETTE TAPES
Proper care of your cassette tapes will extend
the tape life and increase your listening enjoy-
ment. Always protect your tapes and cassette
cases from direct sunlight, severely cold and
dusty conditions. When not in use, cassettes
should always be stored in the original protec-
tive cassette case. When the vehicle is very hot
or cold, allow the interior temperature to become
more comfortable before listening to your cas-
settes.
o Never leave a cassette inserted in the player
when not being played. This could damage
the tape player unit and the cassette tape.
o We strongly recommend against the use of
tapes longer than C-60 (60 minutes total).
Tapes such as C-120 or C-180 are very thin
and do not perform as well in the automotive
environment.B850A01L
B860A01L
Page 122 of 221
1- 110 FEATURES OF YOUR HYUNDAI
o Be sure that the cassette label is not loose
or peeling off or tape ejection may be difficult.
o Never touch or soil the actual audio tape
surfaces.
o Keep all magnetized objects, such as elec-
tric motors, speakers or transformers away
from your cassette tapes and tape player
unit.
o Store cassettes in a cool, dry place with the
open side facing down to prevent dust from
settling in the cassette body.
o Avoid repeated fast reverse usage to replay
one given tune or tape section. This can
cause poor tape winding to occur, and even-
tually cause excessive internal drag and
poor audio quality in the cassette. If this
occurs, it can sometimes be corrected by
fast winding the tape from end to end several
times. If this does not correct the problem,
do not continue to use the tape in your
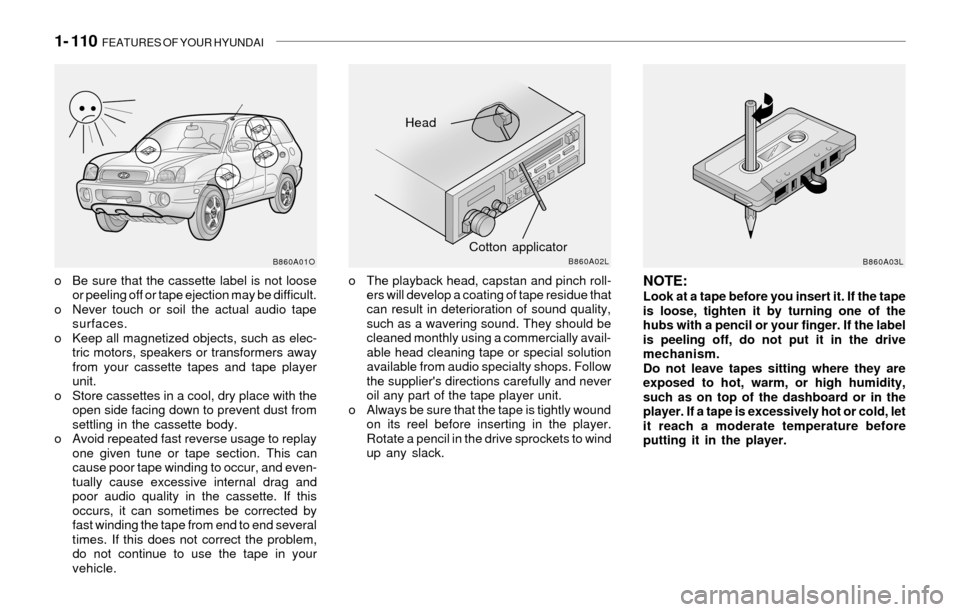
vehicle.NOTE:Look at a tape before you insert it. If the tape
is loose, tighten it by turning one of the
hubs with a pencil or your finger. If the label
is peeling off, do not put it in the drive
mechanism.
Do not leave tapes sitting where they are
exposed to hot, warm, or high humidity,
such as on top of the dashboard or in the
player. If a tape is excessively hot or cold, let
it reach a moderate temperature before
putting it in the player.
Head
Cotton applicator
B860A01OB860A02LB860A03L
o The playback head, capstan and pinch roll-
ers will develop a coating of tape residue that
can result in deterioration of sound quality,
such as a wavering sound. They should be
cleaned monthly using a commercially avail-
able head cleaning tape or special solution
available from audio specialty shops. Follow
the supplier's directions carefully and never
oil any part of the tape player unit.
o Always be sure that the tape is tightly wound
on its reel before inserting in the player.
Rotate a pencil in the drive sprockets to wind
up any slack.
Page 140 of 221
2- 18 DRIVING YOUR HYUNDAI
C160J01A-AATDon't Let Ice and Snow Accumulate
Underneath
Under some conditions, snow and ice can build
up under the fenders and interfere with the
steering. When driving in severe winter condi-
tions where this may happen, you should peri-
odically check underneath the car to be sure the
movement of the front wheels and the steering
components is not obstructed.
C160I01A-AATDon't Let Your Parking Brake Freeze
Under some conditions your parking brake can
freeze in the engaged position. This is most
likely to happen when there is an accumulation
of snow or ice around or near the rear brakes
or if the brakes are wet. If there is a risk the
parking brake may freeze, apply it only tempo-
rarily while you put the gear selector lever in "P"
(automatic) or in first or reverse gear (manual
transaxle) and block the rear wheels so the car
cannot roll. Then release the parking brake.
C160H01A-AATUse Approved Anti-Freeze in Window
Washer System
To keep the water in the window washer system
from freezing, add an approved anti-freeze
solution in accordance with instructions on the
container. Window washer anti-freeze is avail-
able from Hyundai dealers and most auto parts
outlets. Do not use engine coolant or other types
of anti-freeze as these may damage the finish.
C160G01A-AATTo Keep Locks from Freezing
To keep the locks from freezing, squirt an
approved de-icer fluid or glycerine into the key
opening. If a lock is covered with ice, squirt it with
an approved de-icing fluid to remove the ice. If
the lock is frozen internally, you may be able to
thaw it out by using a heated key. Handle the
heated key with care to avoid burning the
fingers.
C160F01A-AAT
Check Spark Plugs and Ignition
System
Inspect your spark plugs as described in Sec-
tion 6 and replace them if necessary. Also
check all ignition wiring and components to be
sure they are not cracked, worn or damaged in
any way.
C160D01A-AATCheck Battery and Cables
Winter puts additional burdens on the battery
system. Visually inspect the battery and cables
as described in Section 6. The level of charge
in your battery can be checked by your Hyundai
dealer or a service station.
C160E01A-AAT
Change to "Winter Weight" Oil if
Necessary
In some climates it is recommended that a lower
viscosity "winter weight" oil be used during cold
weather. See Section 9 for recommendations.
If you aren't sure what weight oil you should use,
consult your Hyundai dealer.
C160C01A-AATUse High Quality Ethylene Glycol
Coolant
Your Hyundai is delivered with high quality
ethylene glycol coolant in the cooling system. It
is the only type of coolant that should be used
because it helps prevent corrosion in the cool-
ing system, lubricates the water pump and
prevents freezing. Be sure to replace or replen-
ish your coolant in accordance with the main-
tenance schedule in Section 5. Before winter,
have your coolant tested to assure that its
freezing point is sufficient for the temperatures
anticipated during the winter.
Page 169 of 221
5- 8 VEHICLE MAINTENANCE REQUIREMENTS
F070L01A-AATo Suspension Mounting Bolts
Check the suspension connections for loose-
ness or damage. Retighten to the specified
torque.
F070G02A-AATo Brake Fluid
Check brake fluid level in the brake fluid reser-
voir. The level should be between "MIN" and
"MAX" marks on the side of the reservoir. Use
only hydraulic brake fluid conforming to DOT 3
or DOT 4.
F070D01A-AATo Manual transaxle oil
Inspect the manual transaxle oil according to
the maintenance schedule.
NOTE:If the oil level is low, check for possible leaks
before adding oil. Do not overfill.
F070F01A-AATo Brake Hoses and Lines
Visually check for proper installation, chafing,
cracks, deterioration and any leakage. Replace
any deteriorated or damaged parts immedi-
ately.
F070E03A-AATo Automatic Transaxle Fluid and Filter
The fluid level should be in the "HOT" range of
the dipstick, after the engine and transaxle are
at normal operating temperature. Check the
automatic transaxle fluid level with the engine
running and the transaxle in neutral, with the
parking brake properly applied. Use GENUINE
HYUNDAI ATF or DIAMOND ATF SP-III or SK
ATF SP-III when adding or changing fluid.
F070K01A-AATo Exhaust Pipe and Muffler
Visually inspect the exhaust pipes, muffler and
hangers for cracks, deterioration, or damage.
Start the engine and listen carefully for any
exhaust gas leakage. Tighten connections or
replace parts as necessary.
F070J01A-AAT
o Brake Pads, Calipers and Rotors
Check the pads for excessive wear, discs for
run out and wear, and calipers for fluid leakage.
F070H01A-AAT
o Rear Brake Drums and Linings/
Parking Brake
Check the rear brake drums and linings for
scoring, burning, leaking fluid, broken parts,
and excessive wear. Inspect the parking brake
system including the parking brake lever and
cables. For detailed service procedures, refer
to the Shop Manual.
F070M01A-AATo Steering Gear Box, Linkage & Boots/
Lower Arm Ball Joint
With the vehicle stopped and engine off, check
for excessive free-play in the steering wheel.
Check the linkage for bends or damage. Check
the dust boots and ball joints for deterioration,
cracks, or damage. Replace any damaged
parts.
Page 176 of 221
6- 6 DO-IT-YOURSELF MAINTENANCE
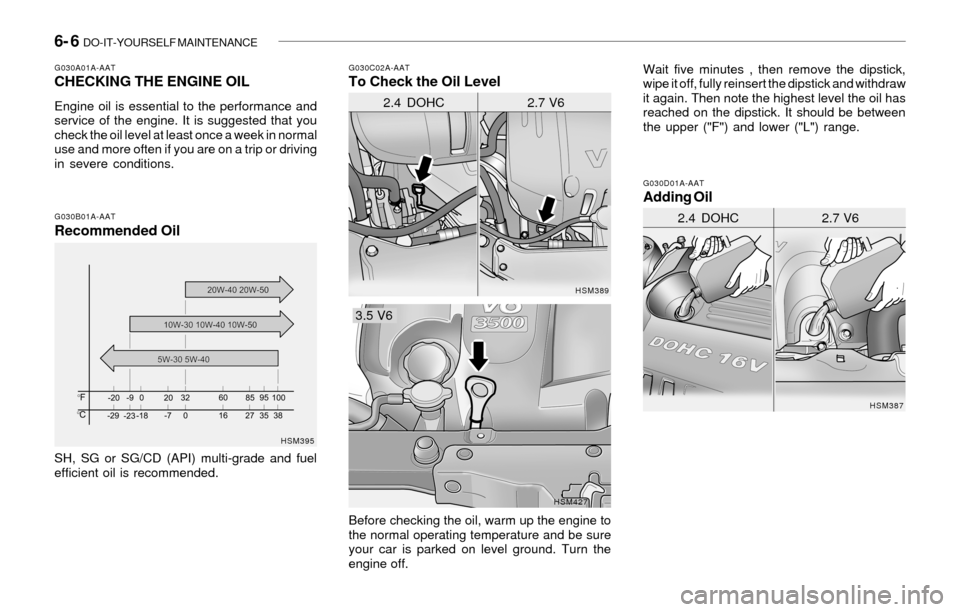
G030A01A-AATCHECKING THE ENGINE OIL
Engine oil is essential to the performance and
service of the engine. It is suggested that you
check the oil level at least once a week in normal
use and more often if you are on a trip or driving
in severe conditions.
G030C02A-AATTo Check the Oil Level
G030B01A-AATRecommended Oil
SH, SG or SG/CD (API) multi-grade and fuel
efficient oil is recommended.Wait five minutes , then remove the dipstick,
wipe it off, fully reinsert the dipstick and withdraw
it again. Then note the highest level the oil has
reached on the dipstick. It should be between
the upper ("F") and lower ("L") range.
HSM395HSM389G030D01A-AAT
Adding Oil
HSM387
2.4 DOHC 2.7 V6
2.4 DOHC 2.7 V6
HSM427
Before checking the oil, warm up the engine to
the normal operating temperature and be sure
your car is parked on level ground. Turn the
engine off.
3.5 V6
Page 177 of 221
DO-IT-YOURSELF MAINTENANCE 6- 7
!
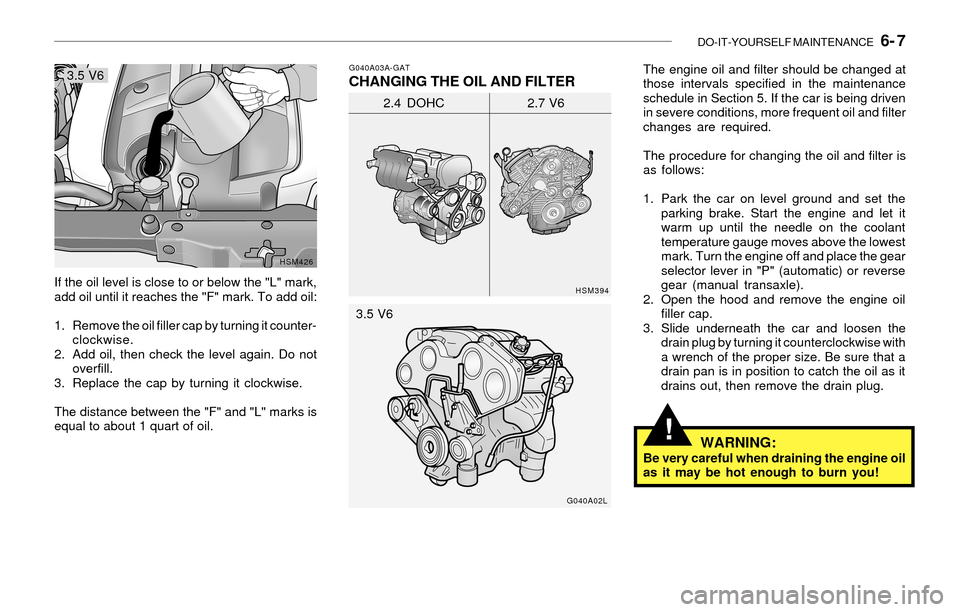
If the oil level is close to or below the "L" mark,
add oil until it reaches the "F" mark. To add oil:
1. Remove the oil filler cap by turning it counter-
clockwise.
2. Add oil, then check the level again. Do not
overfill.
3. Replace the cap by turning it clockwise.
The distance between the "F" and "L" marks is
equal to about 1 quart of oil.
HSM426G040A03A-GAT
CHANGING THE OIL AND FILTERThe engine oil and filter should be changed at
those intervals specified in the maintenance
schedule in Section 5. If the car is being driven
in severe conditions, more frequent oil and filter
changes are required.
The procedure for changing the oil and filter is
as follows:
1. Park the car on level ground and set the
parking brake. Start the engine and let it
warm up until the needle on the coolant
temperature gauge moves above the lowest
mark. Turn the engine off and place the gear
selector lever in "P" (automatic) or reverse
gear (manual transaxle).
2. Open the hood and remove the engine oil
filler cap.
3. Slide underneath the car and loosen the
drain plug by turning it counterclockwise with
a wrench of the proper size. Be sure that a
drain pan is in position to catch the oil as it
drains out, then remove the drain plug.
HSM394
2.4 DOHC 2.7 V6
G040A02L
WARNING:Be very careful when draining the engine oil
as it may be hot enough to burn you! 3.5 V6
3.5 V6
Page 218 of 221
INDEX 10- 3
D
Defrosting / Defogging ......................................................................1-77
Door
Locking, unlocking front door with a key ...................................... 1-4
Drink Holder ......................................................................................1-49
Drive Belts .........................................................................................6-19
Driving
Driving for economy .....................................................................2-16
Smooth cornering .........................................................................2-17
Winter driving ...............................................................................2-17
E
Emission Control System ................................................................... 7-2
Engine
Before starting the engine .............................................................. 2-3
Compartment (2.4 DOHC) ............................................................ 6-2
Compartment (2.7 V6) ................................................................... 6-3
Compartment (3.5 V6) ................................................................... 6-4
Coolant ........................................................................................... 6-8
Coolant temperature gauge .........................................................1-41
If the engine overheats .................................................................. 3-3
Number........................................................................................... 8-2
Oil ................................................................................................... 6-6
Starting ........................................................................................... 2-5
Engine Exhaust Can Be Dangerous .................................................. 2-2
F
Fan Speed Control ............................................................................1-70
Floor Mat Anchor ..............................................................................1-64
Fog Light
Front.............................................................................................1-46Front Seats
Adjustable front seats ..................................................................1-10
Adjustable headrests ...................................................................1-12
Adjusting seat forward and rearward ..........................................1-11
Adjusting seatback angle .............................................................1-11
Fuel
Auto fuel cut switch ......................................................................1-62
Capacity......................................................................................... 9-2
Gauge...........................................................................................1-40
Recommendations......................................................................... 1-2
Fuel Filler Lid
Remote release ............................................................................1-62
Full-time 4WD Operation ..................................................................2-13
Fuses................................................................................................6-20
G
General Checks .................................................................................. 6-5
Glove Box ..........................................................................................1-53
H
Hazard Warning System ..................................................................1-46
Heating and Cooling Control .............................................................1-69
Heating and Ventilation
Air flow control ..............................................................................1-71
Air intake control ..........................................................................1-70
Bi-level heating .............................................................................1-75
Defrosting / Defogging .................................................................1-77
Fan speed control (Blower control) .............................................1-70
Temperature control ....................................................................1-74
High-Mounted Rear Stoplight ............................................................1-61
Homelink Mirror .................................................................................1-56
Page 221 of 221
Seoul KoreaPrinting: FEB. 14, 2003
Publication No.: A26O-EU32P
Printed in Korea
SERVICE STATION INFORMATION
FUEL:
UNLEADED gasoline only
Pump Octane Rating of 87 (Research Octane Number 91) or higher.
FUEL TANK CAPACITY
US.gal (Imp.gal., liter) 19 (15.8, 72)
TIRE PRESSURE:
See the label on the driver's side of the center pillar outer panel.
OTHER TIRE INFORMATION:
See pages 8-2 through 8-6.
HOOD RELEASE:
Pull handle under left side of dash.
ENGINE OIL:
API grade SH, SG or SG/CD multigrade and fuel efficient oil. Use SAE
10W-30, 10W-40 or 10W-50 if normal temperatures are above -10°F
(-23°C). For other viscosity recommendations, see page 6-6 or 9-4.
MANUAL TRANSAXLE:
HYUNDAI GENUINE PARTS MTF 75W/90 (API GL-4) Oil level
should be up to filler-bolt hole in housing beside differential.
AUTOMATIC TRANSAXLE:
Apply the parking brake, with the engine running, shift the selector lever
through all ranges and return to “N” (Neutral) position. Then check the
level of fluid on the dipstick. Use only HYUNDAI GENUINE ATF
available at your dealer or DIAMOND ATF SP-III or SK ATF SP-III.
QUICK INDEX
o Car will not start ....................................................................... 3-2
o Flat tire ..................................................................................... 3-5
o Warning light/chime comes on ................................... 1-37 ~ 1-40
o Engine overheats ...................................................................... 3-3
o Towing of your vehicle ............................................................. 3-9
o Starting the engine ................................................................... 2-5
o Driving tips for first 1,200 miles (2,000 km) .......................... 1-3
o Scheduled maintenance ............................................................ 5-4
o Reporting safety defects ........................................................... 8-7