jump start Hyundai Santa Fe 2006 Owner's Manual
[x] Cancel search | Manufacturer: HYUNDAI, Model Year: 2006, Model line: Santa Fe, Model: Hyundai Santa Fe 2006Pages: 281, PDF Size: 8.94 MB
Page 169 of 281
2
DRIVING YOUR HYUNDAI
18
!
CAUTION:
o While the full-time 4WD vehicle is being
raised on a jack, never start the engine or
cause the tires to rotate.
There is danger that rotating tires touch-
ing the ground could cause the vehicle
to go off the jack and to jump forward.
o If one of the front or rear wheels begins
to spin in mud, snow, etc., the vehicle
can sometimes be driven out by de-
pressing the accelerator pedal further;
however, avoid running the engine con-
tinuously at high rpm because doing so
could damage the 4WD system.
(10)When using tire chains, be sure to install the
chains on all wheels.
(11)If the front or rear wheels get stuck in the
mud, do not spin them recklessly. The 4WD
system could be damaged. o In rare cases when it's unavoidable that
a 4WD vehicle is to be inspected on a
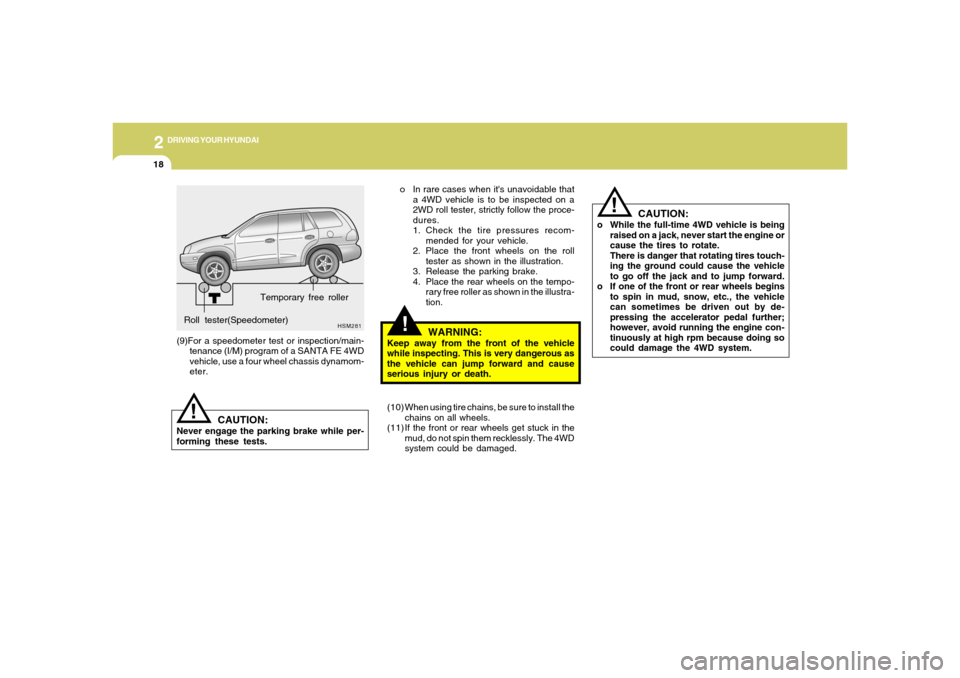
2WD roll tester, strictly follow the proce-
dures.
1. Check the tire pressures recom-
mended for your vehicle.
2. Place the front wheels on the roll
tester as shown in the illustration.
3. Release the parking brake.
4. Place the rear wheels on the tempo-
rary free roller as shown in the illustra-
tion.
!
WARNING:
Keep away from the front of the vehicle
while inspecting. This is very dangerous as
the vehicle can jump forward and cause
serious injury or death.
HSM281
Roll tester(Speedometer)Temporary free roller
CAUTION:
Never engage the parking brake while per-
forming these tests.
!
(9)For a speedometer test or inspection/main-
tenance (I/M) program of a SANTA FE 4WD
vehicle, use a four wheel chassis dynamom-
eter.
Page 170 of 281
2
DRIVING YOUR HYUNDAI
19
!
WARNING:
o Avoid high cornering speeds.
o Do not make quick steering wheel move-
ments, such as sharp lane charges or
fast, sharp turns.
o The risk of rollover is greatly increased if
you lose control of your vehicle at high-
way speeds.
o In a collision, an unbelted person is
significantly more likely to be seriously
injured or killed than a person wearing a
seat belt.
o Loss of control may occurs if two or
more wheels drop off the roadway and
the driver oversteers to reenter the road-
way.
o In the event your vehicle leaves the road-
way, do not steer sharply. Instead, slow
down before pulling back into the travel
lanes.
LIMITED-SLIP DIFFERENTIALD190A01HP-GAT(If installed)A limited-slip differential, if equipped, is for the
rear wheel differential only. The features of this
limited-slip differential are described below:
Just as with a conventional differential, the
wheel on one side is allowed to turn at a different
speed from the wheel on the other side when the
vehicle is cornering. The difference between
the limited-slip differential and a conventional
differential is that if the wheel on one side of the
vehicle loses traction, a greater amount of
torque is applied to the rear wheel on the other
side to improve traction.
CAUTION:
o Never start the engine with the gearshift
lever placed in the forward or reverse
while one of the rear wheels is jacked up
and the other in contact with the
ground; doing so may cause the vehicle
to jump forward.
o Use only recommended oil for LSD in
the rear axle.
See page 9-5 for the recommended oil
descriptions.
!
!GOOD BRAKING PRACTICESC130A01L-AAT
WARNING:
Nothing should be carried on top of the
cargo area cover behind the rear seat. If
there were an accident or a sudden stop,
such objects could move forward and cause
damage to the vehicle or injure the occu-
pants.
o After being parked, check to be sure the
parking brake is not engaged and that the
parking brake indicator light is out before
driving away.
o Driving through water may get the brakes
wet. They can also get wet when the car is
washed. Wet brakes can be dangerous!
Your car will not stop as quickly if the brakes
are wet. Wet brakes may cause the car to
pull to one side. To dry the brakes, apply the
brakes lightly while driving slowly until the
braking action returns to normal, taking care
to keep the car under control at all times. If
the braking action does not return to normal,
stop as soon as it is safe to do so and call your
Hyundai dealer for assistance.
Page 184 of 281
If the Engine will not Start .............................................. 3-2
Jump Starting ................................................................ 3-3
If the Engine Overheats ................................................ 3-4
Spare Tire ..................................................................... 3-5
If You Have a Flat Tire .................................................. 3-6
Changing a Flat Tire ...................................................... 3-6
If Your Vehicle Must be Towed...................................3-12
Emergency Towing.....................................................3-14
If You Lose Your Keys................................................3-15
3
WHAT TO DO IN AN EMERGENCY
3
Page 185 of 281
32WHAT TO DO IN AN EMERGENCY
D010B01O
IF THE ENGINE WILL NOT START!
D010A01A-AAT D010B01L-AAT
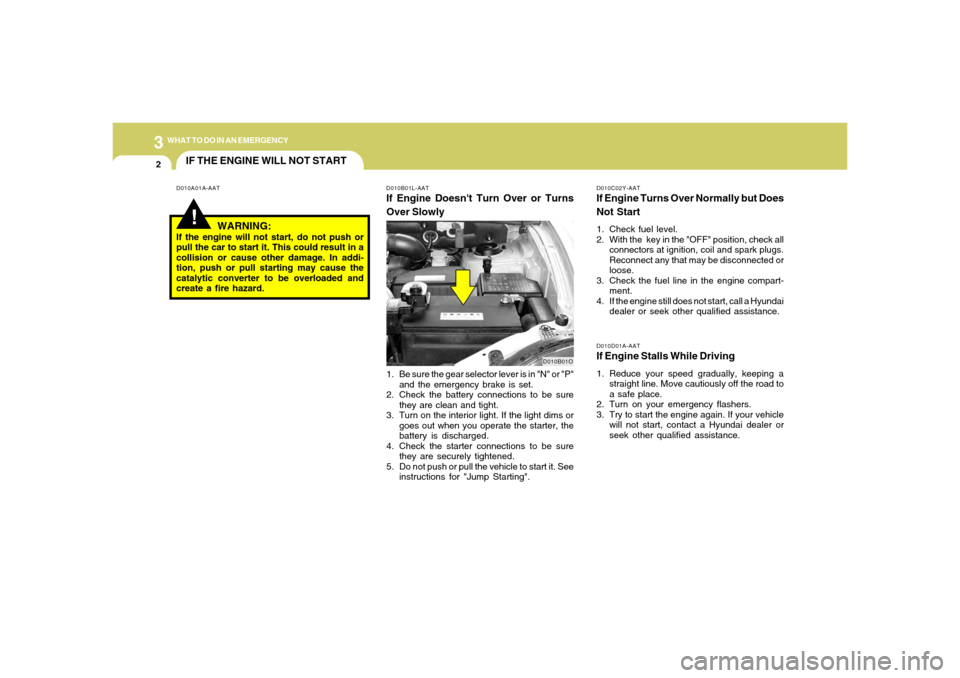
If Engine Doesn't Turn Over or Turns
Over Slowly
D010C02Y-AATIf Engine Turns Over Normally but Does
Not Start1. Check fuel level.
2. With the key in the "OFF" position, check all
connectors at ignition, coil and spark plugs.
Reconnect any that may be disconnected or
loose.
3. Check the fuel line in the engine compart-
ment.
4. If the engine still does not start, call a Hyundai
dealer or seek other qualified assistance.D010D01A-AATIf Engine Stalls While Driving1. Reduce your speed gradually, keeping a
straight line. Move cautiously off the road to
a safe place.
2. Turn on your emergency flashers.
3. Try to start the engine again. If your vehicle
will not start, contact a Hyundai dealer or
seek other qualified assistance.
WARNING:
If the engine will not start, do not push or
pull the car to start it. This could result in a
collision or cause other damage. In addi-
tion, push or pull starting may cause the
catalytic converter to be overloaded and
create a fire hazard.
1. Be sure the gear selector lever is in "N" or "P"
and the emergency brake is set.
2. Check the battery connections to be sure
they are clean and tight.
3. Turn on the interior light. If the light dims or
goes out when you operate the starter, the
battery is discharged.
4. Check the starter connections to be sure
they are securely tightened.
5. Do not push or pull the vehicle to start it. See
instructions for "Jump Starting".
Page 186 of 281
3
WHAT TO DO IN AN EMERGENCY
3
JUMP STARTING!
o If you should accidentally get acid on your
skin or in your eyes, immediately remove
any contaminated clothing and flush the area
with clear water for at least 15 minutes. Then
promptly obtain medical attention. If you
must be transported to an emergency facil-
ity, continue to apply water to the affected
area with a sponge or cloth.
o The gas produced by the battery during the
jump-start operation is highly explosive. Do
not smoke or allow a spark or an open flame
in the vicinity.
o The battery being used to provide the jump
start must be 12-volt. If you cannot deter-
mine that it is a 12-volt battery, do not attempt
to use it for the jump start.
o To jump start a car with a discharged battery,
follow this procedure exactly:
1. If the booster battery is installed in another
vehicle, be sure the two vehicles are not
touching.
2. Turn off all unnecessary lights and acces-
sories in both vehicles.
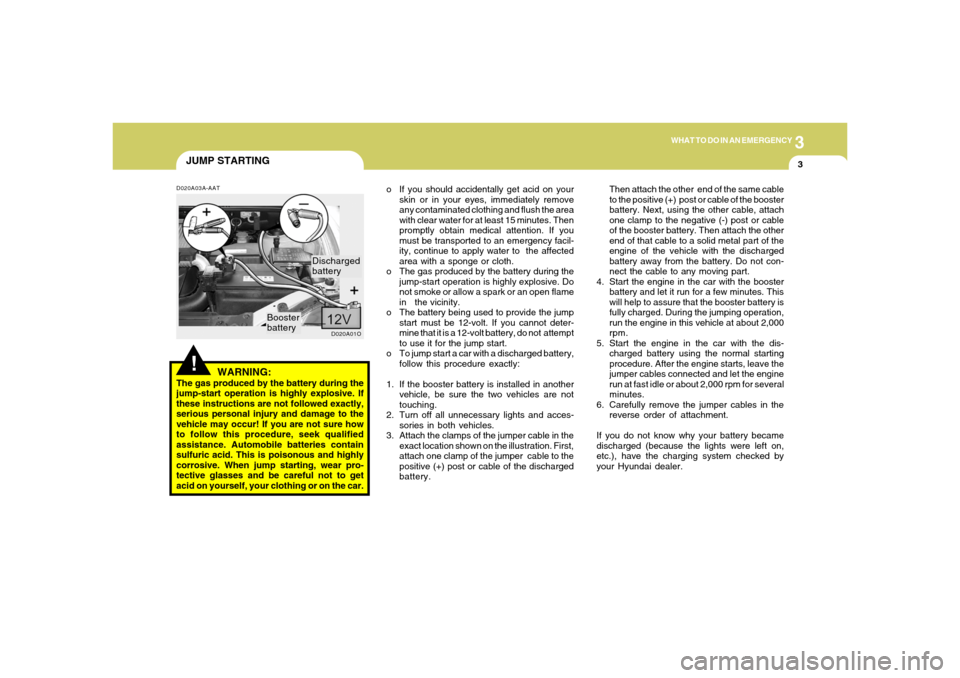
3. Attach the clamps of the jumper cable in the
exact location shown on the illustration. First,
attach one clamp of the jumper cable to the
positive (+) post or cable of the discharged
battery.Then attach the other end of the same cable
to the positive (+) post or cable of the booster
battery. Next, using the other cable, attach
one clamp to the negative (-) post or cable
of the booster battery. Then attach the other
end of that cable to a solid metal part of the
engine of the vehicle with the discharged
battery away from the battery. Do not con-
nect the cable to any moving part.
4. Start the engine in the car with the booster
battery and let it run for a few minutes. This
will help to assure that the booster battery is
fully charged. During the jumping operation,
run the engine in this vehicle at about 2,000
rpm.
5. Start the engine in the car with the dis-
charged battery using the normal starting
procedure. After the engine starts, leave the
jumper cables connected and let the engine
run at fast idle or about 2,000 rpm for several
minutes.
6. Carefully remove the jumper cables in the
reverse order of attachment.
If you do not know why your battery became
discharged (because the lights were left on,
etc.), have the charging system checked by
your Hyundai dealer.
D020A03A-AAT
WARNING:
The gas produced by the battery during the
jump-start operation is highly explosive. If
these instructions are not followed exactly,
serious personal injury and damage to the
vehicle may occur! If you are not sure how
to follow this procedure, seek qualified
assistance. Automobile batteries contain
sulfuric acid. This is poisonous and highly
corrosive. When jump starting, wear pro-
tective glasses and be careful not to get
acid on yourself, your clothing or on the car.
D020A01O
Booster
batteryDischarged
battery
Page 277 of 281
10
INDEX
4
G
General Checks.................................................................................. 6-4
Glove Box..........................................................................................1-72
H
Hazard Warning System ..................................................................1-62
Heating and Cooling Control .............................................................1-92
Heating and Ventilation
Air flow control..............................................................................1-94
Air intake control switch ...............................................................1-93
Bi-level heating.............................................................................1-98
Defrosting / Defogging ..............................................................1-101
Fan speed control (Blower control) .............................................1-93
Temperature control....................................................................1-97
High-Mounted Rear Stop Light .........................................................1-83
Homelink Mirror.................................................................................1-76
Hood Release....................................................................................1-85
Horn.................................................................................................1-88
I
Ignition Switch ...................................................................................... 2-4
Instrument Cluster and Indicator Lights...........................................1-46
Instrument Panel Light Control (Rheostat).......................................1-65
Interior Light.......................................................................................1-71
J
Jump Starting...................................................................................... 3-3K
Keys................................................................................................... 1-3
If you lose your keys ...................................................................3-15
Positions......................................................................................... 2-4
L
Light Bulbs Replacement..................................................................6-26
Limited-Slip Differential......................................................................2-19
Luggage Compartment Light ............................................................1-81
Luggage Net ......................................................................................1-82
M
Maintenance Intervals
Explanation of scheduled maintenance items ............................... 5-7
Maintenance under severe usage conditions............................... 5-6
Scheduled maintenance................................................................ 5-4
Service requirements.................................................................... 5-2
Mirrors
Day-night inside rearview mirror .................................................1-76
Outside rearview mirror ...............................................................1-73
O
Odometer / Trip Odometer ...............................................................1-53
P
Parking Brake....................................................................................1-80
Power Driver's Seat ..........................................................................1-14
Power Outlet......................................................................................1-66
Power Steering Fluid Level ...............................................................6-23