Hyundai Santa Fe 2007 Owner's Manual
Manufacturer: HYUNDAI, Model Year: 2007, Model line: Santa Fe, Model: Hyundai Santa Fe 2007Pages: 355, PDF Size: 13.03 MB
Page 171 of 355
1159159159159159159
FEATURES OF YOUR HYUNDAI
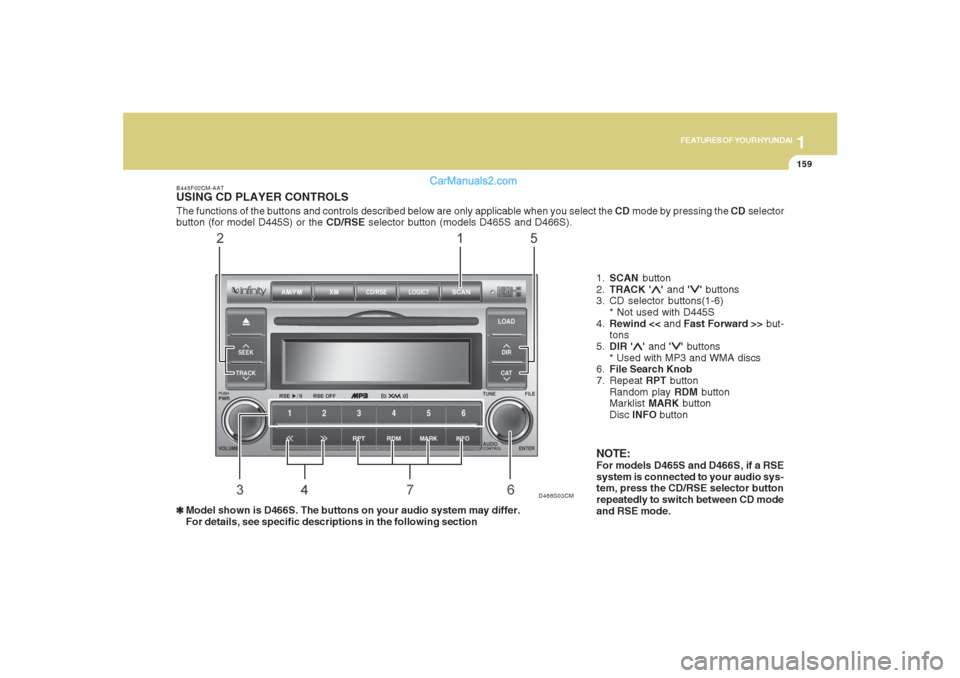
The functions of the buttons and controls described below are only applicable when you select the CD mode by pressing the CD selector
button (for model D445S) or the CD/RSE selector button (models D465S and D466S).B445F02CM-AATUSING CD PLAYER CONTROLS❃ ❃❃ ❃
❃Model shown is D466S. The buttons on your audio system may differ.
For details, see specific descriptions in the following section1.SCAN button
2.TRACK '
∧ ∧∧ ∧
∧' and '
∨ ∨∨ ∨
∨' buttons
3. CD selector buttons(1-6)
* Not used with D445S
4.Rewind << and Fast Forward >> but-
tons
5.DIR '
∧ ∧∧ ∧
∧' and '
∨ ∨∨ ∨
∨' buttons
* Used with MP3 and WMA discs
6.File Search Knob
7. Repeat RPT button
Random play RDM button
Marklist MARK button
Disc INFO button
NOTE:For models D465S and D466S, if a RSE
system is connected to your audio sys-
tem, press the CD/RSE selector button
repeatedly to switch between CD mode
and RSE mode.
D466S03CM
Page 172 of 355
1FEATURES OF YOUR HYUNDAI
160
B445G02CM-AAT1. SCAN buttonDisc Scan function
During CD playback, press the SCAN
button to play the first 10 seconds (pre-
view) of all tracks on the current CD.
Once you hear a track you want, press the
SCAN button again to resume normal play-
back2. Track UP '
∧ ∧∧ ∧
∧' and DOWN '
∨ ∨∨ ∨
∨' but-
tons
During CD playback, press the
∧ and
∨
buttons to select and play the next or pre-
vious track on the current disc. The LCD
screen displays the track number as you
press the buttons. You can press the but-
ton several times to select the track you
want.
3. CD selector buttons (1~6)Model D445S:
The CD selector buttons are not used with
Model D445.
Models D465S and D466S:
Press the CD selector button correspond-
ing to the CD you want. The CD player
automatically interrupts playback and loads
the selected CD.NOTE:If no CD is loaded in the selected posi-
tion, the LCD screen displays the No
Disc indicator.4. Rewind << and Fast Forward >>
buttonsDuring CD playback, press and hold the
<< or >> buttons to rewind or fast-forward
playback of the current track. The LCD
screen displays the elapsed time of the
track you are rewinding or fast-forwarding.
Release the << or >> button when you
have reached the point you want. Play-
back resumes automatically at the selected
point.
5. DIR '
∧ ∧∧ ∧
∧' and '
∨ ∨∨ ∨
∨' buttons (MP3 and
WMA discs)
During MP3/WMA CD playback, press the
DIR '
∧ ∧∧ ∧
∧' or '
∨ ∨∨ ∨
∨' buttons to switch to the next
or previous directory on the CD. The LCD
screen displays the name of the directory
you have switched to. You can press the
button several times to search for the direc-
tory you want. The directories are dis-
played in sequence (i.e. ascending or
descending alphabetical order).
To access the directory displayed, press
the File Search knob to ENTER your se-
lection.
NOTE:The Directory UP and DOWN buttons
can only be used when you are playing a
CD which has organized its tracks in the
form of directories. Normally, only MP3
or WMA CDs will contain a directory tree
which you can navigate using these but-
tons.
Page 173 of 355
1161161161161161161
FEATURES OF YOUR HYUNDAI
6. File Search KnobRotate the knob clockwise or counter-clock-
wise to manually advance up or down the
track list of the CD currently played. This
function allows you to quickly scroll to a
specific track number. It is especially use-
ful if you are playing an MP3 or WMA CD
which contains many directories and
tracks. The LCD screen displays the track
number you have scrolled to.
Once the track number you want is dis-
played, press the File Search knob to
ENTER your selection and begin play-
back of the selected track.
NOTE:You must push the File Search knob to
select the track for playback. Other-
wise, the CD player will not jump to the
track number displayed in the number
counter.
Use the File Search knob and the DIR '
∧ ∧∧ ∧
∧'
and '
∨ ∨∨ ∨
∨' buttons in together to quickly
search for a track you want on an MP3
CD with many directories and tracks.
7. RPT, RDM, MARK & INFO buttonsThese buttons correspond to the Repeat,
Random Playback, Marklist and Disc In-
formation functions.
Turn to the next section of your handbook
for detailed instructions.
Page 174 of 355
1FEATURES OF YOUR HYUNDAI
162
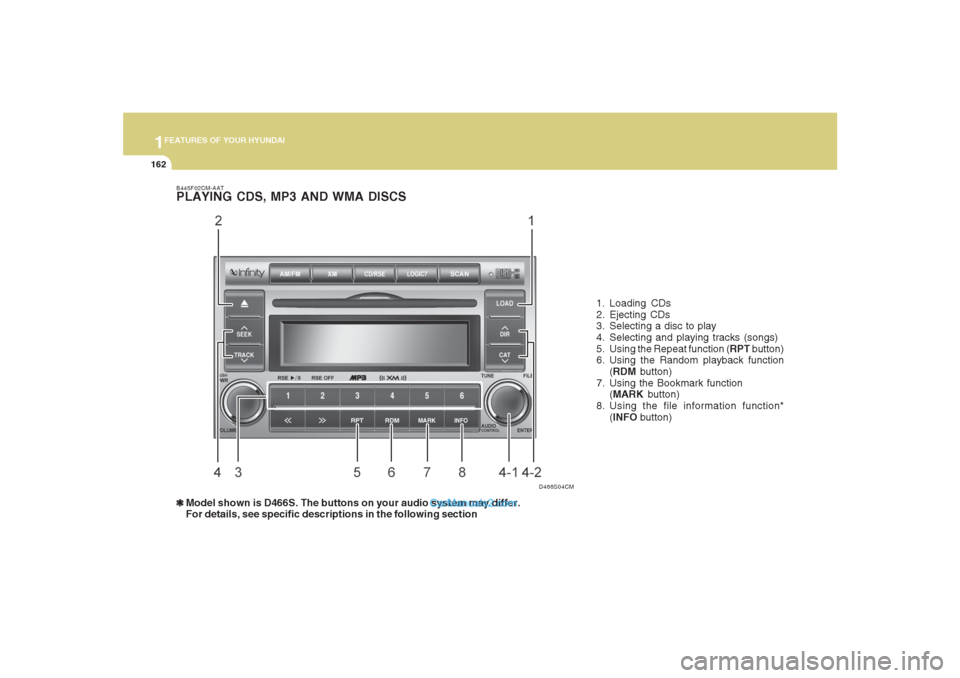
B445F02CM-AATPLAYING CDS, MP3 AND WMA DISCS❃ ❃❃ ❃
❃Model shown is D466S. The buttons on your audio system may differ.
For details, see specific descriptions in the following section1. Loading CDs
2. Ejecting CDs
3. Selecting a disc to play
4. Selecting and playing tracks (songs)
5. Using the Repeat function (RPT button)
6. Using the Random playback function
(RDM button)
7. Using the Bookmark function
(MARK button)
8. Using the file information function*
(INFO button)
D466S04CM
Page 175 of 355
1163163163163163163
FEATURES OF YOUR HYUNDAI
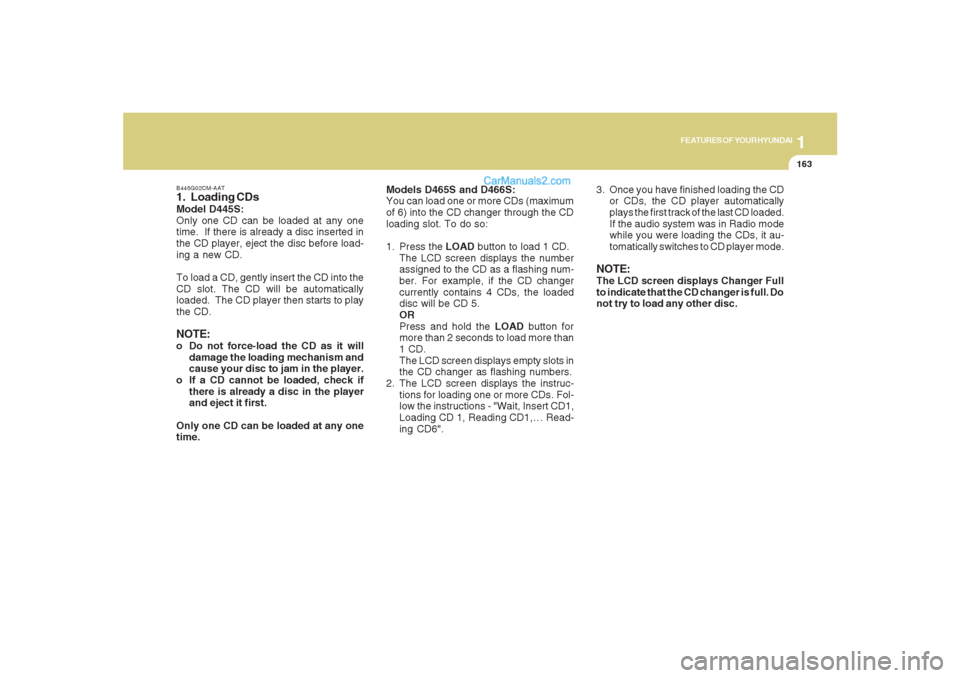
B445G02CM-AAT1. Loading CDsModel D445S:
Only one CD can be loaded at any one
time. If there is already a disc inserted in
the CD player, eject the disc before load-
ing a new CD.
To load a CD, gently insert the CD into the
CD slot. The CD will be automatically
loaded. The CD player then starts to play
the CD.NOTE:o Do not force-load the CD as it will
damage the loading mechanism and
cause your disc to jam in the player.
o If a CD cannot be loaded, check if
there is already a disc in the player
and eject it first.
Only one CD can be loaded at any one
time.Models D465S and D466S:
You can load one or more CDs (maximum
of 6) into the CD changer through the CD
loading slot. To do so:
1. Press the LOAD button to load 1 CD.
The LCD screen displays the number
assigned to the CD as a flashing num-
ber. For example, if the CD changer
currently contains 4 CDs, the loaded
disc will be CD 5.
OR
Press and hold the LOAD button for
more than 2 seconds to load more than
1 CD.
The LCD screen displays empty slots in
the CD changer as flashing numbers.
2. The LCD screen displays the instruc-
tions for loading one or more CDs. Fol-
low the instructions - "Wait, Insert CD1,
Loading CD 1, Reading CD1,… Read-
ing CD6".3. Once you have finished loading the CD
or CDs, the CD player automatically
plays the first track of the last CD loaded.
If the audio system was in Radio mode
while you were loading the CDs, it au-
tomatically switches to CD player mode.
NOTE:The LCD screen displays Changer Full
to indicate that the CD changer is full. Do
not try to load any other disc.
Page 176 of 355
1FEATURES OF YOUR HYUNDAI
164
2. Ejecting CDsModel D445S
Press the CD EJECT ( ) button to eject
the CD in the CD player.
Models D465S and D466S
Press the button once to eject the last
CD played.
Press and hold button for more than 2
seconds to eject all the CDs in the changer
in sequence beginning with the last CD
played.NOTE:You can eject discs without switching on
the audio system using the Power ON-
OFF knob.
To eject 1 CD:
Press the EJECT button once.
If you are playing a CD, playback will
automatically switch to the next available
CD.
The LCD screen displays the number of
the CD ejected as a flashing number.
If there are no other disc left in the CD
changer, the audio system automatically
switches to Radio mode and resumes with
the last channel or frequency selected.
OR
If the audio system is in Radio mode, the
last CD played will be ejected.
The LCD screen displays the number of
the CD ejected as a flashing number.To eject all CDs:
Press and hold the EJECT button for more
than 2 seconds to eject all the CDs in the
CD changer.
The LCD screen displays the CDs being
ejected in the CD changer as flashing
numbers. The CDs are ejected in se-
quence. Follow the instructions displayed
on the LCD screen to remove all CDs from
the changer.
NOTE:If the audio system is in Radio mode, you
can eject CDs without interrupting the
operation of the radio.
Page 177 of 355
1165165165165165165
FEATURES OF YOUR HYUNDAI
3. Selecting a disc to playModel D445S
Only the CD loaded in the player can be
played.
Models D465S and D466S
You can select any disc loaded in the CD
changer for playback.
To do so:
Press the corresponding CD selector
button (1 – 6).
The CD changer automatically loads the
selected CD and begins playback of the
first track.
The LCD screen displays the selected CD
as a flashing number.
4. Selecting and playing tracks
(songs)To select tracks, you can use one of 3
methods:
Method 1:
Press the Track Up or Track Down
button repeatedly until you find the track
you want.
Method 2:
Rotate the File Search knob to scroll to
the track you want. The number counter
in the LCD screen shows you the track
number.
Press the File Search knob to ENTER
your selection and begin playback.
Method 3 (only for MP3 and WMA CDs):
Press the DIR Up or Down buttons re-
peatedly to switch to the directory you
want on the CD.
The LCD screen displays the name of
the directory you have switched to.Rotate the File Search knob to scroll to the
track you want in the selected directory.
The number counter in the LCD screen
shows you the track number. Press the File
Search knob to ENTER your selection and
begin playback.
NOTE:You may notice that the track number
counter on the LCD screen matches the
track list on audio CDs exactly while that
may not be the case for MP3 or WMA
CDs. This is because WMA and MP3 CDs
typically contain multiple tracks (files)
that are organized on the CD as directo-
ries. The number counter displays the
track number of the track being played
in relation to the numbering system on
the MP3 or WMA CD. Depending on the
sequence in which the files and directo-
ries were added to the CD, the track
number sequence displayed on the
screen may not match the playback
sequence. This is due to the MP3 and
WMA encoding process and does not
mean that your CD player is defective.
Page 178 of 355
1FEATURES OF YOUR HYUNDAI
166
5. Using the Repeat function (RPT
button)To repeat playback of the current track:
Press the RPT button once. The LCD
screen displays RPT to indicate that it is
in REPEAT mode. Playback of the cur-
rent track will be repeated.
Press the RPT button again to resume
normal playback. The RPT indicator is
cleared.
To repeat playback of all tracks on the
current CD/File Directory:
Press and hold the RPT button for more
than 2 seconds. The LCD screen dis-
plays RPT ALL to indicate that it is in
REPEAT ALL mode. The tracks of the
current audio CD or the tracks in the
current MP3 file directory will be re-
peated.
Press the RPT button again to resume
normal playback. The RPT ALL indica-
tor is cleared.
6. Using the Random playback func-
tion (RDM button)For random playback in audio CDs (also
applies to current MP3 file directory):
Press the RDM button once. The LCD
screen displays RDM to indicate that it
is in RANDOM mode. Tracks on the
current audio CD/MP3 directory will be
randomly selected and played.
Press the RDM button again to resume
normal playback. The RDM indicator is
cleared. Normal playback resumes.
For random playback of all tracks on a
CD (only for MP3 and WMA CDs):
Press and hold the RDM button for more
than 2 seconds. The LCD screen dis-
plays RDM ALL to indicate that it is in
RANDOM ALL mode. Tracks from all
directories in the MP3/WMA CD will be
randomly selected and played.
Press the RDM button again to resume
normal playback. The RDM ALL indica-
tor is cleared.
7. Using the Bookmark function
(MARK button)The Bookmark function allows you to se-
lect and add up to 20 tracks from any CD
in the CD changer to a playlist (marklist).
You can then play the tracks on the playlist
whenever you want.
Adding tracks to the playlist (marklist):
1. Play the track you want.
2. Press and hold the MARK button for
more than 2 seconds to add the current
track to the playlist (marklist). The LCD
screen displays MARK to indicate that
the track has been added to the playlist
(marklist).
3. Repeat steps 1 & 2 to add more tracks
to the marklist (maximum of 20 book-
marks.)
Page 179 of 355
1167167167167167167
FEATURES OF YOUR HYUNDAI
Playing tracks on the playlist (marklist):
1. Press the MARK button once. The LCD
screen displays MARK to indicate that
it is in bookmark mode and automati-
cally begins playback of the tracks saved
on the playlist (marklist) in sequence.
2. Press the MARK button again to re-
sume normal playback. The MARK in-
dicator is cleared. Normal playback
resumes.
Deleting tracks from the playlist
(marklist):
1. Press the MARK button once. The LCD
screen displays MARK to indicate that
it is in bookmark mode and automati-
cally begins playback of the tracks saved
on the playlist (marklist) in sequence.
2. Select the track you want to remove.
(See Selecting and playing tracks
(songs))
3. Press and hold the MARK button for
more than 2 seconds. The LCD screen
displays TRACK DELETED to confirm
that the bookmark has been deleted.Deleting all tracks from the playlist
(marklist):
1. Press the MARK button once. The LCD
screen displays MARK to indicate that
it is in bookmark mode and automati-
cally begins playback of the tracks saved
on the playlist (marklist) in sequence.
2. Press and hold the MARK button for
more than 4 seconds. The LCD screen
displays MARKLIST EMPTY to confirm
that all the bookmarks in the playlist
(marklist) have been deleted.
8. Using the file information func-
tion* (INFO button)* This function can only be used with
MP3/WMA tracks
Press the INFO button repeatedly to dis-
play information about the track. The LCD
screen displays the File Name, Artiste
Name and Song Title in sequence.
Note:
The information (File Name, Artiste Name
and Song Title) available for display de-
pends on the information the MP3/WMA
file was encoded with. If the relevant infor-
mation was not included when the file was
encoded, you will not be able to see it.
Page 180 of 355
1FEATURES OF YOUR HYUNDAI
168
D466S05CM B466A02CM-AAT
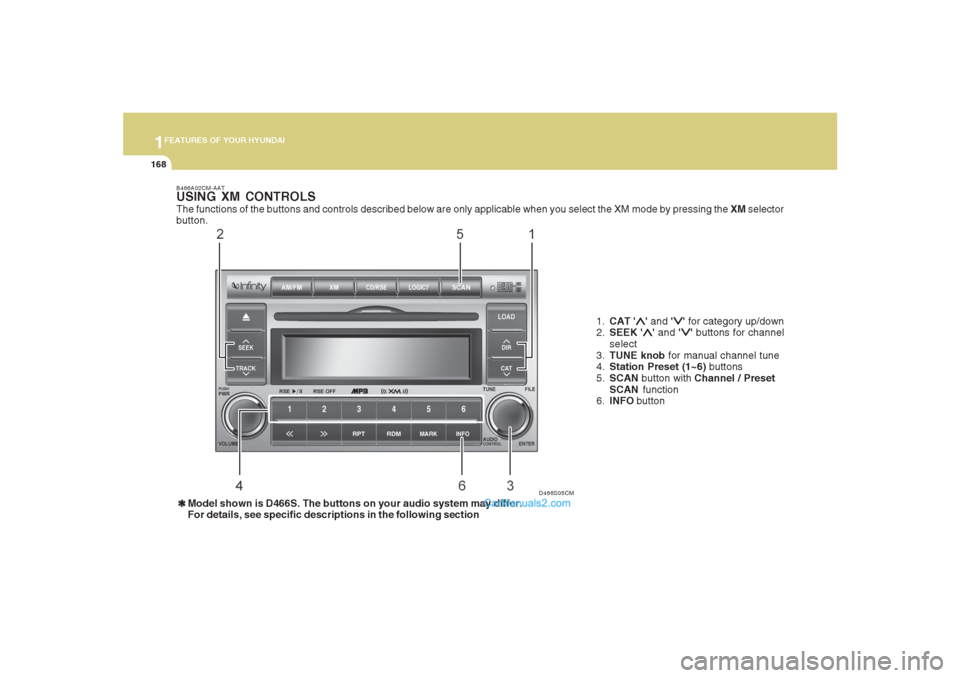
USING XM CONTROLSThe functions of the buttons and controls described below are only applicable when you select the XM mode by pressing the XM selector
button.
1.CAT '
∧ ∧∧ ∧
∧' and '
∨ ∨∨ ∨
∨' for category up/down
2.SEEK '
∧ ∧∧ ∧
∧' and '
∨ ∨∨ ∨
∨' buttons for channel
select
3.TUNE knob for manual channel tune
4.Station Preset (1~6) buttons
5.SCAN button with Channel / Preset
SCAN function
6.INFO button
❃ ❃❃ ❃
❃Model shown is D466S. The buttons on your audio system may differ.
For details, see specific descriptions in the following section