engine Hyundai Santa Fe 2011 - RHD (UK, Australia) Owner's Guide
[x] Cancel search | Manufacturer: HYUNDAI, Model Year: 2011, Model line: Santa Fe, Model: Hyundai Santa Fe 2011Pages: 312, PDF Size: 23.92 MB
Page 99 of 312
Features of your vehicle
24
4
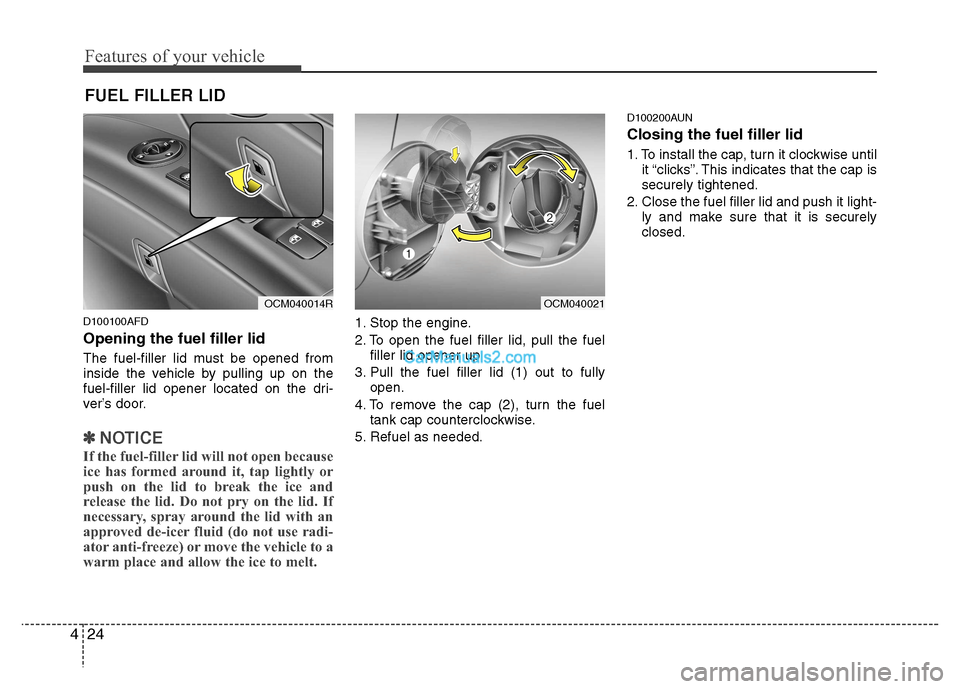
D100100AFD Opening the fuel filler lid
The fuel-filler lid must be opened from
inside the vehicle by pulling up on the
fuel-filler lid opener located on the dri-
ver’s door.
✽✽
NOTICE
If the fuel-filler lid will not open because
ice has formed around it, tap lightly or
push on the lid to break the ice and
release the lid. Do not pry on the lid. If
necessary, spray around the lid with an
approved de-icer fluid (do not use radi-
ator anti-freeze) or move the vehicle to a
warm place and allow the ice to melt.
1. Stop the engine.
2. To open the fuel filler lid, pull the fuel filler lid opener up.
3. Pull the fuel filler lid (1) out to fully open.
4. To remove the cap (2), turn the fuel tank cap counterclockwise.
5. Refuel as needed. D100200AUN Closing the fuel filler lid
1. To install the cap, turn it clockwise until
it “clicks”. This indicates that the cap is securely tightened.
2. Close the fuel filler lid and push it light- ly and make sure that it is securelyclosed.
FUEL FILLER LID
OCM040014ROCM040021
Page 101 of 312
Features of your vehicle
26
4
(Continued)
Use only portable plastic fuel
containers designed to carry and
store petrol.
Do not use mobile phones whilst refuelling. Electric current and/or
electronic interference from
mobile phones can potentially
ignite fuel vapours causing a fire.
When refuelling, always shut the engine off. Sparks produced byelectrical components related tothe engine can ignite fuel
vapours causing a fire. Once
refuelling is complete, check tomake sure the filler cap and filler
door are securely closed, before
starting the engine.
DO NOT use matches or a lighter and DO NOT SMOKE or leave a lit
cigarette in your vehicle whilst at
a gas station especially during
refuelling. Automotive fuel is
highly flammable and can, when
ignited, result in fire.
(Continued)(Continued)
If a fire breaks out during refu-elling, leave the vicinity of the
vehicle, and immediately contact
the manager of the gas stationand then contact the local fire
department. Follow any safety
instructions they provide.CAUTION
Make sure to refuel your vehicle
according to the "Fuel require-
ments" suggested in section 1.
If the fuel filler cap requires replacement, use only a genuineHYUNDAI cap or the equivalent
specified for your vehicle. An incorrect fuel filler cap can resultin a serious malfunction of the fuel system or emission control
system.
Do not spill fuel on the exterior surfaces of the vehicle. Any typeof fuel spilled on painted surfaces may damage the paint.
After refuelling, make sure the fuel cap is installed securely toprevent fuel spillage in the event of an accident.
Page 107 of 312
Features of your vehicle
32
4
Power steering
Power steering uses energy from the
engine to assist you in steering the vehi-
cle. If the engine is off or if the power
steering system becomes inoperative,
the vehicle may still be steered, but it will
require increased steering effort.
Should you notice any change in the
effort required to steer during normal
vehicle operation, have the power steer-
ing checked by a HYUNDAI authorised
repairer.✽✽
NOTICE
If the power steering drive belt breaks
or if the power steering pump malfunc-
tions, the steering effort will greatly
increase.
✽
✽ NOTICE
If the vehicle is parked for extended
periods outside in cold weather (below
-10°C/14°F), the power steering may
require increased effort when the engine
is first started. This is caused by
increased fluid viscosity due to the cold
weather and does not indicate a mal-
function.
When this happens, increase the engine
RPM by depressing the accelerator until
the RPM reaches 1,500 rpm then release
or let the engine idle for two or three
minutes to warm up the fluid.
D130300AFD Tilt steering
A tilt steering wheel allows you to adjust
the steering wheel before you drive. You
can also raise it to give your legs more
room when you exit and enter the vehicle(if equipped).
The steering wheel should be positioned
so that it is comfortable for you to drive,
whilst permitting you to see the instru-
ment panel warning lights and gauges.
STEERING WHEEL
CAUTION
Never hold the steering wheel to the
extreme right or left for more than 5
seconds with the engine running.Holding the steering wheel for morethan 5 seconds in either positionmay cause damage to the power
steering pump.
WARNING
Never adjust the angle and height of steering wheel whilst driving.
You may lose your steering con-
trol and cause severe personal
injury or accidents.
After adjusting, push the steering wheel both up and down to be
certain it is locked in position.
Page 109 of 312
Features of your vehicle
34
4
D140100AUN
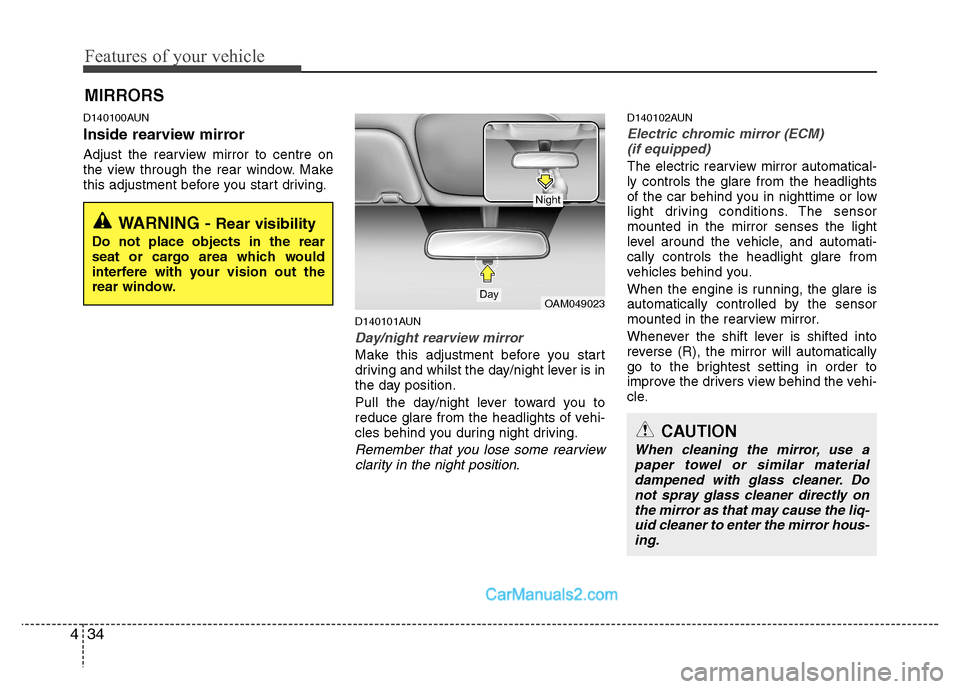
Inside rearview mirror
Adjust the rearview mirror to centre on
the view through the rear window. Make
this adjustment before you start driving.
D140101AUN
Day/night rearview mirror
Make this adjustment before you start
driving and whilst the day/night lever is in
the day position.
Pull the day/night lever toward you to
reduce glare from the headlights of vehi-
cles behind you during night driving.
Remember that you lose some rearviewclarity in the night position.
D140102AUN
Electric chromic mirror (ECM)(if equipped)
The electric rearview mirror automatical- ly controls the glare from the headlights
of the car behind you in nighttime or low
light driving conditions. The sensormounted in the mirror senses the light
level around the vehicle, and automati-cally controls the headlight glare from
vehicles behind you.
When the engine is running, the glare is
automatically controlled by the sensor
mounted in the rearview mirror.
Whenever the shift lever is shifted into
reverse (R), the mirror will automatically
go to the brightest setting in order to
improve the drivers view behind the vehi-
cle.
MIRRORS
WARNING -
Rear visibility
Do not place objects in the rear
seat or cargo area which would
interfere with your vision out the
rear window.
OAM049023
CAUTION
When cleaning the mirror, use a paper towel or similar materialdampened with glass cleaner. Do not spray glass cleaner directly on
the mirror as that may cause the liq- uid cleaner to enter the mirror hous-ing.
Day
Night
Page 113 of 312
Features of your vehicle
38
4
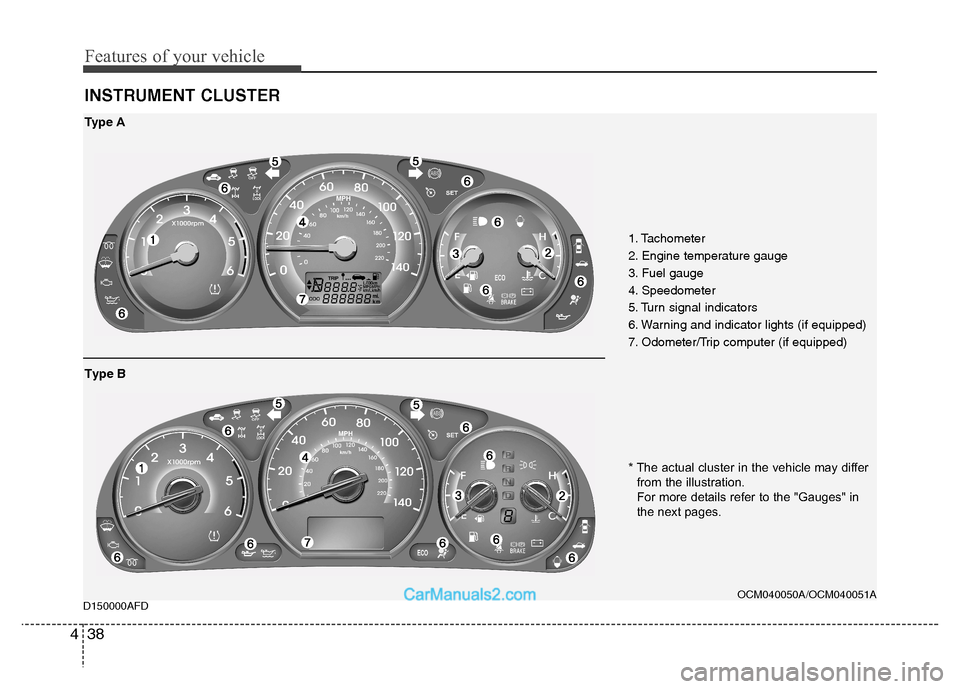
D150000AFD INSTRUMENT CLUSTER
1. Tachometer
2. Engine temperature gauge
3. Fuel gauge
4. Speedometer
5. Turn signal indicators
6. Warning and indicator lights (if equipped)
7. Odometer/Trip computer (if equipped)
OCM040050A/OCM040051A
Type A
* The actual cluster in the vehicle may differ
from the illustration.
For more details refer to the "Gauges" in
the next pages.
Type B
Page 114 of 312
439
Features of your vehicle
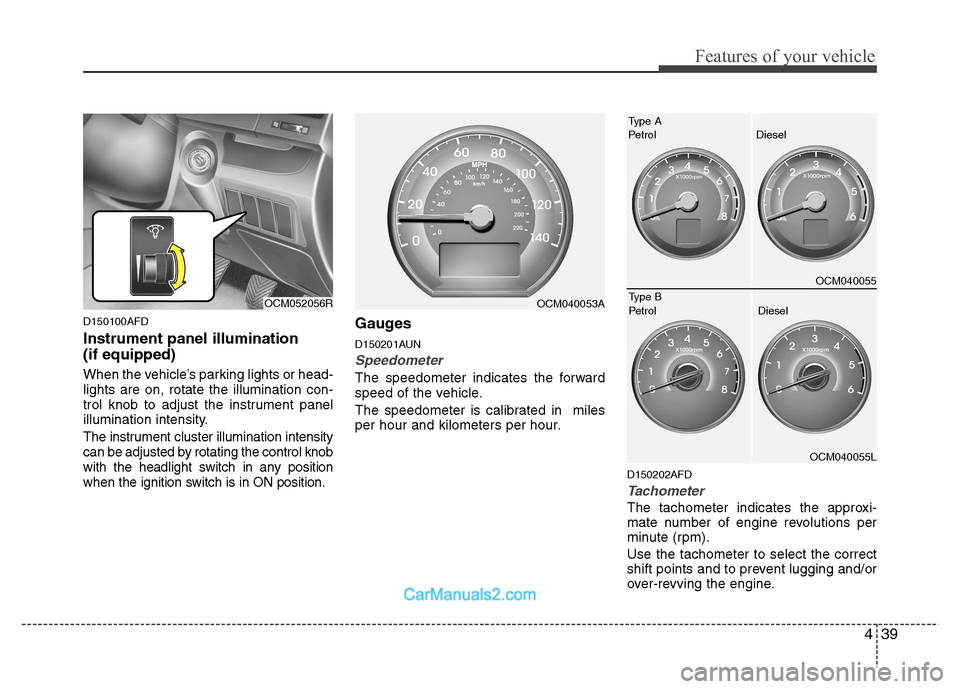
D150100AFD Instrument panel illumination (if equipped)
When the vehicle’s parking lights or head- lights are on, rotate the illumination con-
trol knob to adjust the instrument panel
illumination intensity.
The instrument cluster illumination intensitycan be adjusted by rotating the control knobwith the headlight switch in any positionwhen the ignition switch is in ON position.
Gauges
D150201AUN
Speedometer
The speedometer indicates the forward
speed of the vehicle.
The speedometer is calibrated in miles
per hour and kilometers per hour.D150202AFD
Tachometer
The tachometer indicates the approxi-
mate number of engine revolutions per
minute (rpm). Use the tachometer to select the correct
shift points and to prevent lugging and/or
over-revving the engine.
OCM052056ROCM040053A
OCM040055
OCM040055L
Type A
PetrolDiesel
Type B
Petrol Diesel
Page 115 of 312
Features of your vehicle
40
4
The tachometer pointer may move slight-
ly when the ignition switch is in ACC or
ON position with the engine OFF. This
movement is normal and will not affect
the accuracy of the tachometer once the
engine is running.
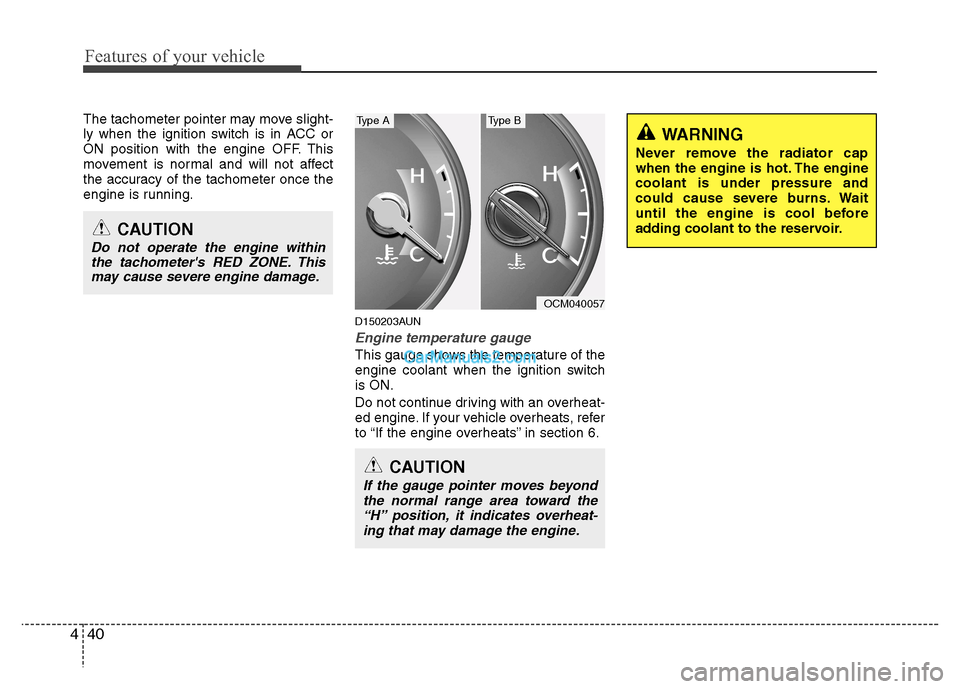
D150203AUN
Engine temperature gauge
This gauge shows the temperature of the
engine coolant when the ignition switchis ON.
Do not continue driving with an overheat-
ed engine. If your vehicle overheats, refer
to “If the engine overheats” in section 6.
OCM040057
CAUTION
If the gauge pointer moves beyondthe normal range area toward the “H” position, it indicates overheat-
ing that may damage the engine.
Type AType B
CAUTION
Do not operate the engine withinthe tachometer's RED ZONE. This may cause severe engine damage.
WARNING
Never remove the radiator cap
when the engine is hot. The enginecoolant is under pressure and
could cause severe burns. Wait
until the engine is cool before
adding coolant to the reservoir.
Page 116 of 312
441
Features of your vehicle
D150204AUN
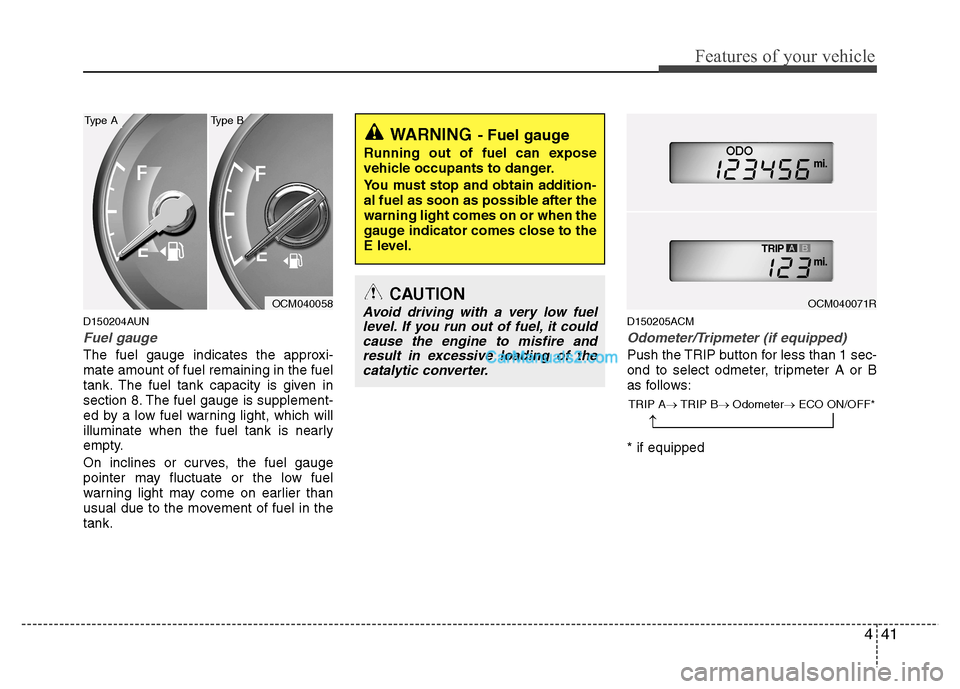
Fuel gauge
The fuel gauge indicates the approxi- mate amount of fuel remaining in the fuel
tank. The fuel tank capacity is given in
section 8. The fuel gauge is supplement-
ed by a low fuel warning light, which will
illuminate when the fuel tank is nearly
empty.
On inclines or curves, the fuel gauge
pointer may fluctuate or the low fuel
warning light may come on earlier than
usual due to the movement of fuel in thetank.D150205ACM
Odometer/Tripmeter (if equipped)
Push the TRIP button for less than 1 sec-
ond to select odmeter, tripmeter A or B
as follows: * if equipped
WARNING
- Fuel gauge
Running out of fuel can expose
vehicle occupants to danger.
You must stop and obtain addition-
al fuel as soon as possible after thewarning light comes on or when the
gauge indicator comes close to the
E level.
OCM040058
Type A Type B
CAUTION
Avoid driving with a very low fuel level. If you run out of fuel, it could cause the engine to misfire andresult in excessive loading of thecatalytic converter.OCM040071R
TRIP A TRIP B Odometer ECO ON/OFF*
Page 119 of 312
Features of your vehicle
44
4
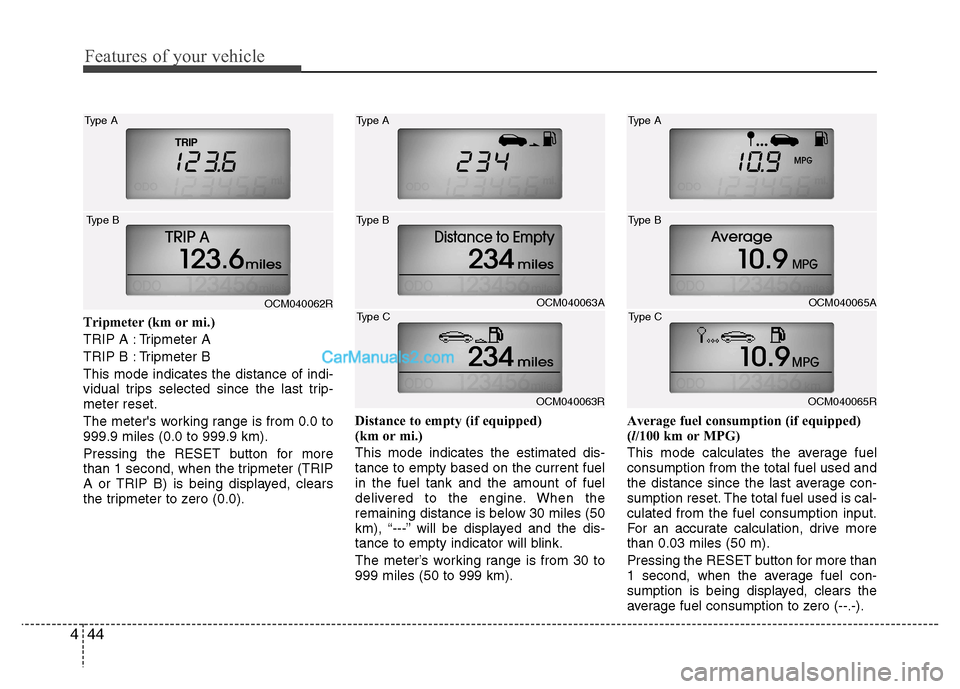
Tripmeter (km or mi.)
TRIP A : Tripmeter A
TRIP B : Tripmeter BThis mode indicates the distance of indi-
vidual trips selected since the last trip-meter reset.
The meter's working range is from 0.0 to 999.9 miles (0.0 to 999.9 km).
Pressing the RESET button for more
than 1 second, when the tripmeter (TRIP
A or TRIP B) is being displayed, clears
the tripmeter to zero (0.0). Distance to empty (if equipped)
(km or mi.) This mode indicates the estimated dis- tance to empty based on the current fuelin the fuel tank and the amount of fuel
delivered to the engine. When the
remaining distance is below 30 miles (50
km), “---” will be displayed and the dis-
tance to empty indicator will blink.
The meter’s working range is from 30 to 999 miles (50 to 999 km).Average fuel consumption (if equipped)(
l/100 km or MPG)
This mode calculates the average fuelconsumption from the total fuel used and
the distance since the last average con-
sumption reset. The total fuel used is cal-culated from the fuel consumption input.
For an accurate calculation, drive morethan 0.03 miles (50 m).
Pressing the RESET button for more than
1 second, when the average fuel con-
sumption is being displayed, clears the
average fuel consumption to zero (--.-).
OCM040062R
Type A
Type BOCM040063A
Type A
Type B
OCM040063R
Type C
OCM040065A
Type A
Type B
OCM040065R
Type C
Page 120 of 312
445
Features of your vehicle
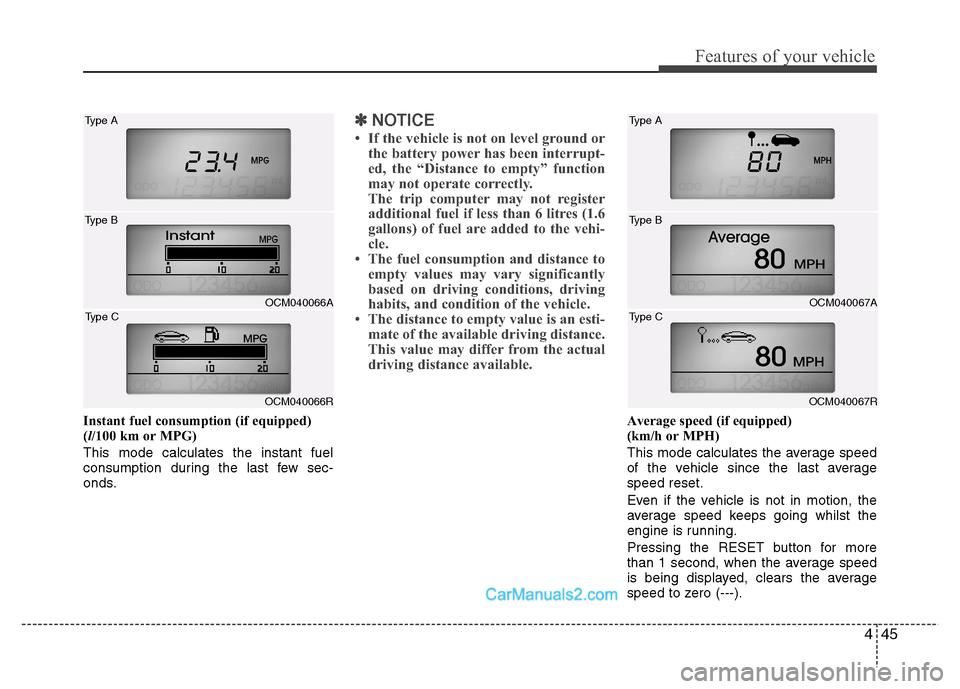
Instant fuel consumption (if equipped) (l/100 km or MPG)
This mode calculates the instant fuel
consumption during the last few sec-
onds.
✽✽ NOTICE
If the vehicle is not on level ground or the battery power has been interrupt-
ed, the “Distance to empty” function
may not operate correctly.
The trip computer may not register
additional fuel if less than 6 litres (1.6
gallons) of fuel are added to the vehi-
cle.
The fuel consumption and distance to
empty values may vary significantly
based on driving conditions, driving
habits, and condition of the vehicle.
The distance to empty value is an esti-
mate of the available driving distance.
This value may differ from the actual
driving distance available.
Average speed (if equipped)
(km/h or MPH)
This mode calculates the average speed
of the vehicle since the last averagespeed reset.
Even if the vehicle is not in motion, the
average speed keeps going whilst the
engine is running.
Pressing the RESET button for more
than 1 second, when the average speed
is being displayed, clears the average
speed to zero (---).
OCM040066A
Type A
Type B
OCM040066R
Type C
OCM040067A
Type A
Type B
OCM040067R
Type C