Door light indicator Hyundai Santa Fe 2012 Owner's Manual
[x] Cancel search | Manufacturer: HYUNDAI, Model Year: 2012, Model line: Santa Fe, Model: Hyundai Santa Fe 2012Pages: 419, PDF Size: 5.61 MB
Page 13 of 419
Introduction
61
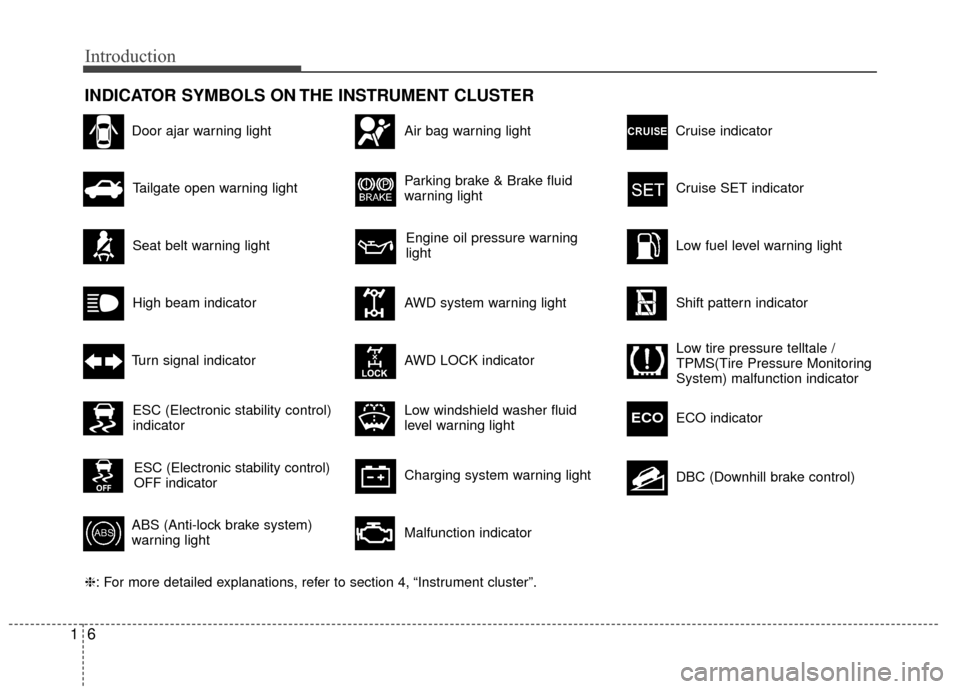
INDICATOR SYMBOLS ON THE INSTRUMENT CLUSTER
Engine oil pressure warning
light
❈: For more detailed explanations, refer to section 4, “Instrument cluster”.Seat belt warning light
Tailgate open warning light
High beam indicator
Turn signal indicator
ABS (Anti-lock brake system)
warning light
Parking brake & Brake fluid
warning light
AWD system warning light
AWD LOCK indicator
Malfunction indicator
Air bag warning light
Cruise SET indicator
Low fuel level warning light
Shift pattern indicator
Charging system warning light
Low windshield washer fluid
level warning light
Door ajar warning lightESC (Electronic stability control)
indicator
ESC (Electronic stability control)
OFF indicator
Low tire pressure telltale /
TPMS(Tire Pressure Monitoring
System) malfunction indicator
ECO indicator
ECO
Cruise indicator
DBC (Downhill brake control)
Page 58 of 419
341
Safety systems of your vehicle
Always be sure that you and all vehicle
occupants are seated and restrained
properly (sitting upright with the seat in
an upright position, centered on the seat
cushion, with the person's legs comfort-
ably extended, feet on the floor, and
wearing the safety belt properly) for the
most effective protection by the air bag
and the safety belt.
The occupant classification system(OCS) may not function properly if the
passenger takes actions which can
affect the detection system. These
include:
(1) Failing to sit in an upright position.
(2) Leaning against the door or center console.
(3) Sitting towards the sides or the front of the seat.
(4) Putting legs on the dashboard or resting them on other locations
which reduce the passenger weight
on the front seat.
(5) Improperly wearing the safety belt.
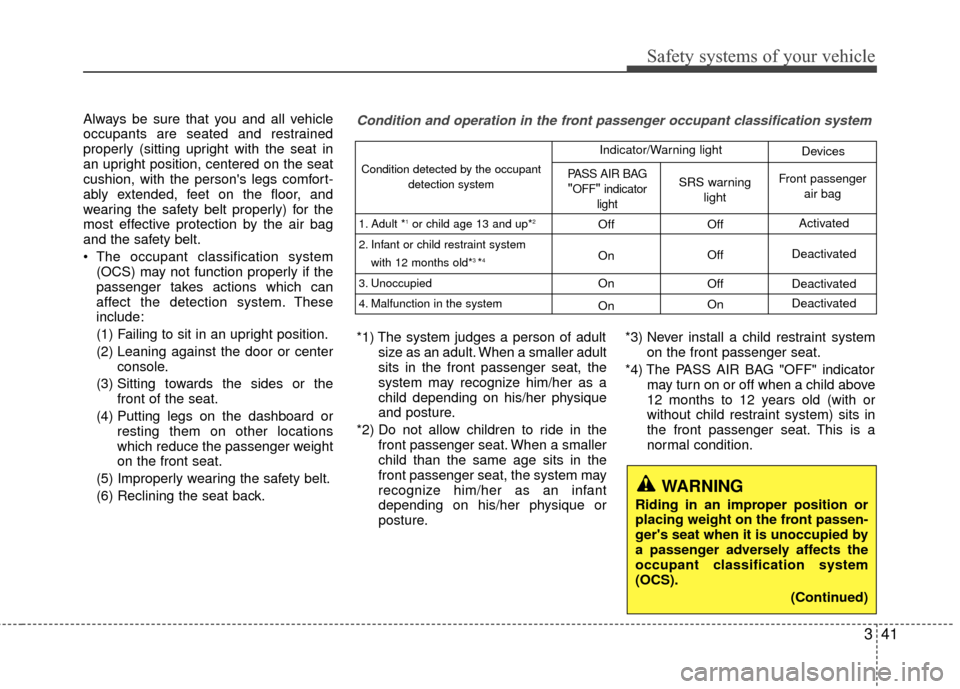
(6) Reclining the seat back.Condition and operation in the front passenger occupant classification system
*1) The system judges a person of adult size as an adult. When a smaller adult
sits in the front passenger seat, the
system may recognize him/her as a
child depending on his/her physique
and posture.
*2) Do not allow children to ride in the front passenger seat. When a smaller
child than the same age sits in the
front passenger seat, the system may
recognize him/her as an infant
depending on his/her physique or
posture. *3) Never install a child restraint system
on the front passenger seat.
*4) The PASS AIR BAG "OFF" indicator may turn on or off when a child above
12 months to 12 years old (with or
without child restraint system) sits in
the front passenger seat. This is a
normal condition.
Condition detected by the occupant
detection system
1. Adult *
1or child age 13 and up*2
2. Infant or child restraint system with 12 months old*3 *4
3. Unoccupied
4. Malfunction in the system
Off
On
On
On Off
Off
Off
On Activated
Deactivated
Deactivated
Deactivated
PASS AIR BAG"OFF"indicator
lightSRS warning lightFront passenger air bag
Indicator/Warning light Devices
WARNING
Riding in an improper position or
placing weight on the front passen-
ger's seat when it is unoccupied by
a passenger adversely affects the
occupant classification system
(OCS).
(Continued)
Page 110 of 419
431
Features of your vehicle
D140105AEN
Electric chromic mirror (ECM) withcompass and HomeLink®system
(if equipped)
Your vehicle may be equipped with a
Gentex Automatic-Dimming Mirror with a
Z-Nav™ Electronic Compass Display
and an Integrated HomeLink
®Wireless
Control System. During nighttime driving,
this feature will automatically detect and
reduce rearview mirror glare while the
compass indicates the direction the vehi-
cle is pointed. The HomeLink
®Universal
Transceiver allows you to activate your
garage door(s), electric gate, home light-
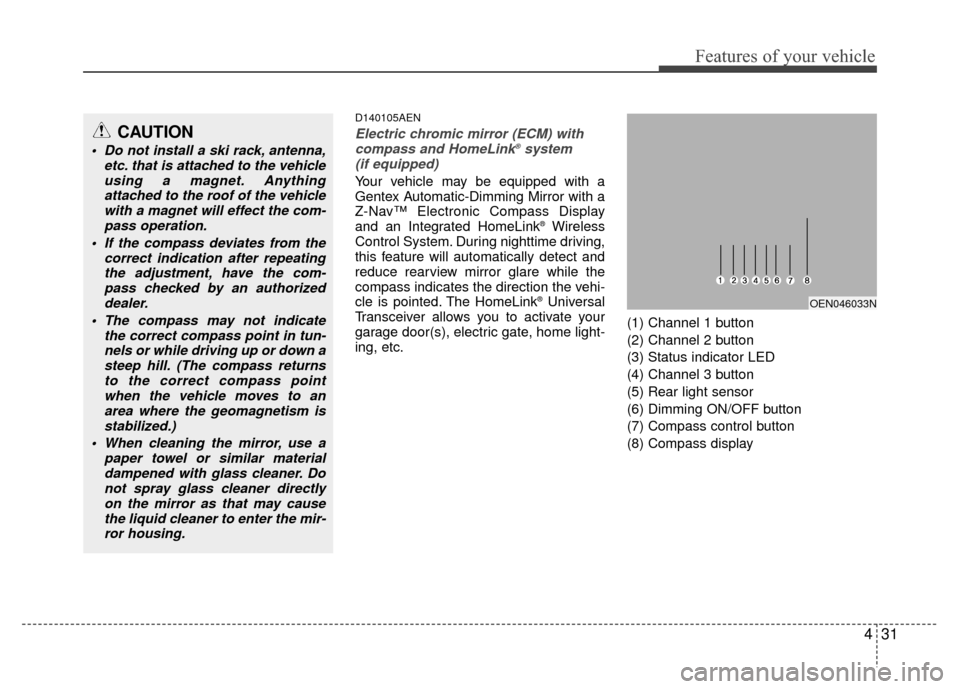
ing, etc. (1) Channel 1 button
(2) Channel 2 button
(3) Status indicator LED
(4) Channel 3 button
(5) Rear light sensor
(6) Dimming ON/OFF button
(7) Compass control button
(8) Compass display OEN046033N
CAUTION
Do not install a ski rack, antenna,
etc. that is attached to the vehicleusing a magnet. Anythingattached to the roof of the vehiclewith a magnet will effect the com- pass operation.
If the compass deviates from the correct indication after repeatingthe adjustment, have the com-pass checked by an authorizeddealer.
The compass may not indicate the correct compass point in tun-nels or while driving up or down asteep hill. (The compass returnsto the correct compass pointwhen the vehicle moves to anarea where the geomagnetism is stabilized.)
When cleaning the mirror, use a paper towel or similar materialdampened with glass cleaner. Donot spray glass cleaner directlyon the mirror as that may causethe liquid cleaner to enter the mir-ror housing.
Page 114 of 419
435
Features of your vehicle
Standard programming
To train most devices, follow these
instructions:
1. For first-time programming, press andhold the two outside buttons,
HomeLink
®Channel 1 and Channel 3
Buttons, until the indicator light begins
to flash (after 20 seconds). Release
both buttons. Do not hold the buttons
for longer than 30 seconds.
2. Position the end of your hand-held transmitter 1-3 inches (2-8 cm) away
from the HomeLink
®buttons while
keeping the indicator light in view.
3. Simultaneously press and hold both the HomeLink
®and hand-held trans-
mitter button. DO NOT release the but-
tons until step 4 has been completed.
4. While continuing to hold the buttons the red Indicator Status LED will flash
slowly and then rapidly after
HomeLink
®successfully trains to the
frequency signal from the hand-held
transmitter. Release both buttons. 5. Press and hold the just-trained
HomeLink
®button and observe the red
Status Indicator LED. If the indicator
light stays on constantly, programming
is complete and your device should
activate when the HomeLink
®button is
pressed and released.
6. To program the remaining two HomeLink
®buttons, follow steps 2
through 5.
Rolling code programming
Rolling code devices which are "code-
protected" and manufactured after 1996
may be determined by the following:
Reference the device owner's manual for verification.
The handheld transmitter appears to program the HomeLink
®Universal
Transceiver but does not activate the
device.
Press and hold the trained HomeLink button. The device has the rolling code
feature if the indicator light flashes rap-
idly and then turns solid after 2 sec-
onds. To train rolling code devices, follow these
instructions:
1. At the garage door opener receiver
(motor-head unit) in the garage, locate
the "learn" or "smart" button. This can
usually be found where the hanging
antenna wire is attached to the motor-
head unit. Exact location and color of
the button may vary by garage door
opener brand.
If there is difficulty locating the training
button, reference the device owner's
manual or please visit our Web site at
www.homelink.com.
2. Firmly press and release the "learn" or "smart" button (which activates the
"training light").
Page 115 of 419
Features of your vehicle
36
4
✽
✽
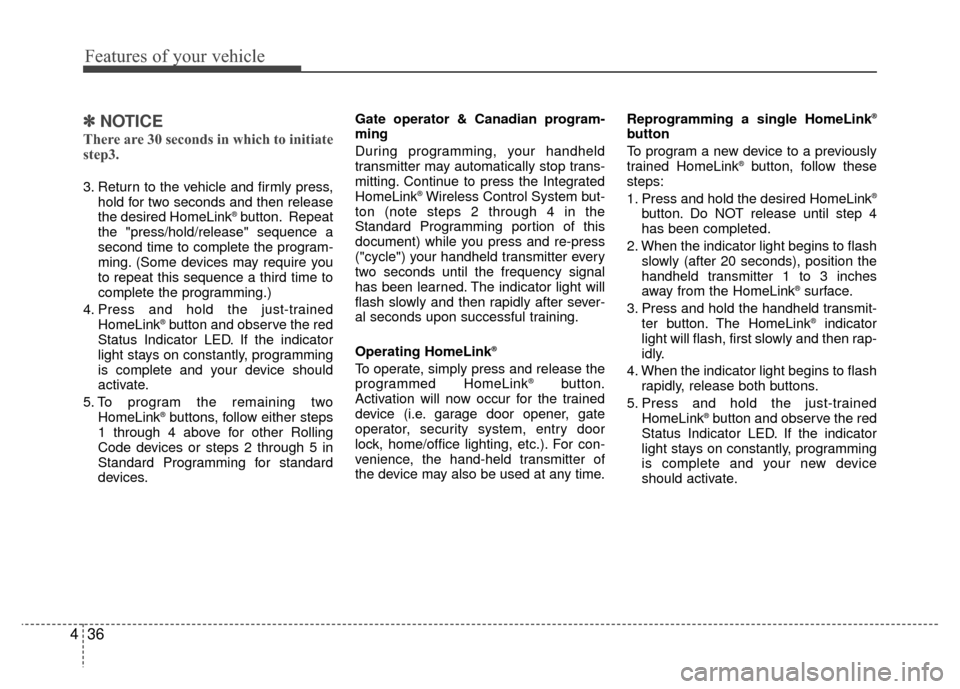
NOTICE
There are 30 seconds in which to initiate
step3.
3. Return to the vehicle and firmly press,
hold for two seconds and then release
the desired HomeLink
®button. Repeat
the "press/hold/release" sequence a
second time to complete the program-
ming. (Some devices may require you
to repeat this sequence a third time to
complete the programming.)
4. Press and hold the just-trained HomeLink
®button and observe the red
Status Indicator LED. If the indicator
light stays on constantly, programming
is complete and your device should
activate.
5. To program the remaining two HomeLink
®buttons, follow either steps
1 through 4 above for other Rolling
Code devices or steps 2 through 5 in
Standard Programming for standard
devices. Gate operator & Canadian program-
ming
During programming, your handheld
transmitter may automatically stop trans-
mitting. Continue to press the Integrated
HomeLink
®Wireless Control System but-
ton (note steps 2 through 4 in the
Standard Programming portion of this
document) while you press and re-press
("cycle") your handheld transmitter every
two seconds until the frequency signal
has been learned. The indicator light will
flash slowly and then rapidly after sever-
al seconds upon successful training.
Operating HomeLink
®
To operate, simply press and release the
programmed HomeLink®button.
Activation will now occur for the trained
device (i.e. garage door opener, gate
operator, security system, entry door
lock, home/office lighting, etc.). For con-
venience, the hand-held transmitter of
the device may also be used at any time. Reprogramming a single HomeLink
®
button
To program a new device to a previously
trained HomeLink
®button, follow these
steps:
1. Press and hold the desired HomeLink
®
button. Do NOT release until step 4
has been completed.
2. When the indicator light begins to flash slowly (after 20 seconds), position the
handheld transmitter 1 to 3 inches
away from the HomeLink
®surface.
3. Press and hold the handheld transmit- ter button. The HomeLink
®indicator
light will flash, first slowly and then rap-
idly.
4. When the indicator light begins to flash rapidly, release both buttons.
5. Press and hold the just-trained HomeLink
®button and observe the red
Status Indicator LED. If the indicator
light stays on constantly, programming
is complete and your new device
should activate.
Page 132 of 419
453
Features of your vehicle
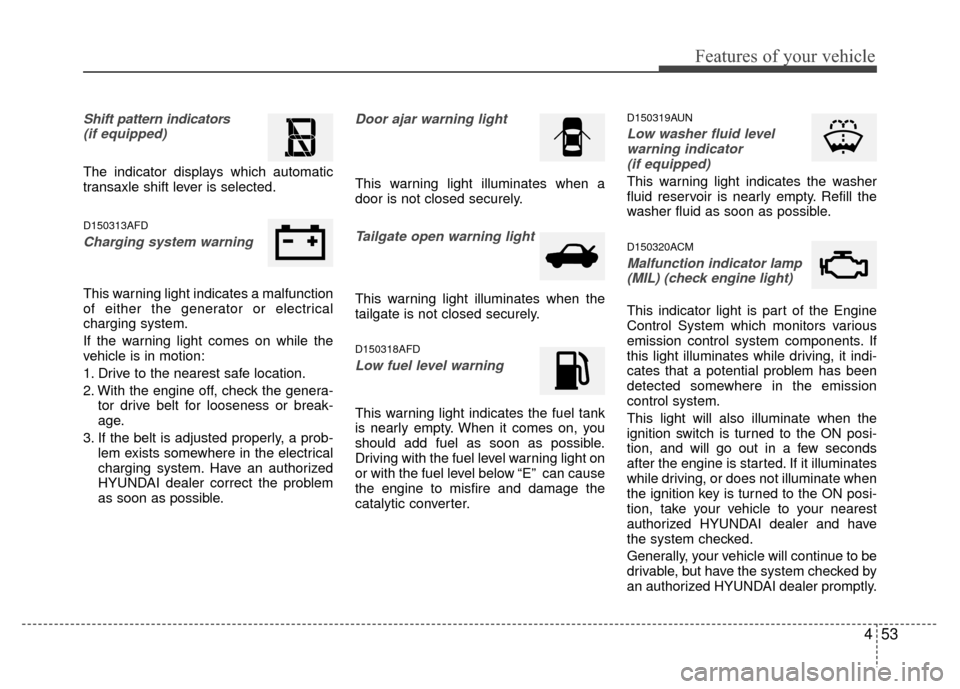
Shift pattern indicators(if equipped)
The indicator displays which automatic
transaxle shift lever is selected.
D150313AFD
Charging system warning
This warning light indicates a malfunction
of either the generator or electrical
charging system.
If the warning light comes on while the
vehicle is in motion:
1. Drive to the nearest safe location.
2. With the engine off, check the genera- tor drive belt for looseness or break-
age.
3. If the belt is adjusted properly, a prob- lem exists somewhere in the electrical
charging system. Have an authorized
HYUNDAI dealer correct the problem
as soon as possible.
Door ajar warning light
This warning light illuminates when a
door is not closed securely.
Tailgate open warning light
This warning light illuminates when the
tailgate is not closed securely.
D150318AFD
Low fuel level warning
This warning light indicates the fuel tank
is nearly empty. When it comes on, you
should add fuel as soon as possible.
Driving with the fuel level warning light on
or with the fuel level below “E” can cause
the engine to misfire and damage the
catalytic converter.
D150319AUN
Low washer fluid levelwarning indicator (if equipped)
This warning light indicates the washer
fluid reservoir is nearly empty. Refill the
washer fluid as soon as possible.
D150320ACM
Malfunction indicator lamp(MIL) (check engine light)
This indicator light is part of the Engine
Control System which monitors various
emission control system components. If
this light illuminates while driving, it indi-
cates that a potential problem has been
detected somewhere in the emission
control system.
This light will also illuminate when the
ignition switch is turned to the ON posi-
tion, and will go out in a few seconds
after the engine is started. If it illuminates
while driving, or does not illuminate when
the ignition key is turned to the ON posi-
tion, take your vehicle to your nearest
authorized HYUNDAI dealer and have
the system checked.
Generally, your vehicle will continue to be
drivable, but have the system checked by
an authorized HYUNDAI dealer promptly.
Page 134 of 419
455
Features of your vehicle
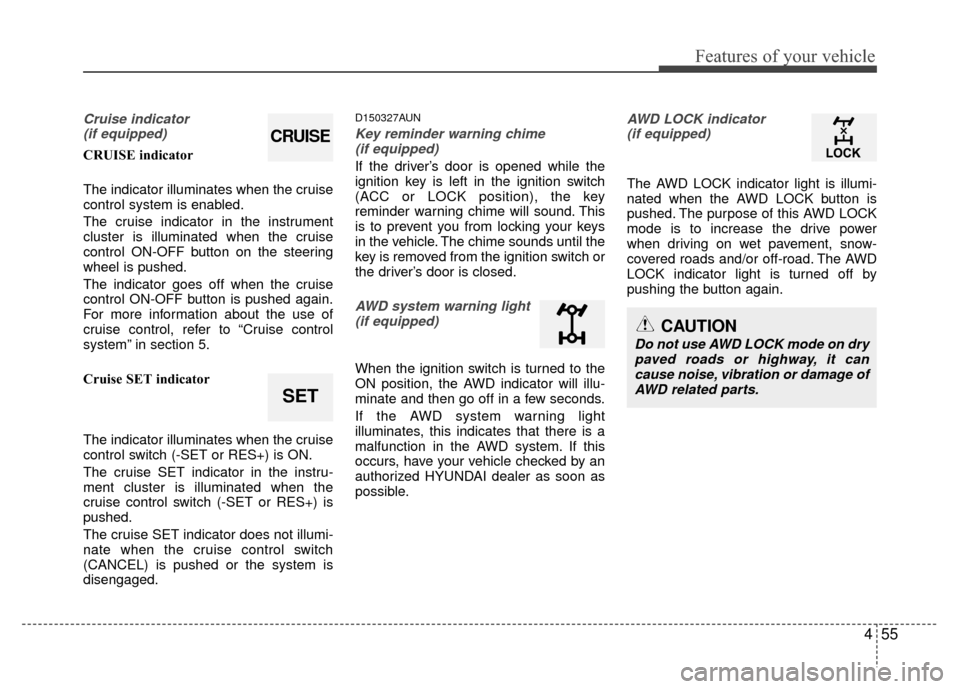
Cruise indicator (if equipped)
CRUISE indicator
The indicator illuminates when the cruise
control system is enabled.
The cruise indicator in the instrument
cluster is illuminated when the cruise
control ON-OFF button on the steering
wheel is pushed.
The indicator goes off when the cruise
control ON-OFF button is pushed again.
For more information about the use of
cruise control, refer to “Cruise control
system” in section 5.
Cruise SET indicator
The indicator illuminates when the cruise
control switch (-SET or RES+) is ON.
The cruise SET indicator in the instru-
ment cluster is illuminated when the
cruise control switch (-SET or RES+) is
pushed.
The cruise SET indicator does not illumi-
nate when the cruise control switch
(CANCEL) is pushed or the system is
disengaged.
D150327AUN
Key reminder warning chime (if equipped)
If the driver’s door is opened while the
ignition key is left in the ignition switch
(ACC or LOCK position), the key
reminder warning chime will sound. This
is to prevent you from locking your keys
in the vehicle. The chime sounds until the
key is removed from the ignition switch or
the driver’s door is closed.
AWD system warning light(if equipped)
When the ignition switch is turned to the
ON position, the AWD indicator will illu-
minate and then go off in a few seconds.
If the AWD system warning light
illuminates, this indicates that there is a
malfunction in the AWD system. If this
occurs, have your vehicle checked by an
authorized HYUNDAI dealer as soon as
possible.
AWD LOCK indicator (if equipped)
The AWD LOCK indicator light is illumi-
nated when the AWD LOCK button is
pushed. The purpose of this AWD LOCK
mode is to increase the drive power
when driving on wet pavement, snow-
covered roads and/or off-road. The AWD
LOCK indicator light is turned off by
pushing the button again.
CAUTION
Do not use AWD LOCK mode on drypaved roads or highway, it can cause noise, vibration or damage ofAWD related parts.
CRUISE
SET
Page 378 of 419
751
Maintenance
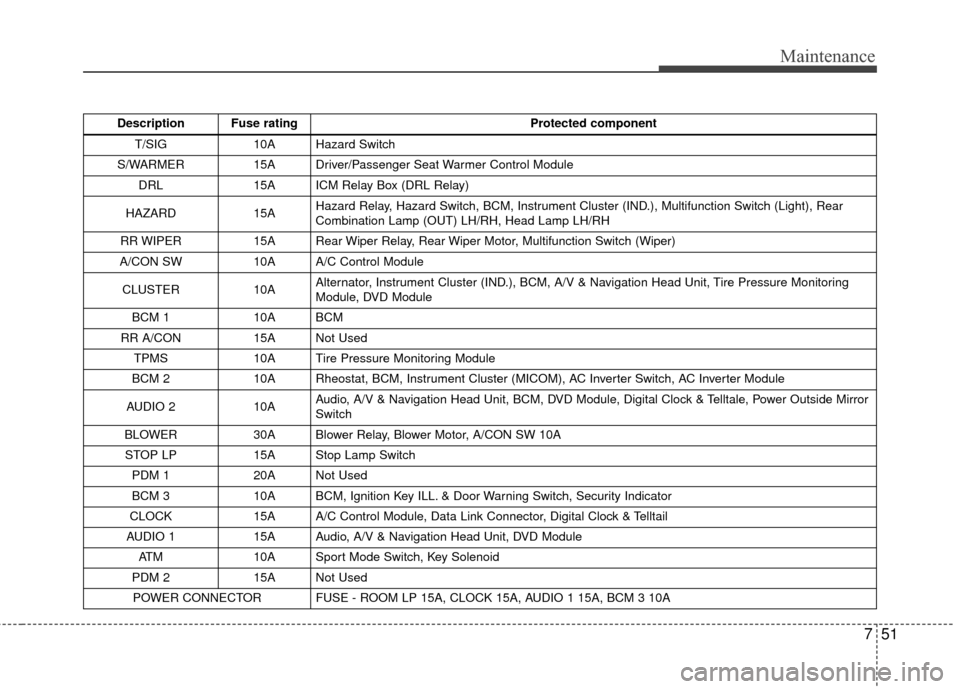
Description Fuse ratingProtected component
T/SIG 10A Hazard Switch
S/WARMER 15A Driver/Passenger Seat Warmer Control Module DRL 15A ICM Relay Box (DRL Relay)
HAZARD 15A Hazard Relay, Hazard Switch, BCM, Instrument Cluster (IND.), Multifunction Switch (Light), Rear
Combination Lamp (OUT) LH/RH, Head Lamp LH/RH
RR WIPER 15A Rear Wiper Relay, Rear Wiper Motor, Multifunction Switch (Wiper)
A/CON SW 10A A/C Control Module
CLUSTER 10A Alternator, Instrument Cluster (IND.), BCM, A/V & Navigation Head Unit, Tire Pressure Monitoring
Module, DVD Module
BCM 1 10A BCM
RR A/CON 15A Not Used TPMS 10A Tire Pressure Monitoring Module
BCM 2 10A Rheostat, BCM, Instrument Cluster (MICOM), AC Inverter Switch, AC Inverter Module
AUDIO 2 10A Audio, A/V & Navigation Head Unit, BCM, DVD Module, Digital Clock & Telltale, Power Outside Mirror
Switch
BLOWER 30A Blower Relay, Blower Motor, A/CON SW 10A STOP LP 15A Stop Lamp Switch PDM 1 20A Not Used
BCM 3 10A BCM, Ignition Key ILL. & Door Warning Switch, Security Indicator
CLOCK 15A A/C Control Module, Data Link Connector, Digital Clock & Telltail
AUDIO 1 15A Audio, A/V & Navigation Head Unit, DVD Module ATM 10A Sport Mode Switch, Key Solenoid
PDM 2 15A Not Used POWER CONNECTOR FUSE - ROOM LP 15A, CLOCK 15A, AUDIO 1 15A, BCM 3 10A
Page 414 of 419
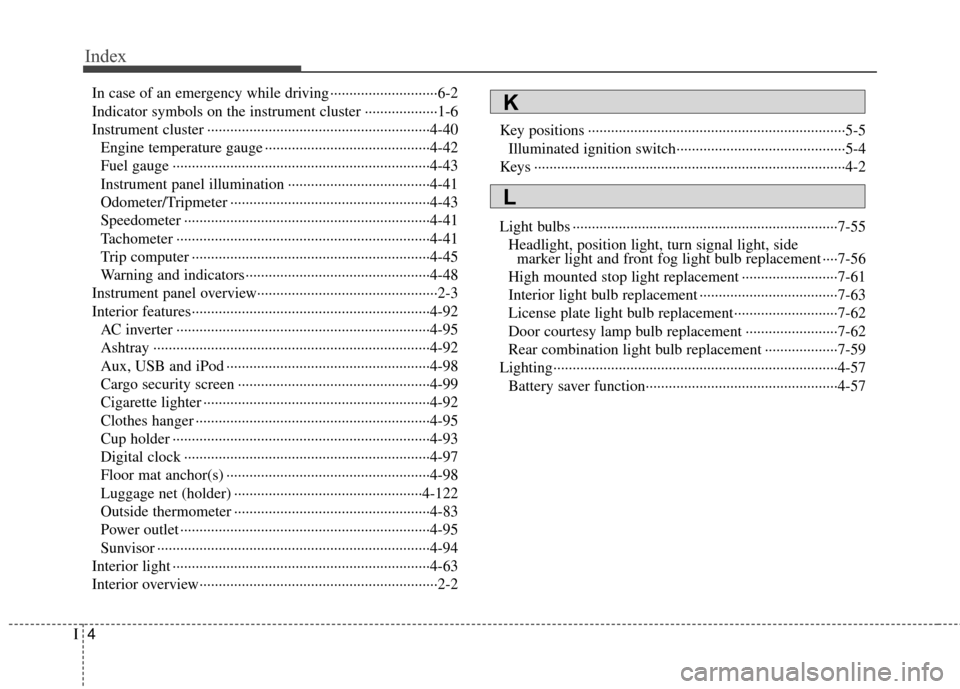
Index
4I
In case of an emergency while driving ··················\
··········6-2
Indicator symbols on the instrument cluster ··················\
·1-6
Instrument cluster ··················\
··················\
··················\
····4-40Engine temperature gauge ··················\
··················\
·······4-42
Fuel gauge ··················\
··················\
··················\
·············4-43
Instrument panel illumination ··················\
··················\
·4-41
Odometer/Tripmeter ··················\
··················\
················4-43
Speedometer ··················\
··················\
··················\
··········4-41
Tachometer ··················\
··················\
··················\
············4-41
Trip computer ··················\
··················\
··················\
········4-45
Warning and indicators ··················\
··················\
············4-48
Instrument panel overview··················\
··················\
···········2-3
Interior features··················\
··················\
··················\
········4-92 AC inverter ··················\
··················\
··················\
············4-95
Ashtray ··················\
··················\
··················\
··················\
4-92
Aux, USB and iPod ··················\
··················\
·················4-98\
Cargo security screen ··················\
··················\
··············4-99
Cigarette lighter ··················\
··················\
··················\
·····4-92
Clothes hanger ··················\
··················\
··················\
·······4-95
Cup holder ··················\
··················\
··················\
·············4-93
Digital clock ··················\
··················\
··················\
··········4-97
Floor mat anchor(s) ··················\
··················\
·················4-98\
Luggage net (holder) ··················\
··················\
·············4-122
Outside thermometer ··················\
··················\
···············4-83
Power outlet ··················\
··················\
··················\
···········4-95
Sunvisor ··················\
··················\
··················\
·················4-94\
Interior light ··················\
··················\
··················\
·············4-63
Interior overview··················\
··················\
··················\
········2-2 Key positions ··················\
··················\
··················\
·············5-5
Illuminated ignition switch··················\
··················\
········5-4
Keys ··················\
··················\
··················\
··················\
·········4-2
Light bulbs ··················\
··················\
··················\
···············7-55 Headlight, position light, turn signal light, side marker light and front fog light bulb replacement ····7-56
High mounted stop light replacement ··················\
·······7-61
Interior light bulb replacement ··················\
··················\
7-63
License plate light bulb replacement··················\
·········7-62
Door courtesy lamp bulb replacement ··················\
······7-62
Rear combination light bulb replacement ··················\
·7-59
Lighting··················\
··················\
··················\
··················\
··4-57 Battery saver function··················\
··················\
··············4-57K
L