radio Hyundai Santa Fe 2016 Navigation Manual
[x] Cancel search | Manufacturer: HYUNDAI, Model Year: 2016, Model line: Santa Fe, Model: Hyundai Santa Fe 2016Pages: 66, PDF Size: 4.46 MB
Page 5 of 66
5
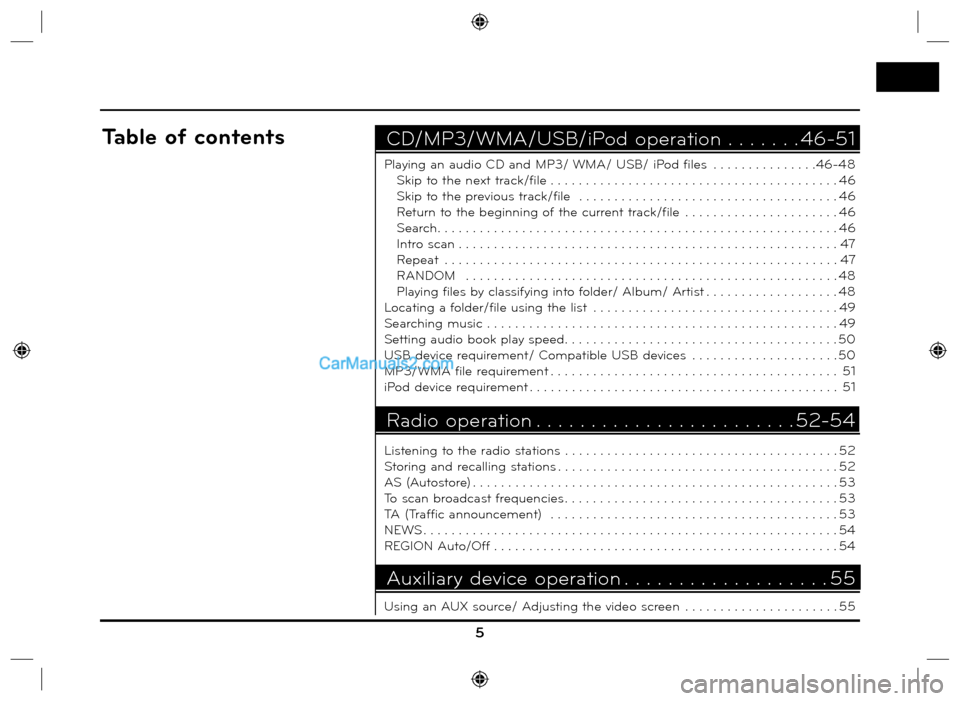
Playing an audio CD and MP3/ WMA/ USB/ iPod files . . . . . . . . . . . . . . .46-48
Skip to the next track/file . . . . . . . . . . . . . . . . . . . . . . . . . . . . . . . . . . . . . . . . . 46
Skip to the previous track/file . . . . . . . . . . . . . . . . . . . . . . . . . . . . . . . . . . . . . 46
Return to the beginning of the current track/file . . . . . . . . . . . . . . . . . . . . . . 46
Search. . . . . . . . . . . . . . . . . . . . . . . . . . . . . . . . . . . . . . . . . . . . . . . . . . . . . . . . . 46
Intro scan . . . . . . . . . . . . . . . . . . . . . . . . . . . . . . . . . . . . . . . . . . . . . . . . . . . . . . 47
Repeat . . . . . . . . . . . . . . . . . . . . . . . . . . . . . . . . . . . . . . . . . . . . . . . . . . . . . . . . 47
RANDOM . . . . . . . . . . . . . . . . . . . . . . . . . . . . . . . . . . . . . . . . . . . . . . . . . . . . . 48
Playing files by classifying into folder/ Album/ Artist . . . . . . . . . . . . . . . . . . . 48
Locating a folder/file using the list . . . . . . . . . . . . . . . . . . . . . . . . . . . . . . . . . . . 49
Searching music . . . . . . . . . . . . . . . . . . . . . . . . . . . . . . . . . . . . . . . . . . . . . . . . . . 49
Setting audio book play speed. . . . . . . . . . . . . . . . . . . . . . . . . . . . . . . . . . . . . . . 50
USB device requirement/ Compatible USB devices . . . . . . . . . . . . . . . . . . . . . 50
MP3/WMA file requirement . . . . . . . . . . . . . . . . . . . . . . . . . . . . . . . . . . . . . . . . . 51
iPod device requirement . . . . . . . . . . . . . . . . . . . . . . . . . . . . . . . . . . . . . . . . . . . . 51
Listening to the radio stations . . . . . . . . . . . . . . . . . . . . . . . . . . . . . . . . . . . . . . . 52
Storing and recalling stations . . . . . . . . . . . . . . . . . . . . . . . . . . . . . . . . . . . . . . . . 52
AS (Autostore) . . . . . . . . . . . . . . . . . . . . . . . . . . . . . . . . . . . . . . . . . . . . . . . . . . . . 53
To scan broadcast frequencies . . . . . . . . . . . . . . . . . . . . . . . . . . . . . . . . . . . . . . . 53
TA (Traffic announcement) . . . . . . . . . . . . . . . . . . . . . . . . . . . . . . . . . . . . . . . . . 53
NEWS . . . . . . . . . . . . . . . . . . . . . . . . . . . . . . . . . . . . . . . . . . . . . . . . . . . . . . . . . . . 54
REGION Auto/Off . . . . . . . . . . . . . . . . . . . . . . . . . . . . . . . . . . . . . . . . . . . . . . . . . 54
Using an AUX source/ Adjusting the video screen . . . . . . . . . . . . . . . . . . . . . . 55
CD/MP3/WMA/USB/iPod operation . . . . . . . 46-51Table of contents
Radio operation . . . . . . . . . . . . . . . . . . . . . . . . 52-54
Auxiliary device operation . . . . . . . . . . . . . . . . . . . 55
Page 11 of 66
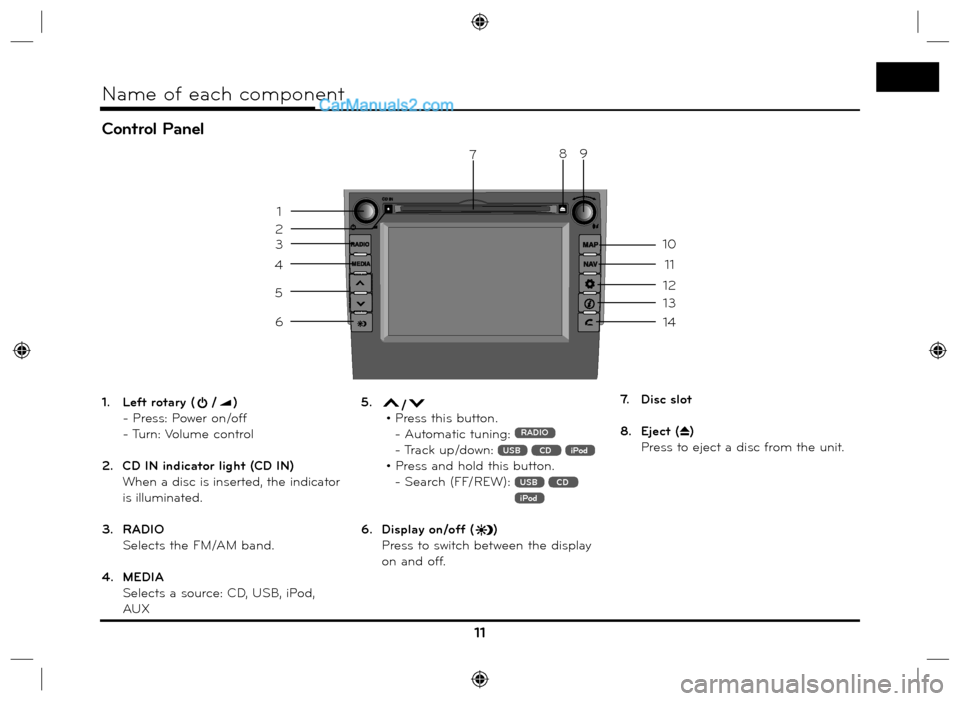
Control Panel
11
Name of each component
1. Left rotary (/)
- Press: Power on/off
- Turn: Volume control
2. CD IN indicator light (CD IN)
When a disc is inserted, the indicator
is illuminated.
3. RADIO
Selects the FM/AM band.
4. MEDIA
Selects a source: CD, USB, iPod,
AUX5. / • Press this button.
- Automatic tuning: RADIO
- Track up/down: USB CD iPod
• Press and hold this button.
- Search (FF/REW):
USB CD iPod
6. Display on/off ()
Press to switch between the display
on and off.7. Disc slot
8. Eject (
Z)
Press to eject a disc from the unit.
3
4
5
6
13
14
7
12
11
10
9
1
2
8
Page 12 of 66
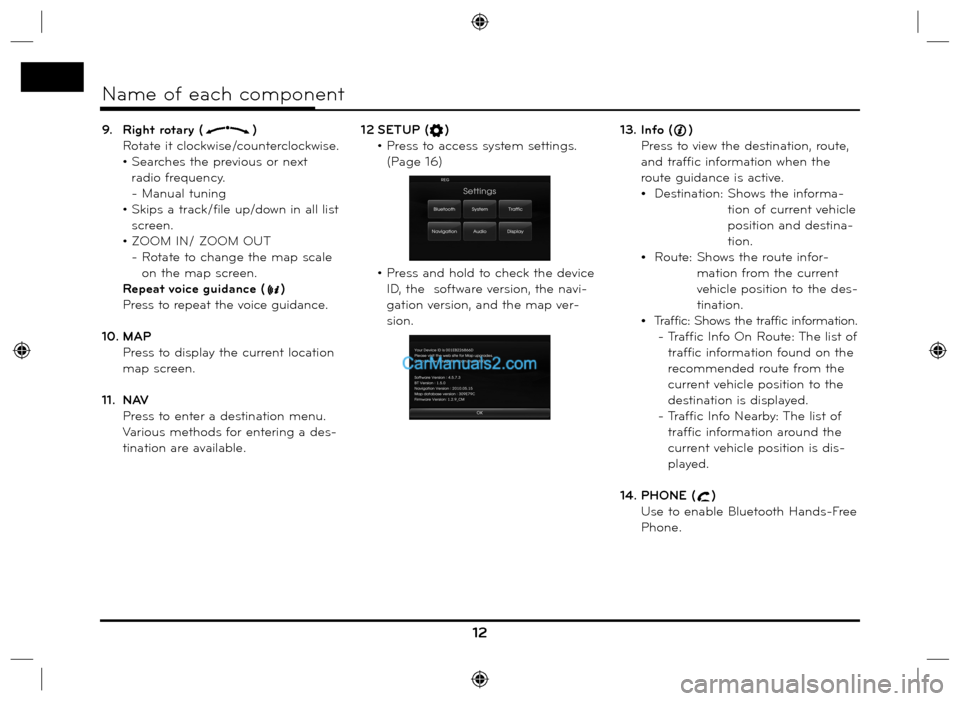
9. Right rotary ()
Rotate it clockwise/counterclockwise.
• Searches the previous or next
radio frequency.
- Manual tuning
• Skips a track/file up/down in all list
screen.
• ZOOM IN/ ZOOM OUT
- Rotate to change the map scale
on the map screen.
Repeat voice guidance (
)
Press to repeat the voice guidance.
10. MAP
Press to display the current location
map screen.
11. NAV
Press to enter a destination menu.
Various methods for entering a des-
tination are available. 12 SETUP (
)
• Press to access system settings.
(Page 16)
• Press and hold to check the device
ID, the software version, the navi-
gation version, and the map ver-
sion.13. Info ()
Press to view the destination, route,
and traffic information when the
route guidance is active.
Destination: Shows the informa-
tion of current vehicle
position and destina-
tion.
Route: Shows the route infor-
mation from the current
vehicle position to the des-
tination.
Traffic: Shows the traffic information.
- Traffic Info On Route: The list of
traffic information found on the
recommended route from the
current vehicle position to the
destination is displayed.
- Traffic Info Nearby: The list of
traffic information around the
current vehicle position is dis-
played.
14. PHONE (
)
Use to enable Bluetooth Hands-Free
Phone.
12
Name of each component
Page 13 of 66
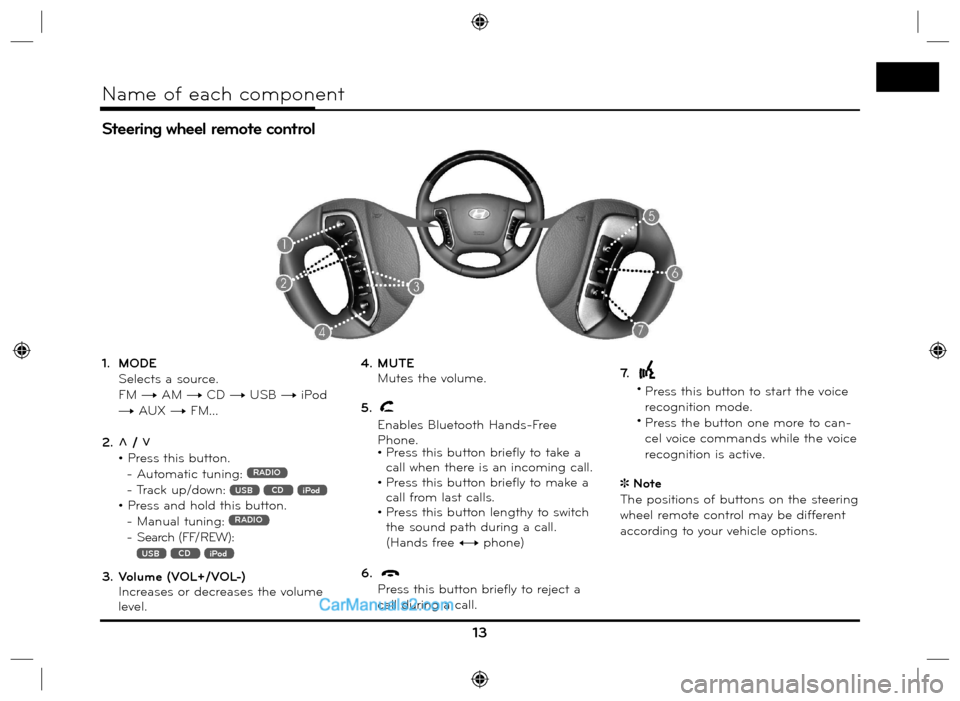
1. MODE
Selects a source.
FM t AM t CD t USB t iPod
t AUX t FM...
2. U / u
• Press this button.
- Automatic tuning:
RADIO
- Track up/down: USB CD iPod
• Press and hold this button.
- Manual tuning: RADIO
- Search (FF/REW):
USB CD iPod
3. Volume (VOL+/VOL-)
Increases or decreases the volume
level.4. MUTE
Mutes the volume.
5.
Enables Bluetooth Hands-Free
Phone.
• Press this button briefly to take a
call when there is an incoming call.
• Press this button briefly to make a
call from last calls.
• Press this button lengthy to switch
the sound path during a call.
(Hands free y phone)
6.
Press this button briefly to reject a
call during a call.7.
•
Press this button to start the voice
recognition mode.
•
Press the button one more to can-
cel voice commands while the voice
recognition is active.
Note
The positions of buttons on the steering
wheel remote control may be different
according to your vehicle options.
Steering wheel remote control
13
Name of each component
Page 14 of 66
Start-up screen
The unit starts when the ignition switch
is placed in the ACC or ON position.
- Then the radio mode is displayed
on the screen.
Note
• The unit memorizes the last mode
that is played lastly. The last mode
is saved in the memory even if the
ignition switch is placed in the OFF
position. When the ignition switch is
placed in the ACC or ON position,
the mode is automatically recalled.
• It may take long time (about 20 sec-
onds) for the unit to be rebooted.Turning the unit onPress on the control panel in power
off status.
Note
When you insert the disc in the disc
slot, the unit is turned on automatically.
Turning the unit offPress on the control panel in power
on status.
Inserting a discInsert a disc in the disc slot and play-
back starts automatically.
Ejecting a discPress Z on the control panel.
The disc is ejected from the loading
slot.
Note
If the ejected disc is not removed in
approximately 10 seconds, the disc is
automatically inserted again into the
loading slot.
Adjusting the volumeRotate the volume knob () on the
control panel.
Note
When you turn the unit off, the current
volume level is automatically memo-
rized. Whenever you turn the unit back
on, it operates at the memorized
volume level.
If you turn the unit off/on below volume
level 5, the volume level is changed
into 5. If you turn the unit off/on above
volume level 25, the volume level is
changed into 25.
14
Basic operation
Page 17 of 66
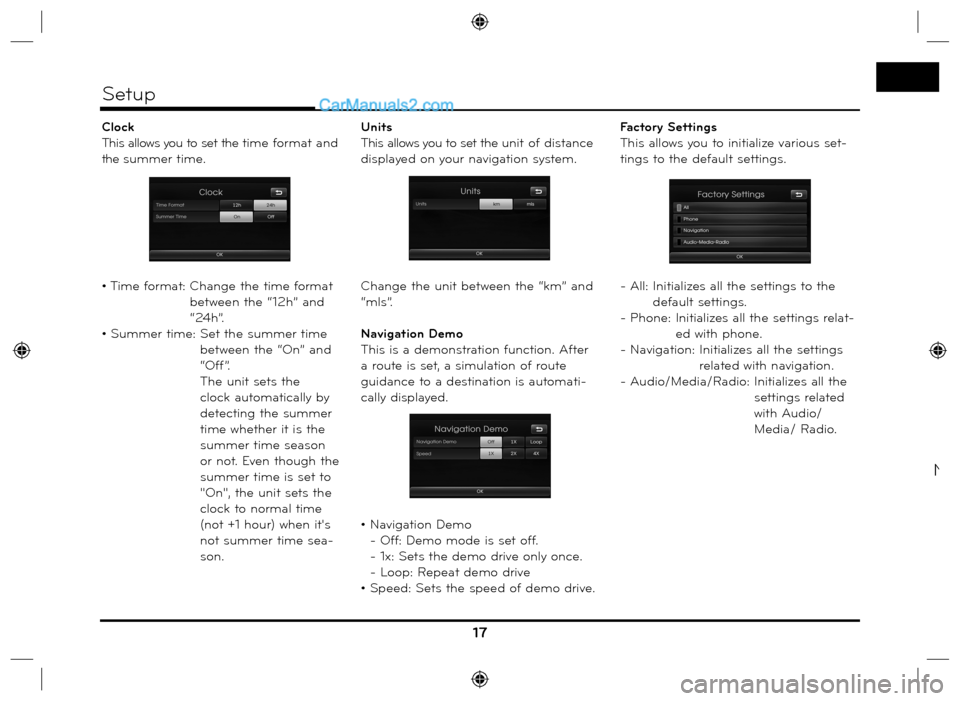
Clock
This allows you to set the time format and
the summer time.
• Time format: Change the time format
between the “12h” and
“24h”.
• Summer time: Set the summer time
between the “On” and
“Off”.
The unit sets the
clock automatically by
detecting the summer
time whether it is the
summer time season
or not. Even though the
summer time is set to
"On", the unit sets the
clock to normal time
(not +1 hour) when it's
not summer time sea-
son.Units
This allows you to set the unit of distance
displayed on your navigation system.
Change the unit between the “km” and
“mls”.
Navigation Demo
This is a demonstration function. After
a route is set, a simulation of route
guidance to a destination is automati-
cally displayed.
• Navigation Demo
- Off: Demo mode is set off.
- 1x: Sets the demo drive only once.
- Loop: Repeat demo drive
• Speed: Sets the speed of demo drive.Factory Settings
This allows you to initialize various set-
tings to the default settings.
- All: Initializes all the settings to the
default settings.
- Phone: Initializes all the settings relat-
ed with phone.
- Navigation:
Initializes all the settings
related with navigation.
- Audio/Media/Radio: Initializes all the
settings related
with Audio/
Media/ Radio.
17
Setup
N
Page 52 of 66
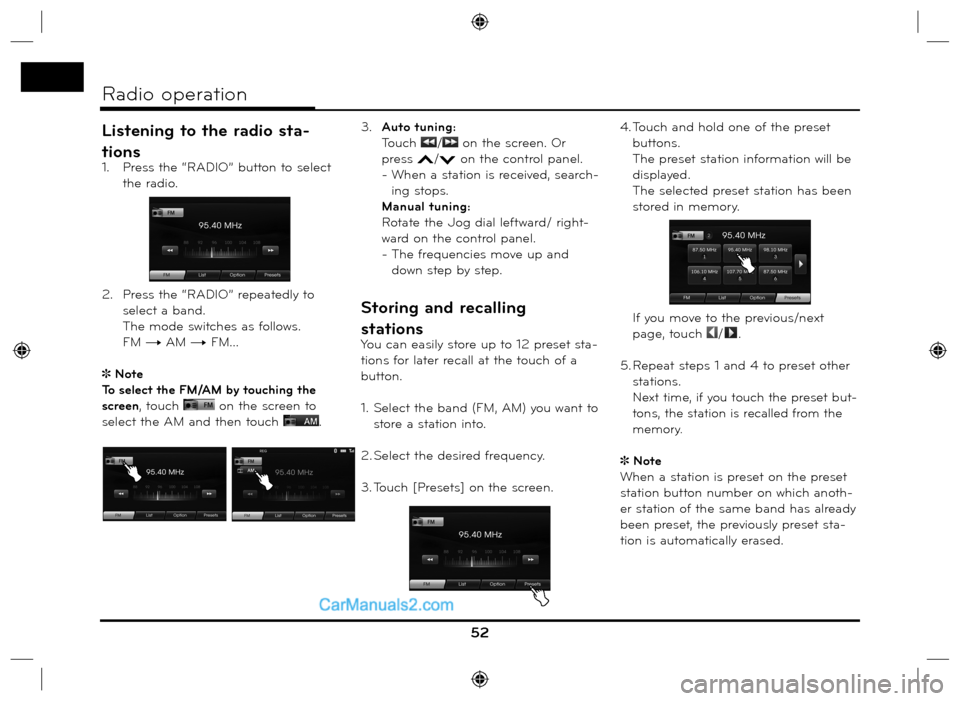
Listening to the radio sta-
tions
1. Press the “RADIO” button to select
the radio.
2. Press the “RADIO” repeatedly to
select a band.
The mode switches as follows.
FM t AM t FM...
Note
To select the FM/AM by touching the
screen, touch
on the screen to
select the AM and then touch
. 3. Auto tuning:
Touch
/ on the screen. Or
press
/ on the control panel.
- When a station is received, search-
ing stops.
Manual tuning:
Rotate the Jog dial leftward/ right-
ward on the control panel.
- The frequencies move up and
down step by step.
Storing and recalling
stations
You can easily store up to 12 preset sta-
tions for later recall at the touch of a
button.
1. Select the band (FM, AM) you want to
store a station into.
2. Select the desired frequency.
3. Touch [Presets] on the screen.4. Touch and hold one of the preset
buttons.
The preset station information will be
displayed.
The selected preset station has been
stored in memory.
If you move to the previous/next
page, touch /.
5. Repeat steps 1 and 4 to preset other
stations.
Next time, if you touch the preset but-
tons
, the station is recalled from the
memory.
Note
When a station is preset on the preset
station button number on which anoth-
er station of the same band has already
been preset, the previously preset sta-
tion is automatically erased.
52
Radio operation
Page 53 of 66
![Hyundai Santa Fe 2016 Navigation Manual AS (Autostore)
This is only available for AM reception.
This function lets you automatically
store the strong broadcast frequencies.
1. Select the band to AM.
2. Touch [Option] on the screen.
3. T Hyundai Santa Fe 2016 Navigation Manual AS (Autostore)
This is only available for AM reception.
This function lets you automatically
store the strong broadcast frequencies.
1. Select the band to AM.
2. Touch [Option] on the screen.
3. T](/img/35/16333/w960_16333-52.png)
AS (Autostore)
This is only available for AM reception.
This function lets you automatically
store the strong broadcast frequencies.
1. Select the band to AM.
2. Touch [Option] on the screen.
3. Touch [Autostore] on the screen.
Local stations with the strong
signals are searched and stored
automatically in the list menu. And
then the list menu appears on the
screen.
4. Touch the broadcast frequency you
want.
To scan broadcast frequen-
cies
The first 10 seconds of each broadcast
frequency are played.
1. Touch [Option] on the screen in
AM/FM mode.
2. Touch [SCAN Start] on the screen.
3. Touch [SCAN Stop] to cancel it.
TA (Traffic announcement)
TA function allows the unit to switch
to traffic announcement (TA) from the
current source (Another FM station, CD,
or other connected components).
1. Touch [Option] on the screen in
AM/FM mode.
2. Touch [TA Off]/ [TA On] on the
screen.
[TA On]: Traffic programs and
announcements can be
automatically received
using TP/TA features.
[TA Off]: Traffic programs and
announcements can not
be received.
53
Radio operation
Page 54 of 66
![Hyundai Santa Fe 2016 Navigation Manual NEWS
This function allows the unit to switch to
news from the current source (Another
FM station, CD, or other connected
components).
1. Touch [Option] on the screen in
AM/FM mode.
2. Touch [NEW Hyundai Santa Fe 2016 Navigation Manual NEWS
This function allows the unit to switch to
news from the current source (Another
FM station, CD, or other connected
components).
1. Touch [Option] on the screen in
AM/FM mode.
2. Touch [NEW](/img/35/16333/w960_16333-53.png)
NEWS
This function allows the unit to switch to
news from the current source (Another
FM station, CD, or other connected
components).
1. Touch [Option] on the screen in
AM/FM mode.
2. Touch [NEWS Off]/ [NEWS On] on
the screen.
[NEWS On]: News can be automati-
cally received.
[NEWS Off]: News can not be
received.
REGION Auto/Off
This is only available for FM reception.
1. Select the band to FM.
2. Touch [Option] on the screen.
3. Touch [REGION Auto]/ [REGION
Off] on the screen.
[REGION Auto]:
The unit switches to another station,
within the same network, broadcast-
ing the same program when the
receiving signals from the current
station become weak.
[REGION Off]:
The unit switches to another station,
within the same network when the
receiving signals from the current
station become weak. (This mode,
the program may differ from the
one currently received.)
54
Radio operation
Page 56 of 66
Voice recognition
Voice recognition allows hands-free
operation of the AV system (RADIO,
CD, USB, iPod), navigation and other
systems equipped on this vehicle, such
as the phone.
Note
To get the best recognition perfor-
mance out of voice recognition, observe
the following:
• Keep the interior of the vehicle as
quiet as possible. Close the windows
to eliminate the surrounding noises
(traffic noises, vibration sounds, etc.),
which may prevent the system from
recognizing the voice commands cor-
rectly.
• Wait until a beep sounds before
speaking a command. Otherwise,
the command will not be recognized
properly.
• Speak in a natural voice without paus-
ing between words.
• The supporting languages in Voice
recognition system are English,
German, French, Spanish and Italian at
this moment.
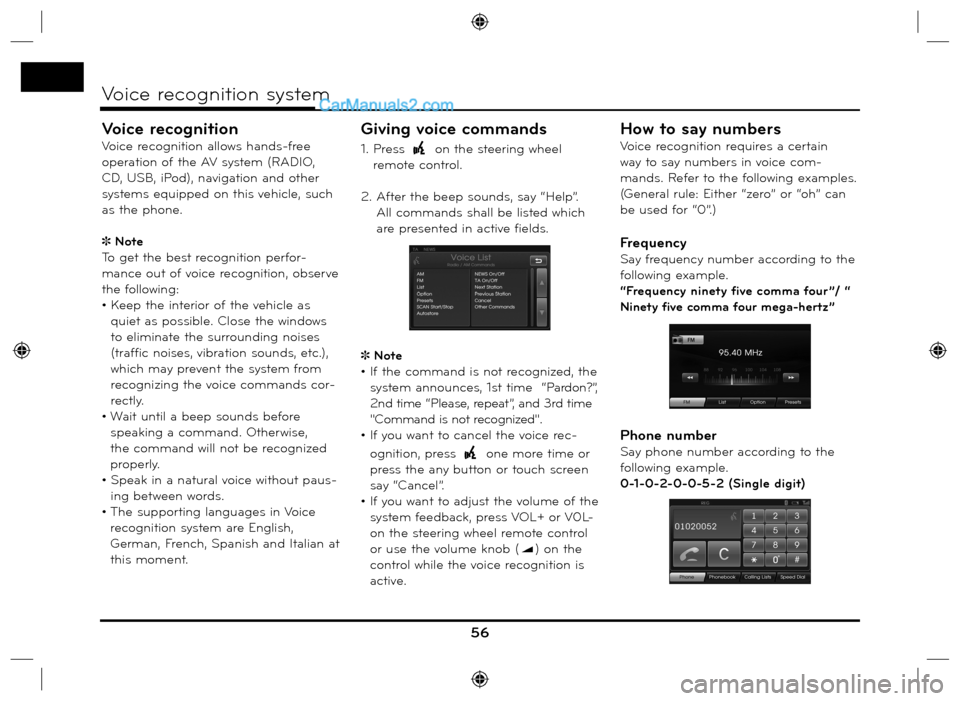
Giving voice commands
1. Press on the steering wheel
remote control.
2. After the beep sounds, say “Help”.
All commands shall be listed which
are presented in active fields.
Note
• If the command is not recognized, the
system announces, 1st time “Pardon?”,
2nd time “Please, repeat”, and 3rd time
"Command is not recognized".
• If you want to cancel the voice rec-
ognition, press
one more time or
press the any button or touch screen
say “Cancel”.
• If you want to adjust the volume of the
system feedback, press VOL+ or V0L-
on the steering wheel remote control
or use the volume knob (
) on the
control while the voice recognition is
active.
How to say numbers
Voice recognition requires a certain
way to say numbers in voice com-
mands. Refer to the following examples.
(General rule: Either “zero” or “oh” can
be used for “0”.)
Frequency
Say frequency number according to the
following example.
“Frequency ninety five comma four ”/ “
Ninety five comma four mega-hertz”
Phone number
Say phone number according to the
following example.
0-1-0-2-0-0-5-2 (Single digit)
56
Voice recognition system