check oil Hyundai Santa Fe 2016 - RHD (UK, Australia) User Guide
[x] Cancel search | Manufacturer: HYUNDAI, Model Year: 2016, Model line: Santa Fe, Model: Hyundai Santa Fe 2016Pages: 699, PDF Size: 15.65 MB
Page 603 of 699
Maintenance
6 7
WARNING -
Maintenance work
• Performing maintenance work
on a vehicle can be danger-
ous. You can be seriously
injured whilst performing
some maintenance proce-
dures. If you lack sufficient
knowledge and experience or
the proper tools and equip-
ment to do the work, we rec-
ommend that the system be
servied by a HYUNDAI autho-
rised repairer.
• Working under the bonnet
with the engine running is
dangerous. It becomes even
more dangerous when you
wear jewellery or loose cloth-
ing.
(Continued)
(Continued)
These can become entangled
in moving parts and result in
injury. Therefore, if you must
run the engine whilst working
under the bonnet, make cer-
tain that you remove all jew-
ellery (especially rings,
bracelets, watches, and neck-
laces) and all neckties,
scarves, and similar loose
clothing before getting near
the engine or cooling fans.CAUTION
• Do not put heavy objects or
apply excessive force on top
of the engine cover (if
equipped) or fuel related
parts.
• When you inspect the fuel
system (fuel lines and fuel
injection devices), we recom-
mend that you contact a
HYUNDAI authorised repairer.
• Do not drive long time with the
engine cover (if equipped)
removed.
• When checking the engine
room, do not go near fire.
Fuel, washer fluid, etc. are
flammable oils that may cause
fire.
• Before touching the battery,
ignition cables and electrical
wiring, you should disconnect
the battery "-" terminal. You
may get an electric shock
from the electric current.
(Continued)
Page 605 of 699
Maintenance
8 7
OWNER MAINTENANCE
The following lists are vehicle checks
and inspections that should be per-
formed at the frequencies indicated
to help ensure safe, dependable
operation of your vehicle.
If you have any question, we recom-
mend that you consult a HYUNDAI
authorised repairer.
These Owner Maintenance Checks
are generally not covered by war-
ranties and you may be charged for
labour, parts and lubricants used.Owner maintenance schedule
When you stop for fuel:
• Check the engine oil level.
• Check coolant level in coolant
reservoir.
• Check the windscreen washer fluid
level.
• Look for low or under-inflated tyres.
Whilst operating your vehicle:
• Note any changes in the sound of
the exhaust or any smell of
exhaust fumes in the vehicle.
• Check for vibrations in the steering
wheel. Notice any increased steer-
ing effort or looseness in the steer-
ing wheel, or change in its straight-
ahead position.
• Notice if your vehicle constantly
turns slightly or “pulls” to one side
when travelling on smooth, level
road.
• When stopping, listen and check
for unusual sounds, pulling to one
side, increased brake pedal travel
or “hard-to-push” brake pedal.
• If any slipping or changes in the
operation of your transaxle occurs,
check the transaxle fluid level.
• Check manual transaxle operation,
including clutch operation.
• Check automatic transaxle P
(Park) function.
WARNING
Be careful when checking your
engine coolant level when the
engine is hot. Scalding hot
coolant and steam may blow
out under pressure. This could
cause burns or other serious
injury.
Page 608 of 699
711
Maintenance
EXPLANATION OF SCHEDULED MAINTENANCE ITEMS
Engine oil and filter
The engine oil and filter should be
changed at the intervals specified in
the maintenance schedule. If the car
is being driven in severe conditions,
more frequent oil and filter changes
are required.
Drive belts
Inspect all drive belts for evidence of
cuts, cracks, excessive wear or oil
saturation and replace if necessary.
Drive belts should be checked peri-
odically for proper tension and
adjusted as necessary.
Fuel filter (cartridge)
A clogged filter can limit the speed at
which the vehicle may be driven,
damage the emission system and
cause multiple issues such as hard
starting. If an excessive amount of
foreign matter accumulates in the
fuel tank, the filter may require
replacement more frequently.
After installing a new filter, run the
engine for several minutes, and
check for leaks at the connections.
We recommend that the fuel filter be
replaced by a HYUNDAI authorised
repairer.
Fuel lines, fuel hoses and con-
nections
Check the fuel lines, fuel hoses and
connections for leakage and dam-
age. We recommend that the fuel
lines, fuel hoses and connectionsr be
replaced by a HYUNDAI authorised
repairer.
WARNING - Diesel only
Never work on injection system
with engine running or within 30
seconds after shutting off
engine. High pressure pump,
rail, injectors and high pressure
pipes are subject to high pres-
sure even after the engine
stopped. The fuel jet produced
by fuel leaks may cause serious
injury, if it touch the body.
People using pacemakers
should not move than 30cm
closer to the ECU or wiring har-
ness within the engine room
whilst engine is running, since
the high currents in the
Common Rail system produce
considerable magnetic fields.
CAUTION
When you are inspecting the
belt, place the ignition switch in
the LOCK/OFF or ACC position.
Page 611 of 699
Maintenance
14 7
Brake pads, calipers and
rotors
Check the pads for excessive wear,
discs for run out and wear, and
calipers for fluid leakage.
For more information on checking
the pads or lining wear limit, refer to
the HYUNDAI web site.
(http://brakeman
ual.hmc.co.kr)
Suspension mounting bolts
Check the suspension connections
for looseness or damage. Retighten
to the specified torque.
Steering gear box, linkage &
boots/lower arm ball joint
With the vehicle stopped and engine
off, check for excessive free-play in
the steering wheel.
Check the linkage for bends or dam-
age. Check the dust boots and ball
joints for deterioration, cracks, or
damage. Replace any damaged
parts.
Power steering pump, belt and
hoses
Check the power steering pump and
hoses for leakage and damage.
Replace any damaged or leaking
parts immediately. Inspect the power
steering belt (or drive belt) for evi-
dence of cuts, cracks, excessive
wear, oiliness and proper tension.
Replace or adjust it if necessary.
Drive shafts and boots
Check the drive shafts, boots and
clamps for cracks, deterioration, or
damage. Replace any damaged
parts and, if necessary, repack the
grease.
Air conditioning refrigerant/
compressor
Check the air conditioning lines and
connections for leakage and dam-
age.
Page 612 of 699
715
Maintenance
ENGINE OIL
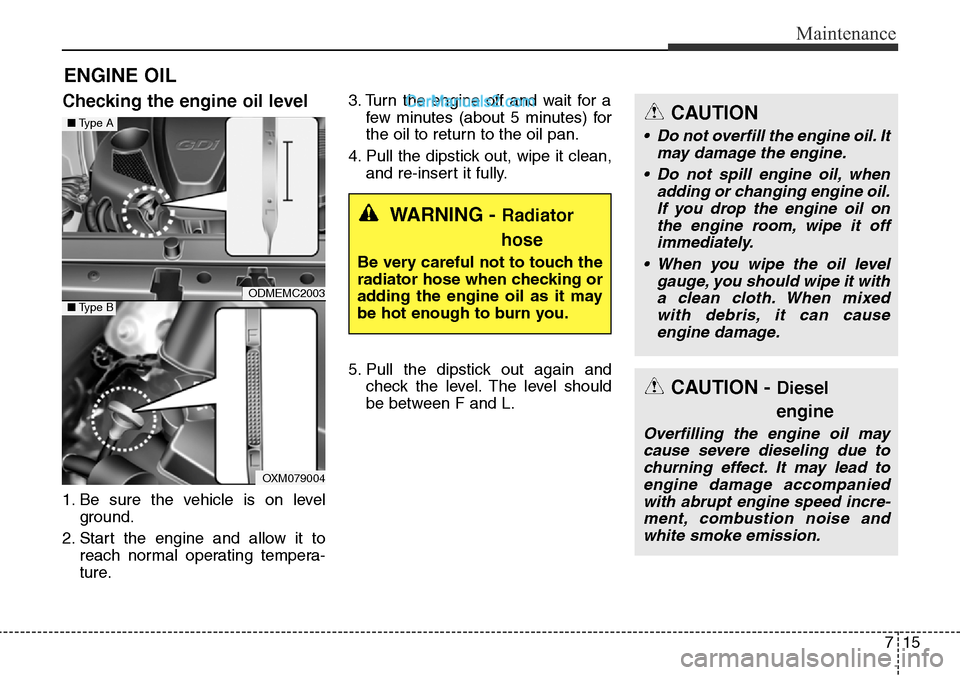
Checking the engine oil level
1. Be sure the vehicle is on level
ground.
2. Start the engine and allow it to
reach normal operating tempera-
ture.3. Turn the engine off and wait for a
few minutes (about 5 minutes) for
the oil to return to the oil pan.
4. Pull the dipstick out, wipe it clean,
and re-insert it fully.
5. Pull the dipstick out again and
check the level. The level should
be between F and L.
WARNING - Radiator
hose
Be very careful not to touch the
radiator hose when checking or
adding the engine oil as it may
be hot enough to burn you.
CAUTION - Diesel
engine
Overfilling the engine oil may
cause severe dieseling due to
churning effect. It may lead to
engine damage accompanied
with abrupt engine speed incre-
ment, combustion noise and
white smoke emission.
CAUTION
• Do not overfill the engine oil. It
may damage the engine.
• Do not spill engine oil, when
adding or changing engine oil.
If you drop the engine oil on
the engine room, wipe it off
immediately.
• When you wipe the oil level
gauge, you should wipe it with
a clean cloth. When mixed
with debris, it can cause
engine damage.
ODMEMC2003
OXM079004
■Type A
■Type B
Page 617 of 699
Maintenance
20 7
BRAKE/CLUTCH FLUID (IF EQUIPPED)
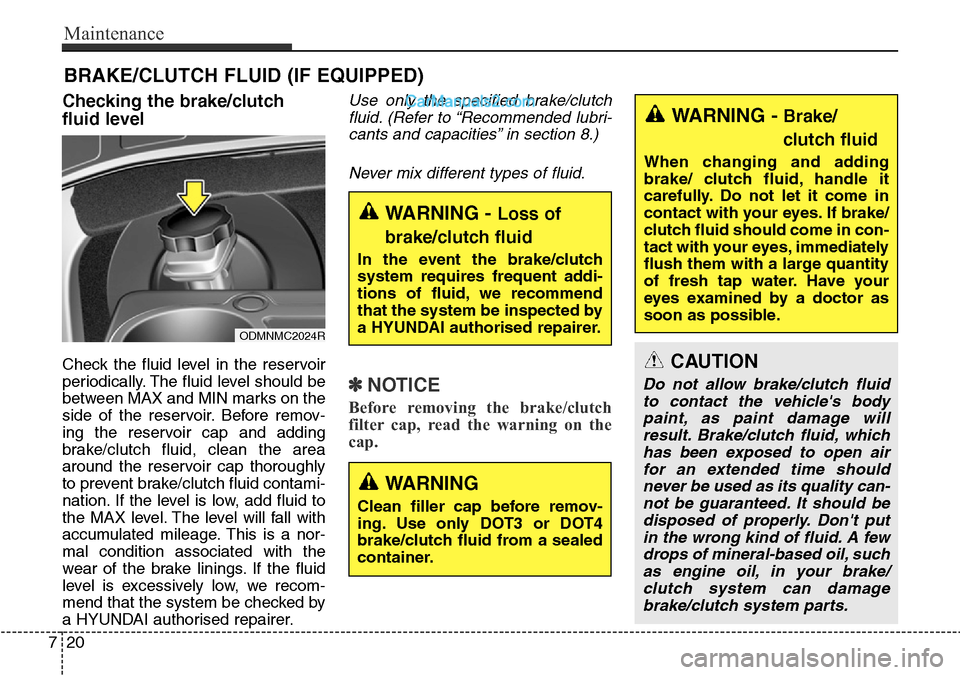
Checking the brake/clutch
fluid level
Check the fluid level in the reservoir
periodically. The fluid level should be
between MAX and MIN marks on the
side of the reservoir. Before remov-
ing the reservoir cap and adding
brake/clutch fluid, clean the area
around the reservoir cap thoroughly
to prevent brake/clutch fluid contami-
nation. If the level is low, add fluid to
the MAX level. The level will fall with
accumulated mileage. This is a nor-
mal condition associated with the
wear of the brake linings. If the fluid
level is excessively low, we recom-
mend that the system be checked by
a HYUNDAI authorised repairer.
Use only the specified brake/clutch
fluid. (Refer to “Recommended lubri-
cants and capacities” in section 8.)
Never mix different types of fluid.
✽NOTICE
Before removing the brake/clutch
filter cap, read the warning on the
cap.
WARNING -Brake/
clutch fluid
When changing and adding
brake/ clutch fluid, handle it
carefully. Do not let it come in
contact with your eyes. If brake/
clutch fluid should come in con-
tact with your eyes, immediately
flush them with a large quantity
of fresh tap water. Have your
eyes examined by a doctor as
soon as possible.
WARNING - Loss of
brake/clutch fluid
In the event the brake/clutch
system requires frequent addi-
tions of fluid, we recommend
that the system be inspected by
a HYUNDAI authorised repairer.
CAUTION
Do not allow brake/clutch fluid
to contact the vehicle's body
paint, as paint damage will
result. Brake/clutch fluid, which
has been exposed to open air
for an extended time should
never be used as its quality can-
not be guaranteed. It should be
disposed of properly. Don't put
in the wrong kind of fluid. A few
drops of mineral-based oil, such
as engine oil, in your brake/
clutch system can damage
brake/clutch system parts.
ODMNMC2024R
WARNING
Clean filler cap before remov-
ing. Use only DOT3 or DOT4
brake/clutch fluid from a sealed
container.
Page 618 of 699
721
Maintenance
POWER STEERING FLUID (IF EQUIPPED)
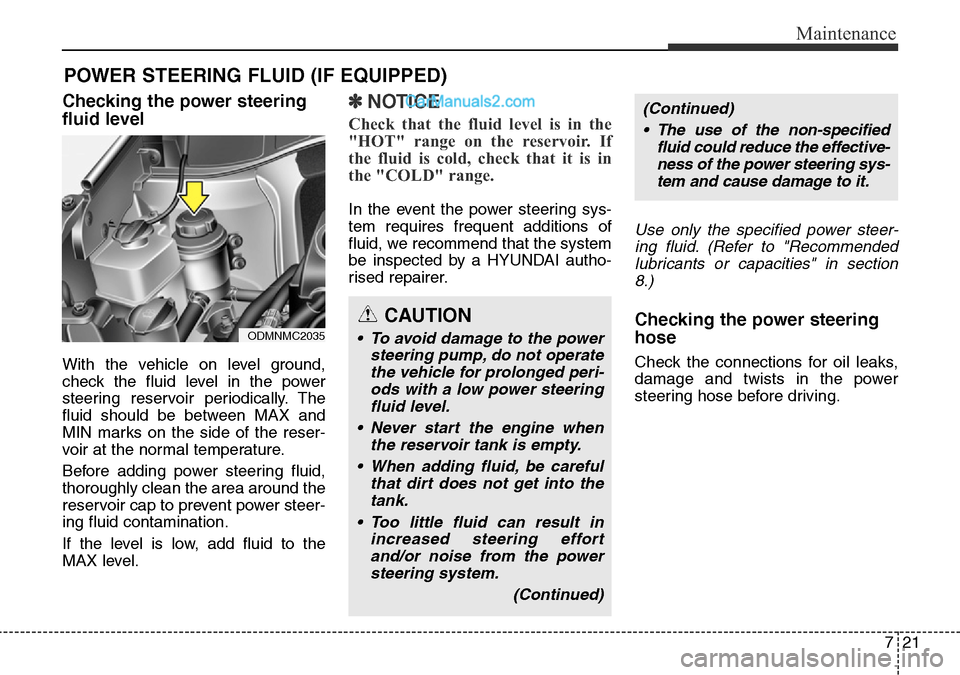
Checking the power steering
fluid level
With the vehicle on level ground,
check the fluid level in the power
steering reservoir periodically. The
fluid should be between MAX and
MIN marks on the side of the reser-
voir at the normal temperature.
Before adding power steering fluid,
thoroughly clean the area around the
reservoir cap to prevent power steer-
ing fluid contamination.
If the level is low, add fluid to the
MAX level.
✽NOTICE
Check that the fluid level is in the
"HOT" range on the reservoir. If
the fluid is cold, check that it is in
the "COLD" range.
In the event the power steering sys-
tem requires frequent additions of
fluid, we recommend that the system
be inspected by a HYUNDAI autho-
rised repairer.
Use only the specified power steer-
ing fluid. (Refer to "Recommended
lubricants or capacities" in section
8.)
Checking the power steering
hose
Check the connections for oil leaks,
damage and twists in the power
steering hose before driving.
CAUTION
• To avoid damage to the power
steering pump, do not operate
the vehicle for prolonged peri-
ods with a low power steering
fluid level.
• Never start the engine when
the reservoir tank is empty.
• When adding fluid, be careful
that dirt does not get into the
tank.
• Too little fluid can result in
increased steering effort
and/or noise from the power
steering system.
(Continued)ODMNMC2035
(Continued)
• The use of the non-specified
fluid could reduce the effective-
ness of the power steering sys-
tem and cause damage to it.
Page 631 of 699
Maintenance
34 7
Battery recharging
Your vehicle has a maintenance-free,
calcium-based battery.
• If the battery becomes discharged
in a short time (because, for exam-
ple, the headlights or interior lights
were left on whilst the vehicle was
not in use), recharge it by slow
charging (trickle) for 10 hours.
• If the battery gradually discharges
because of high electric load whilst
the vehicle is being used, recharge
it at 20-30A for two hours.
Reset items
Items should be reset after the bat-
tery has been discharged or the bat-
tery has been disconnected.
• Auto up/down window
(See section 4)
• Sunroof (See section 4)
• Trip computer (See section 4)
• Climate control system
(See section 4)
• Clock (See section 4)
• Audio (See section 4)
(Continued)
• Watch the battery during
charging, and stop or reduce
the charging rate if the battery
cells begin gassing (boiling)
violently or if the temperature
of the electrolyte of any cell
exceeds 49°C (120°F).
• Wear eye protection when
checking the battery during
charging.
• Disconnect the battery charg-
er in the following order.
1. Turn off the battery charger
main switch.
2. Unhook the negative clamp
from the negative battery
terminal.
3. Unhook the positive clamp
from the positive battery
terminal.
(Continued)
WARNING- Recharging
battery
When recharging the battery,
observe the following precau-
tions:
• The battery must be removed
from the vehicle and placed in
an area with good ventilation.
• Do not allow cigarettes,
sparks, or flame near the bat-
tery.
(Continued)
(Continued)
• Before performing mainte-
nance or recharging the bat-
tery, turn off all accessories
and stop the engine.
• The negative battery cable
must be removed first and
installed last when the battery
is disconnected.
Page 644 of 699
747
Maintenance
FUSES
A vehicle’s electrical system is pro-
tected from electrical overload dam-
age by fuses.
This vehicle has 2 (or 3) fuse panels,
one located in the driver’s side panel
bolster, the other in the engine com-
partment near the battery.
If any of your vehicle’s lights, acces-
sories, or controls do not work, check
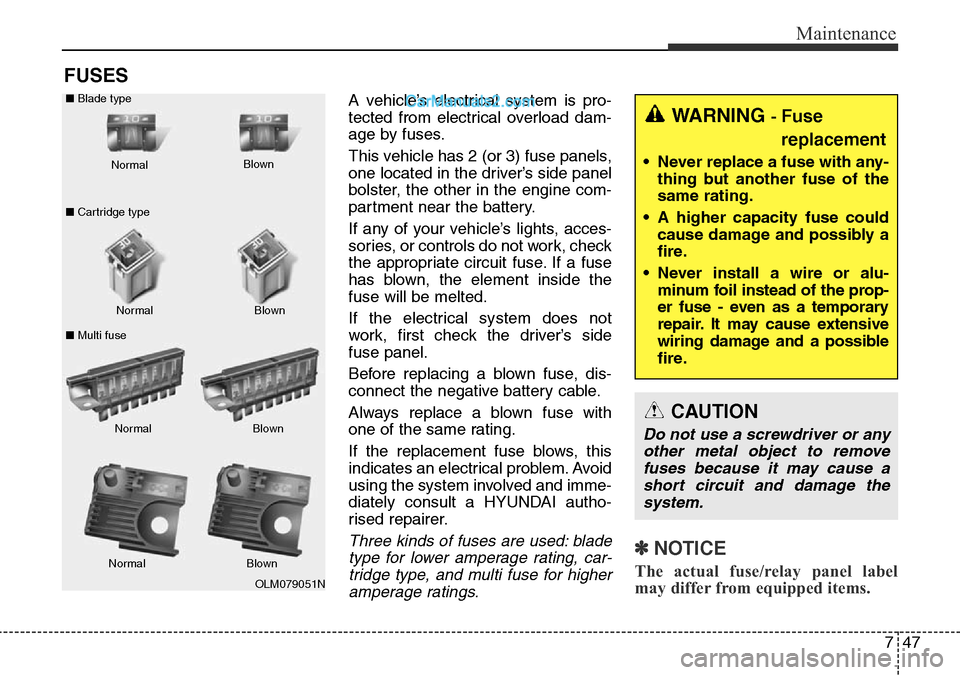
the appropriate circuit fuse. If a fuse
has blown, the element inside the
fuse will be melted.
If the electrical system does not
work, first check the driver’s side
fuse panel.
Before replacing a blown fuse, dis-
connect the negative battery cable.
Always replace a blown fuse with
one of the same rating.
If the replacement fuse blows, this
indicates an electrical problem. Avoid
using the system involved and imme-
diately consult a HYUNDAI autho-
rised repairer.
Three kinds of fuses are used: blade
type for lower amperage rating, car-
tridge type, and multi fuse for higher
amperage ratings.✽NOTICE
The actual fuse/relay panel label
may differ from equipped items.
WARNING - Fuse
replacement
• Never replace a fuse with any-
thing but another fuse of the
same rating.
• A higher capacity fuse could
cause damage and possibly a
fire.
• Never install a wire or alu-
minum foil instead of the prop-
er fuse - even as a temporary
repair. It may cause extensive
wiring damage and a possible
fire.
CAUTION
Do not use a screwdriver or any
other metal object to remove
fuses because it may cause a
short circuit and damage the
system.
OLM079051N Normal Normal ■Blade type
■Cartridge type
■Multi fuseBlown
Blown
Normal Blown
Normal Blown
Page 682 of 699
785
Maintenance
Keep paint and trim in good con-
dition
Scratches or chips in the finish
should be covered with "touch-up"
paint as soon as possible to reduce
the possibility of corrosion. If bare
metal is showing through, the atten-
tion of a qualified body and paint
shop is recommended.
Bird droppings : Bird droppings are
highly corrosive and may damage
painted surfaces in just a few hours.
Always remove bird droppings as
soon as possible.Don't neglect the interior
Moisture can collect under the floor
mats and carpeting to cause corro-
sion. Check under the mats periodi-
cally to be sure the carpeting is dry.
Use particular care if you carry fertil-
izers, cleaning materials or chemi-
cals in the car.
These should be carried only in
proper containers and any spills or
leaks should be cleaned up, flushed
with clean water and thoroughly
dried.Interior care
Interior general precautions
Prevent chemicals such as perfume,
cosmetic oil, sun cream, hand clean-
er and air freshener from contacting
the interior parts because they may
cause damage or discolouration. If
they do contact the interior parts,
wipe them off immediately.
See the instructions that follow for
the proper way to clean vinyl.
CAUTION
Never allow water or other liq-
uids to come in contact with
electrical/electronic compo-
nents inside the vehicle as this
may damage them.