brake Hyundai Santa Fe 2019 Owner's Manual - RHD (UK, Australia)
[x] Cancel search | Manufacturer: HYUNDAI, Model Year: 2019, Model line: Santa Fe, Model: Hyundai Santa Fe 2019Pages: 682, PDF Size: 16.24 MB
Page 11 of 682
As with other vehicles of this type,
failure to operate this vehicle correct-
ly may result in loss of control, an
accident or vehicle rollover.
Specific design characteristics (high-
er ground clearance, track, etc.) give
this vehicle a higher centre of gravity
than other types of vehicles. In other
words they are not designed for cor-
nering at the same speeds as con-
ventional 2-wheel drive vehicles.
Avoid sharp turns or abrupt manoeu-
vres. Again, failure to operate this
vehicle correctly may result in loss of
control, an accident or vehicle
rollover.Be sure to read the
"Reducing the risk of a rollover"
driving guidelines, in section 5 of
this manual.By following a few simple precautions
for the first 600 miles (1,000 km) you
may add to the performance, econo-
my and life of your vehicle.
• Do not race the engine.
• Whilst driving, keep your engine
speed (rpm, or revolutions per
minute) between 2,000 rpm and
4,000 rpm.
• Do not maintain a single speed for
long periods of time, either fast or
slow. Varying engine speed is need-
ed to properly break-in the engine.
• Avoid hard stops, except in emer-
gencies, to allow the brakes to seat
properly.
• Don't tow a trailer during the first
1,200 miles (2,000 km) of operation.HYUNDAI promotes an environmen-
tally sound treatment for end of life
vehicles and offers to take back your
HYUNDAI end of life vehicles in
accordance with the European Union
(EU) End of Life Vehicles Directive.
You can get detailed information
from your national HYUNDAI home-
page.
F11
Introduction
VEHICLE HANDLING
INSTRUCTIONSVEHICLE BREAK-IN
PROCESSRETURNING USED VEHICLES
Page 18 of 682
1-5
Your vehicle at a glance
1
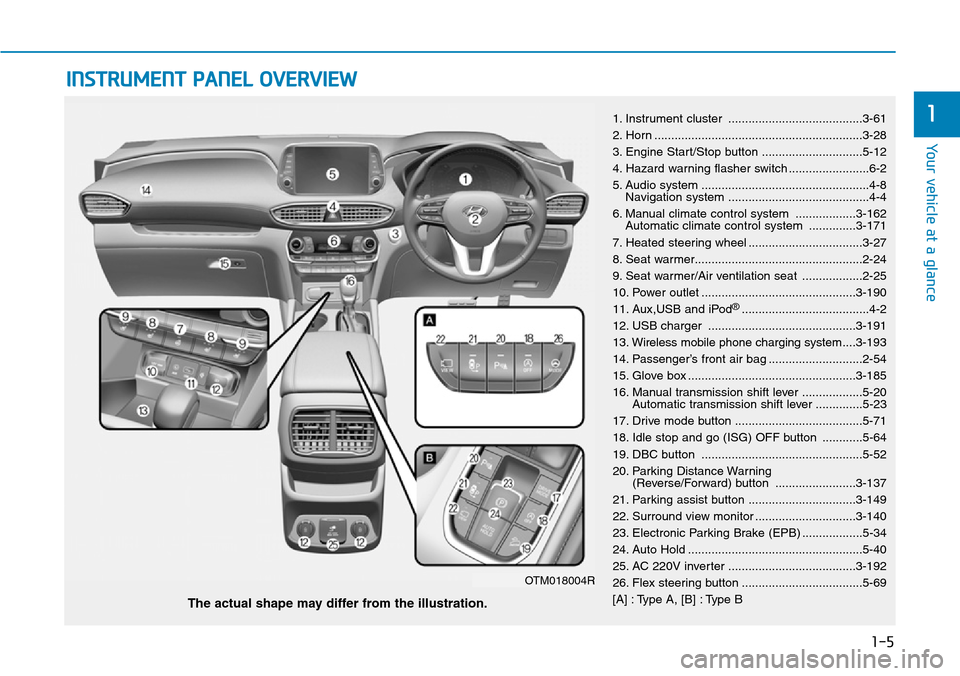
INSTRUMENT PANEL OVERVIEW
1. Instrument cluster ........................................3-61
2. Horn ..............................................................3-28
3. Engine Start/Stop button ..............................5-12
4. Hazard warning flasher switch ........................6-2
5. Audio system ..................................................4-8
Navigation system ..........................................4-4
6. Manual climate control system ..................3-162
Automatic climate control system ..............3-171
7. Heated steering wheel ..................................3-27
8. Seat warmer..................................................2-24
9. Seat warmer/Air ventilation seat ..................2-25
10. Power outlet ..............................................3-190
11. Aux,USB and iPod
®......................................4-2
12. USB charger ............................................3-191
13. Wireless mobile phone charging system....3-193
14. Passenger’s front air bag ............................2-54
15. Glove box ..................................................3-185
16. Manual transmission shift lever ..................5-20
Automatic transmission shift lever ..............5-23
17. Drive mode button ......................................5-71
18. Idle stop and go (ISG) OFF button ............5-64
19. DBC button ................................................5-52
20. Parking Distance Warning
(Reverse/Forward) button ........................3-137
21. Parking assist button ................................3-149
22. Surround view monitor ..............................3-140
23. Electronic Parking Brake (EPB) ..................5-34
24. Auto Hold ....................................................5-40
25. AC 220V inverter ......................................3-192
26. Flex steering button ....................................5-69
[A] : Type A, [B] : Type B
The actual shape may differ from the illustration.
OTM018004R
Page 19 of 682
1-6
Your vehicle at a glance
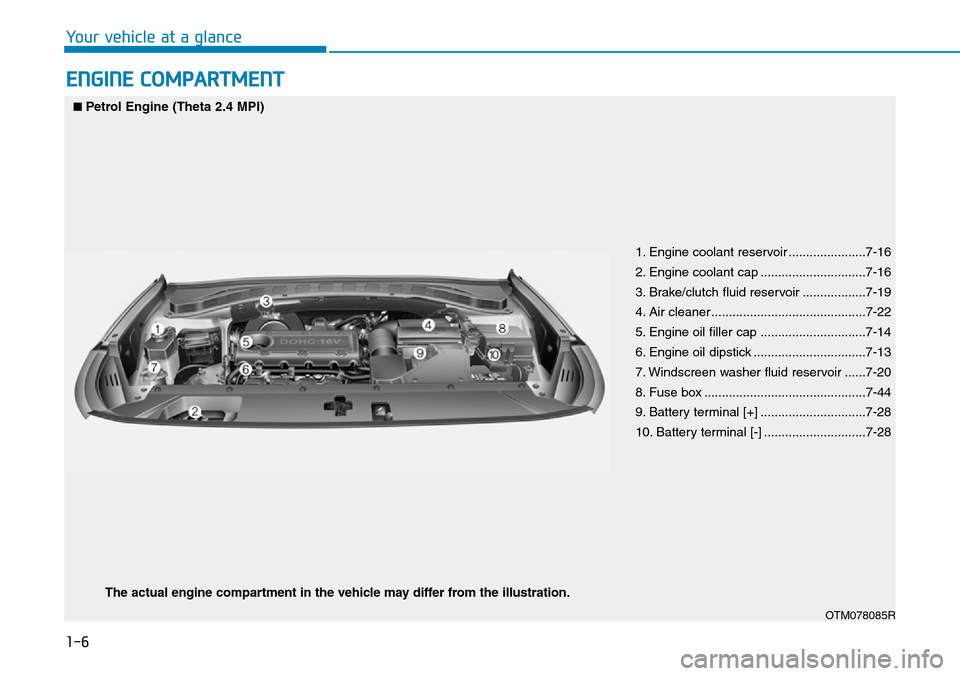
ENGINE COMPARTMENT
1. Engine coolant reservoir ......................7-16
2. Engine coolant cap ..............................7-16
3. Brake/clutch fluid reservoir ..................7-19
4. Air cleaner ............................................7-22
5. Engine oil filler cap ..............................7-14
6. Engine oil dipstick ................................7-13
7. Windscreen washer fluid reservoir ......7-20
8. Fuse box ..............................................7-44
9. Battery terminal [+] ..............................7-28
10. Battery terminal [-] .............................7-28
OTM078085R
■Petrol Engine (Theta 2.4 MPI)
The actual engine compartment in the vehicle may differ from the illustration.
Page 20 of 682
1-7
Your vehicle at a glance
1
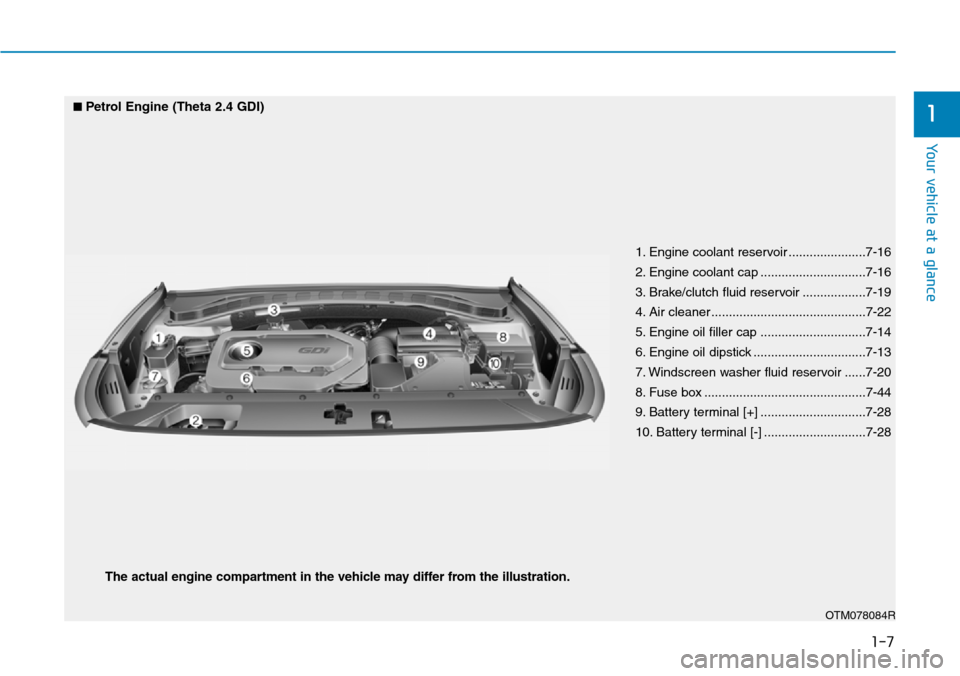
1. Engine coolant reservoir ......................7-16
2. Engine coolant cap ..............................7-16
3. Brake/clutch fluid reservoir ..................7-19
4. Air cleaner ............................................7-22
5. Engine oil filler cap ..............................7-14
6. Engine oil dipstick ................................7-13
7. Windscreen washer fluid reservoir ......7-20
8. Fuse box ..............................................7-44
9. Battery terminal [+] ..............................7-28
10. Battery terminal [-] .............................7-28
OTM078084R
■Petrol Engine (Theta 2.4 GDI)
The actual engine compartment in the vehicle may differ from the illustration.
Page 21 of 682
1-8
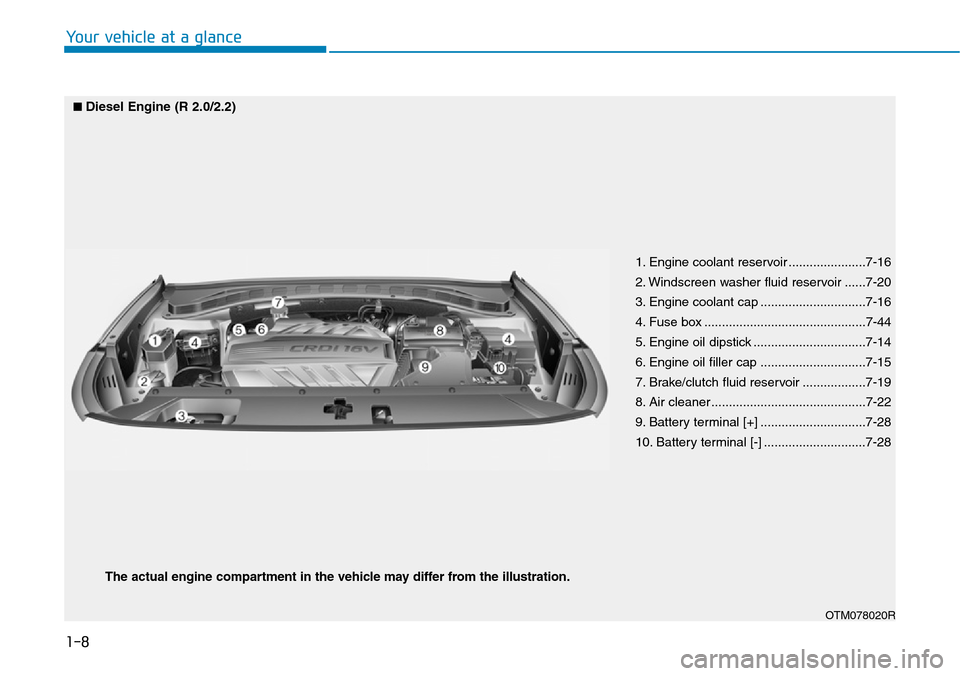
Your vehicle at a glance
1. Engine coolant reservoir ......................7-16
2. Windscreen washer fluid reservoir ......7-20
3. Engine coolant cap ..............................7-16
4. Fuse box ..............................................7-44
5. Engine oil dipstick ................................7-14
6. Engine oil filler cap ..............................7-15
7. Brake/clutch fluid reservoir ..................7-19
8. Air cleaner ............................................7-22
9. Battery terminal [+] ..............................7-28
10. Battery terminal [-] .............................7-28
OTM078020R
■Diesel Engine (R 2.0/2.2)
The actual engine compartment in the vehicle may differ from the illustration.
Page 38 of 682
2-17
Safety system of your vehicle
2
When returning the rear seat-
back from a folded to an upright
position, hold the seatback and
return it slowly. Ensure that the
seatback is completely locked
into its upright position by
pushing on the top of the seat-
back. In an accident or sudden
stop, the unlocked seatback
could allow cargo to move for-
ward with great force and enter
the passenger compartment,
which could result in serious
injury or death.
WARNING
Do not place objects in the rear
seats, since they cannot be
properly secured and may hit
vehicle occupants in a collision
causing serious injury or death.
WARNING
Make sure the engine is off, the
shift lever is in P (Park), and the
parking brake is securely applied
whenever loading or unloading
cargo. Failure to take these steps
may allow the vehicle to move if
the shift lever is inadvertently
moved to another position.
WARNING
Cargo should always be secured
to prevent it from being thrown
about the vehicle in a collision
and causing injury to the vehicle
occupants. Do not place objects
in the rear seats, since they can-
not be properly secured and may
hit the front seat occupants in a
collision.
WARNING
•Be careful when loading cargo
through the rear passenger
seats to prevent damage to
the vehicle interior.
•When cargo is loaded through
the rear passenger seats,
ensure the cargo is properly
secured to prevent it from
moving whilst driving.
CAUTION
Page 89 of 682
2-68
Safety system of your vehicle
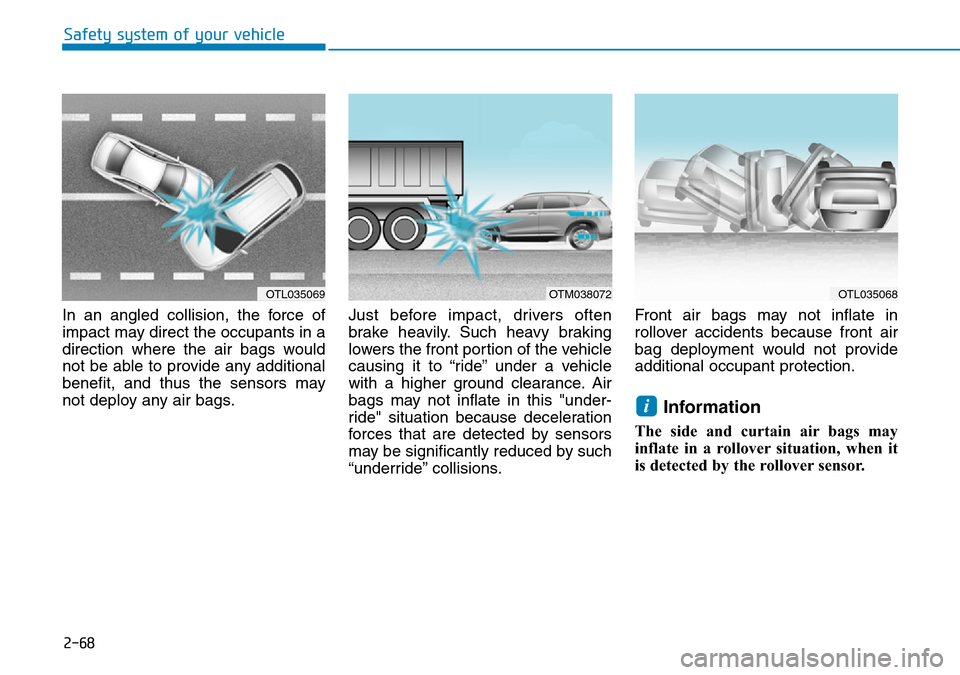
In an angled collision, the force of
impact may direct the occupants in a
direction where the air bags would
not be able to provide any additional
benefit, and thus the sensors may
not deploy any air bags.Just before impact, drivers often
brake heavily. Such heavy braking
lowers the front portion of the vehicle
causing it to “ride” under a vehicle
with a higher ground clearance. Air
bags may not inflate in this "under-
ride" situation because deceleration
forces that are detected by sensors
may be significantly reduced by such
“underride” collisions.Front air bags may not inflate in
rollover accidents because front air
bag deployment would not provide
additional occupant protection.
Information
The side and curtain air bags may
inflate in a rollover situation, when it
is detected by the rollover sensor.
i
OTL035069OTM038072OTL035068
Page 107 of 682
3-16
Convenient features of your vehicle
Deadlocks (if equipped)
Some vehicles are equipped with a
deadlock system. Deadlocks prevent
opening of a door from either inside
or outside the vehicle once the dead-
locks have been activated providing
an additional measure of vehicle
security.
To lock the vehicle using the dead-
lock function, the doors must be
locked by using the remote key or
smart key. To unlock the vehicle, the
transmitter or smart key must be
used again.
Auto door lock/unlock features
Impact sensing door unlock
system (if equipped)
All doors will be automatically
unlocked when an impact causes the
air bags to deploy.
Speed sensing door lock system
(if equipped)
All doors will be automatically locked
when vehicle speed exceeds 9 mph
(15 km/h). Leaving your vehicle unlocked
increases the potential risk to
you or others from someone
hiding in your vehicle.
To secure your vehicle, whilst
depressing the brake, move the
shift lever to the P (Park) posi-
tion (for automatic transmis-
sion) or first gear or R (Reverse,
for manual transmission),
engage the parking brake, and
place the ignition switch in the
LOCK/OFF position, close all
windows, lock all doors, and
always take the key with you.
WARNING
Do not lock the doors with the
remote key or the smart key with
anybody left in the vehicle. The
passenger in the vehicle cannot
unlock the doors with the door
lock button. For example, if the
door is locked with the remote
key, the passenger in the vehicle
cannot unlock the door without
the transmitter.
WARNING
Opening a door when something
is approaching may cause dam-
age or injury. Be careful when
opening doors and watch for
vehicles, motorcycles, bicycles
or pedestrians approaching the
vehicle in the path of the door.
WARNING
If you stay in the vehicle for a
long time whilst the weather is
very hot or cold, there are risks
of injuries or danger to life. Do
not lock the vehicle from the out-
side when someone is in the
vehicle.
WARNING
Page 137 of 682
3-46
Convenient features of your vehicle
EXTERIOR FEATURES
Bonnet
Opening the bonnet
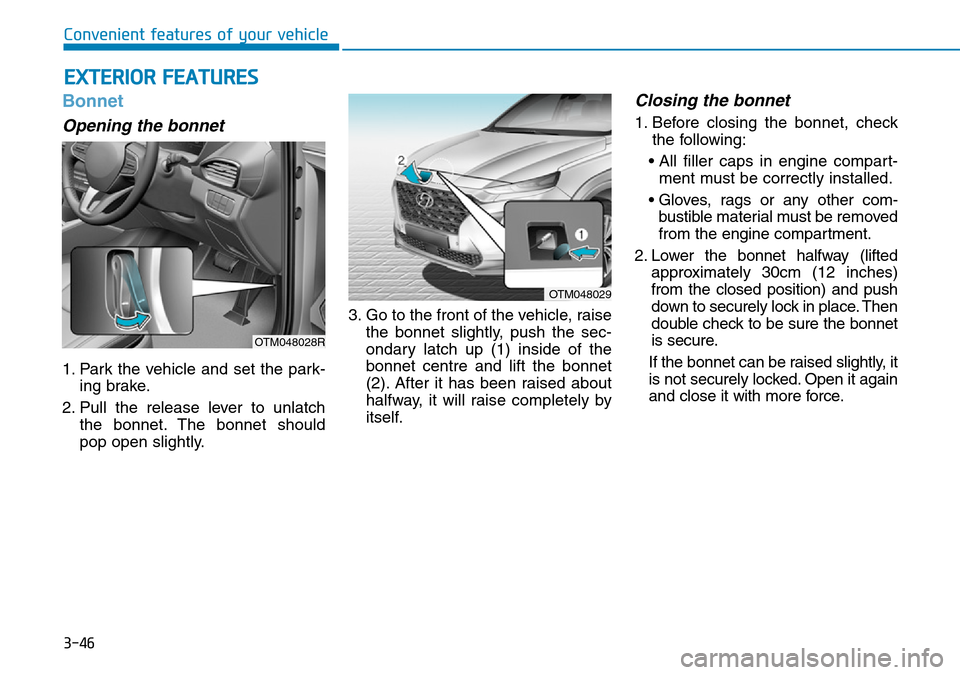
1. Park the vehicle and set the park-
ing brake.
2. Pull the release lever to unlatch
the bonnet. The bonnet should
pop open slightly.3. Go to the front of the vehicle, raise
the bonnet slightly, push the sec-
ondary latch up (1) inside of the
bonnet centre and lift the bonnet
(2). After it has been raised about
halfway, it will raise completely by
itself.
Closing the bonnet
1. Before closing the bonnet, check
the following:
• All filler caps in engine compart-
ment must be correctly installed.
• Gloves, rags or any other com-
bustible material must be removed
from the engine compartment.
2. Lower the bonnet halfway (lifted
approximately 30cm (12 inches)
from the closed position) and push
down to securely lock in place. Then
double check to be sure the bonnet
is secure.
If the bonnet can be raised slightly, it
is not securely locked. Open it again
and close it with more force.
OTM048028R
OTM048029
Page 138 of 682
3-47
Convenient features of your vehicle
3
Tailgate
Opening the tailgate
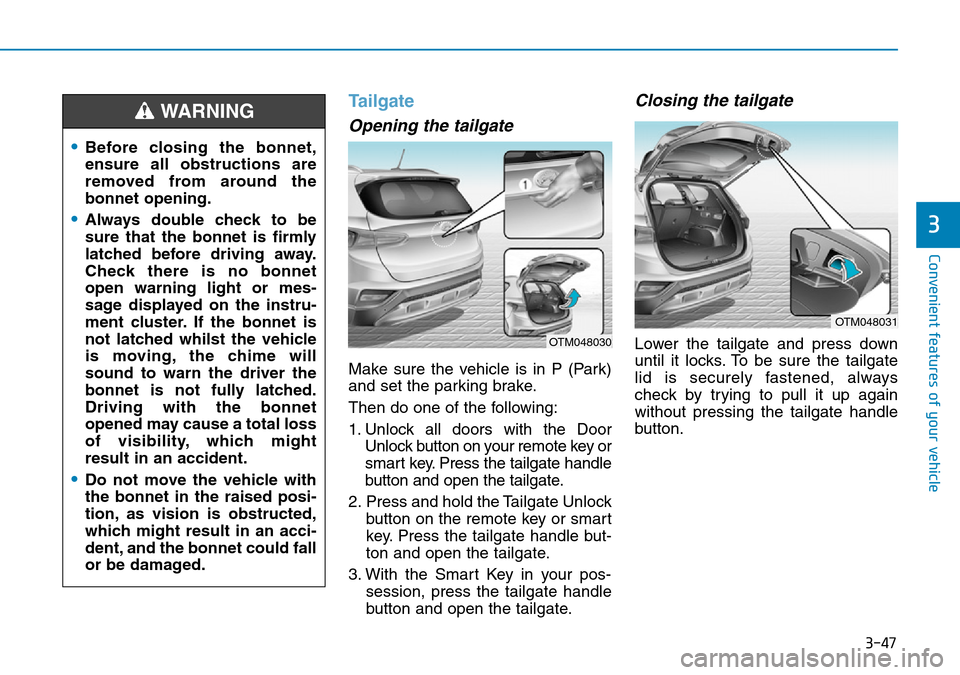
Make sure the vehicle is in P (Park)
and set the parking brake.
Then do one of the following:
1. Unlock all doors with the Door
Unlock button on your remote key or
smart key. Press the tailgate handle
button and open the tailgate.
2. Press and hold the Tailgate Unlock
button on the remote key or smart
key. Press the tailgate handle but-
ton and open the tailgate.
3. With the Smart Key in your pos-
session, press the tailgate handle
button and open the tailgate.
Closing the tailgate
Lower the tailgate and press down
until it locks. To be sure the tailgate
lid is securely fastened, always
check by trying to pull it up again
without pressing the tailgate handle
button.OTM048030
OTM048031
•Before closing the bonnet,
ensure all obstructions are
removed from around the
bonnet opening.
•Always double check to be
sure that the bonnet is firmly
latched before driving away.
Check there is no bonnet
open warning light or mes-
sage displayed on the instru-
ment cluster. If the bonnet is
not latched whilst the vehicle
is moving, the chime will
sound to warn the driver the
bonnet is not fully latched.
Driving with the bonnet
opened may cause a total loss
of visibility, which might
result in an accident.
•Do not move the vehicle with
the bonnet in the raised posi-
tion, as vision is obstructed,
which might result in an acci-
dent, and the bonnet could fall
or be damaged.
WARNING