tow Hyundai Santa Fe 2019 Owner's Manual - RHD (UK, Australia)
[x] Cancel search | Manufacturer: HYUNDAI, Model Year: 2019, Model line: Santa Fe, Model: Hyundai Santa Fe 2019Pages: 682, PDF Size: 16.24 MB
Page 11 of 682
As with other vehicles of this type,
failure to operate this vehicle correct-
ly may result in loss of control, an
accident or vehicle rollover.
Specific design characteristics (high-
er ground clearance, track, etc.) give
this vehicle a higher centre of gravity
than other types of vehicles. In other
words they are not designed for cor-
nering at the same speeds as con-
ventional 2-wheel drive vehicles.
Avoid sharp turns or abrupt manoeu-
vres. Again, failure to operate this
vehicle correctly may result in loss of
control, an accident or vehicle
rollover.Be sure to read the
"Reducing the risk of a rollover"
driving guidelines, in section 5 of
this manual.By following a few simple precautions
for the first 600 miles (1,000 km) you
may add to the performance, econo-
my and life of your vehicle.
• Do not race the engine.
• Whilst driving, keep your engine
speed (rpm, or revolutions per
minute) between 2,000 rpm and
4,000 rpm.
• Do not maintain a single speed for
long periods of time, either fast or
slow. Varying engine speed is need-
ed to properly break-in the engine.
• Avoid hard stops, except in emer-
gencies, to allow the brakes to seat
properly.
• Don't tow a trailer during the first
1,200 miles (2,000 km) of operation.HYUNDAI promotes an environmen-
tally sound treatment for end of life
vehicles and offers to take back your
HYUNDAI end of life vehicles in
accordance with the European Union
(EU) End of Life Vehicles Directive.
You can get detailed information
from your national HYUNDAI home-
page.
F11
Introduction
VEHICLE HANDLING
INSTRUCTIONSVEHICLE BREAK-IN
PROCESSRETURNING USED VEHICLES
Page 36 of 682
2-15
Safety system of your vehicle
2
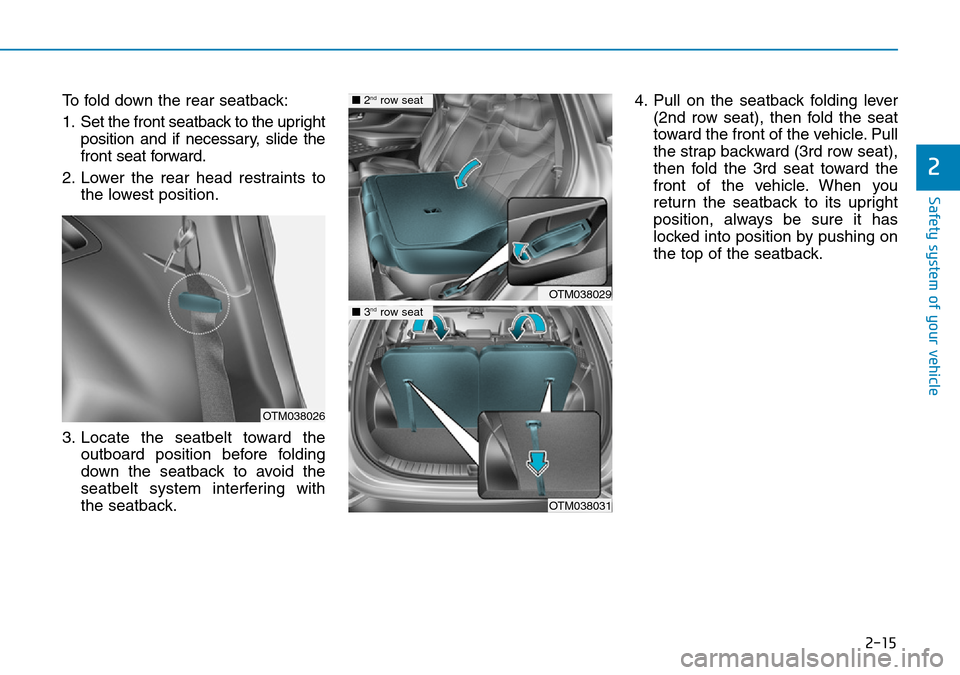
To fold down the rear seatback:
1. Set the front seatback to the upright
position and if necessary, slide the
front seat forward.
2. Lower the rear head restraints to
the lowest position.
3. Locate the seatbelt toward the
outboard position before folding
down the seatback to avoid the
seatbelt system interfering with
the seatback.4. Pull on the seatback folding lever
(2nd row seat), then fold the seat
toward the front of the vehicle. Pull
the strap backward (3rd row seat),
then fold the 3rd seat toward the
front of the vehicle. When you
return the seatback to its upright
position, always be sure it has
locked into position by pushing on
the top of the seatback.
OTM038029
OTM038031
OTM038026
■2ndrow seat
■3ndrow seat
Page 42 of 682
2-21
Safety system of your vehicle
2
If you recline the seatback towards
the front with the head restraint
and seat cushion raised, the head
restraint may come in contact with
the sunvisor or other parts of the
vehicle.
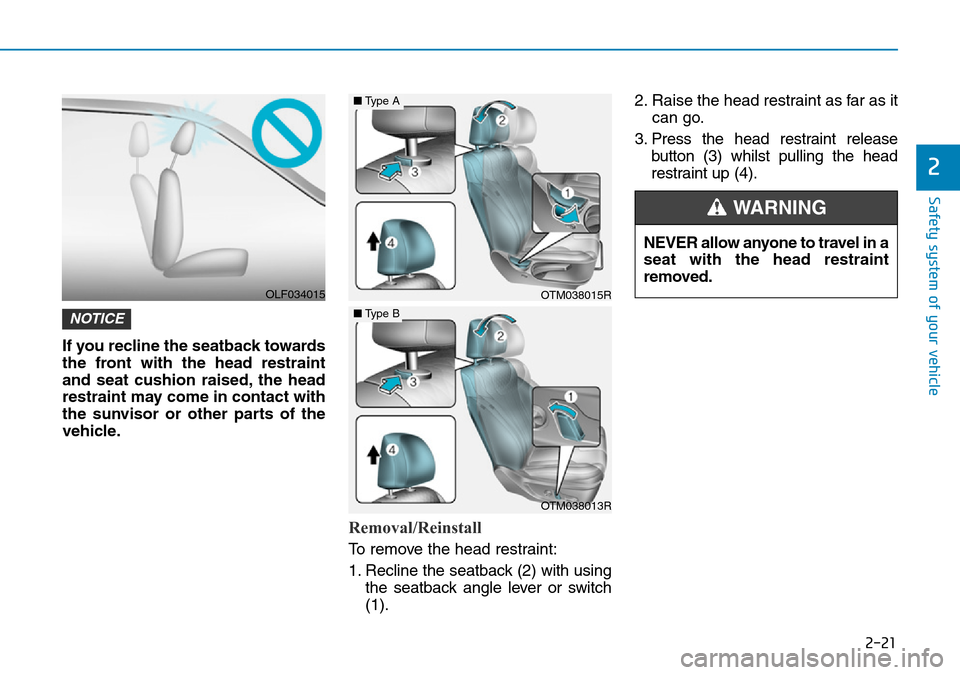
Removal/Reinstall
To remove the head restraint:
1. Recline the seatback (2) with using
the seatback angle lever or switch
(1).2. Raise the head restraint as far as it
can go.
3. Press the head restraint release
button (3) whilst pulling the head
restraint up (4).
NOTICE
OTM038015R
OTM038013R
■Type A
■Type B
OLF034015
NEVER allow anyone to travel in a
seat with the head restraint
removed.
WARNING
Page 55 of 682
2-34
Safety system of your vehicle
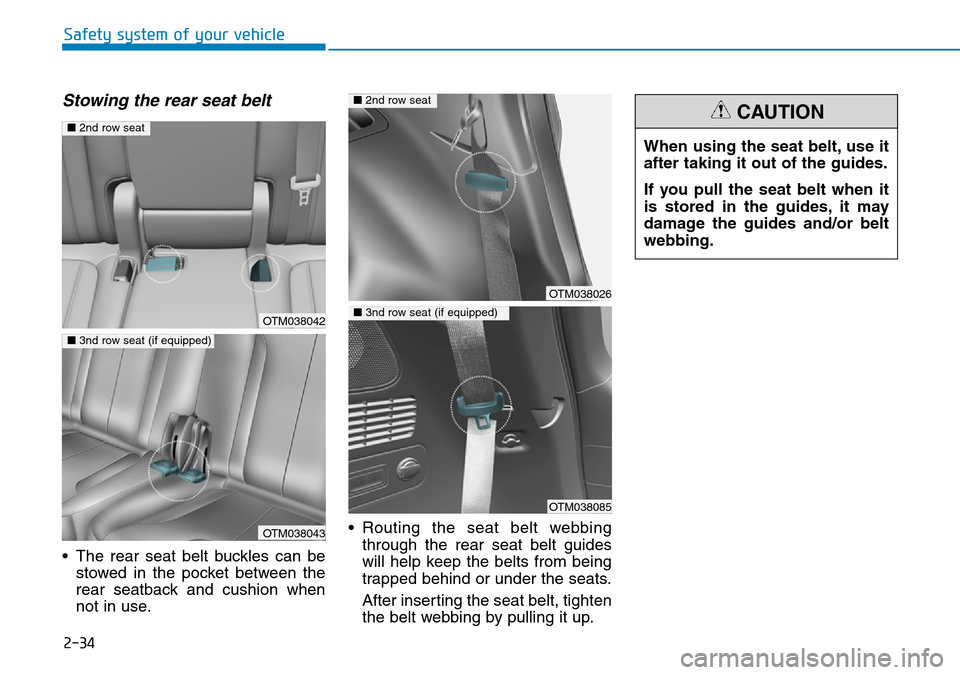
Stowing the rear seat belt
• The rear seat belt buckles can be
stowed in the pocket between the
rear seatback and cushion when
not in use.• Routing the seat belt webbing
through the rear seat belt guides
will help keep the belts from being
trapped behind or under the seats.
After inserting the seat belt, tighten
the belt webbing by pulling it up.
OTM038042
OTM038043
■2nd row seat
■3nd row seat (if equipped)
OTM038026
OTM038085
■2nd row seat
■3nd row seat (if equipped)
When using the seat belt, use it
after taking it out of the guides.
If you pull the seat belt when it
is stored in the guides, it may
damage the guides and/or belt
webbing.
CAUTION
Page 85 of 682
2-64
Safety system of your vehicle
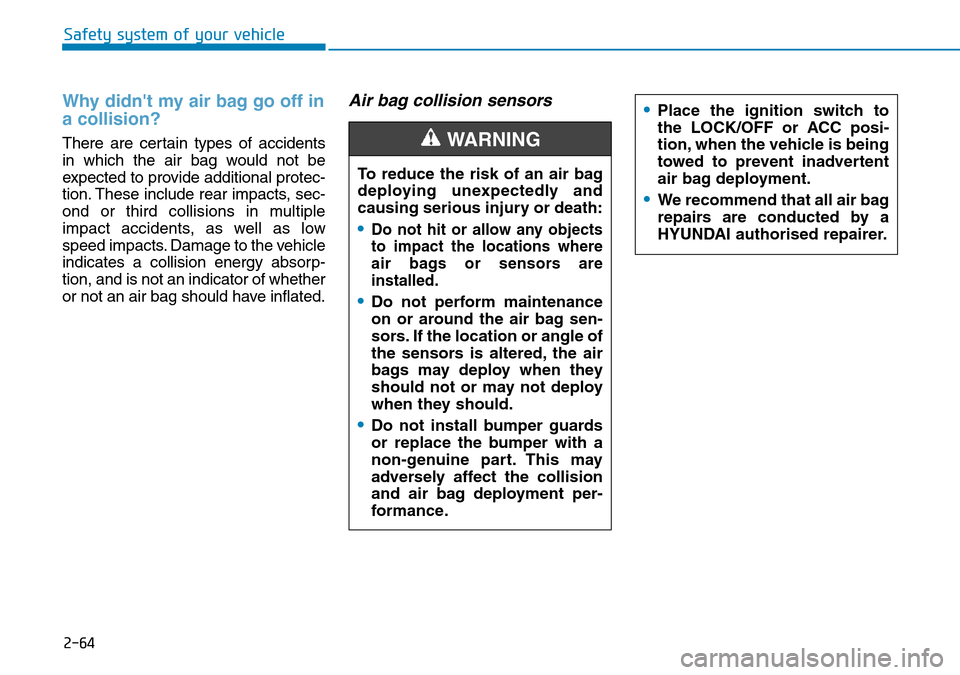
Why didn't my air bag go off in
a collision?
There are certain types of accidents
in which the air bag would not be
expected to provide additional protec-
tion. These include rear impacts, sec-
ond or third collisions in multiple
impact accidents, as well as low
speed impacts. Damage to the vehicle
indicates a collision energy absorp-
tion, and is not an indicator of whether
or not an air bag should have inflated.
Air bag collision sensors
To reduce the risk of an air bag
deploying unexpectedly and
causing serious injury or death:
•Do not hit or allow any objects
to impact the locations where
air bags or sensors are
installed.
•Do not perform maintenance
on or around the air bag sen-
sors. If the location or angle of
the sensors is altered, the air
bags may deploy when they
should not or may not deploy
when they should.
•Do not install bumper guards
or replace the bumper with a
non-genuine part. This may
adversely affect the collision
and air bag deployment per-
formance.
WARNING
•Place the ignition switch to
the LOCK/OFF or ACC posi-
tion, when the vehicle is being
towed to prevent inadvertent
air bag deployment.
•We recommend that all air bag
repairs are conducted by a
HYUNDAI authorised repairer.
Page 100 of 682
3-9
Convenient features of your vehicle
3
Start-up
You can start the engine without
inserting the key.For detailed infor-
mation refer to the Engine
Start/Stop button in chapter 5.
To prevent damaging the smart
key:
• Keep the smart key away from
water or any liquid and fire. If the
inside of the smart key gets
damp (due to drinks or moisture),
or is heated, internal circuit may
malfunction and may void the
vehicle warranty.
• Avoid dropping or throwing the
smart key.
• Protect the smart key from
extreme temperatures.
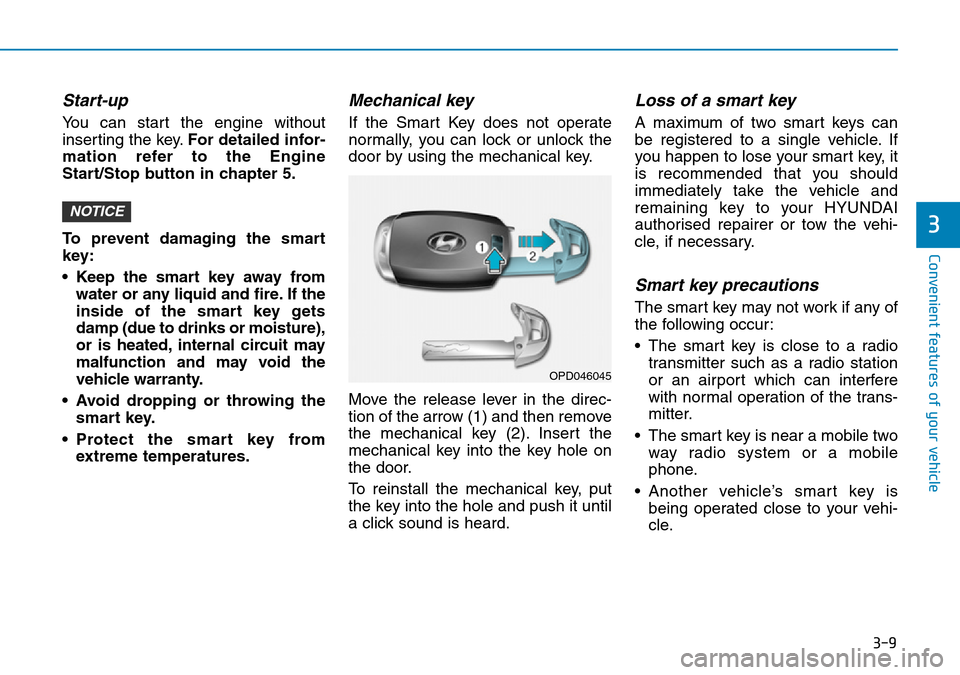
Mechanical key
If the Smart Key does not operate
normally, you can lock or unlock the
door by using the mechanical key.
Move the release lever in the direc-
tion of the arrow (1) and then remove
the mechanical key (2). Insert the
mechanical key into the key hole on
the door.
To reinstall the mechanical key, put
the key into the hole and push it until
a click sound is heard.
Loss of a smart key
A maximum of two smart keys can
be registered to a single vehicle. If
you happen to lose your smart key, it
is recommended that you should
immediately take the vehicle and
remaining key to your HYUNDAI
authorised repairer or tow the vehi-
cle, if necessary.
Smart key precautions
The smart key may not work if any of
the following occur:
• The smart key is close to a radio
transmitter such as a radio station
or an airport which can interfere
with normal operation of the trans-
mitter.
• The smart key is near a mobile two
way radio system or a mobile
phone.
• Another vehicle’s smart key is
being operated close to your vehi-
cle.
NOTICE
OPD046045
Page 104 of 682
![Hyundai Santa Fe 2019 Owners Manual - RHD (UK, Australia) 3-13
Convenient features of your vehicle
3
Operating door locks from
outside the vehicle
Mechanical key
[A] : Unlock, [B] : Lock
Turn the key toward the rear of the
vehicle to lock and toward the fro Hyundai Santa Fe 2019 Owners Manual - RHD (UK, Australia) 3-13
Convenient features of your vehicle
3
Operating door locks from
outside the vehicle
Mechanical key
[A] : Unlock, [B] : Lock
Turn the key toward the rear of the
vehicle to lock and toward the fro](/img/35/16317/w960_16317-103.png)
3-13
Convenient features of your vehicle
3
Operating door locks from
outside the vehicle
Mechanical key
[A] : Unlock, [B] : Lock
Turn the key toward the rear of the
vehicle to lock and toward the front of
the vehicle to unlock.
First, pull the outside door handle (1)
and push the hook (2) located inside
of outside door handle by using the
mechanical key. And remove the
cover (3).
If you lock/unlock the driver's door
with a key, a driver’s door will
lock/unlock.
Once the doors are unlocked, they
may be opened by pulling the door
handle.
When closing the door, push the
door by hand. Make sure that doors
are closed securely.Remote key
To lock the doors, press the Door
Lock button (1) on the remote key.
To unlock the doors, press the Door
Unlock button (2) on the remote key.
Once the doors are unlocked, they
may be opened by pulling the door
handle.
When closing the door, push the
door by hand. Make sure that doors
are closed securely.
DOOR LOCKS
OPDE046413
OTM048001R
■Remote key
OTM048002R
■Smart key
Page 118 of 682
3-27
Convenient features of your vehicle
3
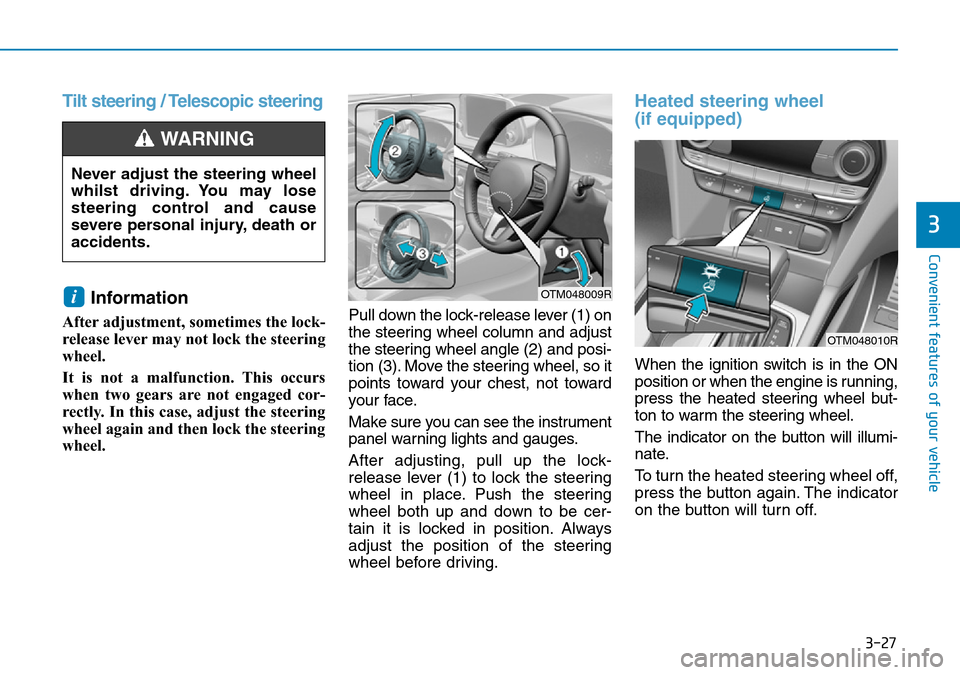
Tilt steering / Telescopic steering
Information
After adjustment, sometimes the lock-
release lever may not lock the steering
wheel.
It is not a malfunction. This occurs
when two gears are not engaged cor-
rectly. In this case, adjust the steering
wheel again and then lock the steering
wheel.Pull down the lock-release lever (1) on
the steering wheel column and adjust
the steering wheel angle (2) and posi-
tion (3). Move the steering wheel, so it
points toward your chest, not toward
your face.
Make sure you can see the instrument
panel warning lights and gauges.
After adjusting, pull up the lock-
release lever (1) to lock the steering
wheel in place. Push the steering
wheel both up and down to be cer-
tain it is locked in position. Always
adjust the position of the steering
wheel before driving.
Heated steering wheel
(if equipped)
When the ignition switch is in the ON
position or when the engine is running,
press the heated steering wheel but-
ton to warm the steering wheel.
The indicator on the button will illumi-
nate.
To turn the heated steering wheel off,
press the button again. The indicator
on the button will turn off.
i
Never adjust the steering wheel
whilst driving. You may lose
steering control and cause
severe personal injury, death or
accidents.
WARNING
OTM048009R
OTM048010R
Page 120 of 682
3-29
Convenient features of your vehicle
MIRRORS
3
Inside rearview mirror
Before you start driving, adjust the
rearview mirror to the centre on the
view through the rear window.When cleaning the mirror, use a
paper towel or similar material
dampened with glass cleaner. Do
not spray glass cleaner directly on
the mirror as that may cause the
liquid cleaner to enter the mirror
housing.
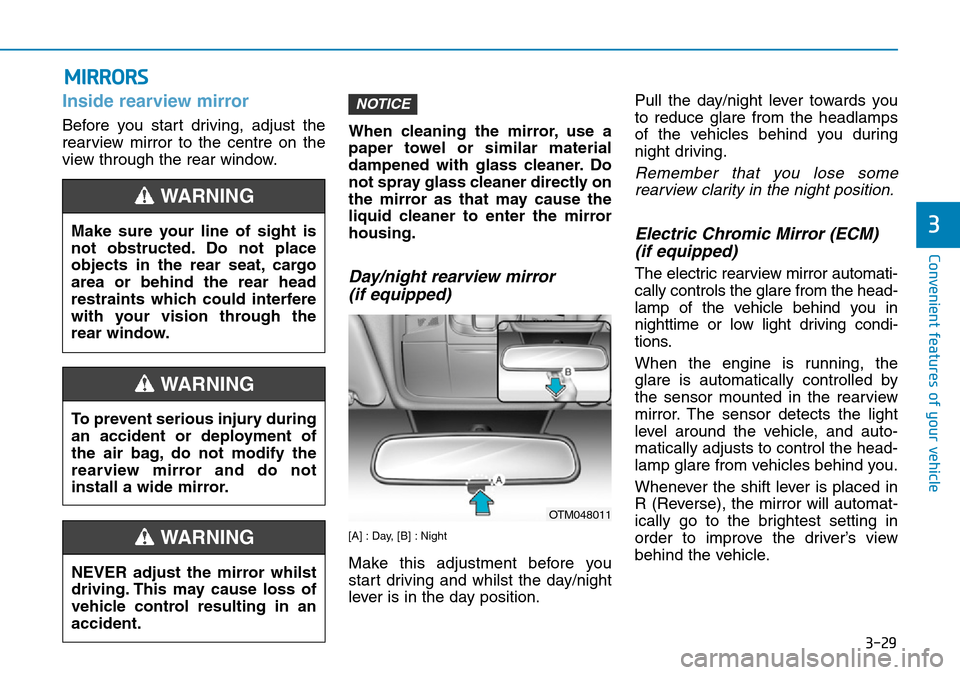
Day/night rearview mirror
(if equipped)
[A] : Day, [B] : Night
Make this adjustment before you
start driving and whilst the day/night
lever is in the day position.Pull the day/night lever towards you
to reduce glare from the headlamps
of the vehicles behind you during
night driving.
Remember that you lose some
rearview clarity in the night position.
Electric Chromic Mirror (ECM)
(if equipped)
The electric rearview mirror automati-
cally controls the glare from the head-
lamp of the vehicle behind you in
nighttime or low light driving condi-
tions.
When the engine is running, the
glare is automatically controlled by
the sensor mounted in the rearview
mirror. The sensor detects the light
level around the vehicle, and auto-
matically adjusts to control the head-
lamp glare from vehicles behind you.
Whenever the shift lever is placed in
R (Reverse), the mirror will automat-
ically go to the brightest setting in
order to improve the driver’s view
behind the vehicle.
NOTICE
NEVER adjust the mirror whilst
driving. This may cause loss of
vehicle control resulting in an
accident.
WARNING
Make sure your line of sight is
not obstructed. Do not place
objects in the rear seat, cargo
area or behind the rear head
restraints which could interfere
with your vision through the
rear window.
WARNING
To prevent serious injury during
an accident or deployment of
the air bag, do not modify the
rearview mirror and do not
install a wide mirror.
WARNING
OTM048011
Page 121 of 682
![Hyundai Santa Fe 2019 Owners Manual - RHD (UK, Australia) 3-30
Convenient features of your vehicle
[1] : Indicator, [2] : ON/OFF button, [3] : Sensor
To operate the electric rearview
mirror:
• Press the on/off button (1) to turn
the automatic dimming funct Hyundai Santa Fe 2019 Owners Manual - RHD (UK, Australia) 3-30
Convenient features of your vehicle
[1] : Indicator, [2] : ON/OFF button, [3] : Sensor
To operate the electric rearview
mirror:
• Press the on/off button (1) to turn
the automatic dimming funct](/img/35/16317/w960_16317-120.png)
3-30
Convenient features of your vehicle
[1] : Indicator, [2] : ON/OFF button, [3] : Sensor
To operate the electric rearview
mirror:
• Press the on/off button (1) to turn
the automatic dimming function on.
The mirror indicator light will illumi-
nate.
Press the on/off button to turn the
automatic dimming function off.
The mirror indicator light will turn
off.
• The mirror defaults to the ON posi-
tion whenever the ignition switch is
turned on.When cleaning the mirror, use a
paper towel or similar material
dampened with glass cleaner. Do
not spray glass cleaner directly on
the mirror as that may cause the
liquid cleaner to enter the mirror
housing.
Electric chromic mirror (ECM)
with compass
1. Rear light sensor
2. Status indicator LED
3. ECM ON/OFF button4. Compass button
5. Display window
Automatic dimming rear view mirror
controls automatically the glare of
headlights of the vehicle behind you
when it turned on by pressing the
ECM ON/OFF button. It is turned off
by pressing he ECM ON/OFF button
once more.
1. To operate Compass feature
Press and release the compass but-
ton, then the vehicle's directional
heading will be displayed. Pressing
and releasing the button again will
turn off the display.
Heading display
- E : East
- W : West
- S : South
- N : North
ex) NE : North East
NOTICE
OTM048428L
OTM048429L