ESP HYUNDAI SANTA FE HYBRID 2021 User Guide
[x] Cancel search | Manufacturer: HYUNDAI, Model Year: 2021, Model line: SANTA FE HYBRID, Model: HYUNDAI SANTA FE HYBRID 2021Pages: 598, PDF Size: 66.6 MB
Page 95 of 598
Seats & Safety System
3-50
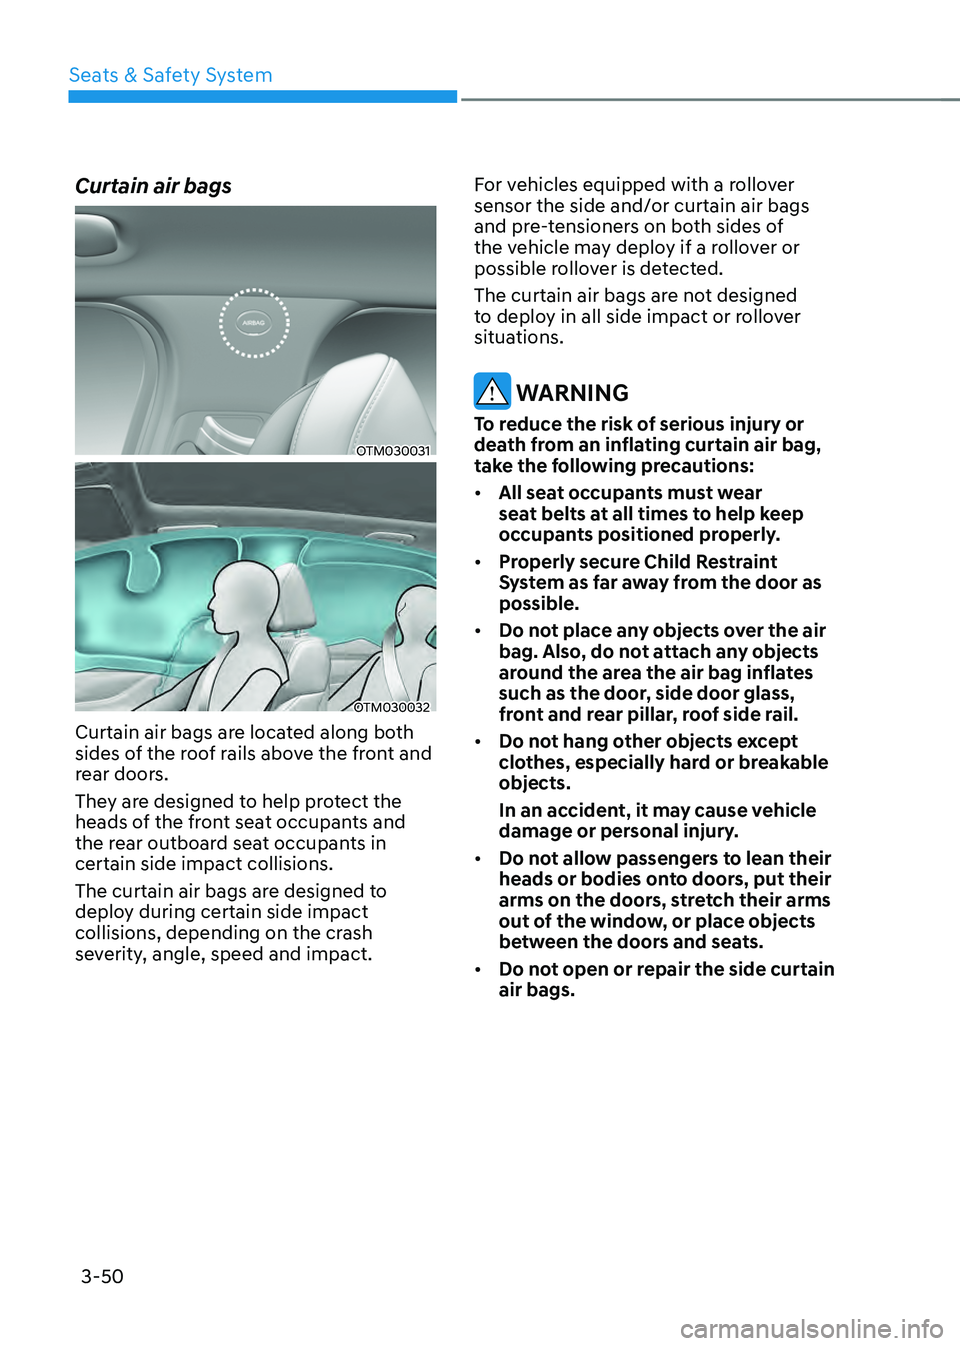
Curtain air bags
OTM030031
OTM030032
Curtain air bags are located along both
sides of the roof rails above the front and
rear doors.
They are designed to help protect the
heads of the front seat occupants and
the rear outboard seat occupants in
certain side impact collisions.
The curtain air bags are designed to
deploy during certain side impact
collisions, depending on the crash
severity, angle, speed and impact.For vehicles equipped with a rollover
sensor the side and/or curtain air bags
and pre-tensioners on both sides of
the vehicle may deploy if a rollover or
possible rollover is detected.
The curtain air bags are not designed
to deploy in all side impact or rollover
situations.
WARNING
To reduce the risk of serious injury or
death from an inflating curtain air bag,
take the following precautions:
•
All seat occupants must wear
seat belts at all times to help keep
occupants positioned properly.
• Properly secure Child Restraint
System as far away from the door as
possible.
• Do not place any objects over the air
bag. Also, do not attach any objects
around the area the air bag inflates
such as the door, side door glass,
front and rear pillar, roof side rail.
• Do not hang other objects except
clothes, especially hard or breakable
objects.
In an accident, it may cause vehicle
damage or personal injury.
• Do not allow passengers to lean their
heads or bodies onto doors, put their
arms on the doors, stretch their arms
out of the window, or place objects
between the doors and seats.
• Do not open or repair the side curtain
air bags.
Page 97 of 598
Seats & Safety System
3-52
During a moderate to severe frontal
collision, sensors will detect the
vehicle’s rapid deceleration. If the rate of
deceleration is high enough, the control
unit will inflate the front air bags, at the
time and with the force needed.
The front air bags help protect the driver
and front passenger by responding to
frontal impacts in which seat belts alone
cannot provide adequate restraint. When
needed, the side air bags help provide
protection in the event of a side impact
or rollover by supporting the side upper
body area.
• Air bags are activated (able to
inflate if necessary) only when the
Engine Start/Stop button is in the
ON or START position, and it can be
activated within about 3 minutes after
the engine is turned off.
• Air bags inflate in the event of certain
frontal or side collisions to help
protect the occupants from serious
physical injury.
• There is no single speed at which the
air bags will inflate. Generally, air bags
are designed to inflate based upon the
severity of a collision and its direction.
These two factors determine whether
the sensors produce an electronic
deployment/inflation signal.
• The front air bags will completely
inflate and deflate in an instant. It is
virtually impossible for you to see the
air bags inflate during an accident. It is
much more likely that you will simply
see the deflated air bags hanging out
of their storage compartments after
the collision. •
In addition to inflating in serious side
collisions, vehicles equipped with a
rollover sensor, side and/or curtain air
bags will inflate if the sensing system
detects a rollover.
When a rollover is detected, curtain
air bags will remain inflated longer to
help provide protection from ejection,
especially when used in conjunction
with the seat belts. (if equipped with a
rollover sensor)
• To help provide protection, the air
bags must inflate rapidly. The speed
of air bag inflation is a consequence
of extremely short time in which
to inflate the air bag between the
occupant and the vehicle structures
before the occupant impacts those
structures. This speed of inflation
reduces the risk of serious or
lifethreatening injuries and is thus a
necessary part of air bag design.
However, the rapid air bag inflation
can also cause injuries which can
include facial abrasions, bruises and
broken bones because the inflation
speed also causes the air bags to
expand with a great deal of force.
• There are even circumstances under
which contact with the air bag can
cause fatal injuries, especially if the
occupant is positioned excessively
close to the air bag.
You can take steps to reduce the risk
of being injured by an inflating air bag.
The greatest risk is sitting too close to
the air bag. An air bag needs about 10
in. (25 cm) of space to inflate. NHTSA
recommends that drivers allow at least
10 in. (25 cm) between the center of the
steering wheel and the chest.
Page 136 of 598
Instrument cluster
4-24
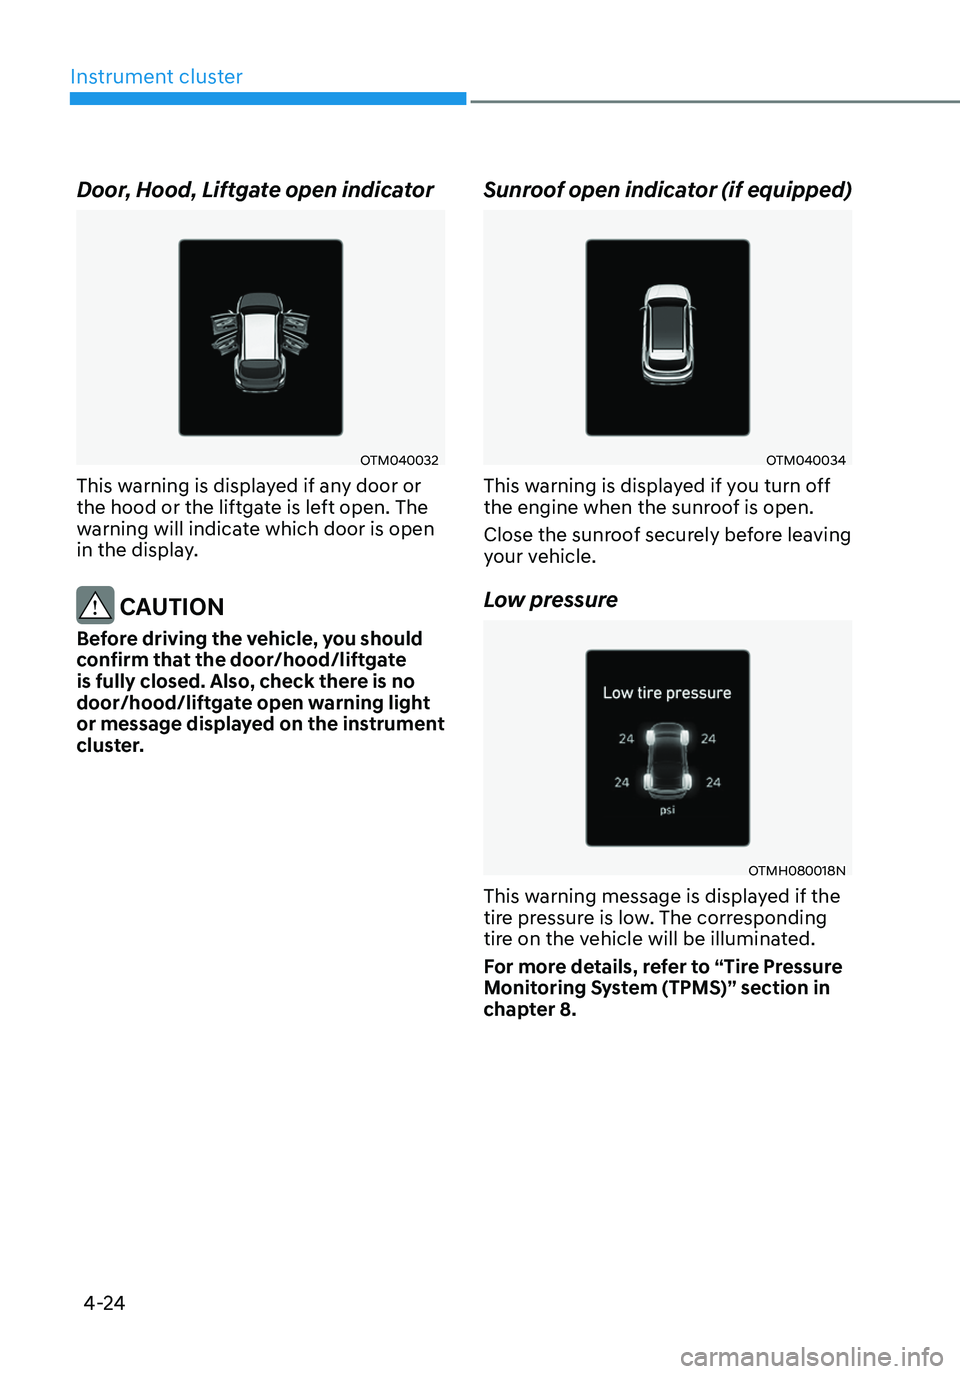
Door, Hood, Liftgate open indicator
OTM040032
This warning is displayed if any door or
the hood or the liftgate is left open. The
warning will indicate which door is open
in the display.
CAUTION
Before driving the vehicle, you should
confirm that the door/hood/liftgate
is fully closed. Also, check there is no
door/hood/liftgate open warning light
or message displayed on the instrument
cluster.
Sunroof open indicator (if equipped)
OTM040034
This warning is displayed if you turn off
the engine when the sunroof is open.
Close the sunroof securely before leaving
your vehicle.
Low pressure
OTMH080018N
This warning message is displayed if the
tire pressure is low. The corresponding
tire on the vehicle will be illuminated.
For more details, refer to “Tire Pressure
Monitoring System (TPMS)” section in
chapter 8.
Page 167 of 598
05
5-9
Information
This device complies with Part 15 of the
FCC rules.
Operation is subject to the following three
conditions:
1. This device may not cause harmful
interference.
2. This device must accept any
interference received, including
interference that may cause undesired
operation.
3. Changes or modifications not expressly
approved by the party responsible
for compliance could void the user’s
authority to operate the device.
NOTICE
• Keep the smart key away from
electromagnetic materials that
blocks electromagnetic waves to the
key surface.
• Always have the smart key with
you when leaving the vehicle. If the
smart key is left near the vehicle, the
vehicle battery may be discharged.
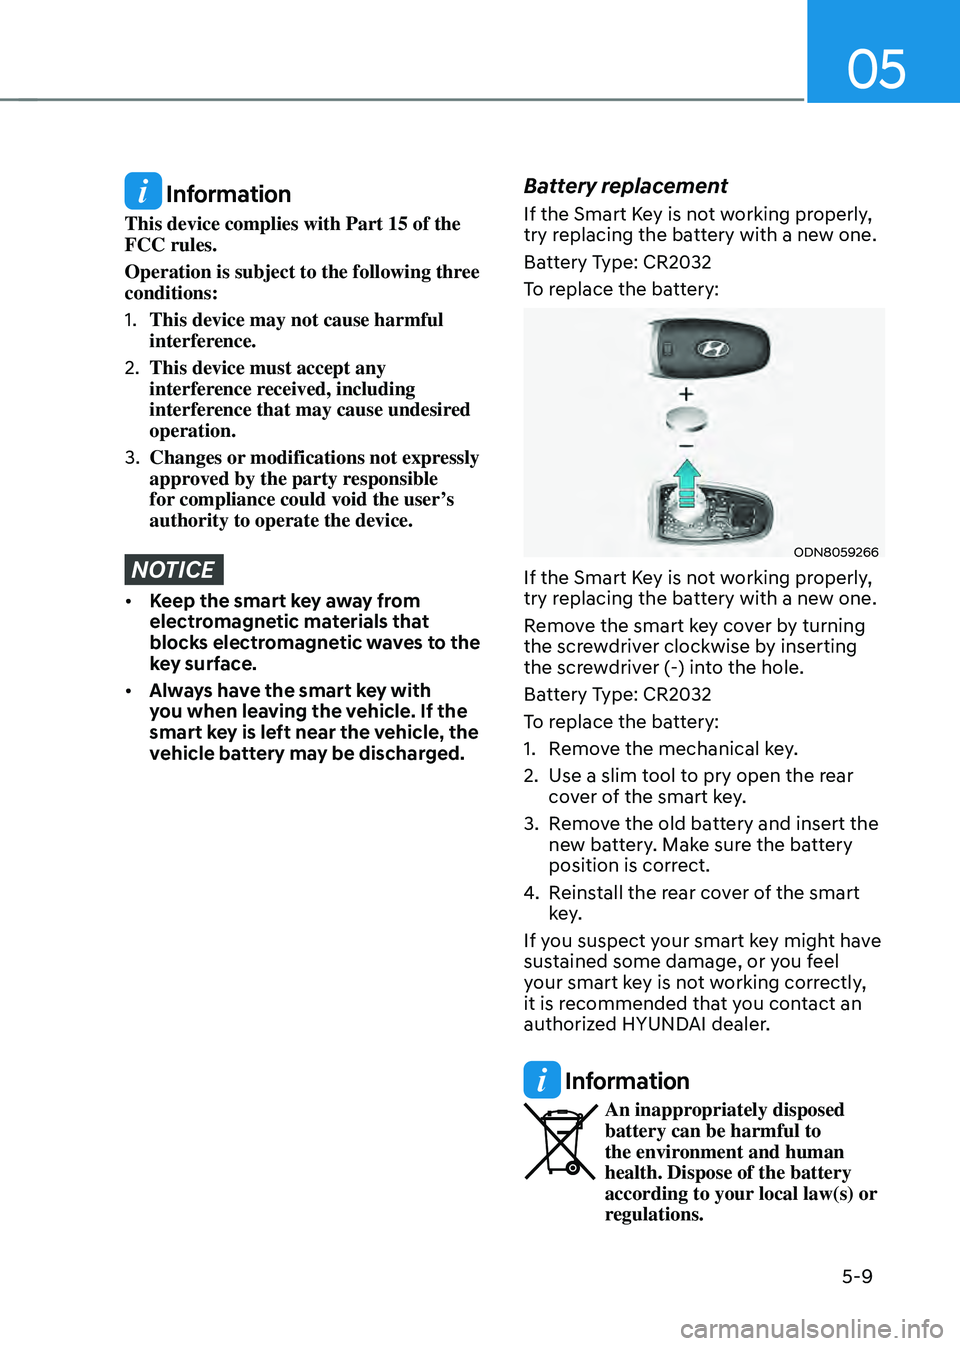
Battery replacement
If the Smart Key is not working properly,
try replacing the battery with a new one.
Battery Type: CR2032
To replace the battery:
ODN8059266
If the Smart Key is not working properly,
try replacing the battery with a new one.
Remove the smart key cover by turning
the screwdriver clockwise by inserting
the screwdriver (-) into the hole.
Battery Type: CR2032
To replace the battery:
1. Remove the mechanical key.
2. Use a slim tool to pry open the rear
cover of the smart key.
3. Remove the old battery and insert the
new battery. Make sure the battery
position is correct.
4. Reinstall the rear cover of the smart
key.
If you suspect your smart key might have
sustained some damage, or you feel
your smart key is not working correctly,
it is recommended that you contact an
authorized HYUNDAI dealer.
Information
An inappropriately disposed battery can be harmful to
the environment and human
health. Dispose of the battery
according to your local law(s) or
regulations.
Page 168 of 598
Convenient features
5-10
Immobilizer system
The immobilizer system helps protect
your vehicle from theft. If an improperly
coded key (or other device) is used, the
engine’s fuel system is disabled.
When the Engine Start/Stop button
is pressed to the ON position, the
immobilizer system indicator should
come on briefly, then go off. If the
indicator starts to blink, the system does
not recognize the coding of the key.
Place the ignition switch to the LOCK/
OFF position, then place the ignition
switch to the ON position again.
The system may not recognize your
key’s coding if another immobilizer key
or other metal object (i.e., key chain) is
near the key. The engine may not start
because the metal may interrupt the
transponder signal from transmitting
normally.
If the system repeatedly does not
recognize the coding of the key, it is
recommended that you contact your
HYUNDAI dealer.
Do not attempt to alter this system
or add other devices to it. Electrical
problems could result that may make
your vehicle inoperable. WARNING
In order to prevent theft of your
vehicle, do not leave spare keys
anywhere in your vehicle. Your
immobilizer password is a customer
unique password and should be kept
confidential.
NOTICE
The transponder in your key is an
important part of the immobilizer
system. It is designed to give years
of trouble-free service, however you
should avoid exposure to moisture,
static electricity and rough handling.
Immobilizer system malfunction could
occur.
Information
This device complies with Part 15 of the
FCC rules.
Operation is subject to the following three
conditions:
1. This device may not cause harmful
interference.
2. This device must accept any
interference received, including
interference that may cause undesired
operation.
3. Changes or modifications not expressly
approved by the party responsible
for compliance could void the user’s
authority to operate the device.
Page 176 of 598
Convenient features
5-18
CAUTION
• Do not leave the registered digital
key (smartphone) and card key in
your vehicle. Please carry around
your keys all the times.
• If you happen to lose your digital
key (smartphone) or card key
registered as a main user’s key, you
should immediately delete the key
on the vehicle’s key menu. For more
information, refer to the Digital Key
Deletion in this chapter.
• If you registered your digital key
(smartphone) or card key in the
vehicle, a message appears on the
instrument cluster and let you know
the key is registered.
(Message: Digital key(s) active.)
• If you buy a used vehicle, you should
confirm the message and delete the
registered smartphone key and card
key. In this case, you should carry
your smart key.
• If you keep place the NFC card
of the digital key on the interior
authentication pad (wireless
charger) while driving, it may cause a
malfunction of the NFC card.
• You should remove your NFC card
of the digital key on the interior
authentication pad after turning on
the engine.
• Hyundai digital key app may not
work properly when the NFC or
Bluetooth communication between
smartphone and car is not good.
• If the remote control operation
is executed where the mobile
connection is weak, Bluetooth
connection is poor due to lots of
Bluetooth devices or there is an
object such as metal or concrete, it
might be delayed or the operable
distance might decrease. Especially,
you should not cover the smartphone
with your hand or place other
devices which can cause frequency
interference. It may result in poor
performance.
• If the remote control function is not
activated, please use NFC function to
lock or unlock the doors
• You should be careful not to
press the remote control button
on the digital key (smartphone)
accidentally.
• If the digital key (smartphone) is
discharged or defective or you
cannot use the digital key since the
vehicle battery is discharged, use the
inside door lock button to lock all of
the doors.
CAUTION
• Hyundai digital key app on the
smartphone and card key may not
work if any of the following occurs:
-Hyundai digital key app on the
smartphone is deleted. (Required
to reinstall the app)
-Account log in information of
Hyundai digital key app is expired.
(Required to re-log in)
-When you try to log in to another
smartphone instead of the
registered smartphone with same
user account.
-Smartphone rooting or app
hacking is detected.
-Smartphone battery or the vehicle
battery is discharged.
-Smartphone’s screen is off or
locked.
-NFC or Bluetooth is turned off on
the smartphone settings.
-Smartphone’s mobile network
setting is off or airplane mode is
activated.
-A credit card is overlapped in the
back of your smartphone or metal
or thick case is used.
-Use the card key with insert it
into the wallet or card holder or
overlapping with other cards.
Page 192 of 598
Convenient features
5-34
Recalling memory positions
1. Shift to P (Park) while the Engine
Start/Stop button is in the ON
position.
2. Press the desired memory button (1
or 2). The system will beep once, and
then the driver’s seat position, side
view mirror position, steering wheel
position, instrument panel illumination
intensity and head-up display height/
brightness will automatically adjust to
the stored positions.
3. ‘Driver 1 (or 2) settings applied’ will
appear on the cluster LCD display.
Information
• If you press the SET button or the
corresponding button which the
setting is being recalled, the setting will
temporarily deactivate. If you press the
other buttons, the setting of the pressed
button will activate.
For example, if you press the SET
button or number 1 button with the
number 1 setting in operation, the
setting will temporarily deactivate. If
you press the number 2 button, the
number 2 setting will activate.
• If you adjust the seat, rearview mirror,
steering wheel, instrument panel
illumination or head-up display while
recalling the stored positions, the pre-
set settings will become ineffective.
Resetting the system
Take the following procedures to reset
integrated memory system, when it does
not operate properly.
Resetting integrated memory
system
1. Stop the vehicle and open the driver’s
door with the Engine Start/Stop
button in the ON position and the
vehicle shifted to P (Park).
2. Adjust the driver’s seat and seatback
to the foremost position.
3. Press the SET button and push
forward the driver’s seat movement
switch over 2 seconds simultaneously.
Page 205 of 598
05
5-47
2) The following instructions will erase ALL HomeLink® programming from
ALL buttons:
OTMA050008
1. Press and hold the buttons (1) and (3)
simultaneously.
2. The HomeLink indicator light (7) will
illuminate solid Orange for about 10
seconds.
3. Release the buttons once the
HomeLink indicator light (7) changes
to Green and flashes rapidly.
4. Now all three HomeLink buttons
(1), (2) and (3) are cleared of any
programming.
Information
HomeLink® and the HomeLink® House
logo are registered trademarks of Gentex
Corporation.
The myQ logo is a registered trademark of
The Chamberlain Group, Inc.
FCC (USA) and ISED (Canada)
This device complies with FCC rules
part 15 and Innovation, Science, and
Economic Development Canada RSS-
210. Operation is subject to the following
two conditions: (1) This device may not
cause harmful interference, and (2) This
device must accept any interference that
may be received including interference
that may cause undesired operation.
WARNING: The transmitter has been
tested and complies with FCC and
ISED rules. Changes or modifications
not expressly approved by the party
responsible for compliance could void
the user’s authority to operate the
device.
This equipment complies with FCC
and ISED radiation exposure limits set
forth for an uncontrolled environment.
End Users must follow the specific
operating instructions for satisfying RF
exposure compliance. This transmitter
must be at least 20cm from the user and
must not be co-located or operating in
conjunction with any other antenna or
transmitter.
Page 206 of 598
Convenient features
5-48
FCC (Htats-Unis) et ISED (Canada)
Cet appareil est conforme aux
règlements de la FCC, section 15, et
au CNR-210 d’Innovation, Sciences et
Dhveloppement économique Canada. Le
fonctionnement est assujetti aux deux
conditions suivantes : (1) cet appareil ne doit pas causer d’interférences nuisibles
et (2) cet appareil doit accepter toute
interférence reçue, y compris celle qui
pourrait entraîner un dysfonctionnement.
MISE EN GARDE : L’émetteur a subi des
tests et est conforme aux règlements de
la FCC et d’ISDE. Les changements ou
modifications non approuvés explicitement
par la partie responsable de la conformité
pourraient rendre caduque l’autorisation de
l’utilisateur de se servir du dispositif.
Cet appareil est conforme aux limites
d’exposition aux radiations de la FCC et
d’ISDE établies pour un environnement
non contrôlé. Les utilisateurs finaux doivent
respecter les instructions d’utilisation
spécifiques pour satisfaire aux exigences
de conformité aux expositions de RF.
L’émetteur doit se trouver à 20 cm au
minimum de l’utilisateur et ne doit pas
être situé au même endroit que tout autre
émetteur ou antenne ni fonctionner avec
un autre émetteur ou antenne.Méjico
La operación de este equipo está sujeta
a las siguientes dos condiciones: (1) es
posible que este equipo o dispositivo
pueda no causar interferencia dañina, y
(2) este dispositivo o dispositivos deben
aceptar cualquier interferencia, que
incluye la interferencia que puede causar
su operación no deseada.
Page 219 of 598
05
5-61
Automatic reverse
ODH043039
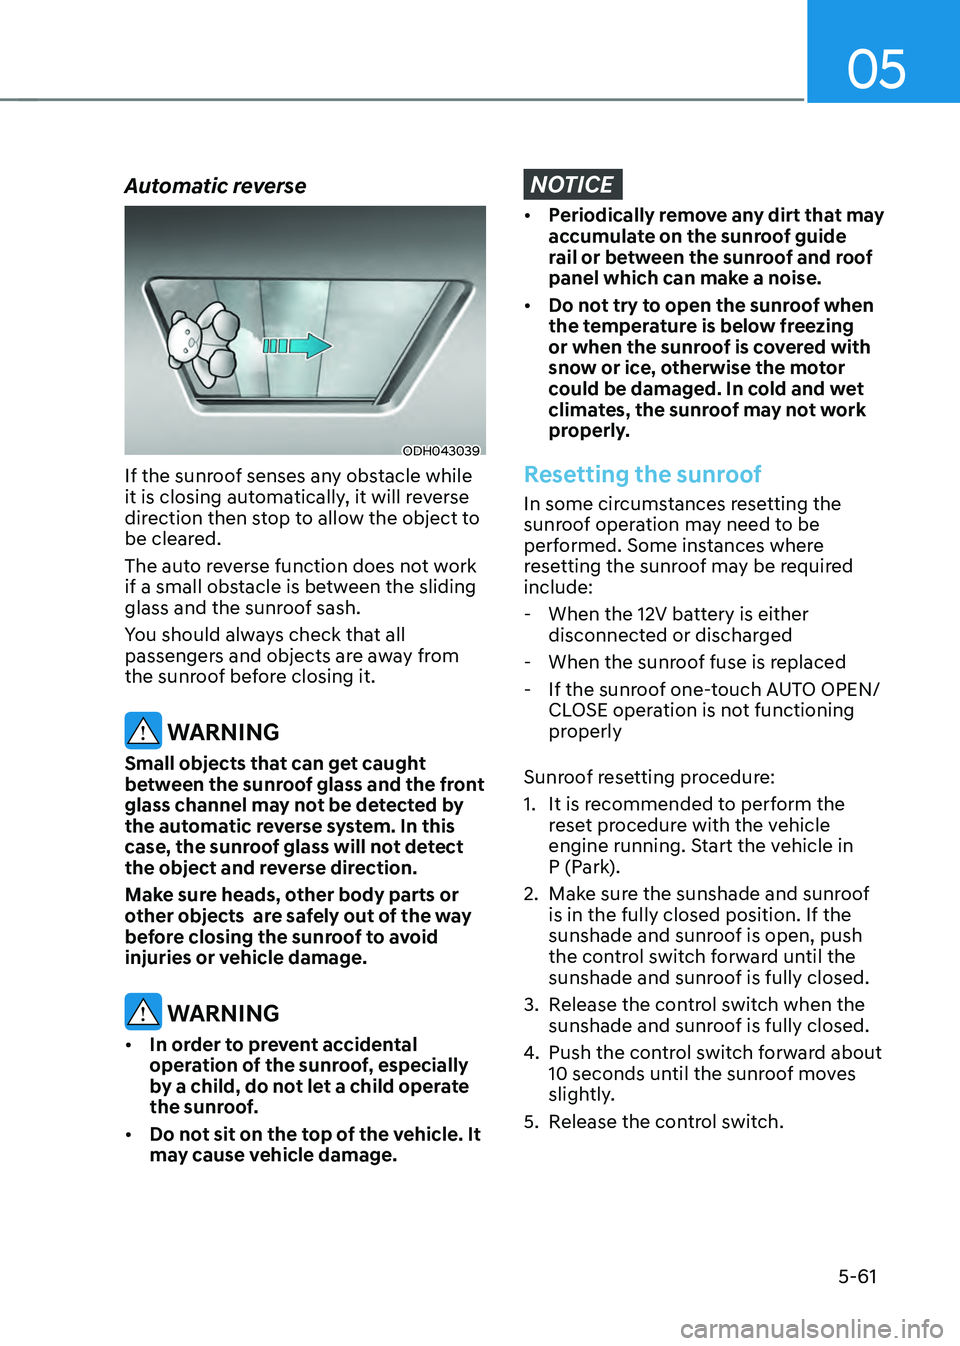
If the sunroof senses any obstacle while
it is closing automatically, it will reverse
direction then stop to allow the object to
be cleared.
The auto reverse function does not work
if a small obstacle is between the sliding
glass and the sunroof sash.
You should always check that all
passengers and objects are away from
the sunroof before closing it.
WARNING
Small objects that can get caught
between the sunroof glass and the front
glass channel may not be detected by
the automatic reverse system. In this
case, the sunroof glass will not detect
the object and reverse direction.
Make sure heads, other body parts or
other objects are safely out of the way
before closing the sunroof to avoid
injuries or vehicle damage.
WARNING
• In order to prevent accidental
operation of the sunroof, especially
by a child, do not let a child operate
the sunroof.
• Do not sit on the top of the vehicle. It
may cause vehicle damage.
NOTICE
• Periodically remove any dirt that may
accumulate on the sunroof guide
rail or between the sunroof and roof
panel which can make a noise.
• Do not try to open the sunroof when
the temperature is below freezing
or when the sunroof is covered with
snow or ice, otherwise the motor
could be damaged. In cold and wet
climates, the sunroof may not work
properly.
Resetting the sunroof
In some circumstances resetting the
sunroof operation may need to be
performed. Some instances where
resetting the sunroof may be required
include:
-When the 12V battery is either
disconnected or discharged
-When the sunroof fuse is replaced
-If the sunroof one-touch AUTO OPEN/
CLOSE operation is not functioning
properly
Sunroof resetting procedure:
1. It is recommended to perform the
reset procedure with the vehicle
engine running. Start the vehicle in
P (Park).
2. Make sure the sunshade and sunroof
is in the fully closed position. If the
sunshade and sunroof is open, push
the control switch forward until the
sunshade and sunroof is fully closed.
3. Release the control switch when the
sunshade and sunroof is fully closed.
4. Push the control switch forward about
10 seconds until the sunroof moves
slightly.
5. Release the control switch.