flasher Hyundai Santa Fe Sport 2016 Owner's Manual
[x] Cancel search | Manufacturer: HYUNDAI, Model Year: 2016, Model line: Santa Fe Sport, Model: Hyundai Santa Fe Sport 2016Pages: 763, PDF Size: 37.75 MB
Page 19 of 763
Your vehicle at a glance
62
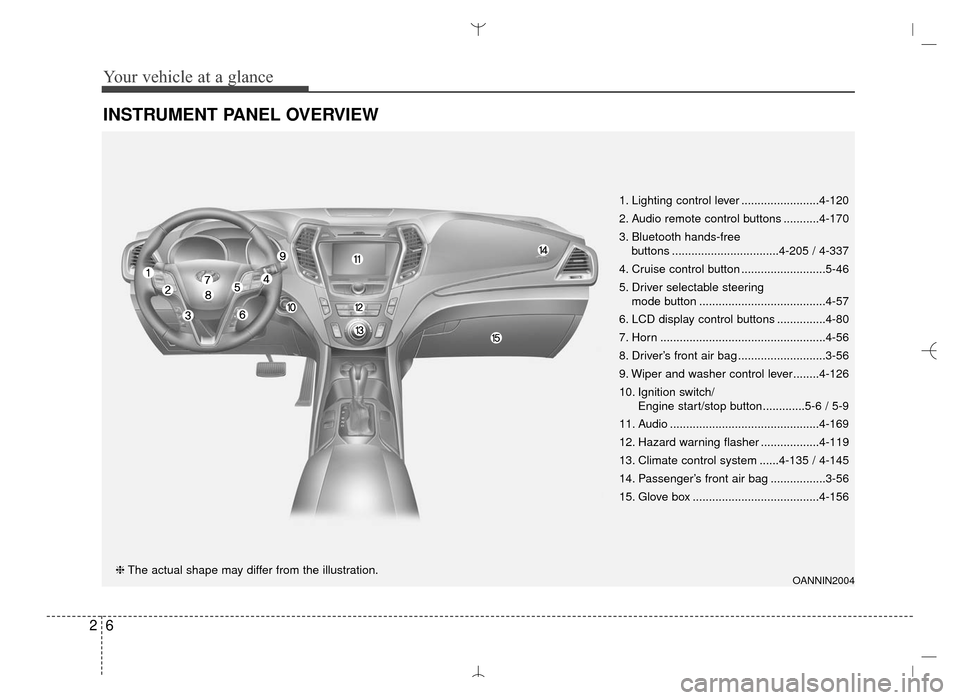
INSTRUMENT PANEL OVERVIEW
OANNIN2004❈The actual shape may differ from the illustration. 1. Lighting control lever ........................4-120
2. Audio remote control buttons ...........4-170
3. Bluetooth hands-free
buttons .................................4-205 / 4-337
4. Cruise control button ..........................5-46
5. Driver selectable steering mode button .......................................4-57
6. LCD display control buttons ...............4-80
7. Horn ...................................................4-56
8. Driver’s front air bag ...........................3-56
9. Wiper and washer control lever........4-126
10. Ignition switch/ Engine start/stop button.............5-6 / 5-9
11. Audio ..............................................4-169
12. Hazard warning flasher ..................4-119
13. Climate control system ......4-135 / 4-145
14. Passenger’s front air bag .................3-56
15. Glove box .......................................4-156
AN HMA 2.QXP 6/10/2015 11:21 AM Page 6
Page 94 of 763
Mirrors . . . . . . . . . . . . . . . . . . . . . . . . . . . . . . . . . . 4-60\
• Inside rearview mirror . . . . . . . . . . . . . . . . . . . . . . . . 4-60
• Outside rearview mirror. . . . . . . . . . . . . . . . . . . . . . . 4-76
• Blind zone mirror (BZM) . . . . . . . . . . . . . . . . . . . . . . 4-78
Instrument cluster . . . . . . . . . . . . . . . . . . . . . . . . . 4-79
• Instrument Cluster Control . . . . . . . . . . . . . . . . . . . . 4-80
• LCD Display Control . . . . . . . . . . . . . . . . . . . . . . . . . 4-80
• Gauges . . . . . . . . . . . . . . . . . . . . . . . . . . . . . . . . . . . . \
. 4-81
• Transaxle Shift Indicator . . . . . . . . . . . . . . . . . . . . . . 4-84
LCD display . . . . . . . . . . . . . . . . . . . . . . . . . . . . . . 4-85
• LCD Modes . . . . . . . . . . . . . . . . . . . . . . . . . . . . . . . . . 4-85
• Service Mode . . . . . . . . . . . . . . . . . . . . . . . . . . . . . . . . 4-86
• User Settings Mode . . . . . . . . . . . . . . . . . . . . . . . . . . . 4-87
• A/V Mode . . . . . . . . . . . . . . . . . . . . . . . . . . . . . . . . . . . 4-\
90
• Turn By Turn Mode . . . . . . . . . . . . . . . . . . . . . . . . . . 4-90
• Warning Messages . . . . . . . . . . . . . . . . . . . . . . . . . . . . 4-91
Trip computer . . . . . . . . . . . . . . . . . . . . . . . . . . . . . 4-98
• Overview . . . . . . . . . . . . . . . . . . . . . . . . . . . . . . . . . . . 4-\
98
• Trip A/B . . . . . . . . . . . . . . . . . . . . . . . . . . . . . . . . . . . . \
4-99
• Fuel Economy . . . . . . . . . . . . . . . . . . . . . . . . . . . . . . 4-100
Warning and indicator lights . . . . . . . . . . . . . . . 4-102
• Warning lights . . . . . . . . . . . . . . . . . . . . . . . . . . . . . . 4-102
• Indicator Lights . . . . . . . . . . . . . . . . . . . . . . . . . . . . . 4-110
Rear parking assist system . . . . . . . . . . . . . . . . . 4-114
• Operation . . . . . . . . . . . . . . . . . . . . . . . . . . . . . . . . . . 4-114• Non-operational conditions . . . . . . . . . . . . . . . . . . . 4-115
• Self-diagnosis . . . . . . . . . . . . . . . . . . . . . . . . . . . . . . . 4-117
Rearview camera . . . . . . . . . . . . . . . . . . . . . . . . . 4-118
Hazard warning flasher . . . . . . . . . . . . . . . . . . . . 4-119
Lighting . . . . . . . . . . . . . . . . . . . . . . . . . . . . . . . . . 4-120
• Battery saver function. . . . . . . . . . . . . . . . . . . . . . . . 4-120
• Headlamp delay function . . . . . . . . . . . . . . . . . . . . . 4-120
• Lighting control . . . . . . . . . . . . . . . . . . . . . . . . . . . . . 4-121
• Daytime running light . . . . . . . . . . . . . . . . . . . . . . . . 4-123
• High - beam operation . . . . . . . . . . . . . . . . . . . . . . . 4-123
• Turn signals and lane change signals . . . . . . . . . . . 4-124
• Front fog light . . . . . . . . . . . . . . . . . . . . . . . . . . . . . . 4-125
Wipers and washers . . . . . . . . . . . . . . . . . . . . . . . 4-126
• Windshield wipers (front) . . . . . . . . . . . . . . . . . . . . . 4-126
• Windshield washers (front) . . . . . . . . . . . . . . . . . . . 4-128
• Rear window wiper and washer switch. . . . . . . . . . 4-129
Interior light . . . . . . . . . . . . . . . . . . . . . . . . . . . . . 4-130
• Automatic turn off function . . . . . . . . . . . . . . . . . . . 4-130
• Map lamp . . . . . . . . . . . . . . . . . . . . . . . . . . . . . . . . . . 4-13\
0
• Room lamp . . . . . . . . . . . . . . . . . . . . . . . . . . . . . . . . . 4-131
• Luggage room lamp . . . . . . . . . . . . . . . . . . . . . . . . . 4-132
• Vanity mirror lamp . . . . . . . . . . . . . . . . . . . . . . . . . . 4-132
Welcome system . . . . . . . . . . . . . . . . . . . . . . . . . . 4-133
• Headlamp welcome . . . . . . . . . . . . . . . . . . . . . . . . . . 4-133
• Interior light. . . . . . . . . . . . . . . . . . . . . . . . . . . . . . . . 4-133
4
AN HMA 4A.QXP 3/5/2015 3:17 PM Page 2
Page 211 of 763
4119
Features of your vehicle
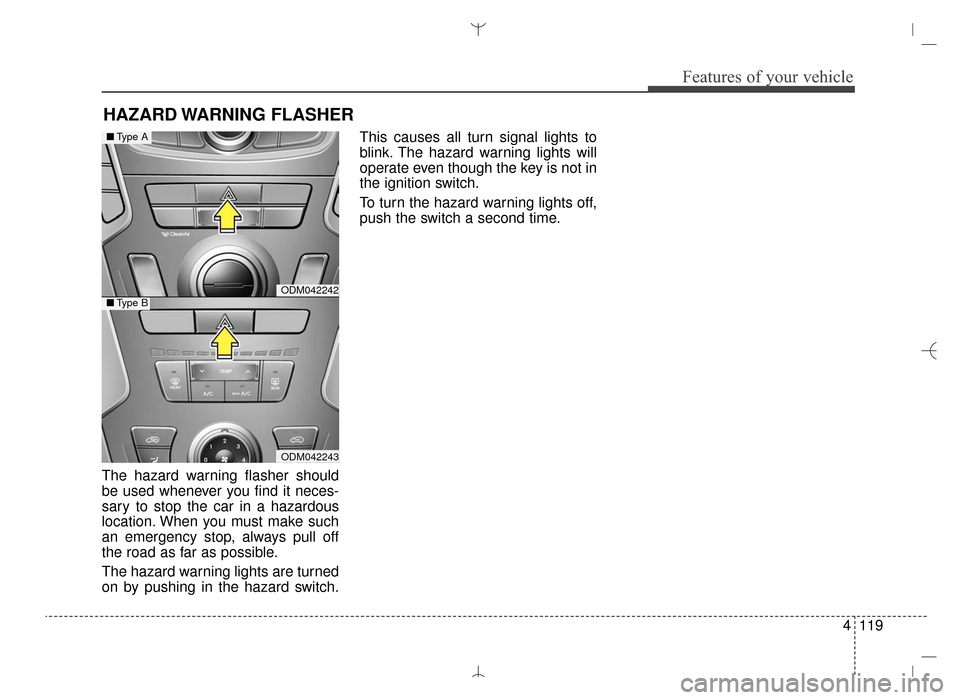
The hazard warning flasher should
be used whenever you find it neces-
sary to stop the car in a hazardous
location. When you must make such
an emergency stop, always pull off
the road as far as possible.
The hazard warning lights are turned
on by pushing in the hazard switch.This causes all turn signal lights to
blink. The hazard warning lights will
operate even though the key is not in
the ignition switch.
To turn the hazard warning lights off,
push the switch a second time.
HAZARD WARNING FLASHER
ODM042242
ODM042243
■
Type A
■Type B
AN HMA 4A.QXP 3/5/2015 3:18 PM Page 119
Page 598 of 763
Driving your vehicle
68
5
Chain installation
When installing chains, follow the
manufacturer's instructions and
mount them as tightly as you can.
Drive slowly with chains installed. If
you hear the chains contacting the
body or chassis, stop and tighten
them. If they still make contact, slow
down until it stops. Remove the
chains as soon as you begin driving
on cleared roads.Use high quality ethylene gly-
col coolant
Your vehicle is delivered with high
quality ethylene glycol coolant in the
cooling system. It is the only type of
coolant that should be used because
it helps prevent corrosion in the cool-
ing system, lubricates the water
pump and prevents freezing. Be sure
to replace or replenish your coolant
in accordance with the maintenance
schedule in section 7. Before winter,
have your coolant tested to assure
that its freezing point is sufficient for
the temperatures anticipated during
the winter.
CAUTION
Chains that are the wrong size
or improperly installed candamage your vehicle's brakelines, suspension, body andwheels.
Stop driving and retighten the chains any time you hear themhitting the vehicle.
WARNING- Tire chains
The use of chains may adversely affect vehicle han-
dling.
Do not exceed 20 mph (30 km/h) or the chain manufac-
turer’s recommended speed
limit, whichever is lower.
Drive carefully and avoid bumps, holes, sharp turns, and
other road hazards, which may
cause the vehicle to bounce.
Avoid sharp turns or locked- wheel braking.
WARNING - Mounting
chains
When mounting snow chains,
park the vehicle on level ground
away from traffic. Turn on the
vehicle Hazard Warning flashers
and place a triangular emer-
gency warning device behind
the vehicle if available. Always
place the vehicle in P (Park),
apply the parking brake and
turn off the engine before
installing snow chains.
AN HMA 5.QXP 2015-02-03 ¿ ¨˜ 1:21 Page 68
Page 604 of 763
Driving your vehicle
74
5
Turn signals when towing a trailer
When you tow a trailer, your vehicle
has to have a different turn signal
flasher and extra wiring. The green
arrows on your instrument panel will
flash whenever you signal a turn or
lane change. Properly connected,
the trailer lights will also flash to alert
other drivers you’re about to turn,
change lanes, or stop.
When towing a trailer, the green
arrows on your instrument panel will
flash for turns even if the bulbs on the
trailer are burned out. Thus, you may
think drivers behind you are seeing
your signals when, in fact, they are
not. It’s important to check occasion-
ally to be sure the trailer bulbs are still
working. You must also check the
lights every time you disconnect and
then reconnect the wires.
Do not connect a trailer lighting sys-
tem directly to your vehicle’s lighting
system. Use only an approved trailer
wiring harness.
An authorized HYUNDAI dealer can
assist you in installing the wiring har-
ness.
Driving on grades
Reduce speed and shift to a lower
gear before you start down a long or
steep downgrade. If you don’t shift
down, you might have to use your
brakes so much that they would get
hot and no longer operate efficiently.
On a long uphill grade, shift down
and reduce your speed to around 45
mph (70 km/h) to reduce the possi-
bility of engine and transaxle over-
heating.
Operating your vehicle in D (Drive)
when towing a trailer will minimize
heat build up and extend the life of
your transaxle.WARNING
Failure to use an approved trail-
er wiring harness could result
in damage to the vehicle electri-
cal system and/or personal
injury.
AN HMA 5.QXP 2015-02-03 ¿ ¨˜ 1:21 Page 74
Page 616 of 763
What to do in an emergency
Road warning . . . . . . . . . . . . . . . . . . . . . . . . . . . . . . 6-2
• Hazard warning flasher . . . . . . . . . . . . . . . . . . . . . . . . 6-2
In case of an emergency while driving . . . . . . . . . . 6-3
• If the engine stalls at a crossroad or crossing. . . . . . . 6-3
• If you have a flat tire while driving . . . . . . . . . . . . . . . 6-3
• If engine stalls while driving . . . . . . . . . . . . . . . . . . . . 6-3
If the engine does not start . . . . . . . . . . . . . . . . . . . 6-4
• If engine doesn’t turn over or turns over slowly . . . . 6-4
• If engine turns over normally but does not start . . . . 6-4
Emergency starting . . . . . . . . . . . . . . . . . . . . . . . . . 6-5
• Jump starting . . . . . . . . . . . . . . . . . . . . . . . . . . . . . . . . . 6-5
• Push-starting . . . . . . . . . . . . . . . . . . . . . . . . . . . . . . . . . 6-7
If the engine overheats . . . . . . . . . . . . . . . . . . . . . . . 6-8
Tire Pressure Monitoring System (TPMS) - Type A . . . . . . . . . . . . . . . . . . . . . . . . . . . . . . . . . . 6-9
• Low tire pressure indicator . . . . . . . . . . . . . . . . . . . . 6-10
• TPMS malfunction indicator . . . . . . . . . . . . . . . . . . . 6-11
• Changing a tire with TPMS . . . . . . . . . . . . . . . . . . . . 6-12
Tire Pressure Monitoring System (TPMS) - Type B . . . . . . . . . . . . . . . . . . . . . . . . . . . . . . . . . 6-14
• Check tire pressure . . . . . . . . . . . . . . . . . . . . . . . . . . . 6-14
• Tire pressure monitoring system . . . . . . . . . . . . . . . . 6-15
• Low tire pressure telltale . . . . . . . . . . . . . . . . . . . . . . 6-16
• Low tire pressure position telltale and tire
pressure telltale . . . . . . . . . . . . . . . . . . . . . . . . . . . . . 6-16
• TPMS (Tire Pressure Monitoring System) malfunction indicator . . . . . . . . . . . . . . . . . . . . . . . . 6-17
• Changing a tire with TPMS . . . . . . . . . . . . . . . . . . . . 6-18
If you have a flat tire . . . . . . . . . . . . . . . . . . . . . . . 6-20
• Jack and tools . . . . . . . . . . . . . . . . . . . . . . . . . . . . . . . 6-20
• Removing and storing the spare tire . . . . . . . . . . . . . 6-21
• Changing tires . . . . . . . . . . . . . . . . . . . . . . . . . . . . . . . 6-23
• Use of temporary compact spare tire . . . . . . . . . . . . 6-27
• Jack Label . . . . . . . . . . . . . . . . . . . . . . . . . . . . . . . . . . 6-29\
Towing . . . . . . . . . . . . . . . . . . . . . . . . . . . . . . . . . . . 6-\
30
• Towing service . . . . . . . . . . . . . . . . . . . . . . . . . . . . . . . 6-30
• Removable towing hook . . . . . . . . . . . . . . . . . . . . . . . 6-31
• Emergency towing . . . . . . . . . . . . . . . . . . . . . . . . . . . . 6-316
AN HMA 6.QXP 2015-02-03 ¿ ¨˜ 1:36 Page 1
Page 617 of 763
What to do in an emergency
26
ROAD WARNING
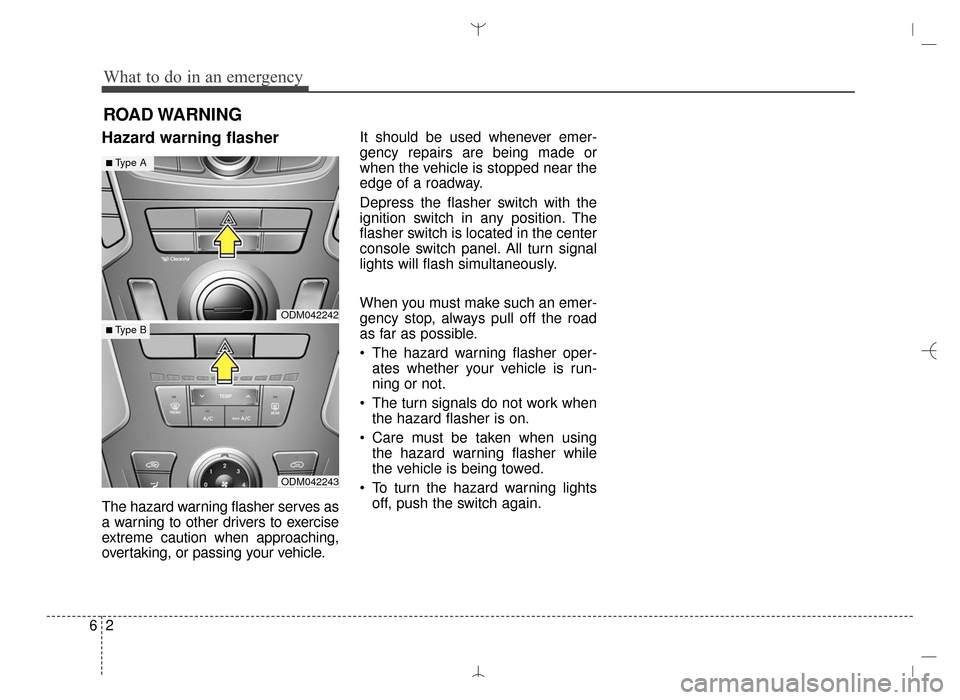
Hazard warning flasher
The hazard warning flasher serves as
a warning to other drivers to exercise
extreme caution when approaching,
overtaking, or passing your vehicle.It should be used whenever emer-
gency repairs are being made or
when the vehicle is stopped near the
edge of a roadway.
Depress the flasher switch with the
ignition switch in any position. The
flasher switch is located in the center
console switch panel. All turn signal
lights will flash simultaneously.
When you must make such an emer-
gency stop, always pull off the road
as far as possible.
• The hazard warning flasher oper-
ates whether your vehicle is run-
ning or not.
The turn signals do not work when the hazard flasher is on.
Care must be taken when using the hazard warning flasher while
the vehicle is being towed.
To turn the hazard warning lights off, push the switch again.
ODM042242
ODM042243
■Type A
■ Type B
AN HMA 6.QXP 2015-02-03 ¿ ¨˜ 1:36 Page 2
Page 618 of 763
63
What to do in an emergency
IN CASE OF AN EMERGENCY WHILE DRIVING
If the engine stalls at a cross-
road or crossing
If the engine stalls at a crossroad or
crossing, set the shift lever in the N
(Neutral) position and then push the
vehicle to a safe place.
If you have a flat tire while
driving
If a tire goes flat while you are driving:
1. Take your foot off the acceleratorpedal and let the car slow down
while driving straight ahead. Do
not apply the brakes immediately
or attempt to pull off the road as
this may cause a loss of control.
When the car has slowed to such
a speed that it is safe to do so,
brake carefully and pull off the
road. Drive off the road as far as
possible and park on firm, level
ground. If you are on a divided
highway, do not park in the median
area between the two traffic lanes.
2. When the vehicle is stopped, turn on your emergency hazard flashers,
set the parking brake and put the
transaxle in P.
3. Have all passengers get out of the car. Be sure they all get out on the
side of the car that is away from
traffic.
4. When repairing a flat tire, follow the instruction provided later in
this section.
If engine stalls while driving
1. Reduce your speed gradually,keeping a straight line. Move cau-
tiously off the road to a safe place.
2. Turn on your emergency flashers.
3. Try to start the engine again. If your vehicle will not start, contact
an authorized HYUNDAI dealer or
seek other qualified assistance.
✽ ✽NOTICE
If there was a check engine light and
loss of power or stall, it is best if safe
to do so to wait at least 10 seconds to
restart a vehicle after it stalls. This
may reset the car so it will no longer
run at low power (limp home) condi-
tion.
AN HMA 6.QXP 2015-02-03 ¿ ¨˜ 1:36 Page 3
Page 757 of 763
I5
Index
Jack and tools ..............................................................6-20
Jack label ....................................................................6-29\
Removing and storing the spare tire ..........................6-21
Floor mat anchor(s) ......................................................4-162
Fluid Brakes fluid ................................................................7-31
Washer fluid ................................................................7-33
Folding Key ......................................................................4-\
4
Folding the rear seat ......................................................3-18
Front fog light ..............................................................4-125
Front seat adjustment - Manual ........................................3-5
Front seat adjustment - Power ..........................................3-6
Fuel Economy ..............................................................4-100
Fuel filler door ................................................................4-44 Emergency fuel filler door release ..............................4-47
Fuel Gauge ......................................................................4-\
82
Fuel requirements ............................................................1-3
Fuse switch ....................................................................7-61\
Fuse/relay panel description ..........................................7-63
Fuses ........................................................................\
......7-59 Engine compartment panel fuse ........................7-61, 7-67
Fuse switch ..................................................................7-61
Fuse/relay panel description ........................................7-63
Instrument panel fuse ..................................................7-60
Multi fuse ....................................................................7-62\
Gauges ........................................................................\
....4-81
Glove box......................................................................4-\
156
Good braking practices ..................................................5-43
Good driving practices....................................................5-19
Gross vehicle weight ........................................................8-5
Hazard warning flasher ................................................4-119
Hazardous driving conditions ........................................5-60
Headlamp welcome ......................................................4-133
Headlight (Headlamp) escort function ........................4-120
Headlight bulb replacement ............................................7-71
Headlight position ........................................................4-122
Headrest (Front) ................................................................3-9
Headrest (Rear) ..............................................................3-15
Heated steering wheel ....................................................4-54
Height adjustment (Front) ..............................................3-25
High beam operation ....................................................4-123
Highway driving ............................................................5-64
Hill-start Assist Control (HAC) ......................................5-42
Hood........................................................................\
........4-42
Horn ........................................................................\
........4-56
How to use this manual ....................................................1-2G
H
AN HMA INDEX.QXP 3/3/2015 11:36 AM Page 5