low beam Hyundai Sonata
[x] Cancel search | Manufacturer: HYUNDAI, Model Year: , Model line: , Model:Pages: 340, PDF Size: 18.45 MB
Page 6 of 340
Introduction
6
1
A050000ANF-EA
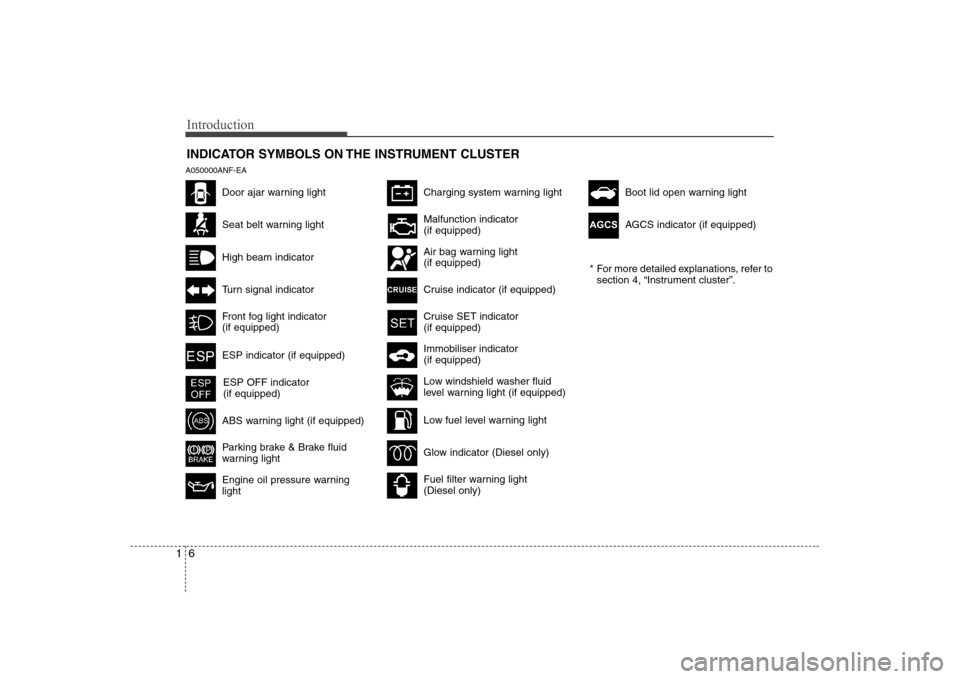
INDICATOR SYMBOLS ON THE INSTRUMENT CLUSTER
Seat belt warning light
High beam indicator
Turn signal indicator
Front fog light indicator (if equipped)
ABS warning light (if equipped)
Parking brake & Brake fluid
warning light
Engine oil pressure warning light
Charging system warning light
ESP indicator (if equipped)
ESP OFF indicator (if equipped)
Malfunction indicator (if equipped)
Air bag warning light (if equipped)
Cruise indicator (if equipped)
Cruise SET indicator (if equipped)
Immobiliser indicator (if equipped)
Low fuel level warning light
Glow indicator (Diesel only)
Fuel filter warning light (Diesel only)
Low windshield washer fluid
level warning light (if equipped) * For more detailed explanations, refer to
section 4, “Instrument cluster”.
Door ajar warning lightBoot lid open warning light
AGCS indicator (if equipped)
AGCS
Page 100 of 340
Features of your vehicle
42
4
Type C
As a reminder to the driver and passen-
ger, seat belt warning light will illuminate
for approximately 6 seconds each time
you turn the ignition switch ON. If the front seat is occupied, the seat belt
warning light and chime will operate as
follows;
If the driver's and/or front passenger's
lap/shoulder belt is not fastened when
the key is turned ON or if it is unfastened
after the key is turned ON, the corre-
sponding seat belt warning light will illu-
minate until the belt is fastened.
If you continue not to fasten the seat belt
and you drive over 9 km/h, the illuminat-
ed warning light will start to blink until you
drive under 6 km/h.
If you continue not to fasten the seat belt
and you drive over 20 km/h for the first
time, the seat belt warning chime will
sound for approximately 100 seconds
and the corresponding warning light will
blink.
Also, when you unfasten your seat belt
and drive over 9 km/h for the first time,
the warning chime will sound for approx-
imately 100 seconds.✽✽
NOTICE
You can find the front passenger's seat
belt warning light on the centre fasciapanel (if equipped).
D150305AFD
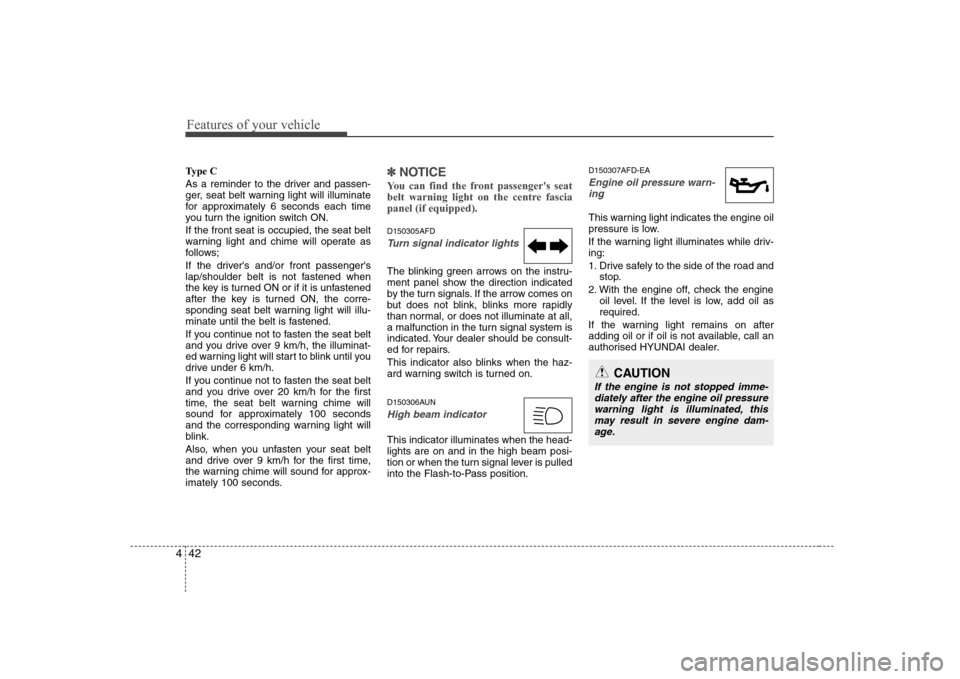
Turn signal indicator lights
The blinking green arrows on the instru-
ment panel show the direction indicated
by the turn signals. If the arrow comes on
but does not blink, blinks more rapidly
than normal, or does not illuminate at all,
a malfunction in the turn signal system is
indicated. Your dealer should be consult-
ed for repairs.
This indicator also blinks when the haz-
ard warning switch is turned on.
D150306AUN
High beam indicator
This indicator illuminates when the head- lights are on and in the high beam posi-
tion or when the turn signal lever is pulled
into the Flash-to-Pass position. D150307AFD-EA
Engine oil pressure warn-
ing
This warning light indicates the engine oil
pressure is low.
If the warning light illuminates while driv- ing:
1. Drive safely to the side of the road and stop.
2. With the engine off, check the engine oil level. If the level is low, add oil as required.
If the warning light remains on after
adding oil or if oil is not available, call an
authorised HYUNDAI dealer.
CAUTION
If the engine is not stopped imme- diately after the engine oil pressure
warning light is illuminated, thismay result in severe engine dam- age.
Page 112 of 340
Features of your vehicle
54
4
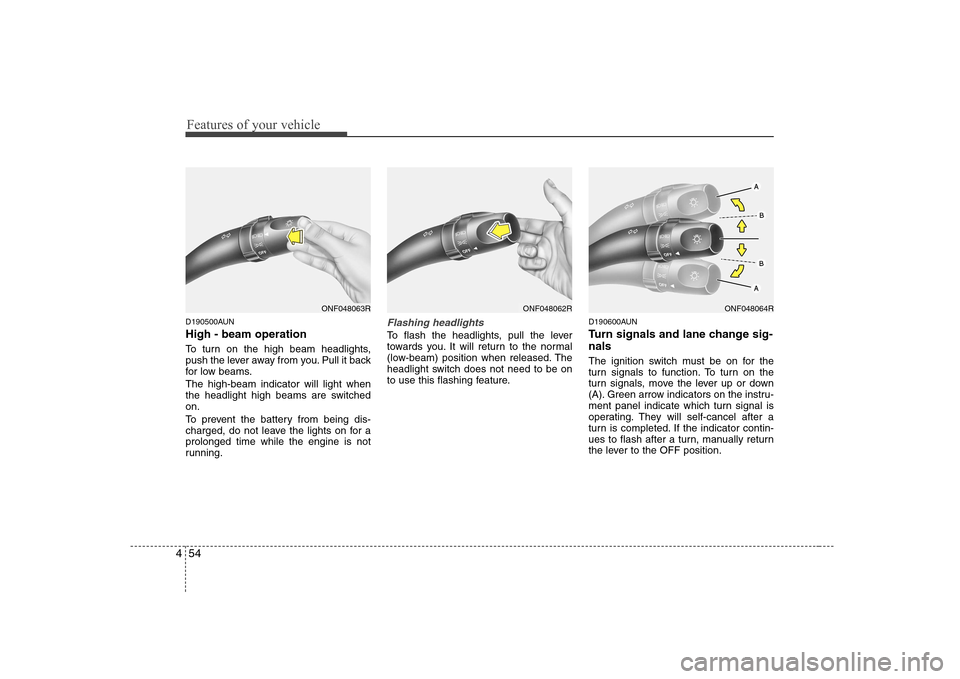
D190500AUN High - beam operation
To turn on the high beam headlights,
push the lever away from you. Pull it back
for low beams. The high-beam indicator will light when
the headlight high beams are switchedon.
To prevent the battery from being dis-
charged, do not leave the lights on for aprolonged time while the engine is not
running.Flashing headlights
To flash the headlights, pull the lever
towards you. It will return to the normal
(low-beam) position when released. The
headlight switch does not need to be on
to use this flashing feature. D190600AUN
Turn signals and lane change sig- nals
The ignition switch must be on for the
turn signals to function. To turn on the
turn signals, move the lever up or down
(A). Green arrow indicators on the instru-
ment panel indicate which turn signal is
operating. They will self-cancel after a
turn is completed. If the indicator contin-
ues to flash after a turn, manually return
the lever to the OFF position.
ONF048063RONF048062RONF048064R
Page 307 of 340
Maintenance
64
7
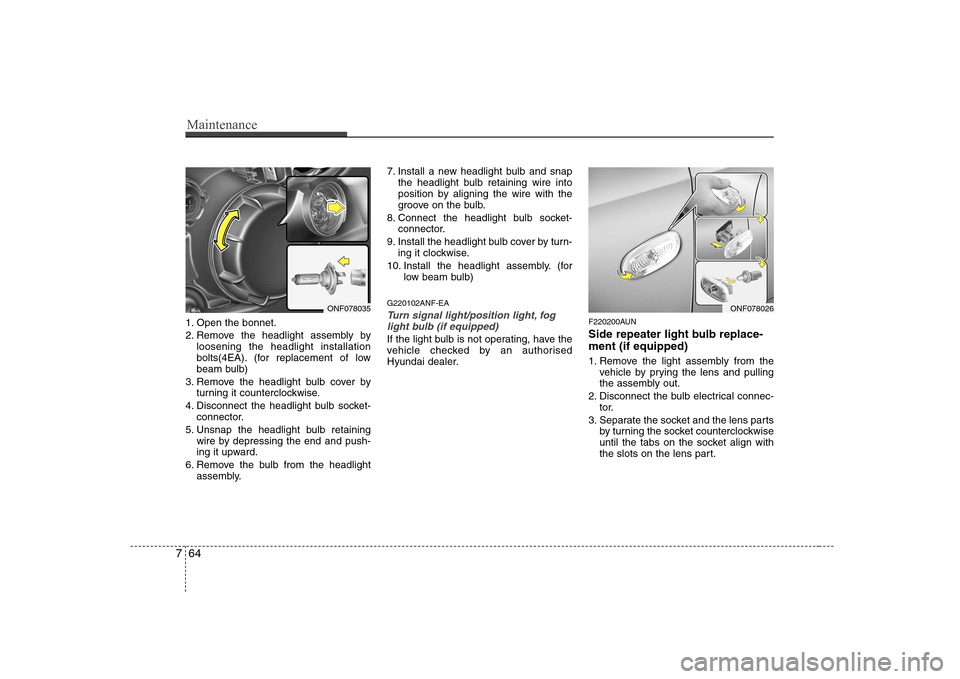
1. Open the bonnet.
2. Remove the headlight assembly by
loosening the headlight installation
bolts(4EA). (for replacement of low
beam bulb)
3. Remove the headlight bulb cover by turning it counterclockwise.
4. Disconnect the headlight bulb socket- connector.
5. Unsnap the headlight bulb retaining wire by depressing the end and push-
ing it upward.
6. Remove the bulb from the headlight assembly. 7. Install a new headlight bulb and snap
the headlight bulb retaining wire into
position by aligning the wire with the
groove on the bulb.
8. Connect the headlight bulb socket- connector.
9. Install the headlight bulb cover by turn- ing it clockwise.
10. Install the headlight assembly. (for low beam bulb)
G220102ANF-EATurn signal light/position light, fog light bulb (if equipped)
If the light bulb is not operating, have the
vehicle checked by an authorised
Hyundai dealer. F220200AUN
Side repeater light bulb replace- ment (if equipped)
1. Remove the light assembly from the
vehicle by prying the lens and pulling
the assembly out.
2. Disconnect the bulb electrical connec- tor.
3. Separate the socket and the lens parts by turning the socket counterclockwise
until the tabs on the socket align with
the slots on the lens part.
ONF078035ONF078026
Page 311 of 340
Maintenance
68
7
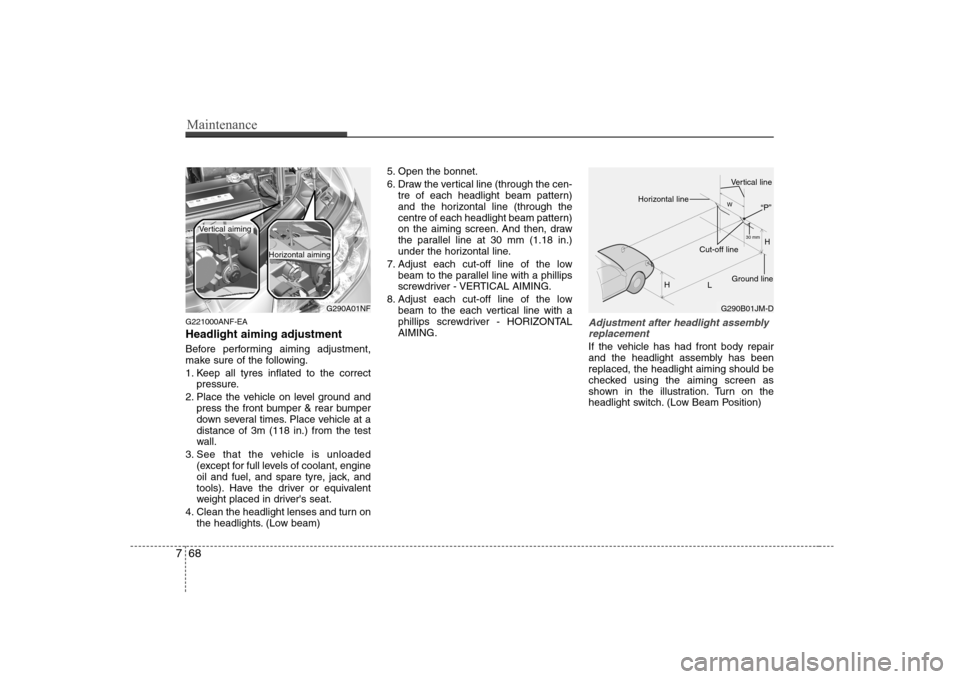
G221000ANF-EA Headlight aiming adjustment
Before performing aiming adjustment,
make sure of the following.
1. Keep all tyres inflated to the correct
pressure.
2. Place the vehicle on level ground and press the front bumper & rear bumper
down several times. Place vehicle at adistance of 3m (118 in.) from the test
wall.
3. See that the vehicle is unloaded (except for full levels of coolant, engine
oil and fuel, and spare tyre, jack, and
tools). Have the driver or equivalent
weight placed in driver's seat.
4. Clean the headlight lenses and turn on the headlights. (Low beam) 5. Open the bonnet.
6. Draw the vertical line (through the cen-
tre of each headlight beam pattern)
and the horizontal line (through the
centre of each headlight beam pattern)
on the aiming screen. And then, draw
the parallel line at 30 mm (1.18 in.)
under the horizontal line.
7. Adjust each cut-off line of the low beam to the parallel line with a phillips
screwdriver - VERTICAL AIMING.
8. Adjust each cut-off line of the low beam to the each vertical line with a
phillips screwdriver - HORIZONTALAIMING.Adjustment after headlight assembly
replacement
If the vehicle has had front body repair
and the headlight assembly has beenreplaced, the headlight aiming should be
checked using the aiming screen as
shown in the illustration. Turn on the
headlight switch. (Low Beam Position)
G290A01NF
Vertical aiming
Horizontal aiming
G290B01JM-D H
H L30 mm
W
Horizontal line
Vertical line
“P”
Ground line
Cut-off line