light Hyundai Sonata 2014 User Guide
[x] Cancel search | Manufacturer: HYUNDAI, Model Year: 2014, Model line: Sonata, Model: Hyundai Sonata 2014Pages: 665, PDF Size: 17.43 MB
Page 36 of 665
2-7
Safety system of your vehicle
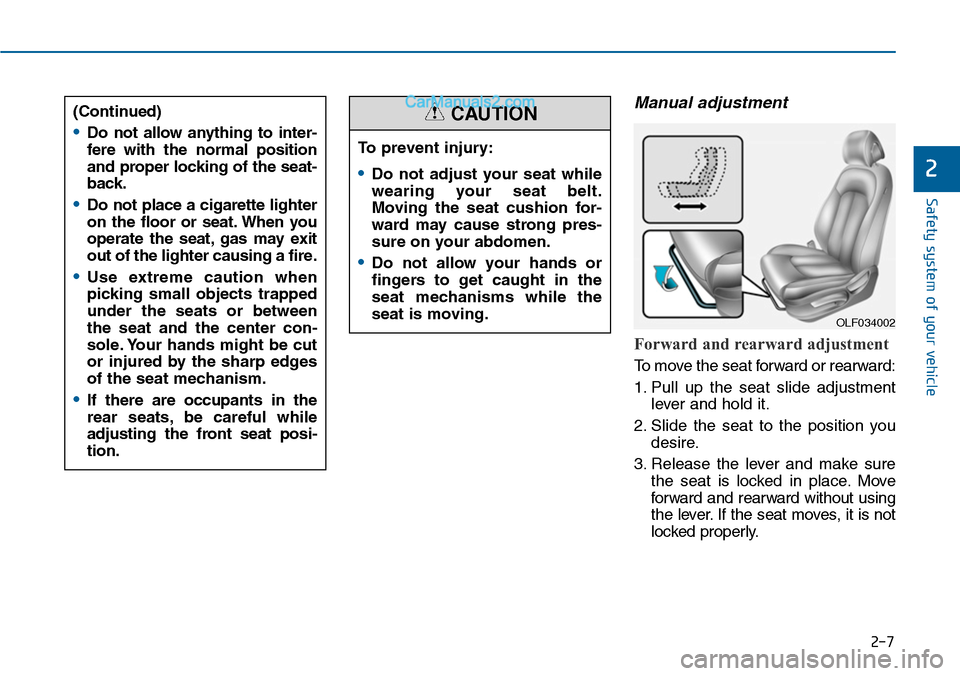
Manual adjustment
Forward and rearward adjustment
To m o v e t h e s e a t f o r w a r d o r r e a r w a r d :
1. Pull up the seat slide adjustment
lever and hold it.
2. Slide the seat to the position you
desire.
3. Release the lever and make sure
the seat is locked in place. Move
forward and rearward without using
the lever. If the seat moves, it is not
locked properly.
2
To prevent injury:
•Do not adjust your seat while
wearing your seat belt.
Moving the seat cushion for-
ward may cause strong pres-
sure on your abdomen.
•Do not allow your hands or
fingers to get caught in the
seat mechanisms while the
seat is moving.
CAUTION(Continued)
•Do not allow anything to inter-
fere with the normal position
and proper locking of the seat-
back.
•Do not place a cigarette lighter
on the floor or seat. When you
operate the seat, gas may exit
out of the lighter causing a fire.
•Use extreme caution when
picking small objects trapped
under the seats or between
the seat and the center con-
sole. Your hands might be cut
or injured by the sharp edges
of the seat mechanism.
•If there are occupants in the
rear seats, be careful while
adjusting the front seat posi-
tion.
OLF034002
Page 37 of 665
2-8
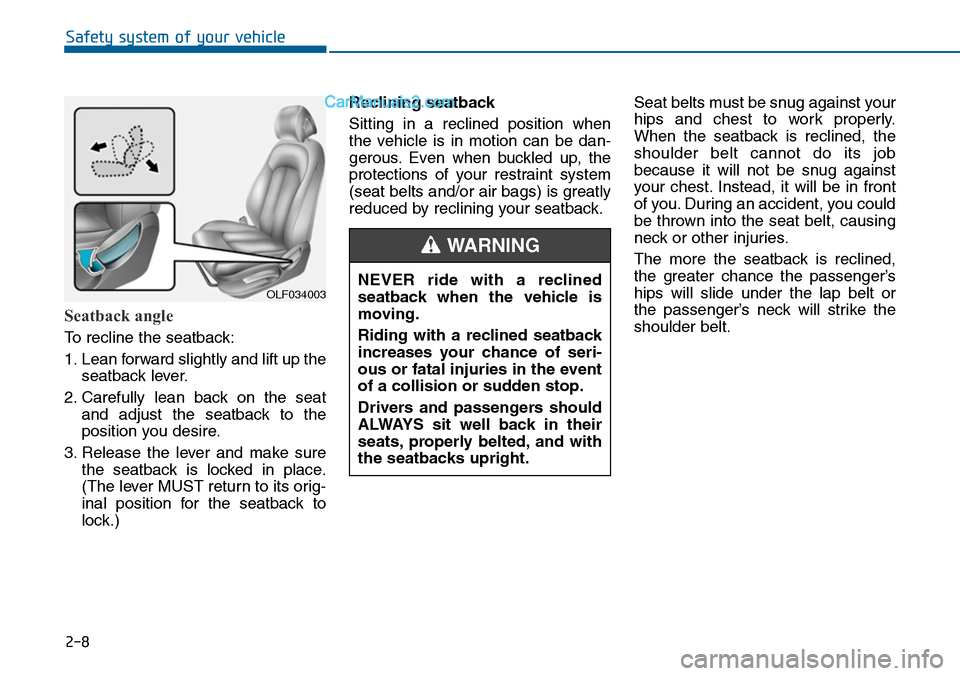
Seatback angle
To recline the seatback:
1. Lean forward slightly and lift up the
seatback lever.
2. Carefully lean back on the seat
and adjust the seatback to the
position you desire.
3. Release the lever and make sure
the seatback is locked in place.
(The lever MUST return to its orig-
inal position for the seatback to
lock.)
Reclining seatback
Sitting in a reclined position when
the vehicle is in motion can be dan-
gerous. Even when buckled up, the
protections of your restraint system
(seat belts and/or air bags) is greatly
reduced by reclining your seatback.
Seat belts must be snug against your
hips and chest to work properly.
When the seatback is reclined, the
shoulder belt cannot do its job
because it will not be snug against
your chest. Instead, it will be in front
of you. During an accident, you could
be thrown into the seat belt, causing
neck or other injuries.
The more the seatback is reclined,
the greater chance the passenger’s
hips will slide under the lap belt or
the passenger’s neck will strike the
shoulder belt.
Safety system of your vehicle
OLF034003NEVER ride with a reclined
seatback when the vehicle is
moving.
Riding with a reclined seatback
increases your chance of seri-
ous or fatal injuries in the event
of a collision or sudden stop.
Drivers and passengers should
ALWAYS sit well back in their
seats, properly belted, and with
the seatbacks upright.
WARNING
Page 40 of 665
2-11
Safety system of your vehicle
2
Seat belts must be snug against your
hips and chest to work properly.
When the seatback is reclined, the
shoulder belt cannot do its job
because it will not be snug against
your chest. Instead, it will be in front
of you. During an accident, you could
be thrown into the seat belt, causing
neck or other injuries.
The more the seatback is reclined,
the greater chance the passenger’s
hips will slide under the lap belt or
the passenger’s neck will strike the
shoulder belt.Seat cushion height
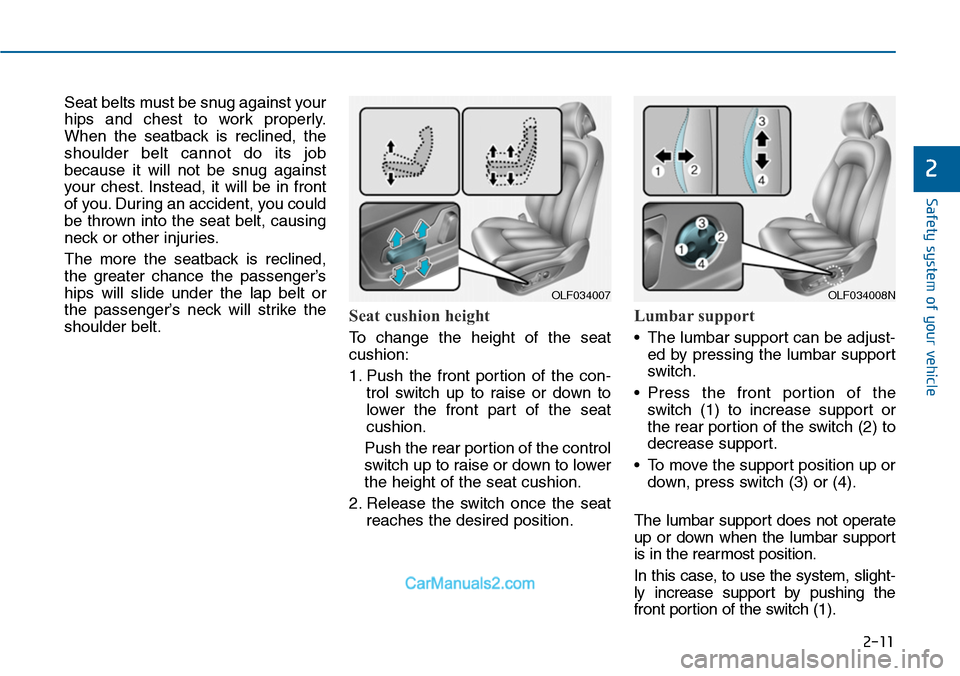
To change the height of the seat
cushion:
1. Push the front portion of the con-
trol switch up to raise or down to
lower the front part of the seat
cushion.
Push the rear portion of the control
switch up to raise or down to lower
the height of the seat cushion.
2. Release the switch once the seat
reaches the desired position.
Lumbar support
•The lumbar support can be adjust-
ed by pressing the lumbar support
switch.
•Press the front portion of the
switch (1) to increase suppor t or
the rear portion of the switch (2) to
decrease support.
•To move the support position up or
down, press switch (3) or (4).
The lumbar support does not operate
up or down when the lumbar support
is in the rearmost position.
In this case, to use the system, slight-
ly increase support by pushing the
front portion of the switch (1).
OLF034007OLF034008N
Page 55 of 665
2-26
Safety system of your vehicle
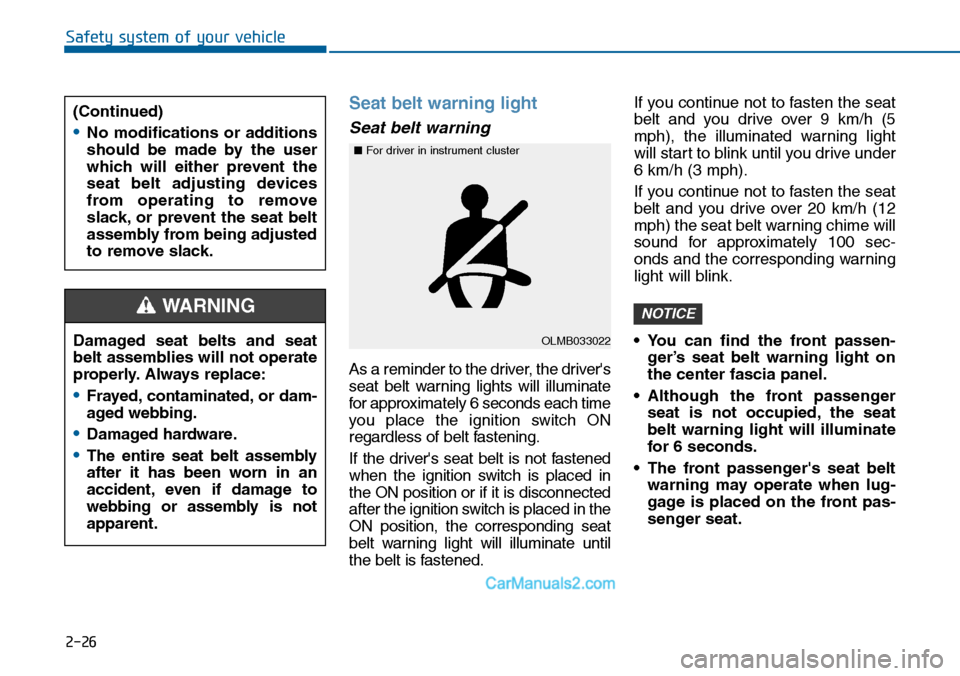
Seat belt warning light
Seat belt warning
As a reminder to the driver, the driver's
seat belt warning lights will illuminate
for approximately 6 seconds each time
you place the ignition switch ON
regardless of belt fastening.
If the driver's seat belt is not fastened
when the ignition switch is placed in
the ON position or if it is disconnected
after the ignition switch is placed in the
ON position, the corresponding seat
belt warning light will illuminate until
the belt is fastened.
If you continue not to fasten the seat
belt and you drive over 9 km/h (5
mph), the illuminated warning light
will start to blink until you drive under
6 km/h (3 mph).
If you continue not to fasten the seat
belt and you drive over 20 km/h (12
mph) the seat belt warning chime will
sound for approximately 100 sec-
onds and the corresponding warning
light will blink.
•You can find the front passen-
ger’s seat belt warning light on
the center fascia panel.
•Although the front passenger
seat is not occupied, the seat
belt warning light will illuminate
for 6 seconds.
•The front passenger's seat belt
warning may operate when lug-
gage is placed on the front pas-
senger seat.
NOTICE
Damaged seat belts and seat
belt assemblies will not operate
properly. Always replace:
•Frayed, contaminated, or dam-
aged webbing.
•Damaged hardware.
•The entire seat belt assembly
after it has been worn in an
accident, even if damage to
webbing or assembly is not
apparent.
WARNING
(Continued)
•No modifications or additions
should be made by the user
which will either prevent the
seat belt adjusting devices
from operating to remove
slack, or prevent the seat belt
assembly from being adjusted
to remove slack.
OLMB033022
■For driver in instrument cluster
Page 60 of 665
2-31
Safety system of your vehicle
2
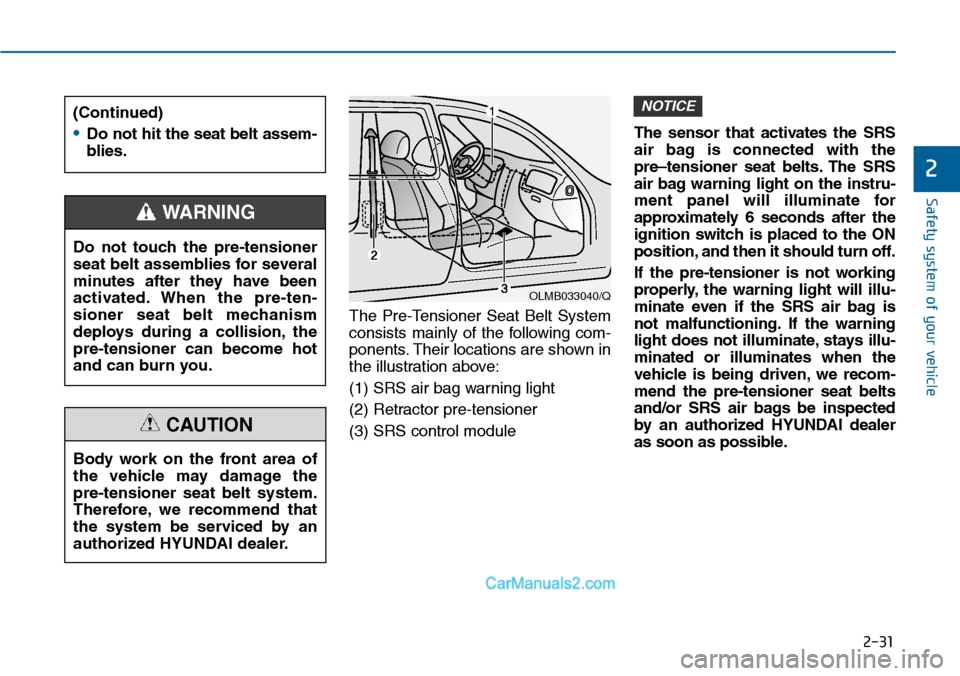
The Pre-Tensioner Seat Belt System
consists mainly of the following com-
ponents. Their locations are shown in
the illustration above:
(1) SRS air bag warning light
(2) Retractor pre-tensioner
(3) SRS control module
The sensor that activates the SRS
air bag is connected with the
pre–tensioner seat belts. The SRS
air bag warning light on the instru-
ment panel will illuminate for
approximately 6 seconds after the
ignition switch is placed to the ON
position, and then it should turn off.
If the pre-tensioner is not working
properly, the warning light will illu-
minate even if the SRS air bag is
not malfunctioning. If the warning
light does not illuminate, stays illu-
minated or illuminates when the
vehicle is being driven, we recom-
mend the pre-tensioner seat belts
and/or SRS air bags be inspected
by an authorized HYUNDAI dealer
as soon as possible.
NOTICE(Continued)
•Do not hit the seat belt assem-
blies.
Do not touch the pre-tensioner
seat belt assemblies for several
minutes after they have been
activated. When the pre-ten-
sioner seat belt mechanism
deploys during a collision, the
pre-tensioner can become hot
and can burn you.
WARNING
Body work on the front area of
the vehicle may damage the
pre-tensioner seat belt system.
Therefore, we recommend that
the system be serviced by an
authorized HYUNDAI dealer.
CAUTION
OLMB033040/Q
Page 62 of 665
2-33
Safety system of your vehicle
2
Small children are best protected
from injury in an accident when prop-
erly restrained in the rear seat by a
child restraint system that meets the
requirements of the Safety Standards
of your country. Before buying any
child restraint system, make sure that
it has a label certifying that it meets
Safety Standard of your country. The
restraint must be appropriate for your
child's height and weight. Check the
label on the child restraint for this
information. Refer to “Child Restraint
Systems” in this chapter.
Larger children
Children under age 13 and who are
too large for a booster seat must
always occupy the rear seat and use
the available lap/shoulder belts. A
seat belt should lie across the upper
thighs and be snug across the shoul-
der and chest to restrain the child
safely. Check belt fit periodically. A
child's squirming could put the belt
out of position. Children are afforded
the most safety in the event of an
accident when they are restrained by
a proper restraint system and/or seat
belts in the rear seat.
If a larger child over age 13 must be
seated in the front seat, the child
must be securely restrained by the
available lap/shoulder belt and the
seat should be placed in the rear-
most position.
If the shoulder belt portion slightly
touches the child’s neck or face, try
placing the child closer to the center
of the vehicle. If the shoulder belt still
touches their face or neck, they need
to be returned to an appropriate
booster seat in the rear seat.
ALWAYS properly restrain infants
and small children in a child
restraint appropriate for the
child’s height and weight.
To r e d u c e t h e r i s k o f s e r i o u s
injury or death to a child and
other passengers, NEVER hold a
child in your lap or arms when
the vehicle is moving. The violent
forces created during an acci-
dent will tear the child from your
arms and throw the child against
the interior of the vehicle.
WARNING
Page 83 of 665
2-54
Safety system of your vehicle
How does the air bags system
operate?
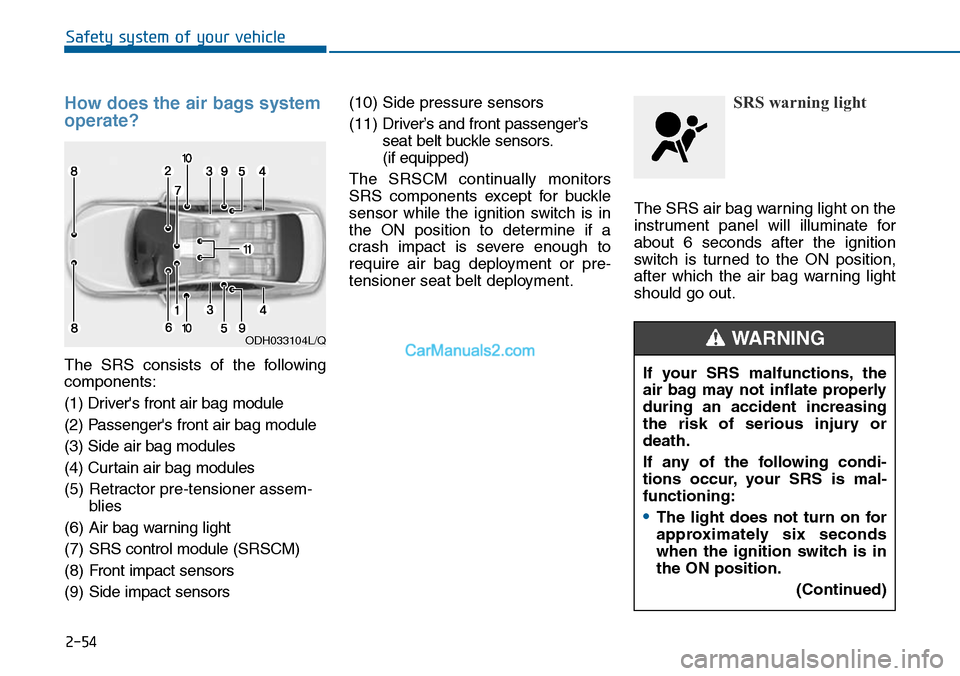
The SRS consists of the following
components:
(1) Driver's front air bag module
(2) Passenger's front air bag module
(3) Side air bag modules
(4) Curtain air bag modules
(5) Retractor pre-tensioner assem-
blies
(6) Air bag warning light
(7) SRS control module (SRSCM)
(8) Front impact sensors
(9) Side impact sensors
(10) Side pressure sensors
(11) Driver’s and front passenger’s
seat belt buckle sensors.
(if equipped)
The SRSCM continually monitors
SRS components except for buckle
sensor while the ignition switch is in
the ON position to determine if a
crash impact is severe enough to
require air bag deployment or pre-
tensioner seat belt deployment.
SRS warning light
The SRS air bag warning light on the
instrument panel will illuminate for
about 6 seconds after the ignition
switch is tur ned to the ON position,
after which the air bag warning light
should go out.
ODH033104L/Q
If your SRS malfunctions, the
air bag may not inflate properly
during an accident increasing
the risk of serious injury or
death.
If any of the following condi-
tions occur, your SRS is mal-
functioning:
•The light does not turn on for
approximately six seconds
when the ignition switch is in
the ON position.
(Continued)
WARNING
Page 84 of 665
2-55
Safety system of your vehicle
2
During a frontal collision, sensors will
detect the vehicle’s deceleration. If the
rate of deceleration is high enough,
the control unit will inflate the front air
bags, at the time and with the force
needed.
The front air bags help protect the
driver and front passenger by
responding to frontal impacts in
which seat belts alone cannot provide
adequate restraint. When needed,
the side air bags help provide protec-
tion in the event of a side impact.
•Air bags are activated (able to
inflate if necessary) only when the
ignition switch is in the ON position.
•Air bags inflate in the event of cer-
tain frontal or side collisions to help
protect the occupants from serious
physical injury.
•There is no single speed at which
the air bags will inflate. Generally,
air bags are designed to inflate
based upon the severity of a colli-
sion and its direction. These two
factors deter mine whether the sen-
sors produce an electronic deploy-
ment/inflation signal.
.• Air bag deployment depends on a
number of factors including vehicle
speed, angles of impact and the
density and stiffness of the vehicles
or objects which your vehicle
impacts during a collision. The
determining factors are not limited
to those mentioned above.
•The front air bags will completely
inflate and deflate in an instant. It is
virtually impossible for you to see
the air bags inflate during an acci-
dent. It is much more likely that you
will simply see the deflated air bags
hanging out of their storage com-
partments after the collision.
(Continued)
•The light stays on after illumi-
nating for approximately six
seconds.
•The light comes on while the
vehicle is in motion.
•The light blinks when the
engine is running.
We recommend that an author-
ized HYUNDAI dealer inspect the
SRS as soon as possible if any
of these conditions occur.
Page 94 of 665
2-65
Safety system of your vehicle
2
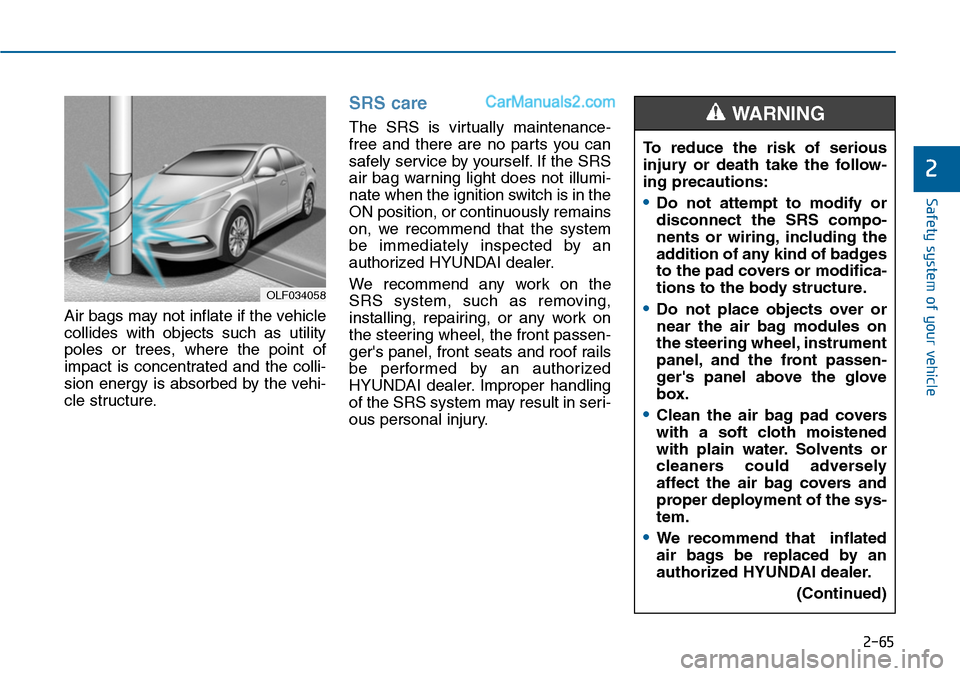
Air bags may not inflate if the vehicle
collides with objects such as utility
poles or trees, where the point of
impact is concentrated and the colli-
sion energy is absorbed by the vehi-
cle structure.
SRS care
The SRS is virtually maintenance-
free and there are no parts you can
safely service by yourself. If the SRS
air bag warning light does not illumi-
nate when the ignition switch is in the
ON position, or continuously remains
on, we recommend that the system
be immediately inspected by an
authorized HYUNDAI dealer.
We recommend any work on the
SRS system, such as removing,
installing, repairing, or any work on
the steering wheel, the front passen-
ger's panel, front seats and roof rails
be performed by an authorized
HYUNDAI dealer. Improper handling
of the SRS system may result in seri-
ous personal injury.
OLF034058
To reduce the risk of serious
injury or death take the follow-
ing precautions:
•Do not attempt to modify or
disconnect the SRS compo-
nents or wiring, including the
addition of any kind of badges
to the pad covers or modifica-
tions to the body structure.
•Do not place objects over or
near the air bag modules on
the steering wheel, instrument
panel, and the front passen-
ger's panel above the glove
box.
•Clean the air bag pad covers
with a soft cloth moistened
with plain water. Solvents or
cleaners could adversely
affect the air bag covers and
proper deployment of the sys-
tem.
•We recommend that inflated
air bags be replaced by an
authorized HYUNDAI dealer.
(Continued)
WARNING
Page 98 of 665
A/V mode ..........................................................................3-68
Information mode ............................................................3-68
User settings mode.........................................................3-70
Warning messages ..........................................................3-75
Tr i p c o m p u t e r . . . . . . . . . . . . . . . . . . . . . . . . . . . . . . . . . . . . . . . . . . . . . . . . . . . . . . . 3 - 8 3
Overview............................................................................3-83
Tr i p m o d e s . . . . . . . . . . . . . . . . . . . . . . . . . . . . . . . . . . . . . . . . . . . . . . . . . . . . . . . . . . . . . . . . . . . . . . . . 3 - 8 3
Tr i p A / B . . . . . . . . . . . . . . . . . . . . . . . . . . . . . . . . . . . . . . . . . . . . . . . . . . . . . . . . . . . . . . . . . . . . . . . . . . . . . 3 - 8 3
Fuel economy ...................................................................3-84
Warning and indicator lights ..............................3-87
Warning lights ..................................................................3-87
Indicator lights .................................................................3-94
Light .......................................................................3-98
Exterior lights ..................................................................3-98
Welcome system ...........................................................3-105
Interior lights..................................................................3-106
Wipers and washers ..........................................3-111
Windshield wipers ........................................................3-111
Windshield washers ....................................................3-113
Driver assist system ..........................................3-115
Rear view camera .........................................................3-115
Rear parking assist system ........................................3-116
Parking assist system ..................................................3-119
Defroster .............................................................3-122
Rear window defroster ...............................................3-122
Manual climate control system........................3-124
Heating and air conditioning......................................3-125
System operation ..........................................................3-130
System maintenance ....................................................3-132
Checking the amount of air conditioner refrigerant and
compressor lubricant ...................................................3-133
Automatic climate control system ...................3-134
Automatic heating and air conditioning ..................3-135
Manual heating and air conditioning .......................3-136
System operation ..........................................................3-142
System maintenance ....................................................3-145
Checking the amount of air conditioner refrigerant and
compressor lubricant ...................................................3-145
Windshield defrosting and defogging ............3-146
Manual climate control system .................................3-146
Automatic climate control system ............................3-147
Defogging logic..............................................................3-148
Climate control additional features.................3-150
Cluster ionizer ................................................................3-150
Sunroof inside air recirculation.................................3-150
Storage compartment ........................................3-151
Center console storage ...............................................3-151
Glove box ........................................................................3-152
Sunglass holder .............................................................3-152
Multi box .........................................................................3-153
3